In this article I'll show you how to create your own appointment booking portal using Calendly. Additionally, you can use your own domain and all this is completely free of charge.
Requirements
Before we start you need a running Next.js project. For this you can either use a current project or simply create a new one.
npx create-next-app@latest --ts
# or
yarn create next-app --typescript
# or
pnpm create next-app --ts
Create component
To get started we will create a new component called CalendlyForm in the folder components/ with the following lines of code.
import Script from 'next/script'

const CalendlyForm = ({ type }: { type?: string }) => {
    const username = process.env.NEXT_PUBLIC_CALENDLY_USERNAME;
    const showDetails: number = process.env.NEXT_PUBLIC_CALENDLY_SHOW_DETAILS == "false" ? 1 : 0;
    const showCookies: number = process.env.NEXT_PUBLIC_CALENDLY_SHOW_COOKIES == "false" ? 1 : 0;

    return (
        <>
            <div className="calendly-inline-widget w-screen h-screen" data-url={`https://calendly.com/${username}${type ? `/${type}` : ''}?hide_landing_page_details=${showDetails}&hide_gdpr_banner=${showCookies}`}></div>

            <Script type="text/javascript" src="https://assets.calendly.com/assets/external/widget.js" async />
        </>
    )
}

export default CalendlyForm
The component accepts a variable called type that reflects the event type of Calendly. If you want to use more than one event type it can be passed here later.
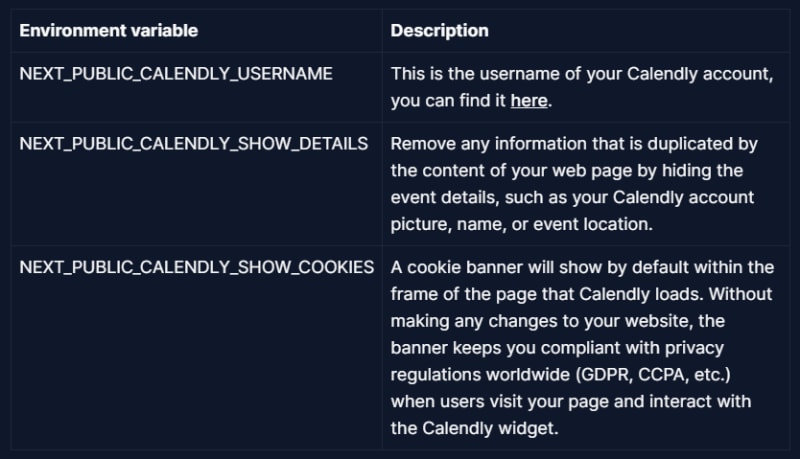
Environment Configuration
We also query some environment variables here that are meant to configure our Calendly Embed.
Implement component
Now we can use our component and display it on our website. In this example, we will simply place the CalendlyForm component on the index page of our Next.js project.
Simply add the component <CalendlyForm /> into the index.tsx file and save it.
import CalendlyForm from "../components/CalendlyForm";

export default function Home() {
  return (
    <>
      <CalendlyForm />
    </>
  );
}
Finally, we need to define the environment variables. If everything is now configured correctly, we should see our Calendly booking form.
Optional: Event types
To be able to use different event types we can now add another route. For this we simply create the file [type].tsx and fill it with the following code.
import type { NextPage } from 'next'
import { useRouter } from 'next/router';
import CalendlyForm from '../components/CalendlyForm';

const Type: NextPage = () => {
    const router = useRouter();
    const { type } = router.query;

    return (
        <>
            {(type &&
                <CalendlyForm type={type.toString()} />
            )}
        </>
    )
}

export default Type
Again, we use our CalendlyForm component and this time include the type variable. We get this variable from the query variables. You can view and display the ID for the event type on your Calendly page. If you select an event here, it will be displayed at the top of the url.
For example: https://calendly.com/sebiweise/30min30min
For example: https://nextjs-calendlyframe.vercel.app/30min
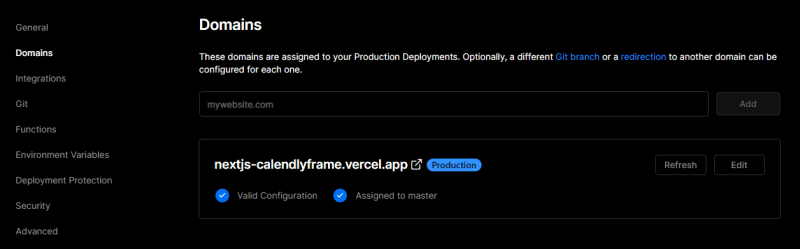
Deployment
To host your appointment booking site now for free with your own domain you can simply use Vercel. To easily create your custom site you can use this button to make a copy of my Github repository and deploy to Vercel.
![]()
Now you just need to connect your domain to Vercel


Top comments (2)
demo is not working. can you update it please
How can I edit the widget styles with this configuration? Somewone knows?