Widget Experiments
This series dives into Kentico 12 MVC Widgets and the related technologies that are part of Kentico's Page Builder technology - Widget Sections, Widgets, Form Components, Inline Editors, and Dialogs 🧐.
Join me 👋, as we explore the nooks and crannies of Kentico EMS MVC Widgets and discover what might be possible with this powerful technology...
If you aren't yet familiar with Kentico MVC Widgets, check out Kentico's Youtube video on Building a Page with MVC Widgets in Kentico.
Goals
This post is going to explore all the various places we can use MVC Widgets in our applications and when we might want to take advantage of each option 😎.
Editable Areas
If we look to Kentico's documentation on building Widgets we can find the section about Editable Areas in views, which states:
Identify the locations on your website where you want editors to place widgets. Then define these locations by adding editable areas to the code of the corresponding views. The identifier of each editable area must be a string without white spaces that is unique within the context of the given page:
The above description has the following code example:
<div>
  @Html.Kentico().EditableArea("area1")
</div>
So, the general idea is, if we want to use Widgets we need to pick a place (or places) in our Razor view where those Widgets can be placed 👍🏾.
Aaaaand... if we want to know where Widgets can be used in our MVC application, we first need to know where Editable Areas can be used 🤔!
Before we begin our explorations, let's create a couple of files so we have something to work with.
Define Our Razor Files
Let's assume all our views are using the following:
- A
_Layout.cshtmlfile as our application's layout:
<!-- ~/Views/Shared/_Layout.cshtml -->

<!DOCTYPE html>
<html>
<head>
    <meta charset="utf-8" />
    <meta name="viewport" content="width=device-width, initial-scale=1.0">
    <link rel="stylesheet" href="/bootstrap.min.css">

    @Html.Kentico().PageBuilderStyles()
</head>
<body>
    @RenderBody()

    <script src="/jquery-3.4.1.slim.min.js"></script>
    <script src="/popper.min.js"></script>
    <script src="/bootstrap.min.js"></script>

    @Html.Kentico().PageBuilderScripts()
</body>
</html>
- A pretty simple single-column Widget section named
_SingleColumn.cshtml:
<!-- ~/Views/Shared/Sections/_SingleColumn.cshtml -->

<div class="container">
    <div class="row">
        <div class="col d-flex justify-content-center">
            @Html.Kentico().WidgetZone()
        </div>
    </div>
</div>
- And finally a "Content" Widget with hard-coded content (normally this content would come from a Document in the Document Tree):
<!-- ~/Views/Shared/Widgets/_Content.cshtml -->

<div class="card" style="width: 18rem;">
    <div class="card-body">
        <h5 class="card-title">Card title</h5>
        <h6 class="card-subtitle mb-2 text-muted">Card subtitle</h6>

        <p class="card-text">Some quick example text to build on the
            card title and make up the bulk of the card's content.
        </p>

        <a href="#" class="card-link">Card link</a>
        <a href="#" class="card-link">Another link</a>
    </div>
</div>
Now that we have something to work with, let's start using our Widget!
Editable Areas in Controller Action Views
The most obvious place to define an Editable Area is directly in the view of a controller action 🙂.
We can create a Home page view that looks as follows:
<!-- ~/Views/Home/Index.cshtml -->

<div class="jumbotron jumbotron-fluid">
    <div class="container">
        <h1 class="display-4">Fluid jumbotron</h1>
        <p class="lead">Lorem Ipsum.</p>
    </div>
</div>

@Html.Kentico().EditableArea("home")
If we add our Content Widget to this Editable Area using our Single Column Section, we'll see the following in the Page Builder UI of the CMS:

This Editable Area allows us to place Widgets directly in the Home page's view - pretty simple.
When To Use This?
Placing Editable Areas directly in our page view files is going to be the most common use of Kentico's Page Builder system in our applications 😄.
It requires the least amount of work and operates intuitively. If we view this page in the CMS Page Builder UI, we will see Widgets in the middle of the screen wherever we have defined an Editable Area.
Editable Areas in Partial Views
Now, let's update our Home view to include a call to render a partial view that has an Editable Area in it.
We will render this partial directly below our home Editable Area:
<!-- ~/Views/Home/Index.cshtml -->

<div class="jumbotron jumbotron-fluid">
    <div class="container">
        <h1 class="display-4">Fluid jumbotron</h1>
        <p class="lead">Lorem Ipsum.</p>
    </div>
</div>

@Html.Kentico().EditableArea("home")

@{ Html.RenderPartial("_HomePartial"); }
The partial view, _HomePartial.cshtml, will contain some content above and below an Editable Area, named home-partial:
<!-- ~/Views/Home/_HomePartial.cshtml -->

<div class="container mt-3">
    <div class="row">
        <div class="col">
            <p>This is the top of the Home Partial.</p>
        </div>
    </div>
</div>

@Html.Kentico().EditableArea("home-partial")

<div class="container mt-3">
    <div class="row">
        <div class="col">
            <p>This is the bottom of the Home Partial.</p>
        </div>
    </div>
</div>
By adding our Content Widget in the Editable Area of the Home page partial view, we end up with the following in the CMS Page Builder UI:
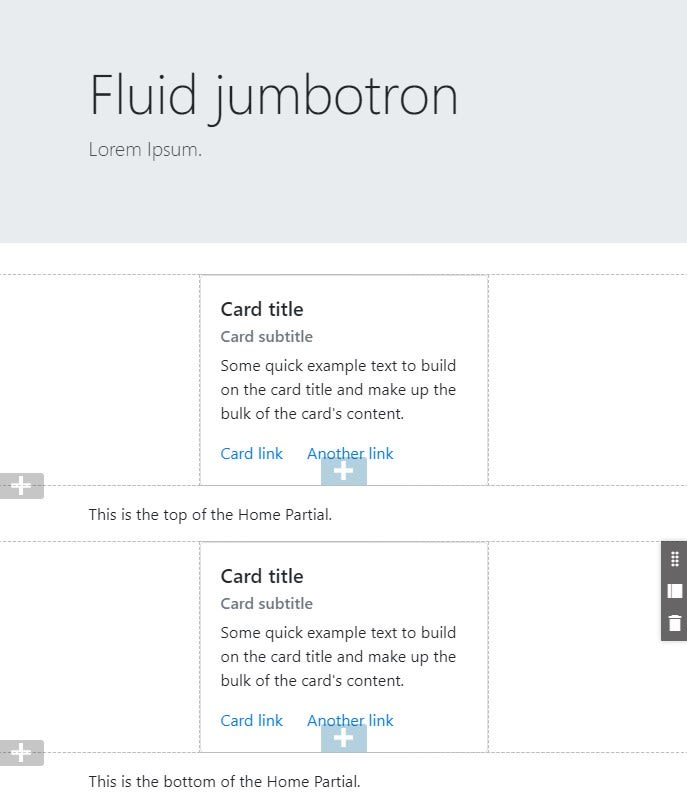
Cool 🔥! We can have Editable Areas inside Razor partial views. This means our Editable Areas can be more reusable by sharing them between views!
When To Use This?
Editable Areas in Partial Views have all the benefits that Partial Views already have - they are re-usable snippets of markup that can be pulled into any page - except with Widgets, these Partial Views become much more customizable!
Also, sometimes our page views get a little complex and it can be nice to simplify, visually, the markup and view-related logic in a Razor file. Partial Views can help with this, by letting us define the markup, for part of view model, in another file.
This same benefit applies when we have many Editable Areas on a page and we want to make the page view more readable 🧐.
Editable Areas in Child Actions
Now we're going to update the Home controller to include a second action method:
// HomeController.cs

public class HomeController : Controller
{
    // ... other methods

    [ChildActionOnly]
    public ActionResult Child() => PartialView();
}
We'll also add a view for this child action, Child.cshtml, and have it utilize Bootstrap's accordion component:
<!-- ~/Views/Home/Child.cshtml -->

<p>
    <button class="btn btn-primary"
            type="button"
            data-toggle="collapse"
            data-target="#collapseExample"
            aria-expanded="false"
            aria-controls="collapseExample">
        Toggle Child view Editable Area
    </button>
</p>

<div class="collapse" id="collapseExample">
    @Html.Kentico().EditableArea("child")
</div>
Finally, we'll update our Home view to include a call to render this child action (replacing the call to render the partial view):
<!-- ~/Views/Home/Index.cshtml -->

<div class="jumbotron jumbotron-fluid">
    <div class="container">
        <h1 class="display-4">Fluid jumbotron</h1>
        <p class="lead">Lorem Ipsum.</p>
    </div>
</div>

@{ Html.RenderAction("Child"); }
When we add our Content Widget to the Editable Area of the child action view (after expanding the accordion!), we can see that everything works as we hoped:

This is pretty cool 🤯!
When To Use This?
While Partial Views are helpful if we need to separate part of a view to simplify or share the markup, Child Actions let us separate out both the markup and, more importantly, all the Controller level behavior - typically data retrieval 😮.
A common scenario here is when we want to have a sidebar on a site and have that sidebar displayed on multiple different pages 👍🏽.
A call to a SidebarController's Sidebar() Child Action method would make the retrieval and rendering of the sidebar data re-usable and isolated from the main page 💪🏿.
When combining this with MVC Widgets, we can create sidebars with both predetermined and customizable content on a per-page basis 😎.
Editable Areas in MVC @section
MVC sections (not to be confused with Widget Sections) allow developers to insert markup into a view's Layout from the view itself - a kind of reverse rendering.
Let's update our files to try and use an Editable Area from a Layout MVC section.
First, we will replace the @RenderBody() call in our _Layout.cshtml file with the following, defining a new MVC section named "footer":
<!-- ~/Views/Shared/_Layout.cshtml -->

@RenderBody()

<nav aria-label="breadcrumb">
    <ol class="breadcrumb">
        <li class="breadcrumb-item active" aria-current="page">
            Breadcrumbs: Home
        </li>
    </ol>
</nav>

@RenderSection("footer", required: false)
Notice above how the "breadcrumbs" markup appears after the call to @RenderBody() but before the call to @RenderSection(). This means, anything our Home view places into the MVC Section should appear after the "breadcrumbs" markup.
Now we will update our Home view to render an Editable Area into the footer MVC section:
<!-- ~/Views/Home/Index.cshtml -->

<div class="jumbotron jumbotron-fluid">
    <div class="container">
        <h1 class="display-4">Fluid jumbotron</h1>
        <p class="lead">Lorem Ipsum.</p>
    </div>
</div>

<div class="section">
    <div class="row">
        <div class="col d-flex justify-content-center">
            <p>
                This is the home page.
            </p>
        </div>
    </div>
</div>

@section footer
{
    @Html.Kentico().EditableArea("footer")
}
Now, when we load the page up in the CMS Page Builder UI, we can see the "footer" Editable Area and add our Content Widget to it:

When To Use This?
MVC sections are a great way to get content into our base layouts from our main page views and, as it turns out, we can push Editable Areas into these sections.
If the MVC section is defined as required: false, then pages using this layout aren't forced to use the section if they don't need it.
This could be a powerful pattern for adding Widgets to headers, footers, or navigation markup on a site 🚀.
Editable Areas in an MVC Layout
Placing Editable Areas in our Layouts works the same as putting them in our page views.
We'll only look at an example of having them in directly in the Layout, but do note that Editable Areas in Partial Views and Child Actions called from a Layout also work 🤓.
Let's update our _Layout.cshtml and replace the beginning of the <body> element content with the following:
<!-- ~/Views/Shared/_Layout.cshtml -->

<body>
    @RenderBody()

    <section>
        <div class="container">
            <h3 class="mb-5">Before "layout" editable area</h3>
        </div>
    </section>

    <div class="mb-5 d-flex justify-content-center">
        @Html.Kentico().EditableArea("layout")
    </div>

    <section class="section">
        <div class="container">
            <h3>After "layout" editable area</h3>
        </div>
    </section>
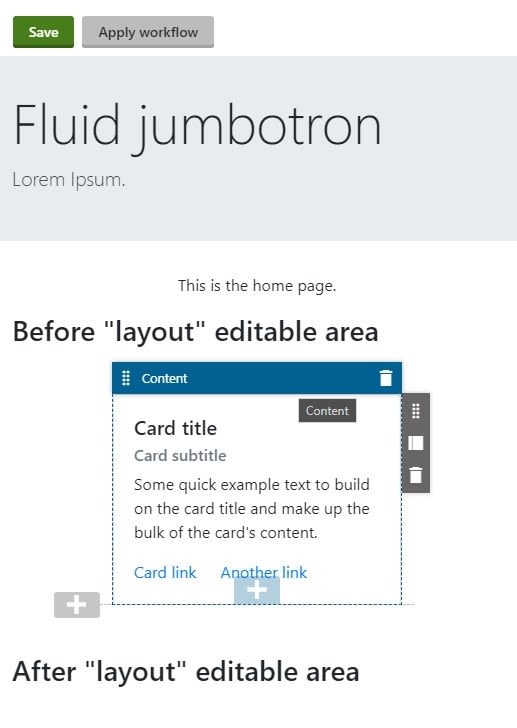
When we look at the Page Builder UI in the CMS after adding our Content Widget to the layout Editable Area, we can see it displays inside the two <h3> elements and below the Home page content:
When To Use This?
Typically, our MVC applications will use Layouts to define areas of the site that are related to each other. They serve the same purpose as Master Pages in Kentico Portal Engine sites.
This means any time we'd want customizable content in the same location of every single page, but outside the page's content, we would want to put an Editable Area in a Layout 😃.
This is similar to using an MVC section, except it's not something the page itself can opt into or out of.
Just as a mental reminder, placing an MVC Widget in an Editable Area located in a Layout doesn't mean that Widget will appear on every page using that Layout. Widgets are tied to the specific Document they were added to 👍.
Editable Areas in Layouts provide the ability to add Widgets to every page using them, not the Widgets themselves.
Where Are Editable Areas Not Available?
We can't put Editable Areas inside the views of Page Builder components, like Widget Sections or Widgets 😔.
We also can't put Widget Zones (the entry point for Widgets inside Widget Section views) inside Widget views, which means we can't nest Widgets 😣.
We also can't trick Kentico's Page Builder system by putting an Editable Area inside a Partial View called from a Widget Section or Widget view 😑.
To put it more simply, all the areas of a page where Widgets can be added need to be defined when the page initially loads inside the CMS.
Since half of the MVC Widget functionality happens in the browser through JavaScript, and that part of the system isn't built to render the Page Builder UI dynamically (as Widgets are added to a page), we can't perform any Widget-Inception 🤯 - maybe it's for the best 🤣!
Conclusion
In this post we looked at all the different ways we can combine Kentico MVC's Widget system with the layout composition features that MVC already comes with:
- Action Views
- Parital Views
- Child Actions
- MVC Sections
- Layouts
Having all these options gives us a lot of power in both where we enable Widgets for content managers, and also how we organize and reuse the MVC Page Builder code we write 💪.
While there are currently some limitations in the Page Builder system - we can't nest Page Builder parts within themselves - there's still a lot we can accomplish to build robust, content rich sites, using the features we have in Kentico 12 MVC today 👏🏽.
As always, thanks for reading 🙏!
We've put together a list over on Kentico's GitHub account of developer resources. Go check it out!
If you are looking for additional Kentico content, checkout the Kentico tag here on DEV:
Or my Kentico blog series:


Top comments (0)