
Kentico 12 MVC - Tools and Frameworks
Back-end
When building a Kentico 12 MVC application, our back-end tools are, to some extant, already chosen for us 👍.
Kentico and all of its libraries provide APIs for interacting with pages, custom module classes, the database, e-commerce related behavior, publishing, permissions, ect...
ASP.NET MVC 5 handles rendering HTML for HTTP requests coming to our site, and provides us many hook points where our business logic can intercept and respond to the various types of requests.
Client-side
When it comes to client-side development, however, the road is wide open 🚗, more so than in any previous versions of Kentico.
We could do everything server-side with the technologies built into HTML, like links and forms, but there's probably an expectation for functionality that can only be performed on the client, through JavaScript.
We could also use Vanilla JS, leveraging the built-in language features, and the ever-evolving set of DOM APIs 🧐.
If you don't have to support IE11, I would recommend seriously looking into building your client-side functionality with as few dependencies as possible. For most sites you might be surprised how far it gets you 🤔.
When I have a lot of HTML rendering and state management to wrangle, I prefer to use a combination of everything the browser gives out-of-the-box, plus a library or framework.
Vue.js
Vue.js is a client-side JavaScript framework designed to help developers build reusable components that manage re-rendering HTML caused by state changes (ex: show / hide) in the components triggered by interactions from users (ex: click / submit).
I've found it's a great tool for combining traditional server-side HTML rendering with rich client-side User Experience (UX) 😉.
Let's dig into this idea further...
One big difference between a typical Vue.js code base, and what I recommend we build, is that normally Vue controls the entire page, often from the <body> element down.
We, however, will be creating many small apps on our page and they will all run separately at the same time.
Why?
Islands of Behavior 🏝
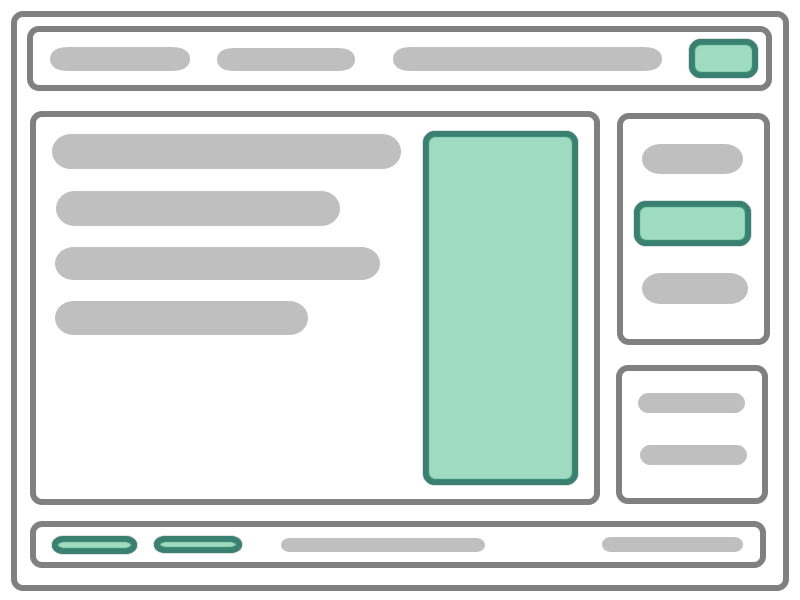
Imagine we have a page that is all server-rendered HTML, but there are a few key areas that have dynamic content that needs to be user-specific or interactive. We want to use Vue.js to help us develop these functionality-rich components:

The only issue is, Vue.js, like most client-side component frameworks, needs to control all the DOM within an entire sub-tree.
We would like to use Vue in various places throughout the DOM, but the only reasonable parent to all these areas of the DOM is probably the <body> element - if the DOM is Australia, Vue wants to control the whole island 😅.

This is fine if we are building a fully JavaScript rendered Single Page Application (SPA), but we want to let MVC render some content (everything SEO optimized and static) and Vue render other parts (user-specific, interactive).
If we look at each of those areas of functionality as being their own trees of the DOM, we can instead create Vue apps at the top of each tree, resulting in many apps on the page at the same time - each Vue app is its own island of behavior:
MVC will use data from Kentico to render most of the page, only handing over control to Vue.js at specific points in the DOM tree 😎.
Despite not often being blogged out, this design approach to using Vue.js with server-side rendered HTML is fully supported and works exceptionally well, compared to some other libraries and frameworks 👏.
For me, this ability to sprinkle the DOM with simple or complex, self-contained JavaScript widgets has been very powerful.
<script> vs CLI
While Vue.js does support adding a simple <script> tag to our HTML and using the framework directly in the browser without any build/compilation process, if we are integrating it into our MVC development workflow I recommend building an entire Vue.js project using the Vue CLI.
The Vue.js docs start out with the simple
<script>tag use-case, so if you aren't familiar with Vue and would like to give it a try, I'd recommend starting there.
There are several steps for integrating Vue.js into our Kentico 12 MVC applications to reduce friction and lead to a predictable development experience.
Let's begin 🤗!
Installing Our Tools
We are going to need a handful of tools to get started here, and, depending on your experience in client-side development, you might have all, some, or none of them already, so let's cover each of them below.
Node.js
We install Node.js, which provides the runtime for executing all of our Vue.js commands.
Once we have Node installed, we open our terminal of choice (I use GitBash from Git for Windows), and check to see that Node installed properly ✅:
$ node -v
v10.16.3
VS Code
Next, we install VS Code.
Many developers familiar with working with back-end technologies might want to use Visual Studio to do their client-side development, but strongly I recommend avoiding this and using the best tool for the job - VS Code.
Many of the best client-side development extensions we will use are just not available in Visual Studio, and for all client-side languages, VS Code simply has better developer ergonomics than Visual Studio 😮.
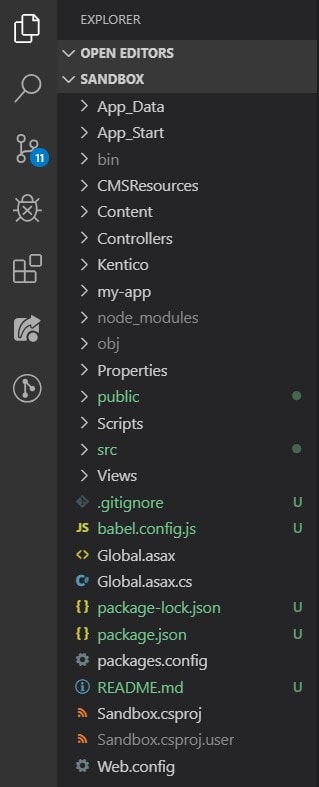
Once installation is finished, we open our terminal and change directory to our Kentico 12 MVC application folder and use the code command to open that folder in VS Code (my MVC project directory is named Sandbox) ✅:
$ cd Sandbox/
$ code .
Vue.js CLI
Now, we want to use Node to install the Vue.js CLI globally on our system:
npm install -g @vue/cli
Installation might take a minute, and after it completes we use the vue command to see the version that was installed ✅:
$ vue --version
@vue/cli 4.0.4
Vue.js Application
Next, we will create a new Vue.js application.
Both MVC and Vue want to own their space - they each want to control the directory and the file structure. Since we are combining them we will need to jump through our first hoop here 😑.
First, we create a new Vue application by using the vue create command:
$ vue create --no-git my-app
We are specifying that Vue shouldn't set up Git since we probably already have it (one directory up).
Once the app creation finishes, we will have a new folder named my-app within our MVC project directory, and we want to take the contents of the my-app folder and move all of it to the MVC project directory:

$ mv my-app/{,.}* ./
VS Code Extensions
Here is the list of extensions I recommend we install, including the extension code names, which we can use to search for them within VS Code or in the VS Code Marketplace:
- ESLint: octref.vetur
- Prettier - Code formatter: esbenp.prettier-vscode
- Vetur: dbaeumer.vscode-eslint
- EditorConfig for VS Code: EditorConfig.EditorConfig
- markdownlint: DavidAnson.vscode-markdownlint
- stylelint: shinnn.stylelint
We can search for and install them 1-by-1...
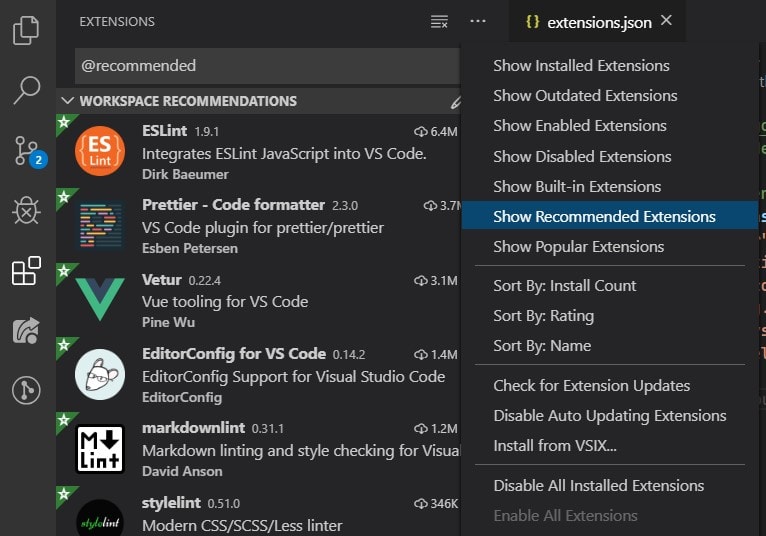
Or we can create a list of "Recommended Extensions" for our workspace (this is what VS Code calls a project) and filter down the extensions list to just the recommended ones:

We can add the extensions list in new file .vscode\extensions.json, which will cause the extensions to show up when we filter for @recommended, either in the search box or through the UI menu ✅:
Workspace Configuration
There are also some workspace settings that I recommend, which we can create in a file located at .vscode\settings.json.
Here is a link to a Gist that contains all the settings.
To integrate with a Kentico MVC project, we need to take some control from the Vue CLI build process, which involves creating a vue.config.js file at the root of our MVC project directory. Here is a link to the file in a Gist.
This config file does stuff like turning off Hot Module Reloading, since we will be using IIS Express for serving our app instead of the Webpack Dev server. It also changes the output paths of the build assets to
~/Content/dist/vueand removes asset fingerprinting.
We will also want to replace the "scripts" contents in our package.json file with the following:
  "scripts": {
    "start": "npm run watch",
    "dev": "vue-cli-service build --mode development",
    "watch": "vue-cli-service build --mode development --watch",
    "build": "vue-cli-service build",
    "deploy": "vue-cli-service build --modern",
    "lint": "vue-cli-service lint"
  },
We can delete the
public\directory, as we won't be using it.
Now that we have all our pieces installed, let's use Vue ⚡!
You might have noticed I never added the Vue files to my MVC
.csproj- this was intentional. Since Visual Studio doesn't have the same tooling support, these files should only be edited through VS Code 😮.
Building Our Vue Applications
If we look under the src\ directory, we can see an App.vue file and a main.js file.
main.js is the root of the Vue CLI application and all files should eventually get imported into it if we want them in the build process output.
The App.vue is the default Vue root component that would signify an island of behavior within the DOM, and we can delete this file as we will not be using it.
We will, however, be creating new components within our ~/Views folder.
We are going to have our Vue components and apps all live next to the MVC Razor views that they are associated with.
We want to follow the "Feature Folders" approach to application development, co-locating files based on the business feature they are related to, not the technology they are built with 👍👍.
To read more about the "Feature Folders" organization pattern, check out my post Kentico 12: Design Patterns Part 3 - Tips and Tricks, Application Structure:

Our Vue Component - Home.vue
If we open the MVC ~/Views/Home folder we can see 1 file, Index.cshtml
Let's edit Index.cshtml to indicate where our Vue application is going to be initialized in the DOM, and define the data that we will pass to it from MVC:
@{
    ViewBag.Title = "Home Page";
}

<h1>Welcome</h1>

<!-- This object on the window will pass data to our component -->

<script>
(function () {
    'use strict';

    window['sandbox-home'] = {
        title: '@ViewBag.Title'
    };
}());
</script>

<!-- This is the 'root' of our first component -->

<sandbox-home></sandbox-home>

<div>
   @Html.Kentico().EditableArea("main")
</div>
As we will soon see, <sandbox-home></sandbox-home> is where our first Vue app will root itself in the DOM 😀.
Next, as a sibling of our Razor view, we can create a new Home.vue file.
<!-- ~/Views/Home/Home.vue -->

<template>
  <div>
    <h1>{{ title }}</h1>
  </div>
</template>

<script>
export default {
  props: {
    title: {
      type: String,
      required: true
    }
  }
};
</script>

<style lang="css" scoped>
h1 {
  color: red;
}
</style>
The traditional way of fixing a Vue application instance to the DOM looks like this:
var app = new Vue({
  el: '#app',
  data: {
    message: 'Hello Vue!'
  }
})
Here, #app represents the CSS selector of the DOM element where we should start our app.
We, however, are going to treat all of our Vue components as if they are normal components, not necessarily the root components of any Vue applications.
Having a consistent structure and initialization for all of our components means they are all composable, reusable, and easy to move around in the code base and the DOM 🧐.
It shouldn't matter if
Home.vueis a child component of some other component, or the top level component of an application island - we build it the same way.
Let's create a file ~/Views/Home/home-loader.js with the following contents:
import Vue from 'vue';

import Home from './Home.vue';

export function load() {
  const selector = 'sandbox-home';

  // Is the custom Vue root element in the DOM?

  if (!document.querySelector(selector)) {
    return;
  }

  // Create a new Vue app with the imported Home component

  new Vue({
    render: createElement =>
      createElement(Home, {
        props: {
          ...window[selector],
        },
      }),
  }).$mount(selector)
}
This
renderfunction is the Vue render function which lets us programmatically create new DOM elements and Vue components.
This file creates a load function that checks if the <sandbox-home></sandbox-home> element is in the current page - if it's not, the app is not created and the component is not loaded.
This saves us from Vue trying to create all of our islands of behavior on every single page load - even when the current page doesn't need that behavior 😉.
If the element is found, Vue creates a new application starting at that element, with 1 child - the custom component we defined (in this case Home.vue).
The Vue application also initializes that component's props with whatever object is found on the window object under the selector's name (in this case window['sandbox-home'] 🤓.
The
...window[selector]syntax is ES2015 object destructuring.
The initialization lets us treat the Home.vue component as a normal child component with props to pass state to it, and ensures it will only be initialized under the custom HTML element that represents it, <sandbox-home></sandbox-home> 👍.
Loading Components
So now that we have a Home.vue and home-loader.js, we need a way to actually tell Vue to try to load our component in the browser.
Let's create a new file ~/Views/component-loader.js:
import { load as loadHome } from './Home/home-loader';

export function loadComponents() {
  loadHome();
}
This file is where we will gather all Vue "loader" modules, each controlling the initialization of an app, and call their load() function (aliased to avoid name conflicts) within the loadComponents() function.
At this point we need to move up to the ~/src/main.js file where we want to replace its current contents with the following:
import Vue from 'vue'

Vue.config.productionTip = false

import { loadComponents } from "../Views/component-loader";

loadComponents();
Building for Development
We now have a fully configured application, a component ready to render in our MVC view, and the only thing left is to use the CLI to run the Vue part of our code base with the following command:
$ npm start
This will put the Vue CLI in "watch" mode, where it will output the built application assets and place them in the ~/Content/dist/vue/ folder of our MVC project.
This is the command we will want to use for normal development as it provides the best source maps and vue debug mode tools 😎.
We only need to reference these in our MVC _Layout.cshtml to see the Home.vue rendered on our home page, with the following lines right above the closing </body> tag:
<script src="~/Content/dist/vue/js/chunk-vendors.js"></script>
<script src="~/Content/dist/vue/js/app.js"></script>
Also add the following right above the closing </head> tag:
<link href="/Content/dist/vue/css/app.css" rel="stylesheet">
If we start our Kentico 12 MVC application, we can now see the Vue app running the the browser.

Huzzah 🤘🤘⚡⚡!
Building for Production
The Vue CLI has a cool feature that allows it to create 2 different sets of build assets - 1 for modern browsers and 1 for legacy browsers (IE11).
The modern browsers receive less complex code (faster for parsing and executing) in smaller bundles, whereas older browsers receive the code they normally would 🤗.
You can read more about modern mode in the Vue CLI documentation.
The npm commands we copied into our package.json earlier include Vue CLI commands to let us perform this type of build, specifically deploy:
$ npm run deploy
Running this command will produce the following output in our ~\Content directory:
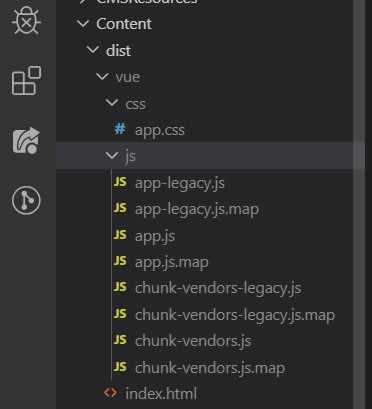
We can take the contents of index.html and use the generated <link> and <script> elements in our _Layout.cshtml:
<head>

  <!-- ... -->

  @Styles.Render("~/Content/css")

  <link
    href="/Content/dist/vue/js/app.js"
    rel="modulepreload"
    as="script">

  <link
    href="/Content/dist/vue/js/chunk-vendors.js"
    rel="modulepreload"
    as="script">

  <link href="/Content/dist/vue/css/app.css" rel="stylesheet">

  @Html.Kentico().PageBuilderStyles()
</head>
<body>

  <!-- ... -->

  <script
    type="module"
    src="/Content/dist/vue/js/chunk-vendors.js"></script>
  <script
    type="module"
    src="/Content/dist/vue/js/app.js"></script>
  <script>
    // Safari specific polyfills excluded for brevity
  </script>
  <script
    src="/Content/dist/vue/js/chunk-vendors-legacy.js" nomodule></script>
  <script
    src="/Content/dist/vue/js/app-legacy.js" nomodule></script>
</body>
Creating a ConfigurationHelper
This will work fine for when we are testing production deployments, but we need an automated way to switch back and forth between script tags 🤔.
We can use a static ConfigurationHelper.cs class in our Razor views to help with this:
public static class ConfigurationHelper
{
    public static bool IsDebugBuild() =>
#if DEBUG
        true;
#else
        false;
#endif

    public static bool IsReleaseBuild() =>
#if RELEASE
        true;
#else
        false;
#endif
}
Now our <script> section of the _Layout.cshtml can be updated as follows:
<body>

  <!-- ... -->

  @if (ConfigurationHelper.IsDebugBuild())
  {
    <script src="~/Content/dist/vue/js/chunk-vendors.js"></script>
    <script src="~/Content/dist/vue/js/app.js"></script>
  }
  else
  {
    <script
        type="module"
        src="/Content/dist/vue/js/chunk-vendors.js"></script>
    <script
        type="module"
        src="/Content/dist/vue/js/app.js"></script>
    <script>
      // Safari specific polyfills excluded for brevity
    </script>
    <script
        src="/Content/dist/vue/js/chunk-vendors-legacy.js" nomodule></script>
    <script
        src="/Content/dist/vue/js/app-legacy.js" nomodule></script>
  }
</body>
Integrating into MSBuild
Finally, we can connect the Vue CLI build process into our MSBuild build process so that every time we do a RELEASE build of our MVC app, we do a dependent 'production' build of our Vue application 👍.
Also, any failures in the the Vue CLI build will fail our MVC build, so a CI/CD process can easily verify the quality of our code base 😅.
To perform this last integration, we add some <Target> elements to our MVC .csproj file:
  <Target
    Name="NpmInstall"
    BeforeTargets="NpmBuildVue"
    Condition=" '$(Configuration)|$(Platform)' != 'Debug|AnyCPU' ">

    <Exec Command="npm ci" />
  </Target>
  <Target
    Name="NpmBuildVue"
    BeforeTargets="BeforeBuild"
    Condition=" '$(Configuration)|$(Platform)' != 'Debug|AnyCPU' ">

    <Exec Command="npm run deploy" />
  </Target>
Now, non-DEBUG builds of our MVC project result in full builds of our Vue application 😉.
Wrap Up
We have covered a lot here, but I think it's enough to get you started down the path of leveraging Vue.js for the client-side behavior of your Kentico 12 MVC applications, by taking the following steps:
- ✅ Installing all of our necessary tools, like Node, VS Code, and the Vue CLI
- ✅ Organizing our project structure to make Vue.js best integrate with MVC
- ✅ Separating our components from the process of loading them as applications
- ✅ Configuring our Razor layout to reference our assets
- ✅ Testing our
Home.vue, with state passed from MVC to Vue - ✅ Updating our Razor layout, and
.csprojto handle both DEBUG and RELEASE builds
There are plenty more customizations we can make, from integration SCSS (using a "Feature Foldered" approach to organization, of course!), to Font Awesome SVG icons 🤓.
We can also expand the feature set of these Vue components from being just interactive UI widgets to state maintaining, API driven mini-applications with axios on the front-end for promise-based HTTP requests and Web API 2 integration on the back-end 🤩.
Check out my post _Kentico 12: Design Patterns Part 7 - Integrating Web API 2 _ to learn more about integration Web API 2:
If you are interested in any of these additional integrations, let me know 📝, and I'll prioritizing blog posts for them.
If you have any questions or issues with the steps I presented above, leave a comment and I'll be happy to help.
As always, thanks for reading 🙏!
If you are looking for additional Kentico content, checkout the Kentico tag here on DEV:
Or my Kentico blog series:


Top comments (4)
Thank you so much for this, it works fine with me, I have a question
now after importing vue component I can not find it in the kentico admin to edit in the page directly like any other
dev-to-uploads.s3.amazonaws.com/i/...
Randa, I'm glad the post was helpful!
What DOM element is your Vue component hooking into, and where in the Razor files is that DOM element located?
Do you have any errors in the console when using Preview/Edit mode in the CMS?
The Page Builder functionality loads a lot of additional JavaScript, so there could be an issue happening when those files are loaded.
Thanks for your help
I follow your steps in attaching Vuejs with kentico(by the way I am a front end not backend)
I am trying to figure out why in the preview my vue components appear there, but in the edit mode for the admin not, any text or variables in Razor appear ordinary in the admin but any vue component not in edit mode only appear in preview or front end side(live preview)
Can I enable admin user to edit vue component wizard from kentico admin like the rest?
I have no errors in console
I have _layout razor
dev-to-uploads.s3.amazonaws.com/i/...
my root component(sandbox-home) (Home page)
dev-to-uploads.s3.amazonaws.com/i/...
Randa,
Hm, I'm surprised that doesn't work. Everything looks correct.
It's very strange that viewing the site in Preview behaves differently than Page Edit, especially since the Vuejs code/markup isn't inside a Widget/Section view.
I've not been able to reproduce your issues on my end, but there are many different ways to manage client-side assets with Kentico 12 MVC, so there could be something happening there.
I'll see if I can get a minimal setup pushed up to GitHub.