Announcement📢
Hi everyone 🙋🏻♂️! My name is Vedant, and I have an important announcement to make.
The SCADE IDE now officially supports Swift 5.7 🎉.
In this article, we will discuss what’s new in Swift 5.7 that is supported by the SCADE editor as well. We will discuss the Swift-nio application and try using the async/await feature with the SCADE editor.
What’s new in Swift 5.7 + SCADE 🔥
- Concurrency in top-level code: SwiftNIO is compatible with the SCADE IDE. The good thing is SCADE now builds the Swift NIO classes for the Android platform as well.
- Async/await much easier to Use: The much-awaited async/await is now compatible with the latest SCADE version. In this article, its usage is explained.
- Distributed actor isolation: Introduces the ability for actors to work in a distributed form – to read and write properties or call methods over a network using remote procedure calls (RPC). We can now use the actor keyword in SCADE.
SwiftNIO with SCADE
SwiftNIO is a cross-platform asynchronous event-driven network application framework for the rapid development of maintainable high-performance protocol servers & clients.
As SCADE now supports Swift 5.7 it is very easy to implement protocol clients using async/await functionality. We will implement a TCP protocol connection as an example to demonstrate the functionality of SwiftNIO with the SCADE editor.
To begin, please make sure you have the latest SCADE editor build(greater than v2.0.57) installed. Create a sample SCADE project and set up the iOS and Android platforms simulators to test the application.
Integrate Apple’s swift-nio SDK
You can check Apple's swift-nio SDK here. It is open-source and you can easily add it to the project using SPM in Package.swift.
// swift-tools-version:5.7

import PackageDescription
import Foundation

let SCADE_SDK = ProcessInfo.processInfo.environment["SCADE_SDK"] ?? ""

let package = Package(
    name: "UgSwiftNioExample",
    platforms: [
        .macOS(.v10_14)
    ],
    products: [
        .library(
            name: "UgSwiftNioExample",
            type: .static,
            targets: [
                "UgSwiftNioExample"
            ]
        )
    ],
    dependencies: [
        .package(url: "https://github.com/apple/swift-nio.git", from: "2.46.0")
    ],
    targets: [
        .target(
            name: "UgSwiftNioExample",
            dependencies: [
                .product(name: "NIO", package: "swift-nio")
            ],
            exclude: ["main.page"],
            swiftSettings: [
                .unsafeFlags(["-F", SCADE_SDK], .when(platforms: [.macOS, .iOS])),
                .unsafeFlags(["-I", "\(SCADE_SDK)/include"], .when(platforms: [.android])),
            ]
        )
    ]
)
Create a TCP Client & Handler class
Now we will create two classes TCPClient & TCPClientHandler. These classes use the NIO framework to establish the TCP connection. Let’s import the required packages.
import Foundation
import NIO
import ScadeKit
The TCPClient class will take the host and port as the input endpoints to make a connection request.
As the next step, the ClientBootstrap instance is used so that a Channel is created & initialized. It will accept the TCPClientHandler instance.
class TCPClient {
  private let group = MultiThreadedEventLoopGroup(numberOfThreads: 10)
  private var host: String
  private var port: Int
  private var channel: Channel?
  private var dataHandler: (String) -> Void

  init(host: String, port: Int, dataHandler: @escaping (String) -> Void) {
    self.host = host
    self.port = port
    self.dataHandler = dataHandler
  }

  func start() async throws -> Bool {
    do {
      let bootstrap = ClientBootstrap(group: group)
        .channelOption(ChannelOptions.socket(SocketOptionLevel(SOL_SOCKET), SO_REUSEADDR), value: 1)
        .channelInitializer { channel in
          channel.pipeline.addHandler(TCPClientHandler(client: self))
        }

      channel = try await bootstrap.connect(host: host, port: port).wait()
      return true
    } catch let error {
      print(error)
      return false
    }
  }

  func callDataHandler(data: String) -> String {
    dataHandler(data)
    return data
  }

}
TCPClientHandler contains the lifecycle methods for receiving the data packets.
- channelActive: invoked as soon the channel is initialized. Then it establishes the HTTP connection in the given context of the current channel.
- channelRead: Once data gets available, the current channel reads the data in bytes. In this method, we can preprocess the data or append it to the final data string.
-
channelInactive: After all data is consumed, the existing channel instance gets closed. In this method, the
TCPClientinstance receives the final fetched data string. - errorCaught: During the entire TCP connection, if there is some sort of error occurred, this method gets called and terminates the TCP connection.
public class TCPClientHandler: ChannelInboundHandler {
  public typealias InboundIn = ByteBuffer
  public typealias OutboundOut = ByteBuffer
  private var client: TCPClient
  private var allData: String = ""

  init(client: TCPClient) {
    self.client = client
  }

  // channel is connected, send http request
  public func channelActive(context: ChannelHandlerContext) {
    let message = "GET / HTTP/1.0\r\n\r\n"
    var buffer = context.channel.allocator.buffer(capacity: message.utf8.count)
    buffer.writeString(message)
    context.writeAndFlush(wrapOutboundOut(buffer), promise: nil)
  }

  // channel data available, read data
  public func channelRead(context: ChannelHandlerContext, data: NIOAny) {
    var buffer = unwrapInboundIn(data)
    let readableBytes = buffer.readableBytes
    if let received = buffer.readString(length: readableBytes) {
      allData += received
    }
  }

  // channel closed, invoking data handler
  public func channelInactive(context: ChannelHandlerContext) {
    client.callDataHandler(data: allData)

  }

  public func errorCaught(context: ChannelHandlerContext, error: Error) {
    print("error: \(error.localizedDescription)")
    context.close(promise: nil)
  }
}
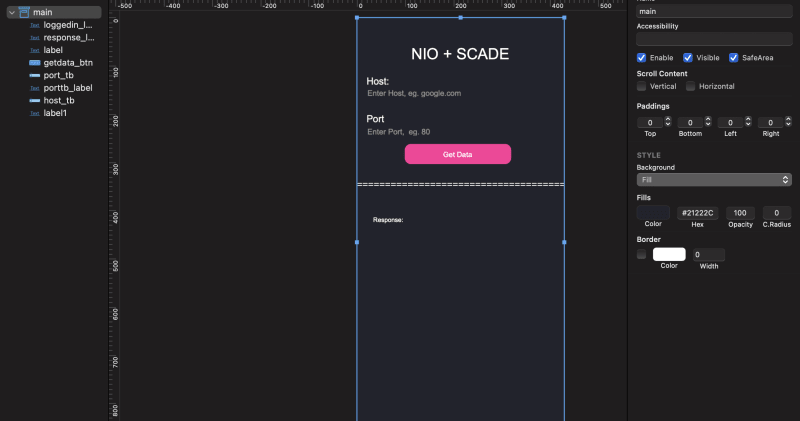
Design some UI for SCADE App
We will create a page design to enter the input fields host & port. With the click of a button, it will display the fetched data on a label.
It is optional and you can also create the page as per your choice of design.
Call the TCPClient Methods in SCADE App
As the first step, let’s fetch the values stored in the Host & Port text fields, and store them in some variables.
    var currHostString: String = ""
    var currPortString: String = ""

    self.host_tb.onTextChange.append(
      SCDWidgetsTextChangeEventHandler { ev in
        currHostString = ev!.newValue
      })

    self.port_tb.onTextChange.append(
      SCDWidgetsTextChangeEventHandler { ev in
        currPortString = ev!.newValue
      })
On the click of the Get Data button, it will initialize the TCPClient instance with the host & port as parameters.
    self.getdata_btn.onClick { _ in
      print("\(currHostString) \(currPortString)")

      if currHostString.isEmpty || currPortString.isEmpty {
        print("Host or Port is Empty")
        return
      }

      self.client = TCPClient(host: currHostString, port: Int(currPortString)!) {
        data in
        print(data)
        let stringData: String = String(data)
        let a = stringData.index(stringData.startIndex, offsetBy: 500)
        let result = stringData.substring(to: a)
        self.response_label.text = result
      }
}
It has a callback function that returns the data. Then as soon as the data is returned, the label displays the data string.
Async/Await usage to start the TCPClient
The final step is now to call the start() method of the TCPClient instance. Since this action is asynchronous in nature, we will use the async/await keyword to make an async call here. The good news is SCADE's latest version is now compatible with the Async/Await usage.
Task {
        let result = try await self.client?.start()
}
Here we used the await keyword to call the start() method of the client as this one is an async network call. The start() function of the client is also marked async as shown below.
func start() async throws -> Bool {
    do {
      let bootstrap = ClientBootstrap(group: group)
        .channelOption(ChannelOptions.socket(SocketOptionLevel(SOL_SOCKET), SO_REUSEADDR), value: 1)
        .channelInitializer { channel in
          channel.pipeline.addHandler(TCPClientHandler(client: self))
        }
 …
actor is now supported by SCADE
In Swift, an actor is a new feature introduced in Swift 5.5 that allows for safe and efficient concurrency. Actors are a type of class that provides a way to encapsulate state and behavior while ensuring that only one piece of code can access the actor's mutable state at any given time. Actors in Swift can be thought of as objects that execute in a separate task, allowing multiple tasks to concurrently communicate with and access the actor's state. This concurrency model enables the safe sharing of mutable states between tasks without the need for locks or other synchronization primitives.
To define an actor in Swift, you use the actor keyword before the class keyword, as shown in the example:
actor MyActor {
  // actor implementation
}
SCADE example App using actor
Given below is a small example demonstrating the usage of actor keyword in SCADE application. We have created an async method asynCalculation() which uses await keyword to perform the asynchronous operation.
Here we use the MainActor.run() method to run the concurrent operation on the main thread. The MainActor helps to call the UI widgets inside the run() method.
class Calculator {
    private var adapter: MainPageAdapter

    public init(adapter: MainPageAdapter) {
        self.adapter = adapter
    }

    func runCalculation() {
        print("runCalculation BEGIN")
        Task.detached(priority: .background) {
            print("runCalculation BACKGROUND")
            let _ = await self.asyncCalculation()
            print("runCalculation BACKGROUND 1")
            await MainActor.run {
                print("runCalculation SET TEXT")
                self.adapter.label.text = "Async task finished!"
            }
            print("runCalculation BACKGROUND END")
        }

        print("runCalculation END")
    }


    func asyncCalculation() async -> Bool {
        await Task.sleep(3 * 1_000_000_000)
        return true
    }
}
Hence, we are able to use the actor functionality in SCADE editor. Let’s now deploy the application and test it for iOS and Android platforms.
Run the App!
Let’s now first run the app on any iOS simulator and check if it’s working fine or not.
iOS

Android

Voila 🎉! It is very easy to integrate AppleNIO with the async/await & actor keywords into the SCADE app. You can find the full source code of the demo application here. We recommend you to use the SCADE editor for developing cross-platform Swift apps. Thank you for reading and see you in the next article!


Latest comments (0)