
Let's be honest, pentesters do what they do because they are hackers (in the purest meaning of the word) and enjoy working on the systems and find vulnerabilities other can and should fix. I yet need to find a pentester who is doing what is doing because he or she likes to generate reports.
This is where tools such as a Reconmap come into play. Vulnerability management and reporting tools simply take the burden of creating reports out of infosec professionals and MSSP (Managed Security Service Providers).
On this first and short tutorial I am going to show you how to go from creating a client to generate a report in a few simple steps, using the open source tool Reconmap.
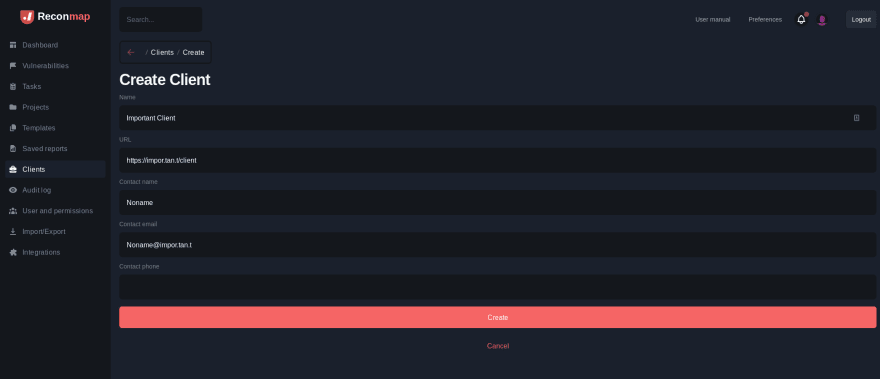
Step 1 - Create a client
The pentest work and report that you are doing is for somebody. This somebody could be your own company but typically is somebody else, a client.
Creating a client in Reconmap could not be simpler. Click on the Clients item on the left bar then enter some basic information in the form and hit the Create button.
Step 2 - Create a project
Once you have the client, you need a project for this particular engagement. The project could be created from scratch or using one of the predefined templates.
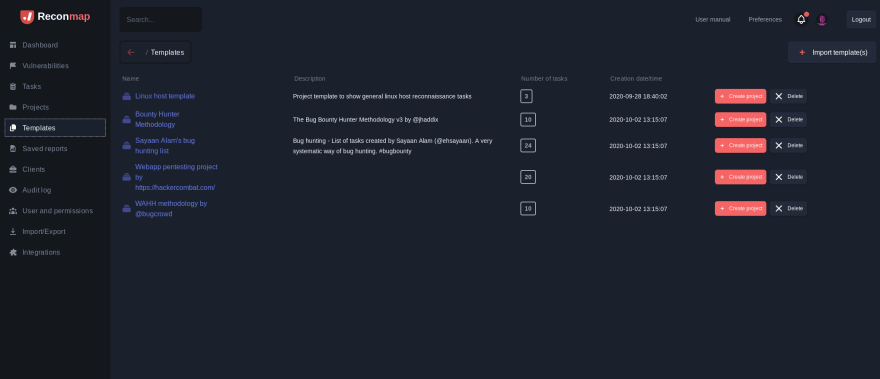
The templates exist to avoid repeating yourself, and come with a list of common tasks that you typically do on pentest projects.
Step 3 - Assign a client and run some tasks
The project is now created but is not assigned to our new client. Use the dropdown at the top of the project details page to select our very important client and owner of this project.
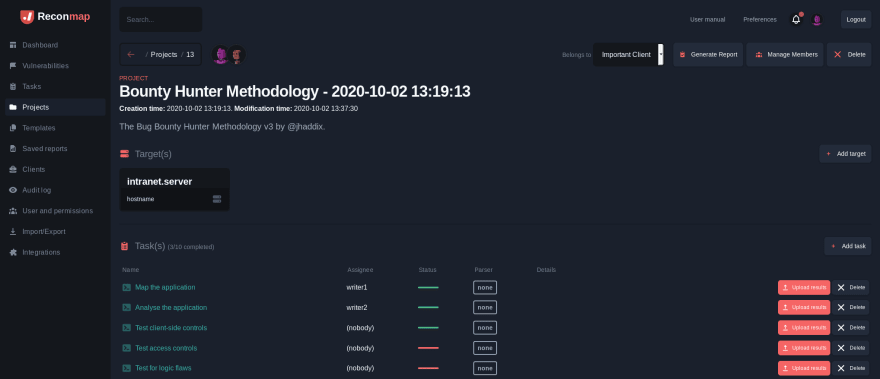
Now comes the fun part: Run some of the tasks that came as part of the template and upload the results to the system. Reconmap will parse the results from your tasks (asynchronously) and automagically create vulnerabilities found on tools such as Zap, Bupr, Sqlmap, Nmap, OpenVas and many more. New parsers are added to the platform on a weekly basis!
Step 4 - Generate a report
Once you complete all of your tasks (alone or as part of your team as Reconmap allows you to assign tasks to different users and split the work), you are in a good position to generate the report.

The reporting part of Reconmap is pretty simple: Click on Generate report, and if you are happy with what you see you can save it as PDF as well. The PDF is super handy to share via email, but you don't need to open your email client for this...
Step 5 - Send the report to the client
Congratulations! Your report is generated and it was not a painful process at all! Now is time to share the report with the client, otherwise what's the point? Reconmap has thought about this as well and allows you to send a report to the client with the ease of a click using the details you enter about the client on Step 1.
Summary
The reporting part of any pentest project was always tedious, error prone and time consuming, but it does not need to be that way any more. Using tools such as Reconmap one can create simple and informative reports in no time, allowing you to concentrate one what's most fun: hacking.
This first tutorial covered pretty much end to end how Reconmap works, but it did not dive deep into the details of how the upload of results and parsing works. More on this in our next tutorial, subscribe to stay up to date!


Top comments (0)