TL;DR
Take a look at the .gitlab-ci.yml configuration file in my recent safe-env-vars project. This shows how I configured GitLab’s built-in CI/CD pipelines to automatically build and publish the package to npm. This post will explain the steps required to set this up in detail.
What’s in a pipeline?
Long before GitHub joined the party with GitHub Actions it was possible to run continuous integration and deployment (CI/CD) workloads on GitLab. For the best part of a decade now, we’ve been able to use the same tool that hosts our code repositories to run our pipelines. I was previously a big fan of Circle CI, especially when they introduced support for Docker containers, but I haven’t needed to use these guys in years.
But why do we care about CI/CD pipelines in the first place? Well, continuous integration (CI) and continuous deployment (CD) are essential for ensuring software quality and agility in distributed teams. They allow us to run automated quality checks, execute our test suites, scan for security vulnerabilities, publish and deploy our apps, and a myriad of other important tasks. They’re also great at saving time on small projects such as npm packages!
At a high level, CI/CD pipelines cover these areas:
- Building — Installing dependencies, compiling your code or application, and anything else required to prepare your project for testing and deployment.
- Verifying — Performing static analysis of your codebase, assets, and compiled artifacts to ensure they meet quality and security standards.
- Testing — Executing your test suite to confirm everything works as expected and no bugs have crept in.
- Deploying — Publishing your package or deploying your application to the cloud.
- Reporting — Providing insight into build errors, development velocity, security vulnerabilities, and a lot more.
What’s in a GitLab pipeline?
Recently I wrote a post about environment variables where I discussed an npm package I had published called safe-env-vars — that package is automatically built and published using GitLab CI/CD (and it’s open source) so if you want to skip ahead why not take a browse of its code repository. The main point of interest for those wishing to skip ahead 🏃💨 is the .gitlab-ci.yml file which tells GitLab about the jobs we want to execute in the pipeline.
Before we can get into the nitty gritty there are a few terms GitLab uses that we ought to define:
- Pipeline — A single CI/CD execution consisting of several stages and jobs, typically triggered by a commit or a merge into a specific branch. You can have different pipelines for different purposes, for example, to verify changes in a merge request, or conduct a cloud deployment.
- Stage — A grouping of related jobs that must succeed before GitLab will proceed to the next stage in the pipeline. If there are no further stages, the pipeline will complete successfully.
-
Job — A task you define that typically runs in its own idempotent container (e.g.
npm run build,npm publish, etc). Multiple jobs within the same stage can be run in parallel as they are usually independent of each other.
GitLab pipelines are very powerful and can be configured in a lot of different ways. Some features are restricted to the paid and enterprise pricing tiers but all the features we’ll use below are available for free, as long as you have some pipeline minutes remaining! At the time of writing GitLab provides 400 free minutes per month for pipeline execution, which is more than ample for our needs here.
Our goal
So what are we aiming to do here? When I created the safe-env-vars package I had two goals:
- Automatically publish my package to npm whenever I committed or merged into the
mainbranch so I didn’t need to do this manually. - Run some code quality checks to catch any silly mistakes. I didn’t want to spend much time setting up these checks so I opted to limit them to code linting and unit testing.
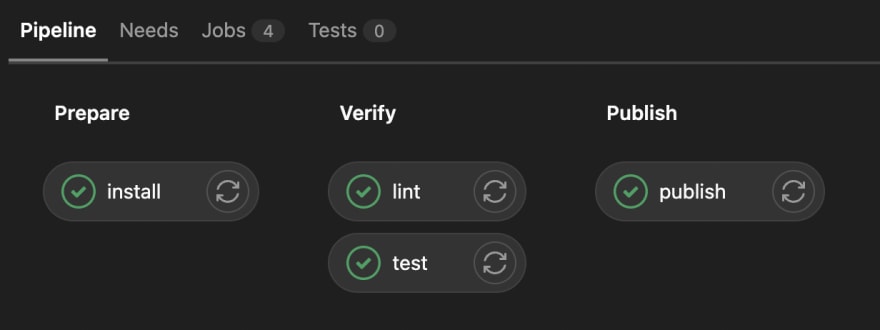
Our pipeline will consist of three stages and four jobs:
| Stage Name | Job Name | Job Description |
|---|---|---|
| Prepare | Install | Runs npm install to install key development dependencies such as TypeScript and Jest, and to build our package using the TS compiler. |
| Verify | Lint | Runs ESLint to verify our code meets the agreed linting rules. |
| Test | Runs Jest to verify all unit tests pass and nothing has broken. | |
| Publish | Publish | Runs npm publish to publish our package to the npm registry. |
Our final pipeline will look something like this:

Step by step guide
Step 1: Create your package
Before you configure the pipeline you’ll need to have created a package with a suitable package.json file. Besides including the usual properties such as the dependecnies, author, and so on, you need to make sure the “main” property points to the JavaScript file which is the entrypoint to your package.
For TypeScript projects you’re going to need a few extra bits, but you can ignore these if you’re working with vanilla JavaScript (but why 😭):
- The
“types”property should point to the entrypoint for exported type definitions. - The
“scripts.build”property should call the TS compiler, something like"build": "npx tsc --outDir ./dist". - The
“scripts.prepublishOnly”property should look like"prepublishOnly": "npm run build"in order to automatically build your package before publishing withnpm publish.
You might end up with a package.json file looking similar to this:
{
    "name": "my-package",
    "version": "1.0.0",
    "main": "dist/src/main.js",
    "types": "index.d.ts",
    "scripts": {
        "build": "npx tsc --outDir ./dist",
        "lint": "npx eslint . --ext .ts,.tsx,.js,.jsx",
        "prepublishOnly": "npm run build",
        "test": "npx jest --watch",
        "test:cov": "npx jest --coverage --verbose --runInBand"
    },
  "dependencies": {...},
  "devDependencies": {...},
}
My personal preference is to have additional scripts defined in the package.json for linting (lint), testing (test), and testing with coverage (test:cov).
Step 2: Add an npm ignore file
In the root of your code repository you’ll want to add a file called .npmignore and within it list all the paths you wish to exclude from your published package. This is important because there are some files you don’t need to include, and some you definitely shouldn’t include.
The syntax is very similar .gitignore and you might end up with something like the below. This ensures the src directory doesn’t get included (for TypeScript projects we only want our dist directory published). It also lists the various configuration files which aren’t important for people to actually use the package in their apps and just add unnecessary weight to a node_modules directory.
src/
.gitlab-ci.yml
.eslintignore
.gitignore
.eslintrc.js
.gitmodules
.prettierrc.js
jest.config.mjs
tsconfig.json
dist/**/*.spec.*
Step 3: Add the CI/CD config file
In the root of your code repository create an empty .gitlab-ci.yml file with the following contents (the full reference for GitLab’s config file is available here: https://docs.gitlab.com/ee/ci/yaml):
image: node:16

variables:
  ARTIFACT_DOWNLOAD_ATTEMPTS: 2 # Number of retries for restoring saved artifacts.
  FORCE_COLOR: '1' # Whether to force colour output in compatible tooling.
  GET_SOURCES_ATTEMPTS: 2 # Number of retries for git commands.
  GIT_STRATEGY: fetch # How to pull submodules.
  GIT_SUBMODULE_STRATEGY: recursive # How to treat nested git submodules.
  RESTORE_CACHE_ATTEMPTS: 2 # Number of retries for restoring cached files.

stages:
  - prepare
  - verify
  - publish
The YAML above is in three parts:
- The
imagestring specifies the Docker image and tag to use (by default) for each of the jobs, in our case Node.js version 16.x. This can be overriden in each individual job later if needed. Advanced developers might want to create and publish their own Docker images with any additional dependencies their pipeline requires. - The
variablesdictionary lists the environment variables to make available to each job. These can also be customised for each job. I’ve started you here with some useful variables that customise the behaviour of the pipeline (see the comments beside each for what they do). For example, theFORCE_COLORvariable is used by many (but not all) tools to force them to output ANSI colour codes even when they can’t detect a TTY device. - Finally, the
stagesarray lists the names of each of the three stages that will house our jobs. We will define each of the jobs next.
Step 4: Add the “install” job
At the bottom of your config file add the following top-level key, install, which defines the job named “install”. The install.stage property defines which stage the job belongs to, in this case the “prepare” stage.
install:
  stage: prepare
  interruptible: true
  retry: 1
  dependencies: []
  artifacts:
    name: 'deps_$CI_COMMIT_REF_SLUG'
    paths:
      - node_modules/
    when: on_success
    expire_in: 12h
  script:
    - npm config set -- '//registry.npmjs.org/:_authToken' "${NPM_AUTH_TOKEN}"
    - npm install --no-progress --no-audit --no-fund --verbose
  only:
    - merge_requests
    - develop
    - main
The full keyword reference on GitLab’s website will explain all the various properties defined above, but the important ones to note are:
-
“artifacts” — Tells GitLab which path(s) to hold on to between jobs, in this case, that’s the
node_modulesdirectory as we’ll be runningnpm installin this job only, and preserving the installed dependencies for use in subsequent jobs to save time. -
“script” — The lines of the shell script to execute for the job, in this case to set the NPM auth token that allows publishing to the registry. The
NPM_AUTH_TOKENenvironment variable should be set in the GitLab UI for your project or group and not comitted to your code repository! You can find the correct page in GitLab by clicking CI/CD in the left-hand menu of any project or group and going to the section titled “variables”. -
“only” — An array listing the events that can trigger the job to be included in the pipeline, in this case we execute the job for merge requests and for commits/merges to the
developandmainbranches. If none of the conditions match, the job will not be included in the pipeline.
Step 5: Add the “lint” job
Add the next job, lint, at the bottom of the config file:
# Lints the codebase.
lint:
  stage: verify
  interruptible: true
  retry: 1
  dependencies:
    - install
  script:
    - npm run lint
  only:
    - merge_requests
    - develop
    - main
Here, we have a similar set of properties defining what our job does, including stage, this time grouping our job in the verify stage, and script which simply runs the npm run lint script we defined in our package.json.
There is a new property to pay attention to, however. In order to execute our lint script ESLint and its associated dependencies need to be installed. Each CI/CD job is run in a new container and so doesn’t have any of the changes introduced in the preceeding install job, such as the node_modules directory.
In order to bring our installed node_modules into this lint job we need to specify the dependencies array and list our install job inside it. This will cause GitLab to pull in all the artifacts specified in the install job (i.e. node_modules) and put them back in the same places they were before. As far as npm will be concerned, the node_modules directory was always there!
Step 6: Add the “test” job
Add the next job, test, at the bottom of the config file:
# Runs the test suite.
test:
  stage: verify
  interruptible: true
  retry: 1
  dependencies:
    - install
  script:
    - npm run test:cov
  only:
    - merge_requests
    - develop
    - main
Once again, our job specifies the install job as a dependency so the node_modules directory is available again, and we specify a simple bash script that runs npm run test:cov - this simply executes our test runner, Jest, with coverage turned on. We also put this job under the verify stage and it will be run in parallel with the lint job to save time.
You might have noticed we specify a property called interruptible: true which simply tells GitLab it is allowed to kill our pipeline whilst this job is running if needed. This is useful when a new pipeline wants to start (i.e. something new has been committed to the same branch) that would otherwise have to wait for the current pipeline to finish, saving us both time and pipeline minutes!
Step 7: Add the “publish” job
Add the next job, test, at the bottom of the config file:
# Publishes the package to npm.
publish:
  stage: publish
  interruptible: false
  retry: 1
  dependencies:
    - install
  script:
    - npm config set -- '//registry.npmjs.org/:_authToken' "${NPM_AUTH_TOKEN}"
    - npm publish --verbose
  resource_group: 'deployment-$CI_COMMIT_REF_SLUG'
  rules:
    - if: '$CI_DEPLOY_FREEZE != null'
      when: never
    - if: '$CI_COMMIT_REF_NAME != "main" && $CI_COMMIT_REF_NAME != "develop"'
      when: never
    - if: '$CI_PIPELINE_SOURCE == "merge_request_event" && $CI_COMMIT_REF_NAME == "develop"'
      when: never
    - when: on_success
Here we set the interruptible property to false because we don’t want GitLab to kill the pipeline halfway through a publish, leaving us in a situation where we can’t be sure what state our package is in… did that version get deployed or not? 🙀📦
We also specify retry: 1 which tells GitLab to retry the job one additional time if it fails. This can be useful in cases where you’re relying on side effects for the job to succeed, for example npm publish makes HTTP requests to the npm registry which could fail due to transient network faults or a problem on npm’s side. In those cases, we want to automatically retry in case the problem resolves itself.
The other property of import here is rules where we list an array of objects. Each object defines a rule for when our publish job should run. We’re using this property instead of only here because we need to define much more complex behaviour than only will allow.
In the above code we have specified four rules and the first rule to match will be applied:
- If the
CI_DEPLOY_FREEZEenvironment variable is set, never execute the publish job. - If the branch we’re running on isn’t
mainordevelop, never execute the publish job. - If we’re in the scope of a merge request, never execute the publish job.
- Otherwise, and if the rest of the pipeline has been successful, then execute the publish job.
The syntax for rules is very powerful and allows us to specify a complex set of conditions for when the job should run (or not). There is far more to this than I can possibly detail here, so I encourage you to refer to the GitLab documentation: https://docs.gitlab.com/ee/ci/yaml.
Step 8: Commit and push
Once your package and the GitLab CI/CD config file are ready, you can commit and push your changes up. If everything has gone to plan, you should see a pipeline appear in the GitLab UI for your repository under CI/CD in the left-hand menu. By clicking into the pipeline you can follow through the jobs as they execute, and drill down into the output logs for each individual job.
Below you can see an example of four pipelines that have been run. The first pipeline at the top of the list is the most recent and was run against the main branch. The second pipeline down was run on a merge request and does not include the publish job as the rules we configured exclude it from being included in merge request pipelines.

Clicking into the first pipeline shows the stages and jobs that were executed. As this pipeline was run against the main branch our rules caused the publish job to be included and the package was subsequently (and automatically) published to npm. Happy days! 🥳
From here if we click into the test job we can see a snippet of the output emitted by Jest during the job. There is also some other log output which isn’t shown here for brevity.

Conclusion
In conclusion, it’s actually very simple to setup a powerful CI/CD pipeline in GitLab, especially if all you’re doing is publishing a package to the npm registry. Pipelines are a great way to verify the quality and robustness of your code, package, or application, and they are a fantastic timesaver when it comes to automatic publishing and deployment. To configure a pipeline in GitLab all you need is a .gitlab-ci.yml file in the root of your repository. You can find the keyword reference for that file on GitLab’s website.


Top comments (0)