Introduction
In this part (part 2/3), I will discuss how to implement the backend server application using NestJS to establish a WebSocket connection.
The code segments in this article are written for reading purpose, the full source code is available on my GitHub, linked at the end.
NestJS is a wonderful backend framework to develop mid to large scale projects. It supports WebSockets officially and a very straightforward setup is available to get things going.
I am considering a single stateful server of NestJS and I will avoid Redis and microservices for now but they would be advisable to use for a fully-scalable application, to keep track of users connected to each WebSocket connection.
I mentioned this stateful because to keep track of all the connected users and their timers, a single variable called userTimers is maintained in our backend app.
That means if the server shuts down for some reason, that state would be lost and we would loose the timers for the users. If we use Redis and microservices knowledge, we could avoid this problem. But I think that should be for another topic.
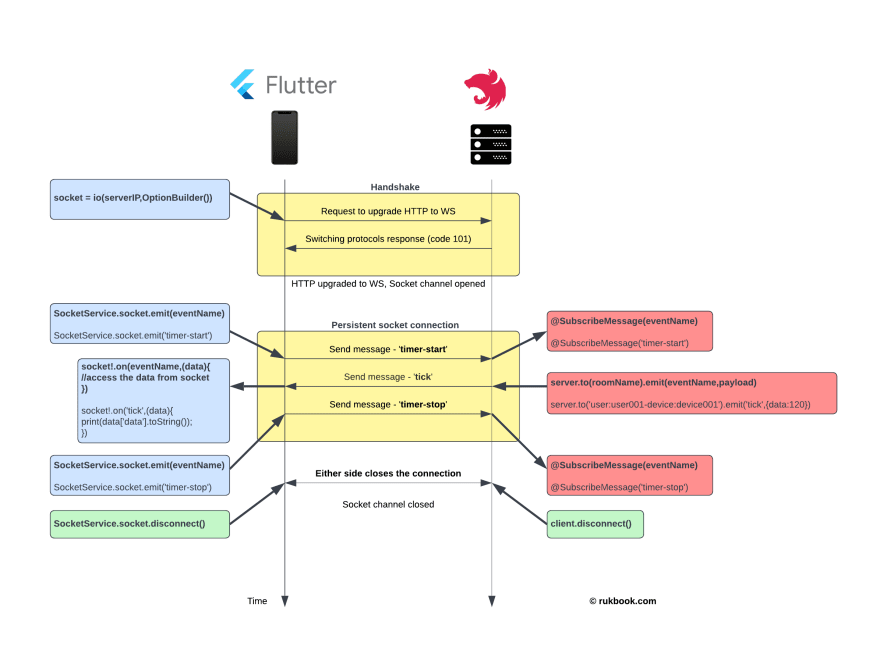
Abstract architecture of our server-side timer app
The following diagram gives an abstract idea of the system we are going to implement. The method calls in the diagram are the ones usually used in a WebSocket connection. If you don't understand it fully, please go through this tutorial series again after reading all 3 parts for the first time. I have tried to simplify things as much as possible.
The things that we have to do for the backend implementation are the following steps.
1. Start a new NestJS project
Please install NestJS on your computer if you don't have already, by running the following command.
npm i -g @nestjs/cli
Then create a new NestJS project.
nest new server-timer-backend
2. Install the needed packages
The two packages that we require are provided by NestJS developers. Since I’ve tested this setup with NestJS version 8.0.0 (Although the latest version is 9), I’ll be using an earlier, supported version of the required packages. This setup is working as of early August, 2022.
@nestjs/websockets@8.4.7@nestjs/platform-socket.io@8.4.7
We can install both of them by running the following command in the terminal.
npm i --save @nestjs/websockets@8.4.7 @nestjs/platform-socket.io@8.4.7
3. Create a sockets gateway (sockets.gateway.ts)
Firstly, I’ll create a folder named sockets where we will keep all of our files required for WebSocket communication for now. You can refactor these files in anyway you like.
Create a new file called sockets.gateway.ts.
Here the gateway file can be thought of as the main file in the backend related to WebSocket communication. It handles the connection, disconnection and any other message event.
This SocketsGateway class implements two interfaces which are provided by the @nestjs/websockets package.
We use the @WebSocketServer() decorator provided by the above package to tell NestJS to inject the WebSocket server.
@WebSocketGateway()
export class SocketsGateway
  implements OnGatewayConnection, OnGatewayDisconnect
{
  @WebSocketServer()
  public server: Server;

  // handleConnection(){}

  // handleDisconnect(){}

  // startMyTimer(){}

  // stopMyTimer(){}
}
I mentioned that an agreed-upon communication channel has to be created between client and server to start WebSocket communication. This agreement is established via a handshake.
Whenever this handshake is established, the handleConnection(){} method is invoked. This handshake is a real thing and its details can be accessed via client.handshake as a JSON with various information related to this WebSocket connection.
  handleConnection(@ConnectedSocket() client: any) {
    // console.log(
    //   `user ${client.user.id} with socket ${client.id} connected with device ${client.handshake?.query?.deviceId}`,
    // );

    client.join(
      getUserDeviceRoom(
        client.user.id,
        client.handshake.query.deviceId.toString(),
      ),
    );
  }
handleDisconnect(){} is more or less similar and it is invoked when an already connected socket is disconnected. You still have access to the handshake via client.handshake.
  handleDisconnect(@ConnectedSocket() client: any) {
    // console.log(
    //   `user ${client.user.id} with socket ${client.id} with device ${client.handshake?.query?.deviceId} DISCONNECTED`,
    // );

    client.leave(
      getUserDeviceRoom(
        client.user.id,
        client.handshake.query.deviceId.toString(),
      ),
    );
  }
A message event is a user-defined event to which the server listens (or subscribes). When a client (for example our flutter app) sends a message under that event, the server will execute whatever code is inside this listener method for that particular message event.
We are using two message events in our timer app - timerStart and timerStop.
In the startMyTimer(){} method, I use the @MessageBody() decorator to catch the payload sent from the client to server via the WebSocket connection. Here, the duration of the timer to be started in seconds, is contained in body.dur value. (We set this in our Flutter app)
In this example, I stop any existing timer for a user device before starting a new timer for that device.
  @SubscribeMessage(TimerEvents.timerStart.toString())
  startMyTimer(@ConnectedSocket() client: any, @MessageBody() body: any): void {
    // Stop any existing timer for this user device.
    stopTimerForUserDevice(
      client.user.id,
      client.handshake.query.deviceId.toString(),
    );

    // Start a new timer for this user device.
    startTimerForUserDevice(
      this.server,
      client.user.id,
      client.handshake.query.deviceId.toString(),
      body.dur, // Timer duration
    );
  }
  @SubscribeMessage(TimerEvents.timerStop.toString())
  stopMyTimer(@ConnectedSocket() client: any): void {
    // Stop current timer for this user device.
    stopTimerForUserDevice(
      client.user.id,
      client.handshake.query.deviceId.toString(),
    );
  }
4. Create a socket adapter (authenticated-socket.adapter.ts)
When we use WebSockets, we want to only allow authenticated users to connect with our backend WebSocket service. For that, we have to have a custom socket adapter (although one is given to us by default). This will make sure each and every request to establish a WebSocket connection will be made by a user authenticated in your backend.
First, create a class named AuthenticatedSocketAdapter which extends the IoAdapter from @nestjs/platform-socket.io package as below.
export class AuthenticatedSocketAdapter extends IoAdapter {
   // constructor(){}

   // createIOServer(){}
}
Next, write the constructor for this class. Here, if you have an AuthService implemented using Firebase Auth or any other auth service of your choice, just uncomment the commented lines shown in the code snippet below.
This authentication can be done using Firebase Auth or any other auth service of your choice and it doesn’t matter, as long as it will throw an exception for an unauthorized user. If the user is authorized, the WebSocket connection is established and if not, it is terminated by throwing Authentication error error.
If you don't have such an implementation yet, don't worry just leave these as is - we can test the implementation without authentication also.
  // private readonly authService:AuthService;
  constructor(private app: INestApplicationContext) {
    super(app);
    // this.authService = this.app.get(AuthService);
  }
We'll cover authentication in another tutorial so that the WebSocket connections will only be available to authenticated users.
Next, create a method named createIOServer(). Inside it, we are writing a middleware to grab the auth token from the handshake of the WebSocket connection, and authenticate that token using an AuthService (AuthService file is not implemented in this tutorial - if you don't have one yourself, you can ignore it for now because we don't need authentication for testing).
If the token is valid, the AuthService should return the relevant user from the authenticateToken() method. This returned user value is assigned to the socket.user variable. It is because we do this, we are able to access the relevant user as client.user by using the @ConnectedSocket() decorator in the sockets.gateway.ts file.
If the token is invalid, it will throw an error and the WebSocket connection would not be established.
Here also, if you have an AuthService implemented using Firebase Auth or any other auth service of your choice, just uncomment the commented lines shown in the code snippet below.
Please note that I have imported the Server type from socket.io library to our application as,
import { Server } from 'socket.io';
This is how I have imported Server type in sockets.gateway.ts, rooms.ts, events.ts files as well.
  createIOServer(port: number, options?: any) {
    const server: Server = super.createIOServer(port, options);

    server.use(async (socket: any, next) => {
      const tokenPayload: string = socket.handshake?.auth?.token;

      if (!tokenPayload) {
        return next(new Error('Token not provided'));
      }

      const [method, token] = tokenPayload.split(' ');

      if (method !== 'Bearer') {
        return next(
          new Error('Invalid authentication method. Only Bearer is supported.'),
        );
      }

      try {
        socket.user = {};
        // const user = await this.authService.authenticateToken(token);
        // socket.user = user;
        return next();
      } catch (error: any) {
        return next(new Error('Authentication error'));
      }
    });
    return server;
  }
5. Enable WebSockets in main.ts
In order to use the AuthenticatedSocketAdapter, the custom WebSocket adapter that we created, we should add the following code to main.ts file as below.
  const app = await NestFactory.create(AppModule);
  app.useWebSocketAdapter(new AuthenticatedSocketAdapter(app)); // Add our custom socket adapter.
Don’t forget to set the SocketsGateway as a provider in the app.module.ts
@Module({
  imports: [],
  controllers: [AppController],
  providers: [AppService, SocketsGateway],
})
export class AppModule {}
6. Create rooms.ts helper file
The rooms.ts is there to keep track of the connected users. This is the place where I will write the application logic related to our server-side timer. The methods in this file would send messages to clients as required.
First, create a global variable userTimers, to keep track of the connected users and their timers. Here, the keys of the object are the userId + deviceId combinations. The values are the timers of each user.
var userTimers = {}; // To keep track of timers for each user.

Here is how the userTimers variable would look like.
{
   "user001device001":Timeout {/* data of timer1 */},
   "user002device002":Timeout {/* data of timer2 */},
   "user003device003":Timeout {/* data of timer3 */}
}
But for more scalable applications, an approach which uses Redis and microservices and thereby making our backend application stateless would be advisable - then unexpected shutdowns of the backend server would not cause loss of user timers. This is because we can use Redis as a high speed key-value store.
Next, create a method getUserDeviceRoom(){}, to keep track of a single device of a user, based on userId and the deviceId. It returns the roomName as a string for that user device.
export function getUserDeviceRoom(userId: string, deviceId: string) {
  return `user:${userId}-device:${deviceId}`;
}
This way, we can use this returned roomName to create a conceptual room for that user device.
In the handleConnection(){} method, the connected client device join to this room. Then we can send a message to this specific device of a user, by sending that message to that room.
In the handleDisconnect(){} method, the connected client device leave from this room. We can no longer send messages to that user device until it establishes a socket connection again.
Next, create the method sendToUserDevice(){} to send the actual message using WebSockets.
export function sendToUserDevice(
  server: Server,
  userId: string,
  deviceId: string,
  event: string,
  payload: any,
) {
  server.to(getUserDeviceRoom(userId, deviceId)).emit(event, payload); // Actually send the message to the user device via WebSocket channel.
}
Next, we have to implement the methods to start the timer and stop the timer. I am using the setInterval() method of JavaScript to create a counter, and that counter value is sent to the user device in each tick.
At the same time, when a timer is created, I add it to a variable timer and it is stored in the variable userTimers that I mentioned in the beginning.
export function startTimerForUserDevice(
  server: Server,
  userId: string,
  deviceId: string,
  dur: number,
) {
  var counter = dur; // Set initial counter value to timer duration `dur` (in seconds).

  var timer = setInterval(function () {
    console.log(`counting ${counter}`);

    sendToUserDevice(server, userId, deviceId, TimerEvents.tick.toString(), {
      timer: counter,
    }); // Send tick message to user device.

    if (counter > 0) {
      counter--;
    } else {
      // Stop timer for this user.
      console.log(`user ${userId} has a timeout`);
    }
  }, 1000);

  userTimers[userId + deviceId] = timer; // Store timer for this user device.
}
We store the timers in the userTimers variable because we need a reference to the timer of each user, to stop it later if the client requests (using the Flutter app) to stop the server-side timer for that device. The relevant code is shown below.
After clearing the interval for that timer, we also delete it from the userTimers object, to release the memory allocated for it.
export function stopTimerForUserDevice(userId: string, deviceId: string) {
  clearInterval(userTimers[userId + deviceId]); // Stop the timer for this user device.

  delete userTimers[userId + deviceId]; // Delete the timer for this user device from the `userTimers` object.
}
Don’t forget to import this file inside the sockets.gateway.ts file.
7. Create events.ts helper file
The events.ts file just contains an enum to easily keep track of the message events I mentioned earlier.
export enum TimerEvents {
  tick = 'tick',
  timerStart = 'timerStart',
  timerStop = 'timerStop',
}
The reason to use enums is because this way we can use the variable name of the enum instead of typing the exact event name as a string everywhere that we need it - this reduces errors due to typing mistakes.
Don’t forget to import this file inside the sockets.gateway.ts file.
Conclusion
We wrote code in the following files in our NestJS server application to enable WebSocket communication.
- sockets.gateway.ts
- authenticated-sockets.adapter.ts
- rooms.ts
- events.ts
- app.module.ts
- main.ts
Although it is recommended to restructure these files according to a proper standard in a production application, this would be more than enough for us for now.
When you are done with this section, please move onto the next section of this 3-part series to see how to setup the flutter front end to connect to this backend WebSocket implementation.
Support me!
Do you think I deserve a cup of coffee for this article? 😃

Video
Source code
You can find the full source code of the project at my GitHub, https://github.com/RukshanJS/websockets-nestjs-flutter
References
Official NestJS docs on sockets -https://docs.nestjs.com/websockets/gateways
Why Socket.IO is needed? - https://stackoverflow.com/a/32811489/8995555
Why two packages are needed for WebSocket implementation in NestJS? - https://stackoverflow.com/a/73339808/8995555


Top comments (6)
Thanks so much for this useful tutorial. I'm trying to implement this WITH that AuthService, but once I comment in the line:
private readonly authService: AuthService;...I'm not sure where
AuthServiceshould be imported from? Who/what provides this service?...or is
AuthServicejust a placeholder for whatever AuthService I intend to implement?Quite a few places in
sockets.gateway.tsrefer toclient.userwhich you say will be undefined if we dont use authentication, so I'm just wondering how to implement things if I didn't plan to use any authentication?Hi @markbloomfield, thanks for your feedback. The reason I didn't include this part in the original tutorial series was because I thought it would complicate things for a reader. But if you are interested in an authenticated flow, I can extend the tutorial series with a part 4.
For now, Yes, you have to implement
AuthServiceseparately and use it within theAuthenticatedSocketIoAdapterclass. To use it, you can use the variablethis.authService. In fact, theconst user = await this.authService.authenticateToken(token);line actually tries to authenticate the user using the token sent from frontend, and return the user object for that authenticated user.For example, if the
AuthServiceuses Firebase as the Auth provider, theAuthServiceclass would look something like,In the above code, the
authenticateWithFirebasemethod call is used within theAuthenticatedSocketIoAdapterclass.Here the injected,
FirebaseServiceclass contains just the firebase initialisation code.UserServiceclass contains the database-related methods (CRUD methods mainly) for user data.Please tell me if this is not clear and please also tell me if I should extend the series with a part 4 explaining the authentication.
Very kind of you to reply, thanks @rukshanjs 🙏 For my current needs, I don't actually need authentication at the socket level, so for now I just immediately
return next();and later when necessary, I'll send a token from my React FE (NextAuth) to validate the timers.My implementation is a little more complex than yours, but your tutorial has been invaluable, thank you.
Another question: Have you experimented with a way to show all active timers in a room?
Hi @iaremarkus I'm super glad my series has been helpful. Currently with my implementation, a single room is for a single user (one user can have several devices and all those devices are within that room). The identifiers for each timer contains the
userIdin it. So to get all the timers within a room, I think we can use theuserIdto find the timers that contain it in the identifier/key of each timer.In this series I'm tracking the timers (for each user device) as a single variable. But I have tried with implementing a Redis connection to keep this state on there so even if the server crashes the timers are still saved.
good tip, i'll give that a go.
thanks again for the great series 👌