
How it all comes together
I have written few blogs now. If you look at all my blogs, then there is one key blog missing that is important in many user experiences and that is adding Payments to your app.
I have written a blog about Geo Search
The other blog was about Push Notifications
And one blog was about adding AI to your app
The latest blog was about offline support with AWS Amplify Datastore
@gijsvdhoven
has written a blog about our base app with Authenication, navigation and error messages
This blog is about adding a payments to your app. With all these technical Guides to implement these features you have a pretty good starting point to build almost every app. The last step is all about your own mindset and finding the the right idea. There I have written this blog about:
https://dev.to/rpostulart/how-to-survive-and-innovate-as-a-developer-11g1
Adding payments to your React Native app
The payment landscape is scattered. There are many payments providers to handle your payments. I work for a large bank in the Netherland which has invented Tikkie. Tikkie is a common used word now. When someone gets money from you, you ask him/her to send you a Tikkie. You receive a link via Whatsapp and can pay in a second with Ideal. Ideal is the most used payment method in the Netherlands.
I want to make a use-full blog with payment methods which are used world-wide, so I can't demo Tikkie with Ideal because that's only available in the Netherlands. So I will use Stripe where you can select any payment method, but you can of course use any provider.
Stripe
Stripe is payment platform which offer different payment options for your app. Stripe has different options that work smoothly with your Web App, but for React Native there is not a real solution. There is one package used by the community, but this is not officially supported by Stripe: https://www.npmjs.com/package/tipsi-stripe
Checkout
Stripe Checkout (https://stripe.com/en-nl/payments/checkout) is a completely ready solution which is line with all the regulation requirements, but it is web based. With a few configuration settings it's possible to add a new payment method.
We will use Checkout in combination with React Native Webview. This is a web component loader for your native applications. We are making use of a secure connection from Stripe.
For this set up you need to have a Stripe account. In the stripe dashboard you can register a developer API key. Which we need later.

React Native
React Native is great because you can just code in javascript and compile to IOS and Android. So less costs and a faster development cycle.
Expo
Expo works out well because it is packaged with a lot features which you can use and you can develop for IOS and Android without installing any other tools or even without having a Mac. Expo is now also compiling to web, so you will have the one tool to build all your front ends.
AWS Amplify
AWS Amplify is the glue between these tools and the backend. Here you can also use Javascript for setting up your API's, storage, authentication and authorization, database, data store and more. we will use Amplify to connect to a Lambda function via Graphql.
Getting Started
Set up AWS Amplify
We first need to have the AWS Amplify CLI installed. The Amplify CLI is a command line tool that allows you to create & deploy various AWS services.
To install the CLI, we'll run the following command:
$ npm install -g @aws-amplify/cli
Next, we'll configure the CLI with a user from our AWS account:
$ amplify configure
For a video walkthrough of the process of configuring the CLI, click
Set up ReactJS
Stripe checkout is using a success and failure URL to redirect to. We are going to set up an amplify hosting project with Reactjs. This site has two URL's: yourURL.com/payment-success en yourURL.com/payment-failure.
The webview will listen to the state change and passing the URL to a function _onNavigationStateChange when the URL of the Webview is changed.
Based on the param we proceed (success) with the payment flow in the app or we stop (failure) the flow.
Run these commands on the root of your dir:
npx create-react-app paymentsite

cd paymentsite

npm install react-router-dom query-string @stripe/stripe-js
Add this code to your app.js and replace STRIPE_PUBLIC_KEY with your key from from Stripe:
import React from "react";
import "./App.css";
import { BrowserRouter as Router, Switch, Route } from "react-router-dom";
import queryString from "query-string";
import { loadStripe } from "@stripe/stripe-js";

const stripePromise = loadStripe("STRIPE_PUBLIC_KEY");

// Showing null, because we will show the result in the app and not on the web
function Success() {
  return null;
}

// Showing null, because we will show the result in the app and not on the web
function Failure() {
  return null;
}

// Showing null, because we will show the result in the app and not on the web
function PaymentInit() {
  return null;
}

function Init() {
  return (
    <div className="App">
      <p>Payment Site</p>
    </div>
  );
}

async function initStripe() {
  const parsed = queryString.parse(window.location.search);
  const sessionId = parsed.session;

  const stripe = await stripePromise;
  await stripe.redirectToCheckout({
    sessionId
  });
}

function Payment() {
  initStripe();
  return null;
}

function App() {
  return (
    <Router>
      <Switch>
        <Route exact path="/">
          <Init />
        </Route>
        <Route path="/payment">
          <Payment />
        </Route>
        <Route path="/payment-init">
          <PaymentInit />
        </Route>
        <Route path="/payment-failure">
          <Failure />
        </Route>
        <Route path="/payment-success">
          <Success />
        </Route>
      </Switch>
    </Router>
  );
}

export default App;
You can test your site locally with:
yarn start
These two URL's should work: /payment-failure and /payment-success
Follow this instruction from @dabit3 This action will publish your local React Website and host it on AWS Amplify. You get an URL which you need to add later to the lambda function.
Instruction: Amplify Console Hosting - Manual Deploys from the Amplify CLI
Set up React Native
First, we'll create the React Native application we'll be working with.
Run these commands in the root dir (so not in your reactJS dir)
$ npx expo init payApp

> Choose a template: blank

$ cd payApp

$ npm install aws-amplify aws-amplify-react-native react-native-webview @react-native-community/netinfo
Init your Amplify Project
Now we can initialize a new Amplify project from within the root of our React Native application:
$ amplify init
Here we'll be guided through a series of steps:
- Enter a name for the project: payApp (or your preferred project name)
- Enter a name for the environment: dev (use this name, because we will reference to it)
- Choose your default editor: Visual Studio Code (or your text editor)
- Choose the type of app that you're building: javascript
- What javascript framework are you using: react-native
- Source Directory Path: /
- Distribution Directory Path: build
- Build Command: npm run-script build
- Start Command: npm run-script start
- Do you want to use an AWS profile? Y
- Please choose the profile you want to use: YOUR_USER_PROFILE
- Now, our Amplify project has been created & we can move on to the next steps.
Add Graphql to your project
Your React Native App is up and running and AWS Amplify is configured. Amplify comes with different services which you can use to enrich your app. We are focussing mostly on the API service. So let’s add an API.
Amplify add api
These steps will take place:
- Select Graphql
- Enter a name for the API: payAPI (your preferred API name)
- Select an authorisation type for the API: Amazon Cognito User Pool ( Because we are using this app with authenticated users only, but you can choose other options)
- Select at do you want to use the default authentication and security configuration: Default configuration
- How do you want users to be able to sign in? Username (with this also the AWS Amplify Auth module will be enabled)
- Do you want to configure advanced settings? No, I am done.
- Do you have an annotated GraphQL schema? n
- Do you want a guided schema creation?: n
- Provide a custom type name: user
Your API and your schema definition have been created now. You can find it in you project directory:
Amplify > backend > api > name of your api
Open the schema.graphql file and add this code.
I added a Product type because otherwise the schema is not deploying, but I want to show this example with Graphql instead of a plain API. In this guide we won't use the product, we show a static product, but you can use this type to add dynamic products to your app.
type Product @model {
  id: ID!
  date: String!
  name: String!
  description: String!
  price: Int!
}

type Mutation {
  createPayment(input: PaymentInput): PaymentResult
    @function(name: "makePayment-${env}")
}

input PaymentInput {
  amount: Float
  total: Int
  name: String
  email: String
}

type PaymentResult {
  statusCode: Int
  body: String
}
Add a Payment Function to your project
By adding a function we are going to create a Lambda Function.
Amplify add function
Follow these steps:
- Provide a friendly name for your resource to be used as a label for this category in the project: makePayment
- Provide the AWS Lambda function name:
- Choose the function runtime that you want to use: NodeJS
- Choose the function template that you want to use: Hello world function
- Do you want to access other resources created in this project from your Lambda function? N
- Do you want to invoke this function on a recurring schedule? N
- Do you want to edit the local lambda function now? N
Your Functions are created now and you can find it in your project directory:
Amplify > backend > function > name of your function
Go to the src directory of the makePayment function and open the index.js file and paste this code. Please walk through the code and add your YOUR SECRET API KEY and AMPLIFY-URL.
const stripe = require("stripe")("*****ADD YOUR SECRET API KEY*******");

exports.handler = async (event, context) => {
  try {
    const amount = event.arguments.input.amount;
    const name = event.arguments.input.name;
    const email = event.arguments.input.email;

    const customer = await createCustomer(name, email);

    const session = await createCheckOutSession(amount, customer.id);

    return session;
  } catch (error) {
    console.log("er is een fout opgetreden", error);
  }
};

async function createCustomer(name, email) {
  return new Promise(function(resolve, reject) {
    stripe.customers
      .create({
        email: email,
        name: name
      })
      .then(customer => {
        resolve(customer);
      })
      .catch(err => {
        // Error response
        reject(err);
      });
  });
}

async function createCheckOutSession(amount, customer) {
  //eslint-disable-line

  return new Promise(function(resolve, reject) {
    stripe.checkout.sessions
      .create({
        payment_method_types: ["card", "ideal"],
        customer: customer,
        line_items: [
          {
            name: "Buy your stuff here",
            amount: amount * 100,
            currency: "eur",
            quantity: 1
          }
        ],
        success_url: "AMPLIFY-URL/payment-success",
        cancel_url: "AMPLIFY-URL/payment-failure",
        locale: "nl"
      })
      .then(source => {
        // Success response
        const response = {
          statusCode: 200,
          body: JSON.stringify(source)
        };

        resolve(response);
      })
      .catch(err => {
        // Error response
        const response = {
          statusCode: 500,
          body: JSON.stringify(err.message)
        };

        reject(response);
      });
  });
}
Add stripe to your node_modules in your function/src directory:
npm install stripe --save
Your backend is set up and can be pushed to the cloud, please run:
amplify push
Follow these steps:
- Are you sure you want to continue? Y
- Do you want to generate code for your newly created GraphQL API? Y
- Choose the code generation language target? Javascript
- Enter the file name pattern of graphql queries, mutations and subscriptions ENTER
- Do you want to generate/update all possible GraphQL operations - queries, mutations and subscriptions Y
- Enter maximum statement depth [increase from default if your schema is deeply nested]? 2
Set up your React Native App
As you are used from me, I don't focus much on the UX of an application during my blogs. I just want you to show how the basic functionality is working.
Go to the app.js in the React Native directory and paste this code.
I have put everything in one file, but of course you can and should refactor this in smaller components.
Replace AMPLIFY-URL with the URL that your created when you deployed your React site to AWS Amplify.
import React from "react";
import {
StyleSheet,
Text,
View,
TextInput,
TouchableOpacity,
ActivityIndicator,
Dimensions
} from "react-native";
import { WebView } from "react-native-webview";
import Amplify, { API, graphqlOperation, Analytics } from "aws-amplify";
import * as mutations from "./src/graphql/mutations";
import { withAuthenticator } from "aws-amplify-react-native";
import config from "./aws-exports";
Amplify.configure(config);
Analytics.disable();
class App extends React.Component {
state = {
amount: 15,
quantity: "0",
screen: "product",
initUrl: "AMPLIFY-URL/",
url: "AMPLIFY-URL/payment-init",
loading: true
};
async createPaymentSession() {
// hardcode input values, make these dynamic with the values from the logged in user
const input = {
amount: this.state.amount * this.state.quantity,
name: "ramon",
email: "ramon@ramon.nl"
};
await API.graphql(
graphqlOperation(mutations.createPayment, { input: input })
)
.then(result => {
const sessionID = JSON.parse(result.data.createPayment.body);
this.setState({
url: this.state.initUrl + "payment?session=" + sessionID.id,
loading: false
});
})
.catch(err => console.log(err));
}
handleOrder() {
this.setState({ screen: "payment" });
}
_onNavigationStateChange(webViewState) {
if (webViewState.url === this.state.initUrl + "payment-init") {
this.createPaymentSession();
}
if (webViewState.url === this.state.initUrl + "payment-success/") {
this.setState({ screen: "success" });
}
if (webViewState.url === this.state.initUrl + "payment-failure/") {
this.setState({ screen: "failure" });
}
}
startPayment() {
const loader = this.state.loading;
let url = this.state.url;
if (url === "") {
url = this.state.initUrl;
}
return (
<View style={{ flex: 1, marginTop: 50 }}>
<View style={{ flex: 2 }}>
{loader && (
<View style={[styles.loader, styles.horizontal]}>
<ActivityIndicator
animating={true}
size="large"
color="#de62bf"
/>
</View>
)}
<View
style={{
position: "absolute",
backgroundColor: "#fff",
height: 70,
width: Dimensions.get("window").width,
zIndex: 200
}}
/>
<WebView
mixedContentMode="never"
source={{
uri: url
}}
onNavigationStateChange={this._onNavigationStateChange.bind(this)}
/>
</View>
</View>
);
}
showProduct() {
return (
<View style={styles.container}>
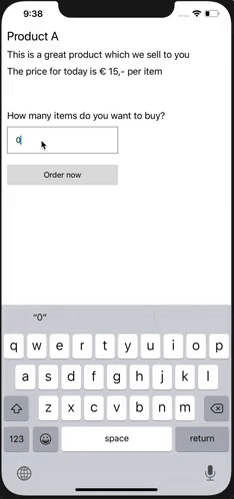
<Text style={styles.product}>Product A</Text>
<Text style={styles.text}>
This is a great product which we sell to you
</Text>
<Text style={styles.text}>
The price for today is € {this.state.amount},- per item
</Text>
<Text style={styles.quantity}>How many items do you want to buy?</Text>
<View style={{ flex: 1 }}>
<TextInput
style={styles.textInput}
onChangeText={text => this.setState({ quantity: text })}
value={this.state.quantity}
/>
<TouchableOpacity
style={styles.button}
onPress={() => this.handleOrder()}
>
<Text>Order now</Text>
</TouchableOpacity>
</View>
</View>
);
}
render() {
switch (this.state.screen) {
case "product":
return this.showProduct();
case "payment":
return this.startPayment();
case "success":
return (
<View style={styles.container}>
<Text style={{ fontSize: 25 }}>Payments Succeeded :)</Text>
</View>
);
case "failure":
return (
<View style={styles.container}>
<Text style={{ fontSize: 25 }}>Payments failed :(</Text>
</View>
);
default:
break;
}
}
}
export default withAuthenticator(App);
const styles = StyleSheet.create({
button: {
alignItems: "center",
marginTop: 20,
backgroundColor: "#DDDDDD",
padding: 10
},
textInput: {
width: 200,
borderColor: "gray",
borderWidth: 1,
padding: 15
},
quantity: {
marginTop: 50,
fontSize: 17,
marginBottom: 10
},
text: {
fontSize: 17,
marginBottom: 10
},
product: {
fontSize: 22,
marginBottom: 10
},
container: {
flex: 1,
backgroundColor: "#fff",
alignItems: "flex-start",
justifyContent: "flex-start",
marginTop: 50,
margin: 10
},
loader: {
flex: 1,
justifyContent: "center"
},
horizontal: {
flexDirection: "row",
justifyContent: "space-around",
padding: 10
}
});
Conclusion
I have shown you how with tools like React Native (Expo), Stripe and AWS Amplify you can set up Payments in your user experience. With Stripe Checkout it is now easily to add more payment methods like Apple, Google Pay and other methods without much effort in changing your app.
I hope this was useful to you and I am looking forward for your feedback.

Do you want to be updated about new blogs?
Follow me on twitter: https://twitter.com/ramonpostulart


Top comments (5)
Great job! I was able to get everything outlined here working locally, but I am facing an issue when using the amplify hosting.
I am receiving a 403 error when redirecting to /payment-init. It will create the payment intent and the user, but will not get to the credit card screen. I am able to switch out the dev URL with local and can get through the whole thing to payment success in both the app and backend of Stripe. Not sure what the issue is yet in regards to authorization with the Amplify hosted site. If you have any idea let me know. Hopefully I get this figured out tomorrow.
Thanks again.
They init page is launching a lambda funtion, have you set that up with the right access?
Thank you for your response! Yes, that makes sense. I am just getting back to this project right now. The lambda function works with my local env, but not with the hosted site. If you have an example of how to set that up, please let me know. I will see if I can get that set up in the meantime and report back here.
Great post! However, no-code payment platforms are getting BIG now. WhenThen is one platform that let's you automate the entire process with their no-code automations and recipes. Check it out: whenthen.com/
Great article. I have some doubts about allowing updates to the payment table from the react app. A malicious user may use that endpoint to update payments records in your db.
I think the payment table should be updated in the backend based on events received by stripe via the webhook.
I might be entirely wrong, but that's my current understanding.