This is a part in a series on AWS serverless architecture. The original blog post series can be found both here and on my blog J-bytes.
CloudFronts and Firewalls
Why Cloudfront for an API?
I'm gonna be honest: When my boss told me to put the API on CloudFront, I thought he might have been joking. Why would you need to put an API on a distribution network? Setting it up was the hardest part of this project (no, seriously), and working with the quirks of CloudFront was a pain.
Then it became super obvious why we did it once it started working.
Do you remember at the beginning when I said that we were assuming the site you were using this with was a collection of static pages (although it doesn't have to be)? Well, if you put your API on CloudFront and your site in S3, they are all under the same SSL and distribution settings. This means no separate configurations for anything, you can ensure all requests are automatically HTTPS, etc., and the configurations are all in one convenient panel. Also, thanks to WAF, your site and your API are protected in the exact same way. You can never launch the site but forget to make the API available and cause user confusion.
We'll be making (as usual) two API CloudFront distributions - one for each of our stages.
Note: As of the time of this publication, it has been my experience and the experience of several others that cloudfront will randomly drop API requests for no reason. This behavior is intermittent but definitely present (source).
S3 Static Sites
First, however, we need to make an S3 distribution. This is because the first origin that we create in our distribution must have a Path Pattern of Default (*) and catches all routes, and we don't want our API to do that. We want our /api requests to go to our API and the rest to go to our S3. Basically, this is just a placeholder so we'll just rig something up lightning quick.
Go make a new bucket in S3 called "whatever unique name you want here-site." We will now call this our site bucket. Edit the properties of this bucket, and set Static Website Hosting to Enable website hosting, then set the Index Document to index.html. Leave Error Document blank. (source)
Upload a single file into it called index.html with some text of your choosing (I always choose the word delicious for really circuitous reasons based on a Japanese word for a bad situation). Make sure to set the permissions on this file to Everyone - Open/Download. If correctly done, you should be able to open just the file and see everything inside it easily. Let's put that on a distribution really fast, and then get to the good part. Read the following very carefully, because redeploys can take a long time so troubleshooting becomes very costly in terms of time.
- Go to the CloudFront panel
- Click Create Distribution
- Under Web, click Get Started
- In Origin Domain Name, type the site bucket name configured as follows:
<bucket-name>.s3-website-<aws-region>.amazonaws.com.(source) - Leave Origin Path blank, Origin ID as is, and Origin Custom Headers blank.
- For the Viewer Protocol Policy, change it to "Redirect HTTP to HTTPS"
- For everything else in Default Cache Behavior Settings, you can leave it as-is. If you need to confirm a lot of rapid site changes in real time on your staging environment, set your Object Caching to Customize and all your TTL to 0. For your Distribution Settings, configure your Price Class to your region. For example, I'm in Japan so we use "Only US, Canada, Europe, and Asia." You probably don't actually have to do this, but it's a great habit to get into. We haven't made a WAF yet (we'll talk about that briefly later), so just leave that blank.
- Ignore everything else and scroll down to Enable IPv6. Turn that off unless you know you need it. For example, if this is the backend for an iPhone App, their testing standards require ipv6 connectivity (source).
- Under comment, write STAGING.
- Create Distribution.
- Make sure that your Origin Protocol Policy says "HTTP Only" under the Origins tab. I do not know why, but one of my stages defaulted to HTTPS and it broke my distribution later on. If your screen does not look like this:
 click on the edit button and simply click Yes, Edit to save your changes. This should hopefully force it back to HTTP only, as it did for me.
Putting the API behind CloudFront
- Click on the distribution you we just made, then click the Origins tab and click Create Origin.
- In Origin Domain Name, type the base URL for your API. For example, if you go to the API panel and click on Stages, then staging you should see an invoke URL like
https://<letters>.execute-api.us-west-1.amazonaws.com/staging. Copy the URL, without the /staging, and paste it in the Origin Domain Name boxhttps://<letters>.execute-api.us-west-1.amazonaws.com - In Origin Path, write the stage name
/staging. This is why we didn't write staging above - we automatically append/stagingto all api requests that come to this domain. - Leave Origin ID and Origin SSL Protocols as-is
- Change Origin Protocol Policy to HTTPS Only. The API Gateway will only accept HTTPS.
- HTTPS Port is 443 (as-is)
- Origin Custom Headers is as-is
- Click Create
- Click the Behaviors tab.
- Create Behavior.
-
Path Pattern:
/api*. This will match anything that looks likehttps://<url.top>/api/endpoint. This is also the reason that our API Gateway is set up so all the requests are under a /api resource, because CloudFront will automatically append the path pattern as-is when it send it to the API Gateway. So, as a quick explanation, if we set the CloudFront path pattern to/api*but our gateway was just /email and then tried site.com/api/email, it would never work because CloudFront forwards the /api/email as is to our API Gateway. - Change Origin to the one we just made: Custom-letters.execute-api-stuff
- Viewer Protocol Policy is redirect HTTP to HTTPS, because the Gateway demands it.
- Allowed HTTP Methods are GET, HEAD, OPTIONS, PUT, POST, PATCH, DELETE because we need to post info to the gateway.
- Forward Headers are set to Whitelist, then type "Origin" in the box and "Add >>" it to the whitelist. This is required by gateway.
- For our Object Caching, set it to customize, and then all TTL must be set to 0. You do not want any caching on the API. This will make requests just plain not work if you try to add GET api methods later.
- Forward Cookies -> All
- Query String Forwarding and Caching -> Forward All, Cached Based on All
- Everything else is no. Create.
Now if you go back to your Cloudfront Overview Page, you should see something like this on status:
 That can, and almost certainly will, take at least 20 minutes to update. While that's working, go ahead and follow all the steps above again, except this time create a production distribution (or don't, I'm not your boss) :). If you do, feel free to point the S3 part at the same bucket because it's just a demo. While we're still waiting (seriously, it takes a while) I'll explain WAF.
WAF: Wireless Application Firewall
You would use a WAF in your actual setup to protect your site. For example, you would configure your WAF for staging so that only your IP Address (and the IP address of your client, if they have to approve site changes before pushing to production) would have access. You can add your production site to that same WAF (for example, before release or during maintenance) and then simply remove it from the WAF when you are ready to launch / finished maintenance.
Go to WAF & Shield in your console.
Click on Go to AWS AWF, then click Configure web ACL. Read the Concepts Overview if you want, then click Next.You probably don't actually have to make a WAF, so unless you have a static IP address or just want to test it, feel free to simply follow along for the learning experience and then delete the result.
- The ACL name should be something unique like " Firewall"
- Region is global (Cloudfront)
- Associated Resource is Production (for now).
- Click Next
- Click "IP match condition"
- Name is Allow Example IP ( for example)
- IP version is V4
- Address is whatever Google tells you your IP is, followed by a /32(example: 127.0.0.1/32). If you own a range, add it with /24 (see the advice on the page). Feel free to add as many IP addresses as you want to allow. Note that unless you purchase a fixed IP address from your ISP, you cannot count on this number not changing.
- Click the Add IP address or range button. If you don't, you'll create an empty condition that will do nothing at all.
- Click Create.
- Click Next.
- On the Create rules page, click Create rule
-
Name: Allow Example IP (or really, whatever you want).
Under conditions, it should read: When a request 'does originate from an ip address in Allow Example IP'
 Note: If you need to add multiple IPs, do not click "Add condition" and add an IP on this screen. If you do, it will make the condition "All requests coming from IP set 1 and IP set 2 at the same time", which is impossible and invalidates this rule completely. If you created multiple IP conditions in the last page (for example, a set of IP addresses to represent your company and another set to represent your client), you need to create a separate rule for each set.
 - Click create.
- Change the Default Action to "Block all request that don't match any rules."
The page should look like this:
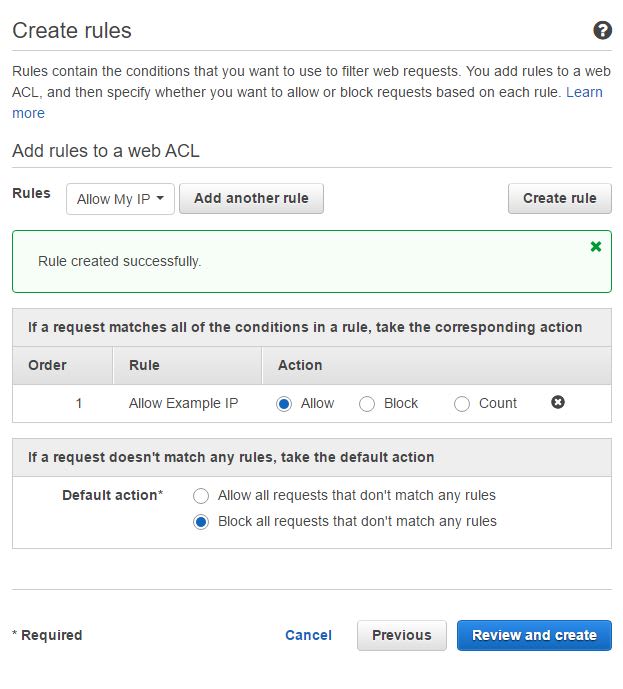 This tells us that our allowed IPs have been set to allow, and if it isn't on our IP list, block it.
 - Click Review and create
- Confirm that your production Cloudfront is attached at the bottom.
- Click Confirm and Create If you want to add your staging distribution to the WAF, it's as easy as clicking Add association on the right-hand side of the screen and selecting your staging distribution. Continue to wait as your Cloudfront Distributions update. Watch Youtube, play a game, etc. When the status is no longer in progress, proceed to testing.
Testing the Cloudfront Distribution and Firewall
Here comes the coolness. Go to your Cloudfront page. You should see both distributions there. Copy and paste the url in the Domain Name section into your browser, and hit enter. Assuming that you configured everything correctly and are coming from the correct IP if you are behind a WAF, you should be seeing the contents of your index.html page. If you try to go to that same domain though a different IP (smartphone on mobile data), you should see a forbidden page. Success!
Try sending some requests in postman to each API (staging and production) with domain-name/api/emails (or twitter) and see what happens. Remember to leave out /staging and /production, as they are included in the origin. You should have the same results as before, and database records should be correctly updated.
That's it for the web site! That was a crazy ride. Next, we'll see what happens when we need to get that data from Dynamodb into our local environment and save emails for clients / send tweets!


Oldest comments (2)
You have made a little mistake in the article. It is not called "Wireless Application Firewall" but "Web Application Firewall". :)
I think there was a problem with Dev.to's notification system. I kept seeing notifications for my articles, but couldn't actually read their contents. I am sorry for the delay in responding.
Thank you for the insight! So much of this article now uses outdated interfaces (unfortunately), but I do appreciate the attention to detail!