In this tutorial, we'll create a Discord bot that adds captions to images, allowing server members to create memes. Users will call the bot using a command and supply it with an image file and a caption. The bot will reply with a new image file that includes the caption.
By the end of this tutorial, you will:
- Use discord.py to create a bot that can be added to any Discord server.
- Understand the basics of image processing and dealing with files in memory using Python.
- Know how to host Discord bots on Replit!
Getting started
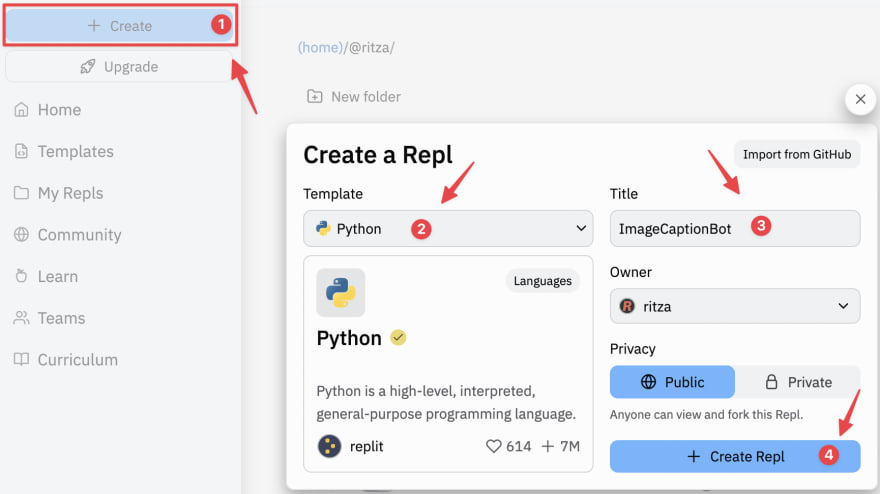
Sign in to Replit or create an account if you haven't already. Once logged in, create a Python repl.
Creating a Discord application
Open another browser tab and visit the Discord Developer Portal. Log in with your Discord account, or create one if you haven't already. Keep your repl open – we'll return to it soon.
Once you're logged in, create a new application. Give it a name, like "ImageCaptioner".

Discord applications can interact with Discord in several different ways, not all of which require bots, so creating one is optional. That said, we'll need one for this project. Let's create a bot.
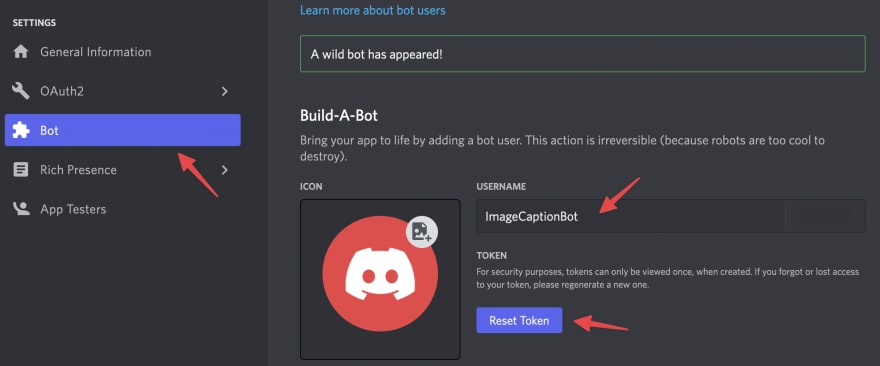
- Click on Bot in the menu on the left-hand side of the page.
- Click Add Bot.
- Give your bot a username (such as "ImageCaptionBot").
- Click Reset Token and then Yes, do it!.
- Copy the token that appears just under your bot's username.
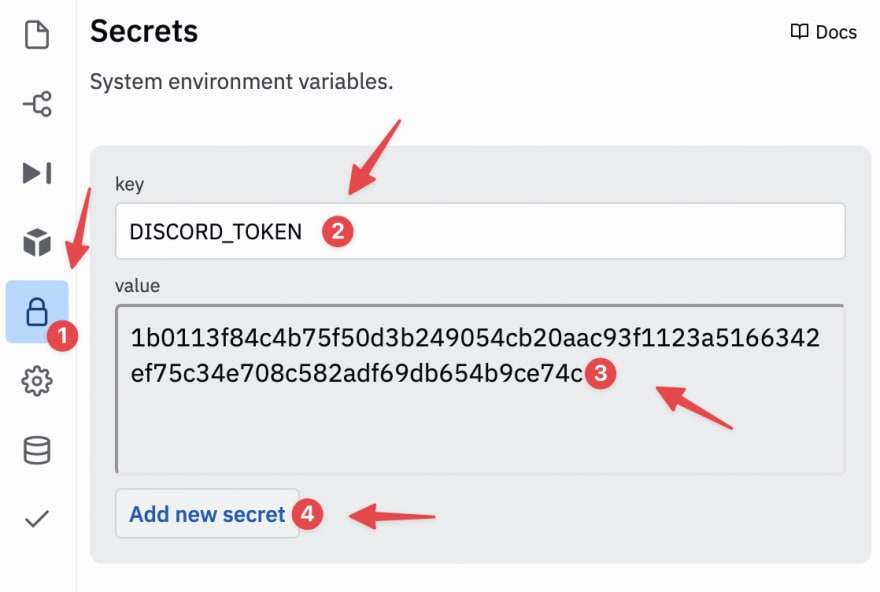
The token you just copied is required for the code in our repl to interface with Discord's API. Return to your repl and open the Secrets tab in the left sidebar. Create a new secret with DISCORD_TOKEN as its key and the token you copied as its value.
Once, you've done that, return to the Discord developer panel. We need to finish setting up our bot.
First, disable the Public Bot option – the functionality we're building for this bot will be highly specific to our server, so we don't want anyone else to try to add it to their server. What's more, bots on 100 or more servers have to go through a special verification and approval process, and we don't want to worry about that.

Second, we need to configure access to privileged Gateway Intents. Depending on a bot's functionality, it will require access to different events and sources of data. Events involving users' actions and the content of their messages are considered more sensitive and need to be explicitly enabled.
For this bot to work, we'll need the "Message Content Intent", which will allow our bot to see the content of users' messages. Toggle it to the on position and save changes when prompted.

Now that we've created our application and its bot, we need to add it to a server. We'll walk you through creating a test server for this tutorial, but you can also use any server you've created in the past, as long as the other members won't get too annoyed about it becoming a bot testing ground. You can't use a server that you're just a normal user on, as adding bots requires special privileges.
Open Discord.com in your browser. You should already be logged in. Then click on the + icon in the leftmost panel to create a new server. Alternatively, open an existing server you own.
In a separate tab, return to the Discord Developer Portal and open your application. Then follow these steps to add your bot to your server:
- Click on OAuth2 in the left sidebar.
- In the menu that appears under OAuth2, select URL Generator.
- Under Scopes, mark the checkbox labelled bot.
Under Bot Permissions, mark the checkboxes labelled Read Messages/View Channels, Send Messages, and Attach Files.

Scroll down and copy the URL under Generated URL.
Paste the URL in your browser's navigation bar and hit Enter.
On the page that appears, select your server from the drop-down box and click Continue.
When prompted about permissions, click Authorize, and complete the CAPTCHA.

Return to your Discord server. You should see that your bot has just joined.
Now that we've done the preparatory work, it's time to write some code. Return to your repl for the next section.
Writing the Discord bot code
We'll be using Discord.py to interface with Discord's API using Python. Add the following code scaffold to main.py in your repl:
import os, discord
from discord.ext import commands

DISCORD_TOKEN = os.getenv("DISCORD_TOKEN")

bot = commands.Bot(command_prefix="!")

@bot.event
async def on_ready():
    print(f"{bot.user} has connected to Discord!")

bot.run(DISCORD_TOKEN)
First, we import some Python libraries we'll need, including Discord.py and its commands extension. We then retrieve the value of the DISCORD_TOKEN environment variable, which we set in our repl's secrets tab above. Following that, we instantiate a Bot object. We'll use this object to listen for Discord events and respond to them. For the most part, we'll be responding to commands - messages from users which start with ! (the command_prefix we specified when creating our Bot object).
However, the first event we're interested in is not a command. The on_ready() event will trigger when our bot logs on to Discord (the @bot.event decorator ensures this). All this event will do is print a message to our repl's console, telling us that the bot has connected.
Note that we've prepended async to the function definition – this makes our on_ready() function into a coroutine. Coroutines are largely similar to functions, but may not execute immediately, and must be invoked with the await keyword. Using coroutines makes our program asynchronous, which means it can continue executing code while waiting for the results of a long-running function, usually one that depends on input or output. If you've used JavaScript before, you'll recognize this style of programming.
The final line in our file starts the bot, providing DISCORD_TOKEN to authenticate it. Run your repl now to see it in action. Once it's started, return to your Discord server. You should see that your bot user is now online.

Receiving user input
The Discord.py commands extension allows us to define command handlers using the @bot.command decorator. Without this, we'd have to manually parse the content of all user messages to determine whether a command had been issued, as was necessary for our role assignment bot tutorial. Let's define our main command now, !caption. Enter the following code below the definition of on_ready():
@bot.command(name="caption", brief="Add a caption to an image.", help="""Add a caption to an attached image. Example:

!caption "Hello world!" <attached image>

Supported image types: PNG, JPEG, WebP
             """)
async def caption(ctx, caption_text):
    pass
The @bot.command decorator will ensure that our function is invoked when a user types a message starting with !caption. We also use it to define some help text – the commands extension provides a default !help command, and each command we define can have two types of explanatory text:
-
brief: A short description of the command that will show alongside other defined commands when the user types!help. -
help: A longer description of the command that will show when the user types!help name_of_command.
Our caption function takes two parameters:
-
ctx: This is the invocation context, a special object containing information such as the user who called the command, the server it was called in, and the files attached to the calling message, if any. All commands must take this parameter. -
caption_text: This will be a string containing the caption the user wants to add to their image.
We'll start the body of the function with some user-friendly error handling. Replace pass with the function body shown below:
async def caption(ctx, caption_text):
    # Must have caption text
    if not caption_text:
        await ctx.message.reply("Please include some caption text after the `!caption` command. For example `!caption \"Hello world!\"")
        return
If the user forgets to include a caption in their command, they'll receive a reply informing them of this omission.
Next, we'll make sure they've attached a file to their command message with the following code:
    # Must have a file attached
    if ctx.message.attachments:
        image_url = ctx.message.attachments[0].url
    else:
        await ctx.message.reply("Please attach an image for me to caption.")
        return
If no file is attached, ctx.message.attachments will be an empty list and we'll send an error message to the user and abort the function. Otherwise, we'll store the URL of the first file attached to the message in image_url and continue execution. It's possible to attach multiple files to a single Discord message, but for this bot, we're going to ignore all but the first one.
Next, we need to check whether the attached file is an image. We'll do this by determining the file's MIME type using Python's built-in mimetypes library. Add the following line to the top of your main.py file:
import mimetypes
We now need to specify which MIME types we'll support. According to our help text, images for captioning should be PNGs, JPEGs, or WebPs. These are the most common non-animating image types on the web, so we shouldn't need to support any more for the moment. Add the following code below the definition of DISCORD_TOKEN:
SUPPORTED_MIMETYPES = ["image/jpeg", "image/png", "image/webp"]
Return to the caption() function. Add the following code below the block of code that checks whether a file is attached to the user's message:
    # File must be an image
    if mimetypes.guess_type(image_url)[0] not in SUPPORTED_MIMETYPES:
        await ctx.message.reply("Sorry, the file you attached is not a supported image format. Please upload a PNG, JPEG or WebP image.")
        return
The mimetypes.guess_type function will determine what kind of file we're dealing with from its URL. If we don't find its filetype in our list of supported types, we'll send an error message to the user and cease execution.
Now that we've dealt with the most likely error cases, it's time to handle a correctly formatted !caption command. First, we need to fetch the image file – we have a URL for it, so we can use Python's requests library for this. Add the following line to the top of your main.py file:
import requests
Then return to the bottom of the caption function and add the following code:
    # Fetch image file
    response = requests.get(image_url)

    # Store image file name
    image_filename = ctx.message.attachments[0].filename
We use a GET request to retrieve the user's image and store its filename in another variable.
It would be convenient if we could deal with this image completely in memory, without saving it to a file. We can do this by treating the image as a binary stream, provided by Python's built-in io library. Add the following line to the top of main.py:
from io import BytesIO
Return to the bottom of the caption function and add the following:
    # Caption image
    final_image = caption_image(BytesIO(response.content), caption_text)
BytesIO will convert the image from HTTP response content into a binary stream, which is similar to the file object returned by open(). This allows us to work with the image as though it were a file without ever saving it to disk.
We'll write the caption_image() function in the next section. It takes an image and a caption and returns an image with the caption applied. Once we've got that implemented, we'll return to this function and send the finished image back to the user.
Captioning images
The code we're going to write in this section is quite different from the Discord API code above, so we'll put it in a separate file. That way, we can easily reuse it for other applications – for example, we might also want to write a Telegram bot, a command-line application, or even a small website that adds captions to images. By separating our code, we can implement any of these later on without having to change or even think about the image captioning logic.
Create a new file named caption.py and populate it with the code below:
from PIL import Image, ImageDraw, ImageFont
from io import BytesIO

def caption_image(image_file, caption, font="impact.ttf"):
    img = Image.open(image_file)
We're using the Pillow library for image processing. This library is imported as PIL because it's a fork of an earlier, discontinued project of that name. This library has a wealth of image manipulation features, one of which is adding text to images.
To install Pillow, open pyproject.toml and add it to [tool.poetry.dependencies] as shown below:
[tool.poetry.dependencies]
python = ">=3.8.0,<3.9"
numpy = "^1.22.2"
replit = "^3.2.4"
discord = "^1.7.3"
pillow = "^9.1.1" # <-- new line
Stop and run your repl to update its dependencies and install the new package. Normally we would let Replit do this for us, but later in this section, we're going to test caption.py without linking it to the Discord code in main.py, so Replit won't have a chance to detect and install our new package on its own.
Return to caption.py. Below our imports, we define the caption_image() function used in main.py. In addition to the image file and caption parameters, we'll add the ability to optionally specify a font, defaulting to Impact, a popular font for making memes. Download the font file now and upload it to your repl.

We start the caption_image() function by creating an Image object from the file provided as an argument. Next, we'll need to convert our Image into an ImageDraw so that we can add text to it. We'll do that with the following line of code, inserted below the definition of img:
draw = ImageDraw.Draw(img)
Next, we need to load our font:
    font_size = int(img.width/16)
    font = ImageFont.truetype("impact.ttf", font_size)
We use ImageFont.truetype() to load a TrueType font from a file. We specify the font size in the second argument. Users will be able to upload different-sized images, so rather than hardcoding a specific font size, we've expressed the size in terms of the image's width, allowing it to scale appropriately. Feel free to experiment with this value.
Now that we've got our image and font, we can start drawing. Extend your function as follows:
    caption_w, caption_h = draw.textsize(caption, font=font)

    draw.text(((img.width-caption_w)/2, (img.height-caption_h)/8), # position
              caption, # text
              (255,255,255), # color
              font=font, # font
              stroke_width=2, # text outline width
              stroke_fill=(0,0,0)) # text outline color
The ImageDraw.textsize() method returns the height and width of a given string in a given font. We need this information to place our caption in the upper center of the image.
The ImageDraw.text() method actually draws our text. We provide it with our text and the necessary positioning and coloring information. To avoid situations where text blends in with the background, we make our text white with a black outline. Again, feel free to experiment with different colors, outlines and positions.
Our work here is done, and all that remains is to return the image. But before we do that, let's test this code out on its own. Add the following line to the bottom of your function to save the image to a file:
img.save("output.png")
Find an image you'd like to add a caption to. If you don't have one on hand, use this picture of a robot. Upload your chosen image to your repl.
At the bottom of caption.py, outside of the definition of caption_image(), add the following line:
caption_image("replbot.png", "Hello world!")
Change the image file to your file's name and the caption to whatever you want. Then, in your repl's shell, type python caption.py and press Enter. A file named output.png should appear in your repl's file pane. Click on it to see the results of the code we've just written. Our version looks like this:

Returning captioned images
Now we'll tie everything together. Once you're happy with the text size and colors of your captions, delete the caption_image() function invocation from the bottom of caption.py and replace the line that reads img.save("output.png") with the following:
    with BytesIO() as img_bytes:
        img.save(img_bytes, format=img.format)
        content = img_bytes.getvalue()

    return content
Instead of saving our image to a file, we save it to a binary stream object, much like we did when fetching the original image from Discord. We keep the image format the same as the original using Pillow's Image.format attribute. We then convert our BytesIO stream into a bytes object with .getvalue() and return it to the caller.
Open main.py and import caption_image() from caption.py with the following line near the top of the file, below your other imports:
from caption import caption_image
Return to the bottom of the caption() function definition. Add the following code below the definition of final_image:
    # Send reply
    await ctx.message.reply(file=discord.File(BytesIO(final_image), filename=f"captioned-{image_filename}"))
This code will reply to the user with a message containing the image we created above.
Stop and run your repl, and then switch to your Discord server. Enter a message such as !caption "Hello world!" and attach an image to it. You should receive a reply something like this:

Text wrapping
Our bot works reasonably well for short captions, but anything longer than about five words goes off the edges of the image.

We can fix this by splitting caption text into multiple lines. We'll use Python's textwrap library to do this. Open caption.py and add the following line to the top of the file:
import textwrap
Then add the new line shown below to the caption_image() function.
    font_size = int(img.width/16)
    font = ImageFont.truetype("impact.ttf", font_size)

    # NEW LINE BELOW
    caption = textwrap.fill(text=caption, width=img.width/(font_size/2))
    # NEW LINE ABOVE

    caption_w, caption_h = draw.textsize(caption, font=font)

    draw.text(((img.width-caption_w)/2, (img.height-caption_h)/8), # position
              caption, # text
              (255,255,255), # color
              font=font, # font
              stroke_width=2, # text outline width
              stroke_fill=(0,0,0)) # text outline color
Here, textwrap.fill() will return a new version of our caption string with newline characters (\n) inserted in appropriate places to ensure that each line of the text contains no more than width characters. It will do this without splitting words over multiple lines.
We use the following calculation to get width:
img.width / (font_size / 2)
This is the width of the image divided by half the font size. Most of the characters in the Impact font are taller than they are wide, so dividing the font size by two gives us reasonably good results for most text. It should also work for other fonts that aren't extremely wide. Try experimenting with different maximum line lengths.

Rerun your repl now and return to Discord to try out some different long captions.
Where next?
Our image captioning bot is functional but quite rudimentary. If you'd like to continue working on it, here are some ideas you might want to try:
- More font and text color options. You could implement these as additional bot commands.
- The ability to add two captions to an image, on both the top and bottom.
- A different interface for your image captioning code, such as a Telegram bot or a simple website.
- Pillow provides a number of filters that you could apply to images in addition to captioning them.
- If you would like to make the text wrapping more robust for different fonts, you could try rewriting that part of
caption.py. You might find this gist and this article helpful.
Discord bot code can be hosted on Replit permanently, but you'll need to use an Always-on repl to keep it running 24/7.
You can find our repl below:


Top comments (0)