In this tutorial, we'll create a text-based RPG that users of a Discord server can play by entering special commands. Users will be able to create characters, fight enemies, and earn experience and gold, which they can use to develop their skills and buy powerful items.
By the end of this tutorial, you will have:
- Used discord.py to create an RPG that can be added to any Discord server, and which can be expanded as you see fit.
- Used Replit Database to store information about the game world through serialization.
- Created a custom Discord message embed.
- Hosted your own Discord bot on Replit!
Getting started
Sign in to Replit or create an account if you haven't already. Once logged in, create a Python repl.

Game design
Before we dive into writing code, it's worth taking a moment to think about how our game is going to work and what options we're going to give our players. Our game will be text-based and played on a Discord server. Players will take actions by issuing commands to a Discord bot, and the bot will respond with the results of those actions.
Players will start the game by creating a character, whom they can name. This character will have the following:
- Hitpoints to determine how much damage they can take.
- Attack and defense skills to determine how they fare in battle.
- A level and experience points.
- Mana for casting spells.
- An inventory for collecting items.
- Gold for purchasing items.
Characters will gain experience and gold for fighting and defeating enemies. They will be able to seek out enemies and battle them. In battle mode, they will be able to fight, use an item, or flee if it doesn't look like they're going to win. Battles will continue until one participant runs out of hitpoints, or until the player's character flees.
At the end of a successful battle, characters will gain experience points and gold, based on the strength of the defeated enemy. If a character is defeated in battle, they will die and the player will have to create a new character.
At certain thresholds of experience points, characters will level up. Every time a player levels up their character, they will be able to choose to increase the character's hitpoints, attack, defense, or mana.
While we've included gold, mana, and an inventory in our design, the implementation of these aspects will be left as an exercise for the reader. For this tutorial, we'll focus on implementing battling enemies and leveling up.
To facilitate the above, our game will need two modes:
- Adventure mode, in which players can hunt for enemies and level up.
- Battle mode, in which players can fight enemies.
We will also need a few commands for players to take game actions:
-
!create <name>: Create a new character with the name provided. -
!status: Display the character's current hitpoints, level, carried items, and other information. -
!die: Destroy the current character. -
!hunt: (In adventure mode) seek out an enemy to fight. -
!fight: (In battle mode) attack an enemy. -
!flee: (In battle mode) flee from a battle. -
!levelup <stat>: (In adventure mode) advance to the next level if enough XP is available, increasing the provided stat (hitpoints, attack, defense, mana).
Game classes
Before we start on the Discord code, let's create some classes to represent the characters, enemies, modes, and items in our game. In your repl, create a new file named game.py and add the following import code to it:
from replit import db
import enum, random, sys
from copy import deepcopy

We're pulling in the Python library for Replit Database, a persistent key-value store attached to every repl. If you haven't used this before, think of it as a Python dictionary with contents that persist between restarts of your repl. We'll be using it to store the state of our game and its characters as they fight enemies and level up.
Additionally, we're importing the Python built-in libraries enum, random, sys, and deepcopy() from copy. These will provide a number of helpful utilities we'll use while building our game.
First off, we'll use enum.IntEnum to enumerate our game modes. Add the following code below your imports:
# Game modes
class GameMode(enum.IntEnum):
    ADVENTURE = 1
    BATTLE = 2
Whenever we refer to a game mode in our code, we'll be able to write GameMode.ADVENTURE or GameMode.BATTLE, rather than the meaningless numbers 1 or 2, but our code and database will see these game modes as 1 and 2. This saves us from having to remember which game mode is which and will make our code clearer.
Next, we'll create classes for living creatures, such as players' characters and the enemies they fight. As these will all share several properties and behaviors, such as hitpoints and the ability to fight, we'll use inheritance to save ourselves some repetition. Our class hierarchy will look like this (but with a few more enemy types):
       ,-----.
       |Actor|
       |-----|
       `-----'
         / \
        /   \
,---------.  ,-----.
|Character|  |Enemy|
|---------|  |-----|
`---------'  `-----'
              /    \
      ,--------.   ,------.
      |GiantRat|   |Dragon|
      |--------|   |------|
      `--------'   `------'
Let's start by implementing our parent class, Actor. This class will define all of the attributes that characters and enemies have in common and implement a fight() method. Add the following code at the bottom of game.py:
# Living creatures
class Actor:

    def __init__(self, name, hp, max_hp, attack, defense, xp, gold):
        self.name = name
        self.hp = hp
        self.max_hp = max_hp
        self.attack = attack
        self.defense = defense
        self.xp = xp
        self.gold = gold

    def fight(self, other):
        defense = min(other.defense, 19) # cap defense value
        chance_to_hit = random.randint(0, 20-defense)
        if chance_to_hit:
            damage = self.attack
        else:
            damage = 0

        other.hp -= damage

        return (self.attack, other.hp <= 0) #(damage, fatal)
Our __init__() method defines several variables per our game design specification above. Note that we've defined both hp and max_hp: these should be the same value when we first create a character or enemy class, but will diverge for characters and enemies we read from the database. Once we get into the game logic, we will be recreating instances of these classes from the database constantly.
Also note that self.xp will represent something slightly different in characters and enemies: For characters, it will be the cumulative experience points earned, whereas for enemies it will be the amount of XP rewarded to characters when the enemy is defeated. A more complex design might instead enable enemies to gain experience points and level up like player characters.
The fight() method takes other, an instance of a class that inherits from Actor. The attack is simulated by first calculating the chance to hit based on the opponent's defense attribute. If chance_to_hit is 0, the attack will miss. The likelihood of a miss happening increases in probability as the defense value increases. For example, an attack will have a 95% chance of succeeding against an enemy with a defense of 1, but only a 50% chance of succeeding against an enemy with defense of 19. We use Python's built-in min() function to cap the value of defense at 19, to avoid creating a completely invulnerable character.
The damage done on a successful hit is determined by the Actor's attack attribute. The function returns a tuple of the amount of damage dealt by the attack and whether it was the fatal blow.
Our Actor class is complete for now. Let's create a Character class that inherits from it and will represent players. Add the following code to the bottom of the game.py file:
class Character(Actor):

    level_cap = 10

    def __init__(self, name, hp, max_hp, attack, defense, mana, level, xp, gold, inventory, mode, battling, user_id):
        super().__init__(name, hp, max_hp, attack, defense, xp, gold)
        self.mana = mana
        self.level = level

        self.inventory = inventory

        self.mode = mode
        self.battling = battling
        self.user_id = user_id
Our Character class has all the same attributes as Actor, plus some additional ones:
-
manarepresents the character's capacity for casting spells. -
levelis the character's level. This will start at 1 and increase with every 10 XP the player earns. -
inventoryis a list of items carried by the character. -
modeis the game mode we defined an enum for above. Two characters will be in different modes depending on their actions. -
battlingis a variable we'll use to store the enemy object that the character is currently fighting. This will beNoneoutside of battle mode. -
user_idis the Discord user ID of the user who created this character.
Also, note the class variable level_cap: this will be the highest possible value of level.
We'll come back to the Character class and use it to implement gameplay actions later, but first let's define the enemy classes, starting with Enemy.
class Enemy(Actor):

    def __init__(self, name, max_hp, attack, defense, xp, gold):
        super().__init__(name, max_hp, max_hp, attack, defense, xp, gold)
For now, this is a straightforward subclass of Actor that uses the same value for hp and max_hp but doesn't define anything extra. We'll specify the actual stats of individual enemy types in the Enemy subclasses, of which we'll define ten. Copy-paste the code below at the bottom of game.py to implement those classes:
class GiantRat(Enemy):
    min_level = 1
    def __init__(self):
        super().__init__("🐀 Giant Rat", 2, 1, 1, 1, 1) # HP, attack, defense, XP, gold

class GiantSpider(Enemy):
    min_level = 1
    def __init__(self):
        super().__init__("🕷️ Giant Spider", 3, 2, 1, 1, 2) # HP, attack, defense, XP, gold

class Bat(Enemy):
    min_level = 1
    def __init__(self):
        super().__init__("🦇 Bat", 4, 2, 1, 2, 1) # HP, attack, defense, XP, gold

class Crocodile(Enemy):
    min_level = 2
    def __init__(self):
        super().__init__("🐊 Crocodile", 5, 3, 1, 2, 2) # HP, attack, defense, XP, gold

class Wolf(Enemy):
    min_level = 2
    def __init__(self):
        super().__init__("🐺 Wolf", 6, 3, 2, 2, 2) # HP, attack, defense, XP, gold

class Poodle(Enemy):
    min_level = 3
    def __init__(self):
        super().__init__("🐩 Poodle", 7, 4, 1, 3, 3) # HP, attack, defense, XP, gold

class Snake(Enemy):
    min_level = 3
    def __init__(self):
        super().__init__("🐍 Snake", 8, 4, 2, 3, 3) # HP, attack, defense, XP, gold

class Lion(Enemy):
    min_level = 4
    def __init__(self):
        super().__init__("🦁 Lion", 9, 5, 1, 4, 4) # HP, attack, defense, XP, gold

class Dragon(Enemy):
    min_level = 5
    def __init__(self):
        super().__init__("🐉 Dragon", 10, 6, 2, 5, 5) # HP, attack, defense, XP, gold
In addition to providing names and hardcoded HP, attack, defense, XP, and gold values, we've implemented min_level as a class variable. This specifies the minimum level the player must be to face this enemy. By implementing this, we avoid having low-level players die instantly against too-powerful enemies and ensure that new enemies will show up as the player levels up, creating a sense of progression. Feel free to change any of these enemies, or add your own.
Saving and loading from the database
We've now defined our player and enemy classes, though they don't do much. But before we implement any actual gameplay, we need a way to ensure that our characters and enemies maintain their state from one moment to the next. Presently, any Actor instances we create will disappear as soon as our repl finishes running or is stopped. We need to use our repl's database to ensure that players can keep the characters they create and that changes such as losing and gaining HP and leveling up will persist.
The most important objects in our game are the instances of Character. These objects store character stats, inventory, and even game mode and the enemy currently being fought. So as long as we can save and load the state of individual characters from our database, our game world will feel permanent. For now, we don't need to worry about storing anything else.
Return to the definition of Character and add the following save_to_db() method below the __init__() method:
class Character(Actor):

    # ...

    def save_to_db(self):
        character_dict = deepcopy(vars(self))
        if self.battling != None:
            character_dict["battling"] = deepcopy(vars(self.battling))

        db["characters"][self.user_id] = character_dict
At the top of game.py, we imported db from the replit Python library – this object provides an interface to our repl's database. The db object is designed to be used like a dictionary, so we can create keys and values as we would with any other dictionary. Our database layout will look like this:
{
    "characters": {
        "123456789012345678": {
            "name": "Bob the Dwarf"
            "hp": 10,
            ...
        },
        "823486788042375673": {
            "name": "Eric the Human"
            "hp": 8,
            ...
        },
        ...
    }
}
The vars() function is a Python built-in that returns the value of __dict__ for any class, module, or instance we pass to it. For most instances, this will be a dictionary containing that instance's attributes. In the case of our Character object, the dictionary will contain all of the attributes we defined in __init__. We use deepcopy() to make a full copy of this dictionary.
Any attributes that contain strings, numbers, boolean values, or even lists or dictionaries can be easily and meaningfully stored in our repl's database. Attributes that reference instances of our custom classes cannot be usefully stored, as the referenced instance may not exist the next time the data is loaded. The deepcopy() operation alone does not solve this problem. Thus, we need to store the object referenced by battling as a dictionary of its attributes using vars(), just like we did for the Character instance.
However, we have a slight problem: While we can store the attributes of the enemy, this way we're not storing its class. There are a few ways we could resolve this issue – the easiest one is to store the instance's class name as an attribute. Go to your Enemy class's __init__() method and add the following line:
class Enemy(Actor):

    def __init__(self, name, max_hp, attack, defense, xp, gold):
        super().__init__(name, max_hp, max_hp, attack, defense, xp, gold)
        # NEW LINE BELOW
        self.enemy = self.__class__.__name__
This new line will store the name of the class as a string, which we can write to the database.
We've now written all the code we'll need to save player characters to the database. Now we need a way to load them back into the game. Fortunately, we already have most of what we need to do this in our Character.__init__() method. A line of code like the following will initialize a new Character with details from our database:
Character(**db["characters"]["123456789012345678"])
The only problem here is that the value of battling will be a dictionary rather than a subclass of Enemy. We can fix this by making some changes to Character.__init__(). Find the method and replace the line self.battling = battling with the new code below:
class Character(Actor):

    level_cap = 10

    def __init__(self, name, hp, max_hp, attack, defense, mana, level, xp, gold, inventory, mode, battling, user_id):
        super().__init__(name, hp, max_hp, attack, defense, xp, gold)
        self.mana = mana
        self.level = level

        self.inventory = inventory

        self.mode = mode
        # NEW CODE BELOW THIS LINE
        if battling != None:
            enemy_class = str_to_class(battling["enemy"])
            self.battling = enemy_class()
            self.battling.rehydrate(**battling)
        else:
            self.battling = None
        # NEW CODE ABOVE THIS LINE

        self.user_id = user_id
This code converts the value of the enemy attribute we created above from a string into a class, initializes a copy of that class, and then calls rehydrate, unpacking the battling dictionary as its arguments. We'll write both the str_to_class function and the Enemy.rehydrate() method shortly.
The str_to_class function will take a string and return the class with its name.
The rehydrate method will set all attributes of the instance to those provided. While we could do this with the __init__() method as we did with Character, this would force us to specify all our attribute values every time we initialize any subclass of Enemy, defeating the point of having subclasses in the first place.
Navigate to the top of game.py and create the str_to_class function just below your imports, as below:
# Helper functions
def str_to_class(classname):
    return getattr(sys.modules[__name__], classname)
This function uses the useful Python built-in getattr to retrieve the class corresponding to the string provided as classname. Note that this function will only work for the classes we define.
Next, return to your Enemy class and create the rehydrate() method just below the __init__() method.
class Enemy(Actor):

    def __init__(self, name, max_hp, attack, defense, xp, gold):
        super().__init__(name, max_hp, max_hp, attack, defense, xp, gold)
        self.enemy = self.__class__.__name__

    # NEW METHOD
    def rehydrate(self, name, hp, max_hp, attack, defense, xp, gold, enemy):
        self.name = name
        self.hp = hp
        self.max_hp = max_hp
        self.attack = attack
        self.defense = defense
        self.xp = xp
        self.gold = gold
Note that we're accepting enemy as an argument without using it. This is to prevent errors when unpacking the battling dictionary.
We will now be able to save characters to the database by calling save_to_db() and load characters from the database by passing a database entry to Character(). As our characters store information about the enemies they're fighting, this is all we need for a persistent game world.
Game actions
Let's implement the player actions from our design specification. We'll start with hunting, the action that enables characters to seek out enemies to fight. Add the following code to the class definition of Character:
    def hunt(self):
        # Generate random enemy to fight
        while True:
            enemy_type = random.choice(Enemy.__subclasses__())

            if enemy_type.min_level <= self.level:
                break

        enemy = enemy_type()

        # Enter battle mode
        self.mode = GameMode.BATTLE
        self.battling = enemy

        # Save changes to DB after state change
        self.save_to_db()

        return enemy
First, we use random.choice() to choose one of the subclasses of Enemy at random. This random selection will be repeated until we chose an enemy with a minimum level less than or equal to our player character's level.
Once the enemy is chosen, we initialize an instance of it, switch the game mode, and save a reference to it in battling. We then update the player object in the database and return the enemy object.
We will need to call save_to_db() at the end of every method that changes the character's state. This includes the fight() method defined in Actor. Add the following method to the Character class to accomplish this:
   def fight(self, enemy):
        outcome = super().fight(enemy)

        # Save changes to DB after state change
        self.save_to_db()

        return outcome
This method will call Actor.fight(), store its result, update the database, and then return the result.
Next, we'll define a flee() method for escaping from a battle the player character is unlikely to win. Add the following method at the bottom of Character:
    def flee(self, enemy):
        if random.randint(0,1+self.defense): # flee unscathed
            damage = 0
        else: # take damage
            damage = enemy.attack/2
            self.hp -= damage

        # Exit battle mode
        self.battling = None
        self.mode = GameMode.ADVENTURE

        # Save to DB after state change
        self.save_to_db()

        return (damage, self.hp <= 0) #(damage, killed)
To add some uncertainty to the flee action, as well as an additional use for the defense stat, we've implemented a random chance that the player will take a small amount of damage on fleeing. We then empty battling, change the game mode, save the state, and return a tuple of the action outcome, similar to the one returned in Actor.fight().
Next, we'll need a method to call after an enemy is defeated, to give the player character their gold and XP. Add the following method definition:
    def defeat(self, enemy):
        if self.level < self.level_cap: # no more XP after hitting level cap
            self.xp += enemy.xp

        self.gold += enemy.gold # loot enemy

        # Exit battle mode
        self.battling = None
        self.mode = GameMode.ADVENTURE

        # Check if ready to level up after earning XP
        ready, _ = self.ready_to_level_up()

        # Save to DB after state change
        self.save_to_db()

        return (enemy.xp, enemy.gold, ready)
If the player's level is below the cap, we add the enemy's XP onto their own. We then add the enemy's gold to their coin-purse, exit battle mode, and check if they've gained enough XP to level up (using a method we'll implement later). Finally, we save the character's state to the database and return a tuple of the results of this action.
Let's define ready_to_level_up() next:
    def ready_to_level_up(self):
        if self.level == self.level_cap: # zero values if we've ready the level cap
            return (False, 0)

        xp_needed = (self.level)*10
        return (self.xp >= xp_needed, xp_needed-self.xp) #(ready, XP needed)
This method merely checks whether the current XP is greater than or equal to ten times the character's level. Characters will need 10 XP to advance to level 2, 20 XP to advance to level 3, etc. The method returns a tuple containing a Boolean that indicates whether the character is ready to level up and the amount of XP still needed. As it does not change the character's state, we do not need a call to save_to_db.
Now that we're increasing the player's XP and checking whether they're ready to level up, we need a method to level them up. Add the following method:
    def level_up(self, increase):
        ready, _ = self.ready_to_level_up()
        if not ready:
            return (False, self.level) # (not leveled up, current level)

        self.level += 1 # increase level
        setattr(self, increase, getattr(self, increase)+1) # increase chosen stat

        self.hp = self.max_hp #refill HP

        # Save to DB after state change
        self.save_to_db()

        return (True, self.level) # (leveled up, new level)
After ensuring that the player is ready to level up, we increase their level and use Python built-ins setattr and getattr to increment one of the character's stats. We reset their HP to the max value, save the state, and finally return the outcome of the action (a tuple indicating whether leveling up succeeded and what the character's new level is).
The last method we need is die(), which will be called when a character is defeated in battle. We could handle player death in a few different ways, but for the sake of simplicity, we'll just delete the character from the database.
    def die(self, player_id):
        if self.user_id in db["characters"].keys():
            del db["characters"][self.user_id]
That's a wrap for our game's logic. Next, we'll integrate with Discord and make our game playable.
Creating a Discord application
Discord will serve as the display layer for our game, allowing players to issue commands and see the results of those commands.
Open another browser tab and visit the Discord Developer Portal. Log in with your Discord account, or create one if you haven't already. Keep your repl open – we'll return to it soon.
Once you're logged in, create a new application. Give it a name like "MyRPG".

Discord applications can interact with Discord in several different ways, not all of which require bots, so creating one is optional. That said, we'll need one for this project. Let's create a bot.
- Click on Bot in the menu on the left-hand side of the page.
- Click Add Bot.
- Give your bot a username (such as "RPGBot").
- Click Reset Token and then Yes, do it!.
- Copy the token that appears just under your bot's username.

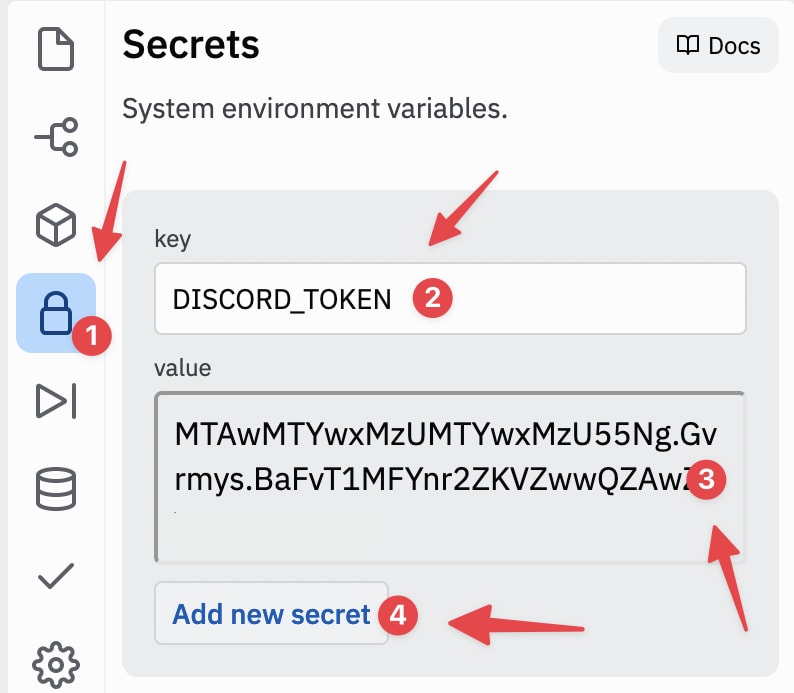
The token you just copied is required for the code in our repl to interface with Discord's API. Return to your repl and open the Secrets tab in the left sidebar. Create a new secret with DISCORD_TOKEN as its key and the token you copied as its value.
Once you've done that, return to the Discord developer panel. We need to finish setting up our bot.
You can leave the Public Bot option enabled or disable it, depending on whether you'd like other people to be able to find and install your bot on their server. Keep in mind that bots on 100 or more servers have to go through a special verification and approval process.

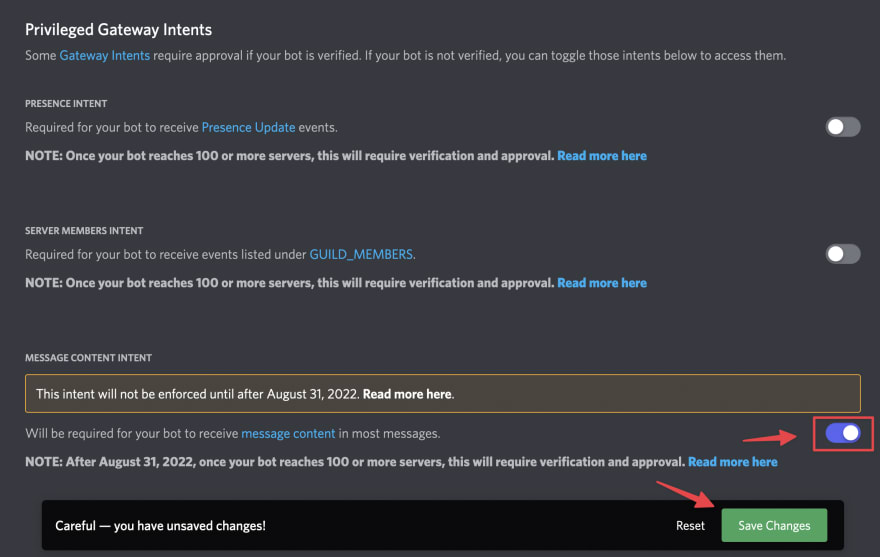
Next, we need to configure access to privileged Gateway Intents. Depending on a bot's functionality, it will require access to different events and sources of data. Events involving users' actions and the content of their messages are considered more sensitive and need to be explicitly enabled.
For this bot to work, we'll need the Message Content Intent, which will allow our bot to see the content of users' messages. Toggle it to the on position and save changes when prompted.
Now that we've created our application and its bot, we need to add it to a server. We'll walk you through creating a test server for this tutorial, but you can also use any server you've created in the past, as long as the other members won't get too annoyed about it becoming a bot testing ground. You can't use a server that you're just a normal user on, as adding bots requires special privileges.
Open Discord in your browser. You should already be logged in. Then click on the + icon in the leftmost panel to create a new server. Alternatively, open an existing server you own.
In a separate tab, return to the Discord Dev Portal and open your application. Then follow these steps to add your bot to your server:
- Click on OAuth2 in the left sidebar.
- In the menu that appears under OAuth2, select URL Generator.
- Under Scopes, mark the checkbox labelled bot.
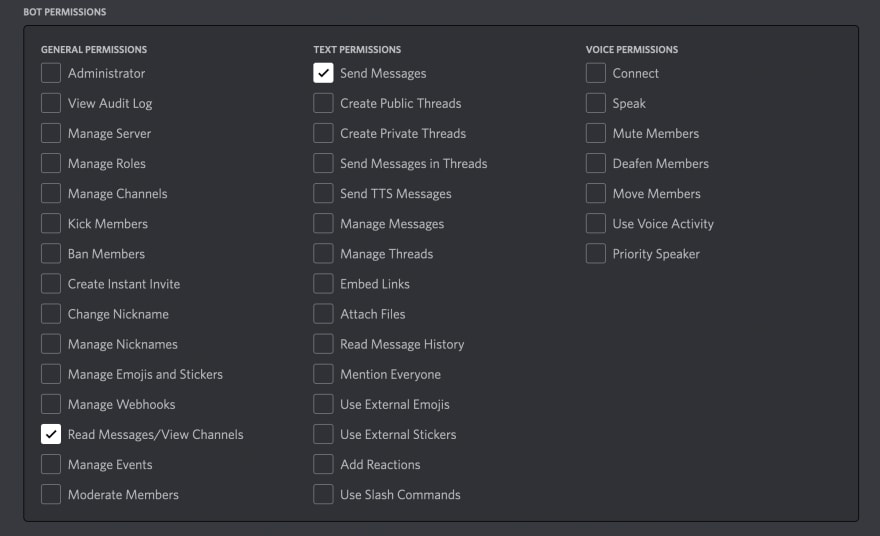
Under Bot Permissions, mark the checkboxes labelled Read Messages/View Channels and Send Messages.
Scroll down and copy the URL under Generated URL.
Paste the URL in your browser's navigation bar and hit enter.
On the page that appears, select your server from the drop-down box and click Continue.
When prompted about permissions, click Authorize, and complete the CAPTCHA.

Return to your Discord server. You should see that your bot has just joined.
Now that we've done the preparatory work, it's time to write some code. Return to your repl for the next section.
Writing the Discord bot code
We'll be using discord.py to interface with Discord's API using Python. Open main.py in your repl and add the following code:
import os, discord
from discord.ext import commands

from replit import db
from game import *

DISCORD_TOKEN = os.getenv("DISCORD_TOKEN")

bot = commands.Bot(command_prefix="!")

@bot.event
async def on_ready():
    print(f"{bot.user} has connected to Discord!")

bot.run(DISCORD_TOKEN)
First, we import the Python libraries we'll need, including discord.py and its commands extension, as well as our database and the contents of game.py.
We then retrieve the value of the DISCORD_TOKEN environment variable, which we set in our repl's Secrets tab above. Following that, we instantiate a Bot object. We'll use this object to listen for Discord events and respond to them. For the most part, we'll be responding to commands: messages from users which start with ! (the command_prefix we specified when creating our Bot object).
However, the first event we're interested in is not a command. The on_ready() event will trigger when our bot logs onto Discord (the @bot.event decorator ensures this). All this event will do is print a message to our repl's console, telling us that the bot has connected.
Note that we've prepended async to the function definition – this makes our on_ready() function into a coroutine. Coroutines are largely similar to functions, but may not execute immediately, and must be invoked with the await keyword. Using coroutines makes our program asynchronous, which means it can continue executing code while waiting for the results of a long-running function, usually one that depends on input or output. If you've used JavaScript before, you'll recognize this style of programming.
The final line in our file starts the bot, providing DISCORD_TOKEN to authenticate it. Run your repl now to see it in action. Once it's started, return to your Discord server. You should see that your bot user is now online.

Handling user commands
Now we can start writing the handlers for our game's actions, such as !create, !hunt, and !fight.
The discord.py commands extension allows us to define command handlers using the @bot.command decorator. Without this, we'd have to manually parse the content of all user messages to determine whether a command has been issued, as was necessary for our role assignment bot tutorial.
Character creation
First, we'll implement our character creation command, !create. Add the following code to main.py below the definition of on_ready():
# Commands
@bot.command(name="create", help="Create a character.")
async def create(ctx, name=None):
    user_id = ctx.message.author.id

    # if no name is specified, use the creator's nickname
    if not name:
        name = ctx.message.author.name
The @bot.command decorator will ensure that our function is invoked when a user types a message starting with !create. We also use it to define some help text – the commands extension provides a default !help command, and each command we define can have two types of explanatory text:
-
brief: A short description of the command that will show alongside other defined commands when the user types!help. -
help: A longer description of the command that will show when the user types!help name_of_command.
In the absence of brief, the help text will be used in both cases, though it may be truncated for the output of !help.
Our create function takes two parameters:
-
ctx: This is the invocation context, a special object containing information such as the user who called the command, the server it was called in, and the files attached to the calling message if any. All commands must take this parameter. -
name: This will be the name for the character we're creating and is an optional parameter.
The function body retrieves the Discord user ID of the user who issued the !create command. It then checks whether a name parameter was provided. If not, it sets name to the name of the user.
Next, we'll create an instance of Character with some starter stats and save it to our repl's database. Add the following code to the body of create:
    # create characters dictionary if it does not exist
    if "characters" not in db.keys():
        db["characters"] = {}

    # only create a new character if the user does not already have one
    if user_id not in db["characters"] or not db["characters"][user_id]:
        character = Character(**{
            "name": name,
            "hp": 16,
            "max_hp": 16,
            "attack": 2,
            "defense": 1,
            "mana": 0,
            "level": 1,
            "xp": 0,
            "gold": 0,
            "inventory": [],
            "mode": GameMode.ADVENTURE,
            "battling": None,
            "user_id": user_id
        })
        character.save_to_db()
        await ctx.message.reply(f"New level 1 character created: {name}. Enter `!status` to see your stats.")
    else:
        await ctx.message.reply("You have already created your character.")
After creating and saving a new character, or failing to do so, this code sends a reply to the message that invoked it. As our game logic primarily resides in the game.py file, constructing these commands will largely be a matter of constructing and sending replies informing the player of what's happened in the game world.
Character status
Next, we'll implement the !status command, which players will use to view their character's current statistics, inventory, and game mode. To convey this information compactly and attractively, we'll use an embed rather than a plain Discord message.
Embeds are usually used to provide link previews, but can also be constructed from scratch, providing a powerful tool for bots to display richly formatted information of any kind. This is what our embed will look like:

Add the following function below the definition create():
@bot.command(name="status", help="Get information about your character.")
async def status(ctx):
    character = load_character(ctx.message.author.id)

    embed = status_embed(ctx, character)
    await ctx.message.reply(embed=embed)
This function retrieves the player's character from the database, passes it and the current context to a function that will construct and return an embed, and then replies with the embed. We'll implement the two methods we've used just above the definition of on_ready(). Go there now.
First, load_character(), which reads from the database and creates an instance of Character using the results:
# Helper functions
def load_character(user_id):
    return Character(**db["characters"][str(user_id)])
Second, status_embed():
MODE_COLOR = {
    GameMode.BATTLE: 0xDC143C,
    GameMode.ADVENTURE: 0x005EB8,
}
def status_embed(ctx, character):

    # Current mode
    if character.mode == GameMode.BATTLE:
        mode_text = f"Currently battling a {character.battling.name}."
    elif character.mode == GameMode.ADVENTURE:
        mode_text = "Currently adventuring."

    # Create embed with description as current mode
    embed = discord.Embed(title=f"{character.name} status", description=mode_text, color=MODE_COLOR[character.mode])
    embed.set_author(name=ctx.author.display_name, icon_url=ctx.author.avatar_url)
Just above the function definition, we've created a dictionary that maps game modes to colors. We'll use this to change the color of the vertical bar on the left side of the embed.
In the function itself, we first check the game mode. This will determine the embed's description text, a paragraph that appears just below the embed's title. Once that's done, we create the embed with discord.Embed, setting the title, description, and color. We then use set_author() to include the calling user's name and profile picture at the top of the embed.
Next, we will construct the embed's fields. You can think of these as individual text boxes, which will be displayed below the description. We'll start with a stats field:
    # Stats field
    _, xp_needed = character.ready_to_level_up()

    embed.add_field(name="Stats", value=f"""
**HP:**    {character.hp}/{character.max_hp}
**ATTACK:**   {character.attack}
**DEFENSE:**   {character.defense}
**MANA:**  {character.mana}
**LEVEL:** {character.level}
**XP:**    {character.xp}/{character.xp+xp_needed}
    """, inline=True)
We've used add_field() to create a field with the title "Stats" that contains a listing of all the player's important stats. Note the call to character.ready_to_level_up(), so that we can show the player how much XP they need to advance to the next level. We've also set inline=True, which allows us to display fields as columns.
Our next column will show the player's inventory:
    # Inventory field
    inventory_text = f"Gold: {character.gold}\n"
    if character.inventory:
        inventory_text += "\n".join(character.inventory)

    embed.add_field(name="Inventory", value=inventory_text, inline=True)
There's currently no logic in our game to put items into characters' inventories, but you should see characters' gold increase as they defeat enemies.
Finally, we'll return the embed.
return embed
Run your repl now, and then switch tabs to your Discord server. Create a character with !create and view its status with !status.

Battles
Next, let's implement our battle commands, starting with !hunt. Add the following function definition below the body of status():
@bot.command(name="hunt", help="Look for an enemy to fight.")
async def hunt(ctx):
    character = load_character(ctx.message.author.id)

    if character.mode != GameMode.ADVENTURE:
        await ctx.message.reply("Can only call this command outside of battle!")
        return

    enemy = character.hunt()

    # Send reply
    await ctx.message.reply(f"You encounter a {enemy.name}. Do you `!fight` or `!flee`?")
This function is fairly simple: We load the character, ensure they're not currently in a battle, call hunt() to generate a random enemy, and reply to the player with a message about what they're fighting and which commands they can use.
Next, we'll implement !fight:
@bot.command(name="fight", help="Fight the current enemy.")
async def fight(ctx):
    character = load_character(ctx.message.author.id)

    if character.mode != GameMode.BATTLE:
        await ctx.message.reply("Can only call this command in battle!")
        return

    # Simulate battle
    enemy = character.battling

    # Character attacks
    damage, killed = character.fight(enemy)
    if damage:
        await ctx.message.reply(f"{character.name} attacks {enemy.name}, dealing {damage} damage!")
    else:
        await ctx.message.reply(f"{character.name} swings at {enemy.name}, but misses!")
Here we load the character, ensure they're currently in battle mode, and then have them fight the enemy, returning a message about the damage inflicted. We also account for the small chance that they will inflict no damage.
Next, we need to check if the enemy was killed by the attack. Add the following code to the bottom of the function:
    # End battle in victory if enemy killed
    if killed:
        xp, gold, ready_to_level_up = character.defeat(enemy)

        await ctx.message.reply(f"{character.name} vanquished the {enemy.name}, earning {xp} XP and {gold} GOLD. HP: {character.hp}/{character.max_hp}.")

        if ready_to_level_up:
            await ctx.message.reply(f"{character.name} has earned enough XP to advance to level {character.level+1}. Enter `!levelup` with the stat (HP, ATTACK, DEFENSE) you would like to increase. e.g. `!levelup hp` or `!levelup attack`.")

        return
Here we call character.defeat() to handle the enemy's death and return appropriate replies. Again, we've already written all the game logic, so all this code needs to do is display it to the player. Once we've sent the reply, we return from the function.
After the player character attacks, we need to have the enemy fight back. Add the following code below the if killed block:
    # Enemy attacks
    damage, killed = enemy.fight(character)
    if damage:
        await ctx.message.reply(f"{enemy.name} attacks {character.name}, dealing {damage} damage!")
    else:
        await ctx.message.reply(f"{enemy.name} tries to attack {character.name}, but misses!")

    character.save_to_db() #enemy.fight() does not save automatically
This is almost identical to the player's attack code, but with enemy.fight(character) instead of character.fight(enemy). But because enemy.fight() does not save to the database after changing the game state, we must do this manually.
Next, we need some code to check whether the player character was killed in the attack. Add the following lines to your function:
    # End battle in death if character killed
    if killed:
        character.die()

        await ctx.message.reply(f"{character.name} was defeated by a {enemy.name} and is no more. Rest in peace, brave adventurer.")
        return
Here we delete the character from the database, send a message of condolences, and return from the function.
The last case we need to handle is the most common one, where neither the player nor their enemy has died. We'll deal with this by sending a final message to close out this round of fighting.
    # No deaths, battle continues
    await ctx.message.reply(f"The battle rages on! Do you `!fight` or `!flee`?")
That's it for !fight – now we need !flee! Add the following function below the one you just finished:
@bot.command(name="flee", help="Flee the current enemy.")
async def flee(ctx):
    character = load_character(ctx.message.author.id)

    if character.mode != GameMode.BATTLE:
        await ctx.message.reply("Can only call this command in battle!")
        return

    enemy = character.battling
    damage, killed = character.flee(enemy)

    if killed:
        character.die()
        await ctx.message.reply(f"{character.name} was killed fleeing the {enemy.name}, and is no more. Rest in peace, brave adventurer.")
    elif damage:
        await ctx.message.reply(f"{character.name} flees the {enemy.name}, taking {damage} damage. HP: {character.hp}/{character.max_hp}")
    else:
        await ctx.message.reply(f"{character.name} flees the {enemy.name} with their life but not their dignity intact. HP: {character.hp}/{character.max_hp}")
Once again, this function loads the character, checks that the game mode is appropriate for the invoked command, and then invokes the appropriate method in Character. We finish off the function by providing for three possible outcomes of an attempt to flee: the character dies, the character flees taking damage, and the character flees unscathed.
Rerun your repl and try hunting, fighting, and fleeing.

Leveling up
Next, we need to implement !levelup. Add the following code below the definition of !flee:
@bot.command(name="levelup", help="Advance to the next level. Specify a stat to increase (HP, ATTACK, DEFENSE).")
async def levelup(ctx, increase):
    character = load_character(ctx.message.author.id)

    if character.mode != GameMode.ADVENTURE:
        await ctx.message.reply("Can only call this command outside of battle!")
        return

    ready, xp_needed = character.ready_to_level_up()
    if not ready:
        await ctx.message.reply(f"You need another {xp_needed} to advance to level {character.level+1}")
        return

    if not increase:
        await ctx.message.reply("Please specify a stat to increase (HP, ATTACK, DEFENSE)")
        return
This function takes increase, which will be a string containing the stat to increase. After our standard character load and mode check, we do some error handling. First, we reject the command if the character does not have enough XP to level up, and then we reject the command if the player has not specified a stat to increase.
Next, we need to parse the value of increase. Add the following code to your function:
    increase = increase.lower()
    if increase == "hp" or increase == "hitpoints" or increase == "max_hp" or increase == "maxhp":
        increase = "max_hp"
    elif increase == "attack" or increase == "att":
        increase = "attack"
    elif increase == "defense" or increase == "def" or increase == "defence":
        increase = "defense"
We're allowing players to increase their characters' HP, attack, or defense stats only. To make our game as user-friendly as possible, we accept a few different words for each of those stats.
Finally, we call the character's level_up() method and report on its results:
    success, new_level = character.level_up(increase)
    if success:
        await ctx.message.reply(f"{character.name} advanced to level {new_level}, gaining 1 {increase.upper().replace('_', ' ')}.")
    else:
        await ctx.message.reply(f"{character.name} failed to level up.")
Rerun your repl and test this out. If you'd prefer to avoid grinding, edit your character creation code temporarily to increase the initial amount of XP.

Character death
There's one more command in our design specification that we have not yet implemented: !die. Players will use this command if they want to start the game over with a new character. Add the following code to define it:
@bot.command(name="die", help="Destroy current character.")
async def die(ctx):
    character = load_character(ctx.message.author.id)

    character.die()

    await ctx.message.reply(f"Character {character.name} is no more. Create a new one with `!create`.")
Character reset
Before we finish up, we're going to implement one last, special command: !reset. This command will delete a player's character and then immediately create a new character. Unlike the commands above, this will be a testing command, for use by the developer rather than players. Add the following code below the definition of die():
@bot.command(name="reset", help="[DEV] Destroy and recreate current character.")
async def reset(ctx):
    user_id = str(ctx.message.author.id)

    if user_id in db["characters"].keys():
        del db["characters"][user_id]

    await ctx.message.reply(f"Character deleted.")
    await create(ctx)
Unlike in die(), we're deleting from the database directly rather than using character.die() method. This is useful because further development of the game might cause errors in Character.__init__(), rendering the die() method temporarily unusable.
Where next?
We've created a text-based RPG that can be played on a Discord server, but our game is pretty barebones. We could expand it in a few different ways:
- Implement a magic system using the
manaattribute. - Implement an economy in which characters can buy and sell items, such as health potions.
- Flesh out the battle system, with multiple attack types, multiple enemies per battle, and the ability to use items that weaken enemies or temporarily strengthen characters.
- Create a game world with different areas the player can travel to, containing different enemies.
- Implement NPCs the player can talk to and receive quests from.
- Enable player versus player combat.
Discord bot code can be hosted on Replit permanently, but you'll need to use an Always-on repl to keep it running 24/7.
You can find our repl below:
https://replit.com/@ritza/DiscordRPG


Latest comments (0)