Following our previous tutorial on building Snake, in this tutorial we'll implement Asteroids, one of the first major arcade game hits, developed by Atari in 1979. We'll use Replit's built-in game development platform, Kaboom.js, and cover the following topics:
- Getting set up in Kaboom.js.
- Calculating movement angles for our spaceship and bullet mechanics.
- Random generation of asteroid placement.
- Defining the effects of object collisions.
- Developing a polished game with animation and sound effects.
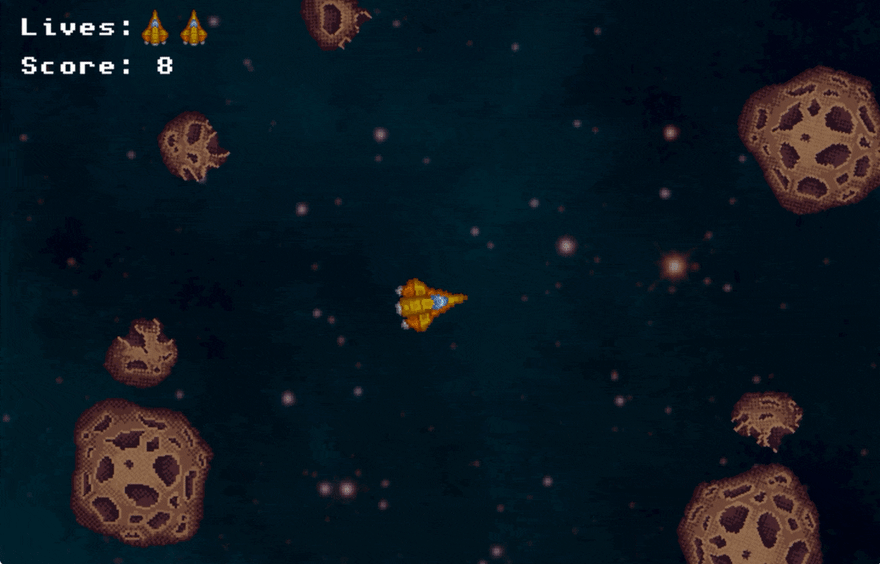
Our finished game will look like this:
We will use these Asteroids sprites and this space background from OpenGameArt.org, and the following sounds from FreeSound.org:
We will also be using music by Eric Matyas of Soundimage.org.
We've created a single ZIP file with the sprites and sounds you will need for this tutorial, which you can download here.
Creating a new project and loading assets
Log into your Replit account and create a new repl. Choose Kaboom as your project type. Give this repl a name, like "asteroids".

Kaboom repls are quite different from other kinds of repls you may have seen before: instead of dealing directly with files in folders, you'll be dealing with scenes, sounds and sprites. Replit will do some work in the background to initialize Kaboom and make sure everything you add gets loaded, so you can focus on game development.
Before we start coding, we need to upload our sprites and sounds. Download this ZIP file and extract it on your computer. Then, upload everything in Sounds folder to the Sounds section of your repl, and everything in the Sprites folder to the Sprites section of your repl.
![]()
Once you've uploaded everything, click on "main" under Scenes, and we'll start writing some code.
Setting the scene
A Kaboom.js game is made up of scenes, which you can think of as different screens, levels or stages. You can use scenes for game levels, menus, cut-scenes and any other screens your game might contain. In this tutorial, we'll just use one scene, which will contain the entire game.
Scenes are further divided into layers, which are populated by game objects (also called sprites). The layer an object is on will determine when it gets drawn and which other objects it can collide with. In this game, we'll use three layers: the background layer (bg), the object layer (obj), and UI layer (ui). Add the following code to your main scene now to initialize these layers:
layers([
    "bg",
    "obj",
    "ui",
], "obj");
These layers will be drawn in the order declared. The majority of gameplay will happen in the obj layer, so we've set that as the default layer. Any objects we create will be placed in this layer, unless we specify a different layer when we create the object.
The bg layer will be drawn first, beneath everything else, and we'll use that to specify a background image for our game. Do that now by adding the following code to your scene:
// Background
add([
    sprite("space"),
    layer("bg")
]);
Here we're adding a very simple game object: the space sprite we uploaded earlier on the background layer. Later game objects, such as the player's ship and the asteroids, will be more complicated.
The final layer, ui, is where we will display information such as the player's remaining lives and total score. Let's draw the score now. First, we have to declare a global variable named score, with the following line:
score = 0;
Now we'll create an empty object on the UI layer, as follows:
// UI
ui = add([
    layer("ui")
]);
Although Kaboom allows us to create objects that display text, this text is set once at object creation and has to be updated manually, which doesn't really make sense for a real-time UI. Instead of doing that, we'll use our ui object's draw event callback to draw text containing the current score. Add the following code:
ui.on("draw", () => {
    drawText("Score: " + score, {
        pos: vec2(8, 24),
    });
});
Callbacks are a key concept in JavaScript and Kaboom makes heavy use of them. Some callbacks, such as the one above, are called on every frame of the game (around 60 times a second). Others are called when specific events happen, such as user keypresses. Because this callback will be invoked so often, our score will always be up to date.
Run your repl now and marvel at the vast emptiness of space.

The player's ship
Now let's populate that empty space. Enter the following code below the UI drawing code to create the player:
// The ship
const player = add([
    sprite("ship"),
    pos(160, 120),
    rotate(0),
    origin("center"),
    "player",
    "mobile",
    "wraps",
    {
        turn_speed: 0.08,
        speed: 0,
        max_thrust: 48,
        acceleration: 2,
        deceleration: 4,
        lives: 3,
        can_shoot: true,
        laser_cooldown: 0.5,
        invulnerable: false,
        invulnerablity_time: 3,
        animation_frame: 0,
        thrusting: false
    }
]);
Here we're creating a game object with a number of components, each of which give our object some data or behavior. These are:
- The
spritecomponent, which draws theship.pngsprite. - The
pos(position) component, which places the player near the center of the screen in the Replit browser. - The
rotatecomponent, which will allow the player to turn the ship with the left and right arrow keys. - The
origincomponent, which sets the sprite's origin to "center", so that when we rotate the ship, it will rotate around the middle of its sprite rather than the default top-left corner.
Following that initial configuration, we're giving the player object three tags: player, mobile and wraps. Kaboom uses a tagging system to apply behavior to objects -- you can think of this as similar to multiple inheritance. By tagging objects with shared behavior, we can save ourselves from duplicating code.
Finally, we assign a number of custom properties to our player object. We'll use these properties to handle a variety of gameplay functions, such as moving and shooting.
If you run your repl now, you should see the ship sprite in the middle of a blank screen. In the next section, we'll implement movement controls.

Movement controls
In this game, our player will turn the nose of the spaceship with the left and right arrow keys, and thrust forward and backward with the up and down arrow keys. We'll handle movement in two phases: user input, and actually moving the ship. First, let's allow the player to turn their ship to the left and right. Add the following code:
// Movement keys
keyDown("left", () => {
    player.angle += player.turn_speed;
});
keyDown("right", () => {
    player.angle -= player.turn_speed;
});
Run your repl now, and you should be able to turn the ship to the left and right by pressing the respective arrow keys. If you think it turns too fast or too slow, change the value of turn_speed in the player creation code.
Now let's implement the up and down keys, so the player can move around the scene. Enter the following code beneath the player turning code:
keyDown("up", () => {
    player.speed = Math.min(player.speed+player.acceleration, player.max_thrust);
    play("rocket_thrust", {
        volume: 0.1,
        speed: 2.0,
    });
});
Rather than having the spaceship go from zero to max speed immediately, we want to simulate a gradual acceleration to our max speed. To achieve this, we use Math.min() to set the player's speed to the minimum value between current speed plus acceleration and its maximum speed. This will make the ship gradually increase in speed until it reaches max_thrust. Play around with the values of acceleration and max_thrust in the player creation code and see what feels right to you.
Additionally, we set our rocket thrust sound to play while accelerating. Kaboom allows us to manipulate sounds in a few different ways, such as changing their speed and volume.
We'll handle deceleration by doing the opposite to acceleration, using Math.max() to choose the maximum between the player's speed minus their deceleration, and their maximum speed in reverse (i.e. negative). Add the following code below the acceleration controls:
keyDown("down", () => {
    player.speed = Math.max(player.speed-player.deceleration, -player.max_thrust);
    play("rocket_thrust", {
        volume: 0.2,
        speed: 2.0,
    });
});
If you run your repl now and try to accelerate or decelerate, the sound will play, but the ship will go nowhere. This is because we're manipulating player.speed, which is a custom property that Kaboom hasn't attached any special behavior to (unlike player.angle). Let's add some movement parameters now.
Movement
Movement in Kaboom and most other 2D game development systems is handled using X and Y coordinates on a plane. To move an object left, you subtract from its X coordinate, and to move it right, you add to its X coordinate. To move an object up, you subtract from its Y coordinate, and to move it down, you add to its Y coordinate. Therefore, basic four-directional movement in games like Snake or Pacman is quite straightforward. The directional movement we need for Asteroids (commonly called tank controls) is more complex, requiring some calculations.
At a high level, we want to move a given distance (player.speed) in a given direction (player.angle). As a first step, let's create an action callback for our mobile tag. This code, like our UI drawing code above, will be run by every object with the "mobile" tag on every frame of the game, so we can use it for more than just the player object. Add the following code at the bottom of your main scene:
// Movement
action("mobile", (e) => {
    e.move(pointAt(e.speed, e.angle));
    e.resolve();
});
First, we move our object, using the function pointAt(), which takes a speed and an angle and returns the corresponding X and Y co-ordinates as a vec2 object, Kaboom's 2D vector type. This data type is provided by Kaboom specifically for working with X and Y coordinates, and comes with a number of useful functions, such as addition and subtraction.
After moving, we invoke Kaboom's resolve() method, which is necessary to determine collisions with solid objects. This will become relevant later on, when we create our asteroids.
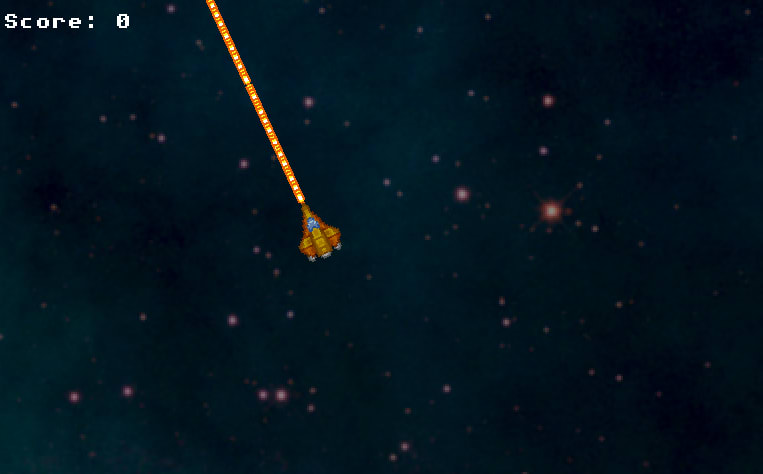
Now we need to create the pointAt() function. Before we jump into the code, let's think about the problem. Our movement can be drawn as an angled line on a plane, and its X and Y coordinates as horizontal and vertical lines connected to it, giving us a right-angled triangle.

We know the values of the triangle's angles: one is 90 degrees, and the other two are equal to player.angle. The length of the triangle's hypotenuse (the red line in the diagram above) is player.speed: this is the distance our ship will be traveling.
We now need to calculate the lengths of the other two sides to get the X and Y values for our movement vector. We can do this using the trigonometric sine and cosine functions, like so:
sine(angle) = y / distance
y = speed * sin(angle)

cosine(angle) = x / distance
x = distance * cos(angle)
Remember, in Kaboom and most other 2D game development platforms, the Y axis is inverted, so we have to make it negative. Add the pointAt() function below, at the top of the main scene code.
function pointAt(distance, angle) {
    return vec2(distance*Math.cos(angle), -distance*Math.sin(angle));
}
Run your repl now and take the ship for a spin. You should be able to thrust forward and backward, moving according to where the ship's nose is pointing.
There's one little problem though: thrust too long, and you'll fly off the screen. In any other game, we might solve that by enclosing the play area with walls, but that doesn't seem quite right in the infinite expanse of space. The original Asteroids solved this by having the player and other key objects wrap around the screen, i.e. appear at the bottom after going over the top, or at the left edge after going past the right edge. Let's implement that now, using the "wraps" tag we assigned to our player object when we created it. Add the following code to the bottom of your main scene:
// Wrap around the screen
action("wraps", (e) => {
    if (e.pos.x > width()) {
        e.pos.x = 0;
    }
    if (e.pos.x < 0) {
        e.pos.x = width();
    }
    if (e.pos.y > height()) {
        e.pos.y = 0;
    }
    if (e.pos.y < 0) {
        e.pos.y = height();
    }
});
This is a fairly straightforward piece of code that checks whether an object's position is outside of the room and, if so, places it on the other side. The width() and height() functions are Kaboom built-ins that return the size of the game canvas. Run your repl now and try it out.
Rocket animation
Our ship can move now, but it would be nice to see its rockets firing when the player presses the up arrow key, as well as hear them. Reactive animations like these make games feel more responsive and look more dynamic.
Kaboom has methods for handling animations when a game object uses an animated sprite (i.e. one with multiple images), but this isn't quite what we want here. Rather than animating the player's ship, we need to animate the rocket thrust that appears behind it when a thrusting key is pressed, so we'll need to handle all the animation code ourselves. Luckily, Kaboom makes this fairly simple.
First, let's create an array with our four rocket sprites. Add the following code at the bottom of your main scene:
// Animate rocket
const thrust_animation = ["rocket1", "rocket2", "rocket3", "rocket4"];
Then we need some way to indicate when to start and stop the animation. We can use Kaboom's keyPress and keyRelease events for this, as well as two of the properties we defined for our player (thrusting and animation_frame). Add the following code:
// rocket animation helpers
keyPress("up", () => {
    player.thrusting = true;
    player.animation_frame = 0;
});
keyRelease("up", () => {
    player.thrusting = false;
});
Now let's draw the animation. We'll use a draw event callback, which lets us make the player draw other things in addition to its own sprite. Add the following code:
// draw current rocket animation frame
on("draw", "player", (p) => {
    if (player.thrusting) {
        // draw current frame
        drawSprite(thrust_animation[p.animation_frame], {
            pos: p.pos.add(pointAt(-p.height/2,p.angle)),
            origin: "center",
            rot: p.angle
        });
    }
});
Here we're using our pointAt function again, but this time we're looking for the rocket end of the ship, rather than its nose. We use our thrust_animation array in conjunction with the player's animation_frame value to figure out which rocket image to draw.
To actually make the rocket animate (i.e. cycle through animation frames), we'll use Kaboom's loop timer, and create a callback that changes the animation frame every 0.1 seconds. Add the following code:
// loop rocket animation
loop(0.1, () => {
    if (player.thrusting) {
        player.animation_frame++;
        if (player.animation_frame >= thrust_animation.length) { // wrap to start
            player.animation_frame = 0;
        }
    }
});
That's it! Run your repl and move your ship around.

Shooting
To make our ship fire laser bullets, we need to create bullet objects just in front of the ship's nose, and have them travel in the same direction the ship is pointing. Here we can reuse our new pointAt() function. Add the following code beneath the existing movement control code:
// Shooting
keyDown("space", () => {
    add([
        sprite("bullet"),
        pos(player.pos.add(pointAt(player.width/2, player.angle))),
        rotate(player.angle),
        origin("center"),
        "bullet",
        "mobile",
        "destructs",
        {
            speed: 100
        }
    ]);
    play("laser");
});
Here we're creating a bullet object at the tip of the ship's nose. We calculate the position of the tip by running our pointAt() function with a distance of half the ship sprite's width, and the sprite's angle. We use half the sprite's width because the ship sprite's origin is at its center. Additionally, we rotate the bullet according to the ship's angle (again using center as the origin) and assign a number of tags to it. Note that because we're tagging it with "mobile" and giving it both a rotate component and a speed property, it will use the same movement code we wrote for our player object.
Try the game out now, and hold down the spacebar to shoot. Do you notice anything about your ship's firing rate?
At the moment, a bullet object will be created in every frame while space is down. That's a lot of bullets, and might make the game too easy, as well as slowing it to a crawl on less capable devices. We need to add a cooldown period, and we can do so by altering our shooting code to look like this:
// Shooting
keyDown("space", () => {
    if (player.can_shoot) { // new if statement
        add([
            sprite("bullet"),
            pos(player.pos.add(pointAt(player.width/2, player.angle))),
            rotate(player.angle),
            origin("center"),
            "bullet",
            "mobile",
            "destructs",
            {
                speed: 100
            }
        ]);
        play("laser");
        player.can_shoot = false; //
        wait(player.laser_cooldown, () => {
            player.can_shoot = true;
        });
    }
});
Here, we use two of the properties we defined in the player object above, can_shoot and laser_cooldown, to implement a cooldown mechanism. We will only create a bullet if can_shoot is true, and we set it to false immediately after each shot. Then we use Kaboom's wait timer to set it to true after laser_cooldown number of seconds. Because this timer is an asynchronous callback, the rest of the game can continue while the laser cooldown period passes.
Run your repl and test whether the ship's laser fires at the expected intervals.
The asteroids
Now that we've added shooting, we need to add something to shoot at. It's time to create the asteroids this game gets its name from.
Creation
Add the following code at the bottom of the main scene:
// Asteroids
const NUM_ASTERIODS = 5;

for (let i = 0; i < NUM_ASTERIODS; i++) {
    var spawnPoint = asteroidSpawnPoint();
    var a = add([
        sprite("asteroid"),
        pos(spawnPoint),
        rotate(rand(1,7)),
        origin("center"),
        solid(),
        "asteroid",
        "mobile",
        "wraps",
        {
            speed: rand(5, 10),
            initializing: true
        }
    ]);

    a.resolve();
}
Here we're creating a constant number of asteroids, and assigning them a random position, direction of movement and speed. The asteroid creation code is largely similar to our player creation code, but with fewer custom properties. One key difference is the presence of the solid component, which marks the asteroid as a solid object that other objects shouldn't be able to pass through. This is supported by the resolve() call we added in our movement code above.
The one custom property that's unique to asteroids is initializing. Because we're spawning each asteroid in a random position, there's a chance we might spawn one on top of another, or on top of the player.
One approach to avoiding this might be to ensure we don't spawn any two asteroids at the same coordinates, but we might still end up spawning them close enough to overlap with each other. We would then need to take into account the size of asteroids and prevent asteroids from spawning at any of those coordinates, and our code would quickly become complicated.
Instead of doing that, we can leverage Kaboom's collision detection to achieve the same effect. Right after we create the asteroid, we can check if it's overlapping with another "mobile"-tagged object (i.e. another asteroid, or the player's ship), and if so, we randomise its position again. We can use a while loop to repeat this action until our asteroid lands up in a free space. Add the following code inside the asteroid creation for-loop, below the add function:
    while (a.isOverlapped("mobile")) {
        spawnPoint = asteroidSpawnPoint();
        a.pos = spawnPoint;
        a.resolve();
    }

    a.initializing = false;
We want the asteroid to be in an "initializing" state while we're finding its starting position. When we implement its actions later on, we'll check the value of its initializing property to prevent it from harming the player or affecting other asteroids while it's still spawning.
Before we move on, let's implement the asteroidSpawnPoint() function. Add the following code near the top of the main scene, just beneath the pointAt() function:
function asteroidSpawnPoint() {
     // spawn randomly at the edge of the scene
     return choose([rand(vec2(0), vec2(width(), 0)),
             rand(vec2(0), vec2(0, height())),
             rand(vec2(0, height()), vec2(width(), height())),
             rand(vec2(width(), 0), vec2(width(), height()))]);
}
This function uses Kaboom's choose() and rand() functions to choose a random location on the edge of the scene to spawn an asteroid.
Collisions
If you've seen any movies set in outer space, you'll know that the main thing asteroids do is crash into spaceships and each other, even though the real-life asteroid belt in our solar system is not nearly dense enough for asteroid collisions to be a frequent occurrence.
There are three types of collisions we need to account for:
- Player and asteroid, which damages the player, causing them to lose a life.
- Bullet and asteroid, which destroys the asteroid.
- Asteroid and asteroid, which causes both asteroids to bounce off each other.
Let's go through the code for each of these, adding it to our main scene just below the code we wrote to make objects wrap around the screen. First, player and asteroid:
// Collisions
collides("player", "asteroid", (p, a) => {
    if (!a.initializing) {
        p.lives--;
    }
});
This code reduces the player's lives by one as long as the asteroid is not initializing.
Next, add the code for collisions between a bullet and an asteroid:
collides("bullet", "asteroid", (b, a) => {
    if (!a.initializing) {
        destroy(b);
        destroy(a);
        play("explosion");
        score++;
    }
});
This very simple code destroys both the bullet and the asteroid, plays an explosion sound, and increments the game score.
Finally, add the following to handle asteroid collisions.
collides("asteroid", "asteroid", (a1, a2) => {
    if (!(a1.initializing || a2.initializing)) {
        a1.speed = -a1.speed;
        a2.speed = -a2.speed;
    }
});
This code makes the asteroids appear to bounce off each other by reversing their movement direction.
Run the game now and see what happens when you ram your ship into some asteroids!

Ending the game
The player's ship can now lose lives by crashing into asteroids, but this doesn't mean much at the moment, as we haven't added any code to end the game if the player runs out of lives, or even to display the lives remaining. Let's do that now. First, let's change the code in the player–asteroid collision to trigger a custom "damage" event instead of just subtracting a life.
// Collisions
collides("player", "asteroid", (p, a) => {
    if (!a.initializing) {
        p.trigger("damage"); // previously lives--
    }
});
Now we can add the code to handle this event just below the collision code:
// Take damage
player.on("damage", () => {
    player.lives--;

    // destroy ship if lives finished
    if (player.lives <= 0) {
        destroy(player);
    }
});
When objects are destroyed in Kaboom, the "destroy" event is triggered. We'll use this event to show a game over screen with the player's score by adding the following code:
// End game on player destruction
player.on("destroy", () => {
    add([
        text(`GAME OVER\n\nScore: ${score}\n\n[R]estart?`, 16),
        pos(width()/2, height()/2),
        layer("ui")
    ]);
});
We need to give the player a way to restart the game and try again. Add the following code just below the previous block:
// Restart game
keyPress("r", () => {
    go("main");
});
The go function is a Kaboom built-in for moving between scenes. As this game only has one scene, we can use it to reset the scene and thus the game to its initial state.
Lastly, we need to add the player's lives to the game UI, so they know how much more damage they can afford to take. Find the ui object code near the top of the main scene and alter it to resemble the below:
ui.on("draw", () => {
    drawText("Score: " + score, {
        pos: vec2(8, 24),
    });

    // lives (new code below)
    drawText("Lives: ", {
        pos: vec2(8),
    });
    for (let x = 64; x < 64 + (16*player.lives); x += 16) {
        drawSprite("ship", {
            pos: vec2(x, 12),
            rot: 1.6,
            origin: "center",
            scale: 0.5
        });
    }
});
This code draws a number of scaled down player spaceships equal to the number of remaining lives.

Final touches
Our game is fully playable now, but it's still missing some niceties, and one core gameplay feature that you should be able to identify if you've played Asteroids before. In this final section, we'll add the following:
- Some background music.
- Smaller, faster asteroids that our large asteroids break into when destroyed.
- Temporary invulnerability for the player for a few seconds after they take damage.
Background music
Add the following code somewhere in your main scene.
// Background music
const music = play("Steamtech-Mayhem_Looping");
music.loop();
The first line plays the piece Steamtech Mayhem from Soundimage.org and the second line will ensure that it repeats as long as the game is running.
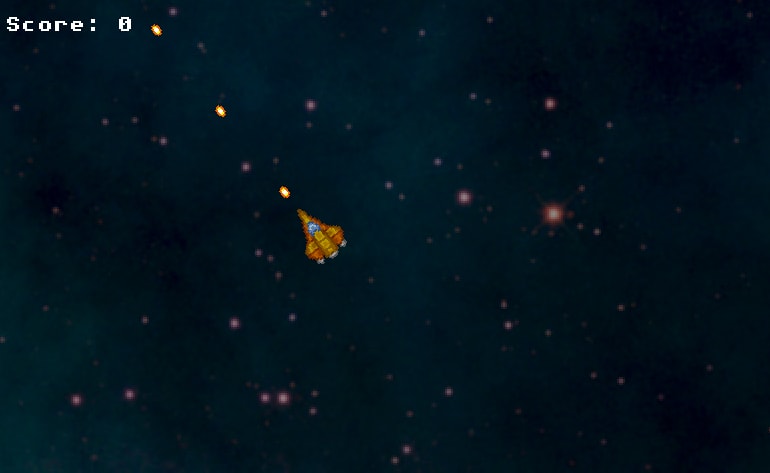
Smaller asteroids
To create smaller asteroids when a large asteroid is destroyed, we'll use a destroy event callback, which will run every time an asteroid is destroyed. Add the following code to the bottom of your main scene:
// Asteroid destruction
on("destroy", "asteroid", (a) => {
    if (!a.is("small")) {
        // create four smaller asteroids at each corner of the large one
        positions = [a.pos.add(vec2(a.width/4, -a.height/4)),
                    a.pos.add(vec2(-a.width/4, -a.height/4)),
                    a.pos.add(vec2(-a.width/4, a.height/4)),
                    a.pos.add(vec2(a.width/4, a.height/4))];

        // small asteroids move out from the center of the explosion
        rotations = [0.6,2.4,4,5.4];

        for (let i = 0; i < positions.length; i++) {
            add([
                sprite(`asteroid_small${i+1}`),
                pos(positions[i]),
                rotate(rotations[i]),
                origin("center"),
                solid(),
                "asteroid",
                "small",
                "mobile",
                "wraps",
                {
                    speed: rand(15, 25),
                    initializing: false
                }
            ]);
        }
    }
});
Our small asteroids are mostly similar to our large ones. Differences include the addition of the small tag, the less random approach to initial placement, the higher speed, and the selection of one of four different possible small asteroid sprites.
To make our game true to the original Asteroids, we should give the player more points for destroying these fast, small asteroids. Find and modify the bullet–asteroid collision code as below:
collides("bullet", "asteroid", (b, a) => {
    if (!a.initializing) {
        destroy(b);
        destroy(a);
        play("explosion");
        score = a.is("small") ? score + 2 : score++; // 2 points for small, 1 for big
    }
});

Temporary invulnerability
A nice touch to make our game a little more forgiving is temporary invulnerability for the player after they lose a life. We can add this by finding and altering the player's damage event callback as follows:
// Take damage
player.on("damage", () => {
    if (!player.invulnerable) { // new if statement
        player.lives--;
    }

    // destroy ship if lives finished
    if (player.lives <= 0) {
        destroy(player);
    }
    else // new code
    {
        // Temporary invulnerability
        player.invulnerable = true;

        wait(player.invulnerablity_time, () => {
            player.invulnerable = false;
            player.hidden = false;
        });
    }
});
Here we're making the player invulnerable and then using a wait callback to make them vulnerable again after a given number of seconds, similar to what we did for the laser timeout. We're also making sure the player is visible by setting player.hidden to false, because the way we're going to indicate the player's invulnerability is by having their ship flash rapidly. Add the following loop timer just below the above code:
loop(0.1, () => {
    if (player.invulnerable) {
        player.hidden = !player.hidden;
    }
});
Where to next?
We've covered a lot of ground in this tutorial and touched on a lot of Kaboom's features. From here, you can start making your own games with Kaboom, or if you want to extend this one, here are some ideas:
- Power-ups, such as extra lives and time-limited weapon upgrades.
- Enemy spaceships that fire at the player.
- A third, even smaller size of asteroid.
- More animations, for explosions and laser firing.
You can find the game repl below:


Top comments (0)