The Mario series is one of the most known and loved game series of all time. The first Mario game was released by Nintendo in the mid-80s, and people haven't stopped playing Mario since.
Tons of games still use the basic side-scroller formula of Mario, so it's a good game to build to learn the basics of game making. We'll build it in the new Kaboom game engine. Kaboom has many useful functions for building platform games, and we'll try to go through as many as we can in this tutorial.

Designing the game
We'd like to make a game that has the Mario essence. This means we need a few things:
- The ability to jump and bump into reward boxes.
- A big and small character type.
- The ability to attack enemies by jumping on them.
- The classic Mario scrolling and camera motion.
For the graphics, we will use a tile set from this creator.
Creating a new project in Replit
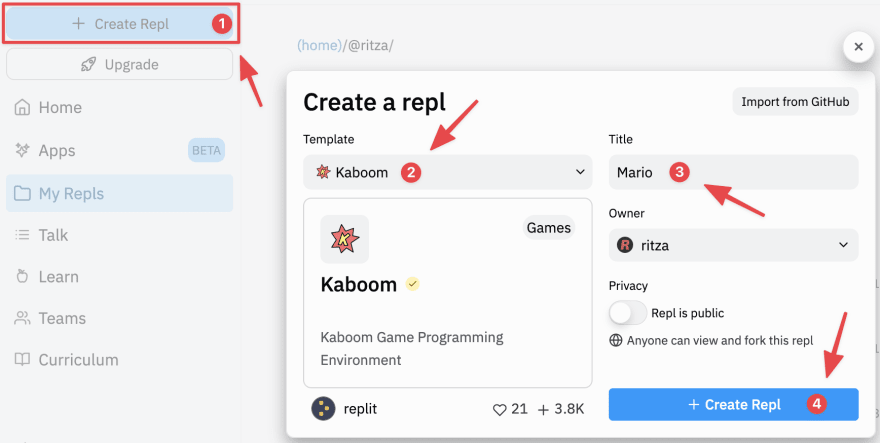
Head over to Replit and create a new repl. Choose Kaboom as your project type. Give this repl a name, like "Mario".
After the repl has booted up, you should see a main.js file under the "Code" section. This is where we'll start coding. It already has some code in it, but we'll replace that.
Download this archive of sprite and asset files that we'll need for the game, and unzip them on your computer. In the Kaboom editor, click the "Files" icon in the sidebar. Now drag and drop all the sprite and asset files into the "sprites" folder. Once they have uploaded, you can click on the "Kaboom" icon in the sidebar, and return to the "main" code file.

Setting up Kaboom
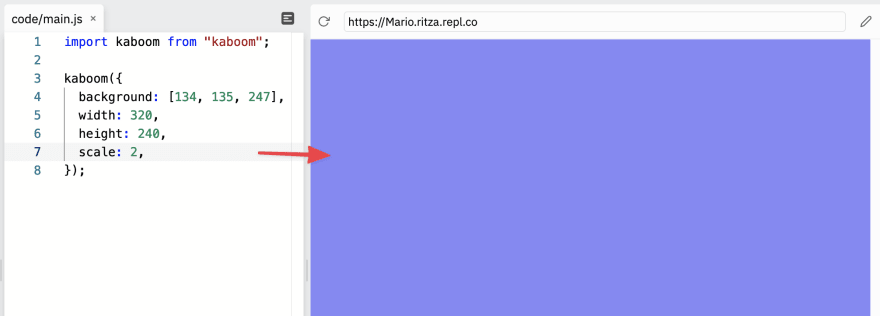
To start, we need to set up Kaboom with the screen size and colors we want for the game window. Replace the code in main.js with the code below:
  import kaboom from "kaboom";

  kaboom({
    background: [134, 135, 247],
    width: 320,
    height: 240,
    scale: 2,
  });
This creates a new Kaboom canvas with a nice Mario sky-blue background. We also set the size of the view to 320x240 pixels, which is a very low resolution for a modern game, but the right kind of pixelation for a Mario-type remake. We use scale to make the background twice the size on screen - you can increase this value if you have a monitor with very high resolution. Click the "Run" button, and you should see a lovely blue sky in the output window.
Now, let's load up some of the sprites so we can add them to the blue sky scene. This code loads each of the graphic elements we'll use, and gives them a name so we can refer to them when we build the game characters:
loadRoot("sprites/");
loadAseprite("mario", "Mario.png", "Mario.json");
loadAseprite("enemies", "enemies.png", "enemies.json");
loadSprite("ground", "ground.png");
loadSprite("questionBox", "questionBox.png");
loadSprite("emptyBox", "emptyBox.png");
loadSprite("brick", "brick.png");
loadSprite("coin", "coin.png");
loadSprite("bigMushy", "bigMushy.png");
loadSprite("pipeTop", "pipeTop.png");
loadSprite("pipeBottom", "pipeBottom.png");
loadSprite("shrubbery", "shrubbery.png");
loadSprite("hill", "hill.png");
loadSprite("cloud", "cloud.png");
loadSprite("castle", "castle.png");
The first line, loadRoot, specifies which folder to load all the sprites and game elements from, so we don't have to keep typing it in for each sprite. Then each line loads a game sprite and gives it a name so that we can refer to it in code later.
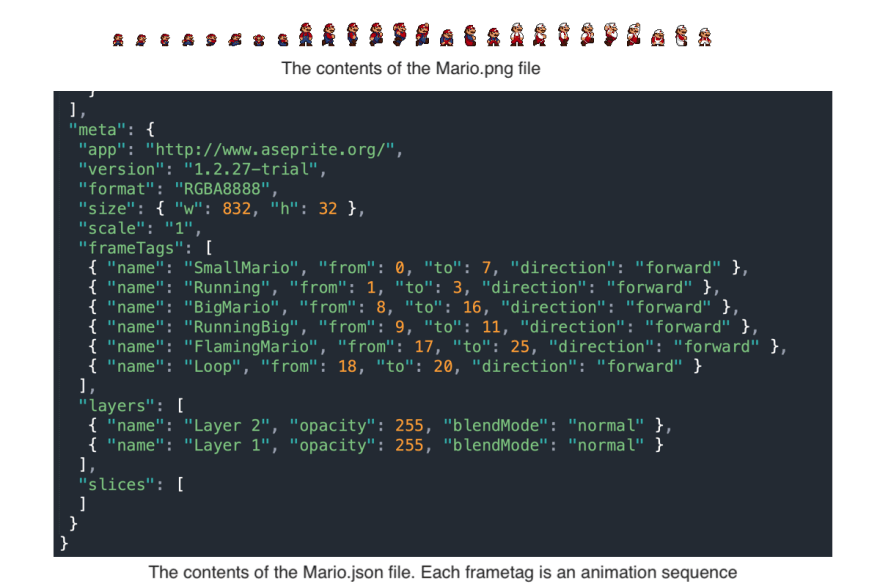
Notice that the mario and enemies sprites are loaded with the function loadAseprite, and have an extra parameter specifying a .json file. This extra file is in a file format made by Aseprite, which is a pixel art and animation app. If you open the Mario.png file, you'll see that it has many different images of Mario in different positions, which are frames of Mario animations. The .json file from Aseprite contains all the information needed to animate Mario in our game. Kaboom knows how to interpret this file, and we can pick which animation we want to run at any time by choosing one from the frameTags list in the .json file and using the .play() method on a sprite. We can also choose a particular frame to show at any time, using the sprite's .frame property, and specifying the frame number to use, starting from 0.
Creating the level maps
Let's add 2 levels to start. You can create and add as many levels as you want - that's one of the great benefits of writing your own game!
Kaboom has a really cool way of defining levels. It allows us to draw a layout of the level using only text. Each letter or symbol in this text map can be mapped to a character in the Kaboom game. In Kaboom, characters are anything that makes up the game world, including floor, platforms, and so on, and not only the players and bots.
Add the following to define the levels:
const LEVELS = [
  [
    "                                                                                                ",
    "                                                                                                ",
    "                                                                                                ",
    "                                                                                                ",
    "                                                                                                ",
    "                                                                                                ",
    "                                                                                                ",
    "      -?-b-                                                                                     ",
    "                                                    ?        ?                                  ",
    "                                                                                                ",
    "                                      _                 ?                                       ",
    "                                 _    |                                                         ",
    "                           _     |    |                _                                        ",
    "       E                   |     |    |   E   E        |                            H           ",
    "================     ===========================================================================",
    "================     ===========================================================================",
  ],
  [
    "                                                                                             ",
    "                                                                                             ",
    "                                                                                             ",
    "                                       ?                                                     ",
    "                                                                                             ",
    "                                   -?-                                                       ",
    "                                                                                             ",
    "      -?-b-                  -?-                                                             ",
    "                                                                                             ",
    "                                                                                             ",
    "                                                                                             ",
    "                                                                                             ",
    "       _                                            _                                        ",
    "       |                                            |          E    E            H           ",
    "================     ========================================================================",
    "================     ========================================================================",
  ]
];
Now we can map each symbol and letter in the levels to a character definition:
const levelConf = {
  // grid size
  width: 16,
  height: 16,
  pos: vec2(0, 0),
  // define each object as a list of components
  "=": () => [
    sprite("ground"),
    area(),
    solid(),
    origin("bot"),
    "ground"
  ],
  "-": () => [
    sprite("brick"),
    area(),
    solid(),
    origin("bot"),
    "brick"
  ],
  "H": () => [
    sprite("castle"),
    area({ width: 1, height: 240 }),
    origin("bot"),
    "castle"
  ],
  "?": () => [
    sprite("questionBox"),
    area(),
    solid(),
    origin("bot"),
    'questionBox',
    'coinBox'
  ],
  "b": () => [
    sprite("questionBox"),
    area(),
    solid(),
    origin("bot"),
    'questionBox',
    'mushyBox'
  ],
  "!": () => [
    sprite("emptyBox"),
    area(),
    solid(),
   // bump(),
    origin("bot"),
    'emptyBox'
  ],
  "c": () => [
    sprite("coin"),
    area(),
    solid(),
    //bump(64, 8),
    cleanup(),
    lifespan(0.4, { fade: 0.01 }),
    origin("bot"),
    "coin"
  ],
  "M": () => [
    sprite("bigMushy"),
    area(),
    solid(),
    //patrol(10000),
    body(),
    cleanup(),
    origin("bot"),
    "bigMushy"
  ],
  "|": () => [
    sprite("pipeBottom"),
    area(),
    solid(),
    origin("bot"),
    "pipe"
  ],
  "_": () => [
    sprite("pipeTop"),
    area(),
    solid(),
    origin("bot"),
    "pipe"
  ],
  "E": () => [
    sprite("enemies", { anim: 'Walking' }),
    area({ width: 16, height: 16 }),
    solid(),
    body(),
    //patrol(50),
    //enemy(),
    origin("bot"),
    "badGuy"
  ],
  "p": () => [
    sprite("mario", { frame: 0 }),
    area({ width: 16, height: 16 }),
    body(),
    //mario(),
    //bump(150, 20, false),
    origin("bot"),
    "player"
  ]
};
That looks like a lot, but it's really one pattern repeated for each element. Let's take it apart.
The first 3 lines of the config set the default width and height of each element in the level maps. We use pos to specify where to position the whole map in the Kaboom canvas. This is normally going to be (0,0), i.e. at the top left of the screen.
Next we have definitions for each of the symbols we used in the map. Each definition is a function that returns an array of components. In Kaboom, every character is made up of 1 or more components. Components give special properties to each character. There are built-in components for many properties, like sprite to give the character an avatar, body, to make the character respond to gravity, solid to make the character solid so other characters can't move through it, and many others.
Kaboom also allows you to write your own custom components to create any property or behavior you like for a character. The components patrol, mario, enemy, and bump are all custom here. You'll notice that those custom components are commented out (//), as we'll need to create the implementations for them before we can use them. We'll do that later in this tutorial.
Adding a scene
Kaboom "scenes" allow us to group logic and levels together. In this game we'll have 2 scenes:
- A "start" or intro scene, which waits for a player to press a button to start the game. We'll also return to this scene if the player dies, so they can start again.
- A main "game" scene, which will contain the game levels and all the logic to move Mario, and the logic for the enemies and rewards, etc.
We can use the go function to switch between scenes.
Let's add the "start" scene, and make the game go to that scene by default:
scene("start", () => {

  add([
    text("Press enter to start", { size: 24 }),
    pos(vec2(160, 120)),
    origin("center"),
    color(255, 255, 255),
  ]);

  keyRelease("enter", () => {
    go("game");
  })
});

go("start");
We define the scene using the scene function. This function takes a string as the scene name – we're calling the scene "start". We're using an inline function here, using arrow function notation. You could also use the function keyword, if you'd like to specify a function in that way.
We also add some instruction text in the scene function, using the text component and setting the text's content and size. The pos component sets the position of the text on the screen, and the origin component specifies that the center of the text should be used to position it. Finally, we set the color of the text to white using the color component, which takes RGB (red, green, blue) values from 0-255.
We also have a call to the function keyRelease, which listens for the enter key being pressed. If the enter key is pressed, we go to the main game scene (which we'll add shortly!).
Finally, we use the go function to go to the start scene when the game starts up.
After copying the code into your repl, press Command + S (Mac) or Control + S (Windows/Linux) to update the output window. You should see something like this:

Note that if you push enter now to start the game, you'll get an error message. Don't worry, we'll sort that out soon.
Adding the main game scene
Now let's get the game scene up and running. Add the code below:
scene("game", (levelNumber = 0) => {

  layers([
    "bg",
    "game",
    "ui",
  ], "game");


  const level = addLevel(LEVELS[levelNumber], levelConf);

  add([
    sprite("cloud"),
    pos(20, 50),
    layer("bg")
  ]);

  add([
    sprite("hill"),
    pos(32, 208),
    layer("bg"),
    origin("bot")
  ])

  add([
    sprite("shrubbery"),
    pos(200, 208),
    layer("bg"),
    origin("bot")
  ])

  add([
    text("Level " + (levelNumber + 1), { size: 24 }),
    pos(vec2(160, 120)),
    color(255, 255, 255),
    origin("center"),
    layer('ui'),
    lifespan(1, { fade: 0.5 })
  ]);

  const player = level.spawn("p", 1, 10)

});
Press Command + S or Control + S now, and push enter at the start screen prompt. You should see our replica of Mario World instead of the error message.
You should also see the enemy character wobble its feet, like it's trying to walk. This is because when we added the enemy definition E in the level config, we specified in the sprite component that it must use the Walking animation, which is defined in the enemies.json file. Kaboom starts the character using that animation.

Ok, back to looking at the code we added and what it does. First, we define a new scene like we did for the start scene. This time, we specify a parameter levelNumber that can be passed to the scene. We give this parameter a default value of 0. This will be the first level in our LEVELS array - remember, arrays start at index 0, so 0 is level 1. This parameter will let us call the same scene again when we get to the end of the level, but with 1 as the parameter so that we can play the next level. You can specify any parameters you like or need when creating a scene, and you can pass values from one scene to another. This is very useful, for example if you want to pass the player score to an end game scene, or pass in player options from the start scene.
Next, we define some layers. Layers allow us to have backgrounds that don't affect the game - we call that layer bg. We'll place all the main game objects (like our hero, his enemies, and any other objects he interacts with) on the game layer, and all the UI elements (like current score, health, etc.) on the ui level. We make game the default layer, so if we don't specify a layer component on a game object, it will be drawn on the game layer.
In the next line of code, we initialize and create the level by calling the addLevel function. Here we pass in the level from the LEVELS array, using the index from the levelNumber parameter we added to the scene. We also pass in the configuration for all the symbols in the level map that we assigned to the levelConf variable. At this point, the map and all the characters in it are drawn to the screen. Note that, because the map is much wider than the size we set in the settings for the Kaboom window, we only see part of the map. This is great, because it will allow us to show more of the map as Mario starts walking.
Then we add a few elements to the background layer - clouds, hills and shrubberies. Note the use of the layer component on these elements. We do this so that they don't interact with our game objects - they just add some visual interest. You can add as many as you like - the original Mario has them in a repeating pattern across the whole level.
We also add some temporary text to the ui layer to let the player know which level they are on. Notice that we use the lifespan component here to automatically fade out and remove the info text after 1 second.
Finally, we add Mario to the game! We could have added him by placing his symbol, p, on our level map definition. However, by adding him manually to the scene using level.spawn(), we can get a reference to him. This will be useful later when we are dealing with collisions and other interactions. We also set the position we want the character to initially be placed at.
Making Mario move
The scene is all set up, so let's add in some interaction. The player will use the arrow keys to move Mario left and right, and the space bar to make him jump. We'll use the keyDown function for moving left and right, as we want Mario to keep moving as long as the player holds down either key. Then we can use the keyPress function to make Mario jump. The player will need to push the space key each time they want Mario to jump - it's always fun to smash buttons! Add the following code at the bottom of the game scene:
    const SPEED = 120;

    keyDown("right", () => {
      player.flipX(false);
      player.move(SPEED, 0);
    });

    keyDown("left", () => {
      player.flipX(true);
      if (toScreen(player.pos).x > 20) {
        player.move(-SPEED, 0);
      }
    });

    keyPress("space", () => {
      if (player.grounded()) {
        player.jump();
      }
    });
Take a look at thekeyDown handlers "right" and "left". We use the flipX method that is added to the character through the sprite component. If this is true, it draws the sprite as a mirror image. This flip will make Mario face in the correct direction. We call the move method, which is added by the pos component. Our move method takes in the number of pixels to move per second, which we set in the SPEED constant. You might want to move this constant definition nearer to the top of the file, so it's easier to find if you want to tweak it later.
In the "left" handler, there is also another check. In Mario, you can't walk back to previous parts of a level once it's gone off screen. We can simulate this by checking if Mario is near the left edge of the screen. We get Mario's current position by calling the pos method which is added by the pos component. However, this position will be relative to the whole level, and not just the onscreen view. To help us figure out if Mario is near the edge of the screen, and not just at the beginning of the level, we can use the toScreen function, which converts "game world" or level co-ordinates to actual screen co-ordinates.
When a player releases the space key, we want to make Mario jump. To do this, we can call the jump method, which is added to the character through the body component. However, jump will make the character shoot up, even if it is already in the air. To prevent this double jumping, we first check if the player is standing on some solid object. The body component also adds the grounded() function, which returns true if the player is indeed standing on a solid object.
Press Command + S or Control + S to update the output, and test it out. Mario should move around, but it doesn't look very natural and Mario-like - yet! Another thing you'll notice is that the screen does not scroll when Mario walks to the right, so we can't get to the rest of the level. Let's fix that first.
Adding scrolling
Kaboom has a number of functions to control the "camera" of the scene. The camera represents the field of view that the player can see. At the moment, the camera only shows the first part of the level. By using the camPos function, we can move the camera to show more of the level as Mario walks across the scene.
Let's add this code to the game scene:
player.action(() => {
  // center camera to player
  var currCam = camPos();
  if (currCam.x < player.pos.x) {
    camPos(player.pos.x, currCam.y);
  }
});
Here we add a handler to the action event for the player. This is called for each frame that is rendered. In this handler, we get the camera's current position by calling the camPos function without any arguments. Then we can check if Mario is further to the right of the scene than the camera is. If he is, then we set the camera's X position to that of Mario, so essentially the camera is following Mario. We only do this if he is further to the right of the camera, and not for positions further to the left. This is because we don't want the player to be able to go back on a level.
Update the output again and test it out. As you move Mario past the center of the screen, the camera should start following him, giving the sense of scrolling.

Creating a custom component
To add more abilities to the characters and features to the game, we'll use components that we create ourselves and can add to our games objects. To define a new component in Kaboom, we make a function that returns an object with a few required fields and methods. Here's a template to illustrate code for a custom component (not part of the game code):
function customComponent(args) {
  return {
    id: "name",
    require: ["component1", "component2",],
    add() {
    },
    update() {
    },
  };
}
In the object we return, Kaboom requires an id, which is a unique name for the component. Kaboom also needs a require property, which is a list of other components this component needs in order to work. When a component is first initialized on a game object, Kaboom calls the add() method so we have the opportunity to run any setup code we need. The method update() is called on every game frame, so we can make animation and collision updates there.
One behavior we need is for the enemy characters to walk up and down, instead of just standing in one place. Let's make a custom component we can add to our enemy characters so that they automatically move back and forth, or patrol their part of the level. Add the code below to the bottom of main.js:
function patrol(distance = 100, speed = 50, dir = 1) {
  return {
    id: "patrol",
    require: ["pos", "area",],
    startingPos: vec2(0, 0),
    add() {
      this.startingPos = this.pos;
      this.on("collide", (obj, side) => {
        if (side === "left" || side === "right") {
          dir = -dir;
        }
      });
    },
    update() {
      if (Math.abs(this.pos.x - this.startingPos.x) >= distance) {
        dir = -dir;
      }
      this.move(speed * dir, 0);
    },
  };
}
We've called this custom component "patrol", as it will make a character move some distance, at a set speed, and then turn around and walk in the opposite direction, dir. The character will also turn and move in the opposite direction if it collides with another game object. Because we use the move method (which is part of the pos component), and the collide event handler (which is part of the area component), we add the pos and area components to the require list.
When the component is first initialized, we want to record its starting position. This is so that we know how far the character is from where it started off, and therefore we'll know when we must turn it to move in the opposite direction. We do this by making use of the add() method. As we mentioned above, Kaboom will call this method on our component when the character is added to the scene. We read the position of the character at that time by calling this.pos: this refers to our character (as our component is made part of the character, this is reference to the combination of all the components making up the character). We can save this initial position to a property of the component object, in our case one called startingPos. We then attach a collide handler, so we know if the character bumps into anything, so we can turn it and move it in the opposite direction again.
The collide handler has 2 arguments passed to it: the obj that our character collided with, and the side of character that was hit. We only want to flip the direction our character moves in if it was hit from the sides left and right. To change the direction, we flip the sign of our dir variable, which we'll use in the update() method.
The update() method is called for each frame. In it, we first check if the character is further than the specified maximum distance from its starting position. If it is, we switch the sign of the dir variable to make the character move in the opposite direction. Note that we we use the Math.abs function, which returns the absolute value of a number. The absolute value of a number is always positive, and this allows us to compare it to our distance variable, which is also a positive value. Then we call the move method (provided by the pos component) and use the speed variable (passed in when the component was created) along with the dir variable to specify how fast and in which direction to move the character for this frame.
Now that we've created this component, let's use it on a character. Uncomment the lines //patrol wherever you see it in the levelConf setup we created. Update the output and test it out. You should see the enemy character walk back and forth.
You'll notice we also make use of the patrol component on the bigMushy character, which we'll use to make Mario grow from small Mario to big Mario. We'll get to that in a bit.
Creating a custom component for the enemies
Now that the enemies are moving around, we can give them some more behaviors and properties. One of the most important things to do is to squash the enemies if Mario jumps on them. If you take a look at the enemies.png sprite file, you'll see that the 3rd frame (index 2) is an image of the enemy, but squashed.

We can swap out the animation that is played when the enemy is patrolling for this frame. Kaboom has a built in lifespan component that also has a fade out function. This component allows us to slowly fade out the squashed enemy from the scene, and then automatically remove it entirely once the specified lifetime is reached. Kaboom also allows us to dynamically add and remove components from characters using the use and unuse methods. These methods are not yet documented, but you can find them (and more tricks!) by looking at the Kaboom source code. Let's use this knowledge to build a custom component to handle the enemy getting squashed and fading out of the scene:
function enemy() {
  return {
    id: "enemy",
    require: ["pos", "area", "sprite", "patrol"],
    isAlive: true,
    update() {

    },
    squash() {
      this.isAlive = false;
      this.unuse("patrol");
      this.stop();
      this.frame = 2;
      this.area.width = 16;
      this.area.height = 8;
      this.use(lifespan(0.5, { fade: 0.1 }));
    }
  }
}
We define the custom component as we did before. Because we need to stop the enemy from patrolling, we require the patrol custom component. We also require the sprite component so we can stop the animation and set the squashed frame to display. The area component is necessary, as the squashed enemy frame is half the height of the regular enemy frames (8 pixels vs 16 pixels). We're going to need to adjust the height of the area so that the collision zone the enemy occupies once squashed is correct.
As a side note, pressing F1 in the game turns on Kaboom debugging, which will draw the area box around each game element, so you can easily see when characters collide. It also shows other handy info, like the frame rate and character properties.

Back to our code. We execute our enemy squash in the squash method. We have a flag called isAlive, which we'll use to determine if the enemy is able to hurt Mario. This is usually true, but set to false once the enemy is squashed and harmless. We also unuse the patrol component so that the enemy stops walking back and forth. Then we call stop, which is a method added by the sprite component. Calling stop stops playing the current animation. Then we set the frame of the sprite to use to 2, which is the squashed enemy frame, and update the area width and height to be the same size as the frame. Finally, we call use to add the lifespan component so that the character is removed from the scene after 0.5 seconds, and fades out for 0.1 seconds.
Now let's add this custom component to the enemy. First, uncomment the //enemy(), line in the levelConf setup we created earlier. Now create a collision handler in the game scene between Mario and the enemy, so we know when it gets squashed:
let canSquash = false;

player.collides("badGuy", (baddy) => {
  if (baddy.isAlive == false) return;
  if (canSquash) {
    // Mario has jumped on the bad guy:
    baddy.squash();
  } else {
    // Mario has been hurt. Add logic here later...
  }
});
In this collides handler, we check if the player, Mario, collides with a badGuy - which is the tag we gave to the enemies in the levelConf setup above. Then we attach our handler, which takes the baddy character Mario collided with. We first check if the baddy is still alive - if not we leave early, as there is no real interaction between Mario and a dead enemy. Then, we check the canSquash variable - if it is set to true, that means Mario has jumped onto the enemy. In this case, we call the squash method, which we created in the custom component for the enemy. This will execute all the logic we added there, and "kill" the enemy. We leave a bit of room in the handler to come back and add logic if Mario collides with the enemy without jumping on it - we'll add in that logic later.
Modify the keyPress handler for the space key as follows:
  keyPress("space", () => {
    if (player.grounded()) {
      player.jump();
      canSquash = true;
    }
  });
Here, we set the canSquash variable to true to allow the player to squash the enemy if the player has jumped over it upon collision.
Add the following code to the player.action handler:
if (player.grounded()) {
  canSquash = false;
}
This code will reset the canSquash variable so that the player will not squash the enemy if it hasn't jumped over it in the collision handler we added earlier.
Update the output and test our game out. If you jump on an enemy, it should be squashed and then disappear after half a second.
Headbutting surprise boxes
Another key Mario action is headbutting the surprise boxes (the ones with "?" on them). In Mario World, this could release a coin, a super mushroom (one that makes Mario grow bigger), etc. When Mario headbutts these boxes, the box is 'bumped' and moves up and down quickly, while releasing its surprise. Once the box is empty, the "?" is removed from it. Let's create the logic to control these boxes. As above, we'll make more use of custom components.
We'll take care of the boxes for coins and for the grow-bigger mushrooms. If you take a look in the levelConf setup we added in the beginning, you'll see entries for coin and mushroom "question boxes". The only real difference between the two is the final tag, which marks which surprise the box should release. We also have definitions for an empty box (!), the coin (c), and the mushroom (M).
Let's create a component that makes the box jump up and fall back down when it is headbutted. We can also re-use it on the coin to make it flip as it's bumped out of the box. We'll call this new component bump:
  function bump(offset = 8, speed = 2, stopAtOrigin = true) {
    return {
      id: "bump",
      require: ["pos"],
      bumpOffset: offset,
      speed: speed,
      bumped: false,
      origPos: 0,
      direction: -1,
      update() {
        if (this.bumped) {
          this.pos.y = this.pos.y + this.direction * this.speed;
          if (this.pos.y < this.origPos - this.bumpOffset) {
            this.direction = 1;
          }
          if (stopAtOrigin && this.pos.y >= this.origPos) {
            this.bumped = false;
            this.pos.y = this.origPos;
            this.direction = -1;
          }
        }
      },
      bump() {
        this.bumped = true;
        this.origPos = this.pos.y;
      }
    };
  }
This looks a bit more complicated than our other custom components, but that's only because it has code for the object moving in both directions. First off, we have a few parameters when creating this component:
-
offsetis how far up we want the object to be bumped before settling down again. -
speedis how fast we want it to move when bumped. -
stopAtOriginspecifies whether we want the object to return to its original position after being bumped, or just keep falling down - if this parameter isfalse, then bumping the object will make it look like it got dislodged and it will fall down.
The object this component is added to must also have the pos component. We'll use that to move the object when it is bumped.
We add a method, bump, which we can call from a collision handler or elsewhere. This sets the property bumped to true. This is a flag in the update method that will trigger the bump behavior. In the bump method, we also record the y position of the object in a property origPos so that we can stop the object at its original position if the stopAtOrigin flag has been set.
In the update method, which is run on each frame, we first check if the bumped flag has been set. If it has, we update the y position of the object using the speed we set, and in the current direction. On a screen, the top of the screen is where y = 0, and the bottom is the max height of the screen. Therefore to start, direction is set to -1 to move the object up. Then we have a check to see if the new position of the object is higher than the offset parameter distance from the object's original position. If it is, we reverse the direction, so the object now starts moving back down.
Next, we have a check to see if the flag stopAtOrigin is set. If the object has fallen down to its original position (or further), we set the bumped flag back to false and update the object's position exactly back to its original position. We also set the direction flag back to -1, so the object is back in a state that it can be bumped again.
Now that this bump component exists, you can uncomment the //bump(), lines in the levelConf setup we created earlier.
To trigger the bump and add the code to make the surprise come out, we'll need to add a collision handler. Believe it or not, Kaboom has a special case collision event called headbutt (which is not documented, but you can also find it in the source code) just for this type of thing!
player.on("headbutt", (obj) => {
  if (obj.is("questionBox")) {
    if (obj.is("coinBox")) {
      let coin = level.spawn("c", obj.gridPos.sub(0, 1));
      coin.bump();
    } else
    if (obj.is("mushyBox")) {
      level.spawn("M", obj.gridPos.sub(0, 1));
    }
    var pos = obj.gridPos;
    destroy(obj);
    var box = level.spawn("!", pos);
    box.bump();
  }
});
In the handler for headbutt, we are passed the object, obj, that the player headbutted. We check to see if it is indeed one of our questionBox objects. If it is, we check if it is a coinBox (a coin must pop out) or a mushyBox (a grow-bigger mushroom should pop out).
If it is a coinBox, we spawn a new coin 1 block above the coin box, using the configuration c we setup for a coin in the levelConf in the beginning. Then we call bump on the coin to invoke our custom component's method to make it appear to flip up out of the box.
If it is a mushyBox, we do the same, except we don't bump the mushroom. The mushroom has our custom patrol component added to it (check in the levelConf for M), so it will start moving immediately. We set the patrol distance very large on the mushroom so it won't automatically turn around, it will just keep going until if falls of the screen.
Then, to replace the questionBox with an empty box, we first record its position, then destroy it, and spawn a new empty box (! in the levelConf) to take its place. Finally, we bump this new box to give it the motion we want.
Cool, time to update the output and test this out. When you jump up using the space key and headbutt the question boxes now, they should move and have things pop out!

Adding special behaviors to Mario
Now we've got the basics of all the other game elements down, it's time to create a custom component for Mario himself. This component will need to do quite a bit, as Mario is the main character. Here are the things it will need to handle:
- Make Mario get bigger or smaller.
- Run the "running" animation when Mario is running, and change to a standing or jumping frame in other cases.
- "Freeze" Mario when he gets to the castle or has died, so the player can no longer move him.
- Handle Mario dying, with a classic spring up and out of the scene.
Ok, here it is, our Mario custom component:
function mario() {
    return {
      id: "mario",
      require: ["body", "area", "sprite", "bump"],
      smallAnimation: "Running",
      bigAnimation: "RunningBig",
      smallStopFrame: 0,
      bigStopFrame: 8,
      smallJumpFrame: 5,
      bigJumpFrame: 13,
      isBig: false,
      isFrozen: false,
      isAlive: true,
      update() {
        if (this.isFrozen) {
          this.standing();
          return;
        }

        if (!this.grounded()) {
          this.jumping();
        }
        else {
          if (keyIsDown("left") || keyIsDown("right")) {
            this.running();
          } else {
            this.standing();
          }
        }
      },
      bigger() {
        this.isBig = true;
        this.area.width = 24;
        this.area.height = 32;
      },
      smaller() {
        this.isBig = false;
        this.area.width = 16;
        this.area.height = 16;
      },
      standing() {
        this.stop();
        this.frame = this.isBig ? this.bigStopFrame : this.smallStopFrame;
      },
      jumping() {
        this.stop();
        this.frame = this.isBig ? this.bigJumpFrame : this.smallJumpFrame;
      },
      running() {
        const animation = this.isBig ? this.bigAnimation : this.smallAnimation;
        if (this.curAnim() !== animation) {
          this.play(animation);
        }
      },
      freeze() {
        this.isFrozen = true;
      },
      die() {
        this.unuse("body");
        this.bump();
        this.isAlive = false;
        this.freeze();
        this.use(lifespan(1, { fade: 1 }));
      }
    }
  }
Firstly, we require the character to have a few other components: body, so we can determine if Mario is jumping or on the ground; area, so we can change the collision box area of Mario as he grows or shrinks; sprite, so we can start and stop animations and set static frames; and our custom bump component, so we can throw Mario off the screen if he dies.
If we take a peek in the Mario.json file along with the Mario.png sprite file, we'll see that there are some animations defined in the frameTags section that we can use. The Running animation contains all the frames to make Mario appear to be running when he is in small size. Similarly, RunningBig has all the frames for when Mario is running while he is in big size. We can also see that a good frame for small Mario standing still, or stopped, is the first frame, or frame 0. A good frame to use for big Mario standing still or stopped is frame 8. Good frames for Mario jumping when he is small and big are 5 and 13 respectively. So we don't have to keep remembering all these magic strings and numbers, we set them as properties of the Mario component.
If we measure the size of the big Mario images, we'll see that the tightest crop we can get on them is about 24x32 pixels. For small Mario, the size is 16x16 pixels. We'll use this knowledge to set the correct Mario animation and area collision boxes when changing between animations and sizes.
In the mario component, we define a number of custom methods. Let's go through them.
- The
biggerandsmallermethods provide a way to change the size of Mario. We set a flagisBigthat we check in the other methods to choose appropriate animations and frames. We also set the collisionareasize appropriate for the size of Mario. - The
standingandjumpingmethods are called from our mainupdatemethod, which is called with each frame. In these 2 methods, we stop any animation that is currently running using thestopmethod provided by thespritecomponent. Then, depending on the size of Mario, determined by theisBigflag, we set the appropriate staticframeto make Mario look like he is standing still or jumping. - In the
runningmethod, we find the correct running animation depending on whether Mario is big or small. Then we check if that animation is the same animation that Mario is currently using, by calling thecurAnimmethod provided by thespritecomponent. If they are not the same, we update the current animation by callingplayto start the new animation. We first check the current animation because, if we set the animation regardless of what is currently playing, we'd keep resetting the current animation to the beginning with each frame and make it appear as a static frame. - The
freezemethod sets a flagisFrozen, which is used in theupdatemethod to determine whether Mario can move. - When Mario is killed, we can call the
diemethod. This first removes thebodycomponent on Mario so that he is no longer subject to gravity or collisions, because these are things that ghosts are not worried about. Then we call thebumpmethod that is added by our custombumpcomponent. This shoots Mario up into the air, and back down again. We also set theisAliveflag to false, to signal to any collision handlers that Mario is dead before they try kill him again, or give him a 1-up mushroom or coin. Wefreeze()Mario so that he reverts to a standing pose and keyboard input doesn't affect him, and finally, weusethelifespancomponent to fade Mario out and remove him from the scene.
We also have the required update method, which Kaboom calls every frame. In this method, we check if Mario is frozen, in which case we call our standing method to update Mario's pose. Then we check if Mario is not on the ground, in other words he is in the air, using the grounded() method provided by the body component. This method returns true if he is on a solid object, or false otherwise. If this comes back false, we call the jumping method to stop any animations and set the static jumping frame.
If Mario is not jumping, i.e. he is grounded, then we check if the user currently has the left or right key down. If so, this means Mario is running(). The final condition is if Mario is on the ground but is not moving, then he must be standing().
Nice! Uncomment the mario component line in the levelConf to activate this new component on Mario. Update the output and test the animation changes out. Instead of Mario in a single pose, you should see an animation as he runs, changing to a static frame as he stands still or jumps.
Now we can hook up collision handlers to check if Mario has eaten the mushroom to grow larger, or if he gets injured or killed by an enemy or falling off the screen.
Adding more Mario collisions and events
First, let's add a collision handler between the mushroom and Mario. Then we can call our bigger method from our custom mario component to grow him.
player.collides("bigMushy", (mushy) => {
  destroy(mushy);
  player.bigger();
});
In this handler, we remove the mushroom from the scene, and then make Mario bigger().
Let's add some more code to the handler we created earlier for Mario colliding with an enemy. There, we only handled the case of Mario jumping on the enemy. We still need to account for Mario being injured or killed by the enemy. Update the badGuy collision handler like this:
player.collides("badGuy", (baddy) => {
  if (baddy.isAlive == false) return;
  if (player.isAlive == false) return;
  if (canSquash) {
    // Mario has jumped on the bad guy:
    baddy.squash();
  } else {
    // Mario has been hurt
    if (player.isBig) {
      player.smaller();
    } else {
      // Mario is dead :(
      killed();
    }
  }
});
We add in a condition at the top of the handler to exit early if Mario is not alive.
In the else condition, if Mario did not squash the bad guy, we check if we are dealing with big Mario. If so, Mario World rules are that he doesn't die, he just gets smaller(). However, if Mario is already small, he unfortunately is now dead. We call out to another function killed to handle Mario's death scene. Let's add that function:
function killed() {
  // Mario is dead :(
  if (player.isAlive == false) return; // Don't run it if mario is already dead
  player.die();
  add([
    text("Game Over :(", { size: 24 }),
    pos(toWorld(vec2(160, 120))),
    color(255, 255, 255),
    origin("center"),
    layer('ui'),
  ]);
  wait(2, () => {
    go("start");
  })
}
This function does a few things. First, we run the code in the die method from the custom mario component. Then we add some text to notify the player that the game is over. We wait for 2 seconds as we pay Mario our final respects, and then we go back to the start scene to play again.
Another way Mario can die in Mario World is if he falls off the platform into the void. We can check for this by modifying the player.action handler we added earlier for moving the camera:
player.action(() => {
  // center camera to player
  var currCam = camPos();
  if (currCam.x < player.pos.x) {
    camPos(player.pos.x, currCam.y);
  }

  if (player.isAlive && player.grounded()) {
    canSquash = false;
  }

  // Check if Mario has fallen off the screen
  if (player.pos.y > height() - 16){
    killed();
  }

});
Here, we check if Mario's y co-ordinate is greater than the height of the Kaboom window, less the size of one platform block, which is 16 pixels. If this is the case, it means Mario has fallen off the top row of the platform, and therefore has been killed().
We also need to update our left and right key handler events to check if Mario isFrozen. In this case the handlers should just return early without moving Mario:
    keyDown("right", () => {
      if (player.isFrozen) return;
      player.flipX(false);
      player.move(SPEED, 0);
    });

    keyDown("left", () => {
      if (player.isFrozen) return;
      player.flipX(true);
      if (toScreen(player.pos).x > 20) {
        player.move(-SPEED, 0);
      }
    });
Then we also modify the space key handler to only jump if Mario is still alive:
keyPress("space", () => {
    if (player.isAlive && player.grounded()) {
      player.jump();
      canSquash = true;
    }
});
Time to update the output and test all these changes out! First thing to test is if Mario grows bigger by eating the mushroom. Second thing to check is if Mario then gets smaller again by colliding with an enemy. Also check if Mario is killed when colliding with an enemy when he is small, or when falling off the platform.
Ending when we get to the castle
The final thing to do for this tutorial is to handle the case when Mario reaches the castle. At this point, when Mario is at the door, we want him to freeze, a congratulations message to appear to the player, and then move on to the next level.
We can use a regular collision handler to check if Mario is at the castle. Notice in the setup for the castle in the levelConf we added earlier, we set the collision area of the castle to a very narrow, completely vertical line of width 1 pixel and height 240, which is the screen height:
  "H": () => [
    sprite("castle"),
    area({ width: 1, height: 240 }),
    origin("bot"),
    "castle"
  ],
This is so that the collision between Mario and the castle is only registered when Mario gets to the center of the castle, where the door is. We can visualize this by pressing F1 in the game to enable the debugger and look at the area box at the castle:

The reason we make the area box the height of the screen is make sure the player can't accidentally jump over the ending point and fall off the end of the level.
Now let's add our collision handler for the castle to the game scene:
player.collides("castle", (castle, side) => {
  player.freeze();
  add([
    text("Well Done!", { size: 24 }),
    pos(toWorld(vec2(160, 120))),
    color(255, 255, 255),
    origin("center"),
    layer('ui'),
  ]);
  wait(1, () => {
    let nextLevel = levelNumber + 1;

    if (nextLevel >= LEVELS.length) {
      go("start");
    } else {
      go("game", nextLevel);
    }
  })
});
First, we freeze Mario so the player can't control him anymore. Then we add our "Well Done!" text message to the center of the screen. We wait a second before incrementing our level number and going to the next level, or going back to the start of the game if we have completed all levels.
Next steps
There are few things left to do to complete the game:
- Add in some scoring. You can check out a previous Kaboom tutorial, like Space Shooter, to see how scoring works.
- Add in sounds and music. If you get your own copy of the Mario soundtrack and effects, you can use the
playsound function in Kaboom to get those classic tunes blasting as you play. - Add in some more levels. This is the really fun part, where you get to create Mario levels you wish existed.
- You can also add in some more of the Mario World game characters.
Credits
https://twitter.com/Arrow_N_TheKnee for the Mario Visual Assets


Top comments (1)
Thnks Ritza, I've tried it on replit and it works fine, but I am working on this project to add more levels and effects