In this tutorial, we'll use the Kaboom framework to develop a simple block-breaking game, similar to classics like Atari's Breakout and Taito's Arkanoid.
By the end of this tutorial, you'll be able to:
- Use the Kaboom framework to develop a polished arcade game with multiple levels.
- Have a basic game to build on by adding your own powerups and block types.
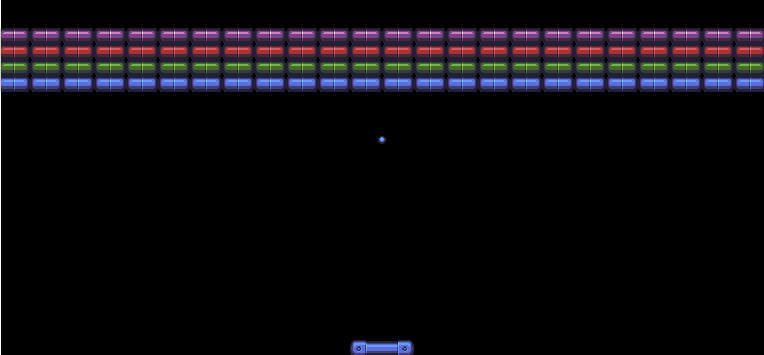
Our finished game will look like this:

We will be using this set of sprites by Michele Bucelli and sound effects from this pack by Jaymin Covy. We'll also use music by Eric Matyas of Soundimage.org.
We've created a single ZIP file with the sprites and sounds you will need for this tutorial, which you can download here.
Getting started
Log into your Replit account and create a new repl. Choose Kaboom as your project type. Give this repl a name, like "blockbreaker".

Kaboom repls are quite different from other kinds of repls you may have seen before: instead of dealing directly with files in folders, you'll be dealing with code, sounds and sprites, the latter of which you can draw directly in Replit's image editor.
Before we start coding, we need to upload our sprites and sounds. Download this ZIP file and extract it on your computer. Click the "Files" icon on the sidebar and upload everything in the extracted file's Sounds folder to the "sounds" section of your repl, and everything in the Sprites folder to the "sprites" section of your repl.

Once you've uploaded the files, you can click on the "Kaboom" icon in the sidebar, and return to the "main" code file.
Loading assets
When you first open your new Kaboom repl, you'll be greeted by a file containing the sample code below.
import kaboom from "kaboom";

// initialize context
kaboom();

// load assets
loadSprite("bean", "sprites/bean.png");

// add a character to screen
add([
    // list of components
    sprite("bean"),
    pos(80, 40),
    area(),
]);

// add a kaboom on mouse click
onClick(() => {
    addKaboom(mousePos())
})

// burp on "b"
onKeyPress("b", burp)
Before we start developing our game, let's remove most of this code, leaving only the following lines:
import kaboom from "kaboom";

// initialize context
kaboom();
Now we can set the stage for our own game. First, we'll make the game background black and fix the game's screen size by altering the Kaboom context initialization. Add the following to the line kaboom();:
// initialize context
kaboom({
    width: 768,
    height: 360,
    background: [0,0,0]
});
Next, we need to import sprites for our game's objects: the player's paddle, the ball, and the breakable blocks. As the OpenGameArt sprites we're using are all in a single image file, we'll load them using Kaboom's loadSpriteAtlas() function. This saves us the hassle of splitting each sprite into its own image file. Add the following code to the bottom of your main code file:
loadSpriteAtlas("sprites/breakout_pieces.png", {
    "blocka": {
        x: 8,
        y: 8,
        width: 32,
        height: 16,
    },
    "blockb": {
        x: 8,
        y: 28,
        width: 32,
        height: 16,
    },
    "blockc": {
        x: 8,
        y: 48,
        width: 32,
        height: 16,
    },
    "blockd": {
        x: 8,
        y: 68,
        width: 32,
        height: 16,
    },
    "paddle": {
        x: 8,
        y: 152,
        width: 64,
        height: 16,
    },
    "ball": {
        x: 48,
        y: 136,
        width: 8,
        height: 8,
    },
    "heart": {
        x: 120,
        y: 136,
        width: 8,
        height: 8,
    }
});
Note that we've imported four different block sprites, named block{a-d}. Each sprite is a different color and will be worth a different number of points when broken. We've also left most of the sprite sheet's contents untouched – only a few sprites are needed for basic gameplay.
Next, we need to import a font, which we'll use to display the player's score and lives. As Kaboom comes with a number of default fonts we could use, this step is optional, but it will help to give our game a cohesive visual style.
loadFont("breakout", "sprites/breakout_font.png", 6, 8, { chars: "ABCDEFGHIJKLMNOPQRSTUVWXYZ 0123456789:!'" });
We've used Kaboom's loadFont() function, specifying the name of the font, the image file to source it from, the width and height of individual characters, and the characters it contains. Take a look at the layout of breakout_font.png to see the format Kaboom expects. Also note that we will not be able to use any characters outside of the ones represented here – this includes lowercase letters.
![]()
Lastly, we need to load our sound effects and music. Add the following code at the bottom to do this:
// sounds
loadSound("blockbreak", "sounds/Explosion5.ogg");
loadSound("paddlehit", "sounds/Powerup20.ogg");
loadSound("powerup", "sounds/Powerup2.ogg");
loadSound("ArcadeOddities", "sounds/Arcade-Oddities.mp3");
Creating levels
We will create two initial levels for our game, using Kaboom's ASCII art level creation functionality. Add the following level definitions to the bottom of your file:
// levels
const LEVELS = [
    [
        "                        ",
        "                        ",
        "dddddddddddddddddddddddd",
        "cccccccccccccccccccccccc",
        "bbbbbbbbbbbbbbbbbbbbbbbb",
        "aaaaaaaaaaaaaaaaaaaaaaaa",
        "                        ",
        "                        ",
        "                        ",
        "            .           ",
        "                        ",
        "                        ",
        "                        ",
        "                        ",
        "                        ",
        "                        ",
        "                        ",
        "                        ",
        "                        ",
        "                        ",
        "                        ",
        "                        ",
        "            @           ",
    ],
    [
        " aaaaaaaaaaaaaaaaaaaaaa ",
        " a                    a ",
        " a  bbbbbbbbbbbbbbbbb a ",
        " a  b               b a ",
        " a  b    ccccccc    b a ",
        " a  b  ccdddddddcc  b a ",
        " a  b    ccccccc    b a ",
        " a  b               b a ",
        " a  bbbbbbbbbbbbbbbbb a ",
        " a                    a ",
        " aaaaaaaaaaaaaaaaaaaaaa ",
        "                        ",
        "            .           ",
        "                        ",
        "                        ",
        "                        ",
        "                        ",
        "                        ",
        "                        ",
        "                        ",
        "                        ",
        "                        ",
        "            @           ",
    ],
]
In the above levels, a-d are blocks, . is the ball, and @ is the player's paddle. We will make these definitions with a LevelOpt JSON object, which defines the width and height of individual blocks, and provides definitions for each game object. Add the following code to your file:
const LEVELOPT = {
    width: 32,
    height: 16,
    "a": () => [ // block
        sprite("blocka"),
        area(),
        "block",
        "bouncy",
        {
            points: 1
        }
    ],
    "b": () => [ // block
        sprite("blockb"),
        area(),
        "block",
        "bouncy",
        {
            points: 2
        }
    ],
    "c": () => [ // block
        sprite("blockc"),
        area(),
        "block",
        "bouncy",
        {
            points: 4
        }
    ],
    "d": () => [ // block
        sprite("blockd"),
        area(),
        "block",
        "bouncy",
        {
            points: 8
        }
    ],
    "@": () => [ // paddle
        sprite("paddle"),
        area(),
        origin("center"),
        "paddle",
        "bouncy",
        {
            speed: 400
        }
    ],
    ".": () => [ // ball
        sprite("ball"),
        color(WHITE),
        area(),
        origin("center"),
        "ball",
        {
            hspeed: 100,
            vspeed: 50
        }
    ]
}
Let's take a closer look at each of these definitions, starting with the first block object.
    "a": () => [ // block
        sprite("blocka"),
        area(),
        "block",
        "bouncy",
        {
            points: 1
        }
    ],
A game object definition in Kaboom is a list of components, tags, and custom attributes.
Components are a core part of Kaboom – they provide different functionality to game objects, from an object's appearance to functionality such as collision detection. In this case, we have two components: sprite(), which tells the object which sprite to represent itself with and area(), which gives the object the ability to collide with other objects.
While components come with prepackaged behaviors, tags are just labels that we can use to define our own behavior. This object has the tag "block", which we'll use to give it block-specific behaviors, such as being destroyed by the ball and giving the player points. It also has the tag "bouncy", which we'll use to make the ball bounce off it.
Lastly, our block has a custom points attribute, which will determine how many points it will give the player when it is destroyed. Our four block objects use different sprites and have different point values, but are otherwise identical.
Next, let's look at the paddle object:
    "@": () => [ // paddle
        sprite("paddle"),
        area(),
        origin("center"),
        "paddle",
        "bouncy",
        {
            speed: 400
        }
    ],
Like our block objects, the paddle has both sprite() and area() components. We've also given it the "bouncy" tag, so that the ball will bounce off it. Using tags like this is a great way to avoid writing the same code multiple times. Unlike our block objects, the paddle has an origin component, set to "center" – this will allow us to move the object from its center rather than its top-left corner.
The paddle object also has a speed attribute, which will determine how fast it moves across the screen.
Our last object is the ball.
    ".": () => [ // ball
        sprite("ball"),
        area(),
        origin("center"),
        "ball",
        {
            hspeed: 100,
            vspeed: 50
        }
    ]
As a moving object, this is largely similar to the paddle. The main difference is that we give it both horizontal and vertical speed attributes, as it will be moving in all directions, whereas the paddle only moves left and right.
Now that we've defined our level layouts and the objects that will populate them, we can create our game scene. In Kaboom, a scene is a unique screen with its own objects and game rules. We can use scenes to separate gameplay from menus and information screens, or even to separate different kinds of minigames in the same project. As scenes can take arguments, we can use a single "game" scene to represent all of our levels. Add the following code below your LEVELOPT definition:
scene("game", ({levelIndex, score, lives}) => {

    addLevel(LEVELS[levelIndex], LEVELOPT);

});
In addition to providing the level number as an argument (levelIndex), we provide both score and lives. This will allow us to preserve both values when the player defeats one level and moves to the next.
Then add this code to the bottom of the main code file to define and call game start function. This function will go() to the first level, setting the player's score to 0 and their lives to 3. In addition to calling it when the game first loads, we will call this function when we need to restart after a game over.
// start game on first level
function start() {
    go("game", {
        levelIndex: 0,
        score: 0,
        lives: 3,
    });
}

start();
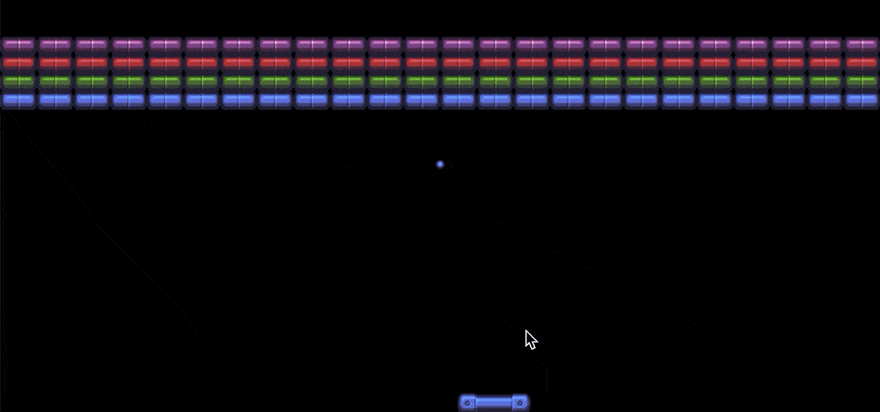
Run your repl now. You should see our first level, with its colorful blocks, paddle and ball, frozen in amber. In the next section, we'll add some motion.
Moving the paddle
Let's write some code to control the player's paddle. First, we need to retrieve a reference to the paddle using get(). We'll place this code inside the "game" scene, below addLevel:
    // player's paddle
    const paddle = get("paddle")[0];
Now we'll add code to move the paddle left and right. We could do this with the left and right arrow keys, which would give our game a retro feeling, but most modern browser-based block-breaking games have a mouse-controlled paddle. Moreover, as Kaboom automatically translates touch events to mouse events, implementing mouse controls will make our game playable on mobile devices without keyboards. So let's add some code to have our paddle follow the mouse cursor:
    // mouse controls
    onUpdate(() => {
        if (mousePos().x > 0 && mousePos().x < width() && mousePos().y > 0 && mousePos().y < height()) {
            if (mousePos().x < paddle.worldArea().p1.x) { // left
                paddle.move(-paddle.speed, 0);
            }
            else if (mousePos().x > paddle.worldArea().p2.x) { // right
                paddle.move(paddle.speed, 0);
            }
        }
    });
This code will run every frame. First, it checks whether the mouse cursor is inside the game area. Then it checks whether the cursor is to the paddle's left or right, and moves the paddle in that direction. The paddle won't move if it is vertically in line with the cursor.
Note the use of worldArea(). This method, provided by the area() component, returns an object containing two sets of X- and Y-coordinates, p1 and p2. The first set, p1, is the top-left corner of the object's collision mask, and p2 is its bottom-right corner. By default, an object's collision mask is a rectangle of the same size as its sprite – Kaboom does not support non-rectangular collision masks.
Rerun your repl now and try out the controls. If you have a touch screen on your device, you can also move the paddle by tapping or dragging your finger.
Moving the ball
Now that we can move the paddle, we need the ball to move too. Add the following code to your file with the "game" scene:
    // ball movement
    onUpdate("ball", (ball) => {
        ball.move(ball.hspeed, ball.vspeed);
    });
You'll recall that we set the ball's hspeed and vspeed in its object definition. Run your repl now, and watch as the ball flies off the screen. Our game won't last very long if the ball can leave the screen like this, so we need to add some code to have it bounce off the edges. Alter your onUpdate("ball") callback to match the following:
    onUpdate("ball", (ball) => {
        // bounce off screen edges
        if (ball.worldArea().p1.x < 0 || ball.worldArea().p2.x > width()) {
            ball.hspeed = -ball.hspeed;
        }

        if (ball.worldArea().p1.y < 0 || ball.worldArea().p2.y > height()) {
            ball.vspeed = -ball.vspeed;
        }

        // move
        ball.move(ball.hspeed, ball.vspeed);
    });
If the ball goes off the left or right edges of the screen, we reverse its horizontal direction, and if it goes off the top or bottom of the screen, we reverse its vertical direction. Run your repl now to see this effect in action.

Collisions
Now that the ball can move and bounce off the screen's edges, we need it to also bounce off the paddle and the blocks. To achieve this, we'll write an onCollide() event handler for the tags "ball" and "bouncy". Add the following code to the "game" scene, below your ball movement code:
    // collisions
    onCollide("ball", "bouncy", (ball, bouncy) => {
        ball.vspeed = -ball.vspeed;

        if (bouncy.is("paddle")) { // play sound
            play("paddlehit");
        }
    });
Note that we're only changing the vertical direction of the ball, because that's the important one for our gameplay. While we could implement more complex bounce physics by taking into account which sides the collision occurred on, changing the vertical direction alone gets us the type of ball movement players expect from a block-breaking game.
Now that the player can actually hit the ball with their paddle, we shouldn't have the ball bounce off the bottom of the screen anymore. Find your onUpdate("ball") callback and remove second condition from the second if statement. Your callback should now look like this:
    // ball movement
    onUpdate("ball", (ball) => {
        // bounce off screen edges
        if (ball.worldArea().p1.x < 0 || ball.worldArea.p2().x > width()) {
            ball.hspeed = -ball.hspeed;
        }

        if (ball.worldArea().p1.y < 0) { // <-- second condition removed
            ball.vspeed = -ball.vspeed;
        }

        // move
        ball.move(ball.hspeed, ball.vspeed);
    });
The other important collision event that we need to implement is having the ball destroy blocks it hits. Add the following code below the onCollide("ball", "bouncy") callback.
    onCollide("ball", "block", (ball, block) => {
        block.destroy();
        score += block.points;
        play("blockbreak"); // play sound
    });
Here we use the destroy() function to remove the block object from play, and then increment our score by the block's points value.
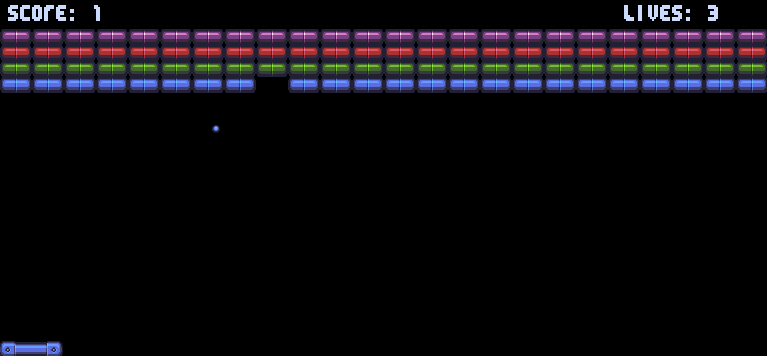
Now that we're changing the score variable, it's important that we display it on the screen, along with lives. Add the following code to the "game" scene, below your collision code:
    // ui
    onDraw(() => {
        drawText({
            text: `SCORE: ${score}`,
            size: 16,
            pos: vec2(8,8),
            font: "breakout",
            color: WHITE
        });
        drawText({
            text: `LIVES: ${lives}`,
            size: 16,
            pos: vec2(width()*13/16, 8),
            font: "breakout",
            color: WHITE
        });
    });
We've added an onDraw() callback, which will run every frame, after all onUpdate() callbacks have run. The onDraw() callbacks are the only place we can use drawing functions such as drawText(). Also note that we've used the font we defined at the start of this tutorial.
Run your repl now, and you should be able to hit the ball with your paddle, destroy blocks, and get points. Our core gameplay is implemented.
Winning and losing
As it stands, our game is both unforgiving and unrewarding. If you let the ball go off the bottom of the screen, it's permanently gone, and you have to refresh your browser to try again. If you manage to destroy all the blocks, the game continues without moving to the next level or acknowledging your victory.
Let's fix these deficiencies now by implementing lives, as well as win and lose conditions. We'll implement lives in the onUpdate("ball") callback that deals with ball movement. Find this callback and add the following new code just below the second if statement:
    onUpdate("ball", (ball) => {
      // bounce off screen edges
      if (ball.worldArea().p1.x < 0 || ball.worldArea().p2.x > width()) {
        ball.hspeed = -ball.hspeed;
      }

      if (ball.worldArea().p1.y < 0) {
        ball.vspeed = -ball.vspeed;
      }

      // fall off screen -- NEW CODE BELOW
      if (ball.pos.y > height()) {
        lives -= 1;
        if (lives <= 0) {
          go("lose", { score: score });
        }
        else {
          ball.pos.x = width()/2;
          ball.pos.y = height()/2;
        }
      }
      // END OF NEW CODE

      // move
      ball.move(ball.hspeed, ball.vspeed);
    });
This code checks whether the ball has fallen of the screen, and if so, decrements lives. If there are lives remaining, it moves the ball back to the middle of the screen. Otherwise, it sends the player to the "lose" scene, which we'll define soon. But first, we need to provide for the game's win condition.
We'll consider a level won once all the blocks have been destroyed. To determine this, we can check whether the number of blocks in the level is 0. We'll put this check in the ball and block collision callback, after the block is destroyed. Find this code and alter it to resemble the following:
    onCollide("ball", "block", (ball, block) => {
        block.destroy();
        score += block.points;
        play("blockbreak");

        // level end -- NEW CODE BELOW
        if (get("block").length === 0) { // next level
            if (levelIndex < LEVELS.length) {
                go("game", {
                    levelIndex: levelIndex+1,
                    score: score,
                    lives: lives
                    });
            }
            else { // win
                go("win", { score: score });
            }
        }
    });
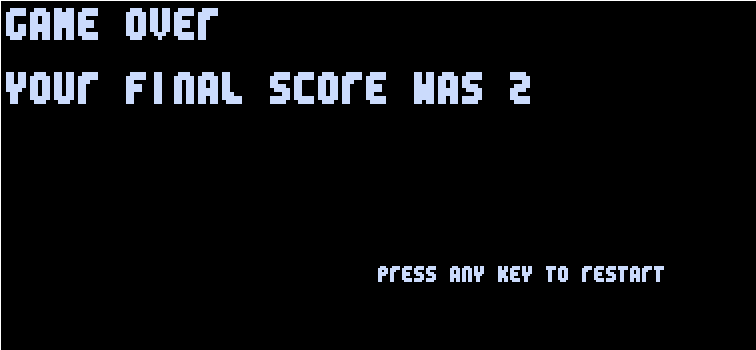
Now we need to create our "win" and "lose" scenes. Add the following code for both scenes below the "game" scene and above the start function definition:
// gameover screens
scene("lose", ({ score }) => {

    add([
        text(`GAME OVER\n\nYOUR FINAL SCORE WAS ${score}`, {
            size: 32,
            width: width(),
            font: "breakout"
        }),
        pos(12),
    ]);

    add([
        text(`PRESS ANY KEY TO RESTART`, {
            size: 16,
            width: width(),
            font: "breakout"
        }),
        pos(width()/2, height()*(3/4)),
    ]);

    onKeyPress(start);
    onMousePress(start);
});

scene("win", ({ score }) => {

    add([
        text(`CONGRATULATIONS, YOU WIN!\n\nYOUR FINAL SCORE WAS ${score}`, {
            size: 32,
            width: width(),
            font: "breakout"
        }),
        pos(width()/2, height()/2),
    ]);

    add([
        text(`PRESS ANY KEY TO RESTART`, {
            size: 16,
            width: width(),
            font: "breakout"
        }),
        pos(width()/2, height()*(3/4)),
    ]);

    onKeyPress(start);
    onMousePress(start);
});
These scenes are quite similar to each other: each one displays some text, including the player's final score, and prompts the player to press any key. Both onKeyPress(start) and onMousePress(start) will call the start function if any keyboard key or mouse button is pressed, or if the screen is tapped on a touch device.
Run your repl now. You should now be able to play through both levels of our block-breaking game (or lose and reach the game over screen).
Powerups
There's one more sprite we loaded at the start of the tutorial that we haven't used yet – the heart. This will be a powerup. We'll have it randomly appear in place of destroyed blocks and start falling. If the player catches it with their paddle, they will gain an additional life.
Find your onCollide("ball", "block") code and add the new code specified below:
    // collisions
    onCollide("ball", "block", (ball, block) => {
        block.destroy();
        score += block.points;
        play("blockbreak");

        // level end
        if (get("block").length === 0) { // next level
            if (levelIndex < LEVELS.length) {
                go("game", {
                    levelIndex: levelIndex+1,
                    score: score,
                    lives: lives
                    });
            }
            else { // win
                go("win", { score: score });
            }
        }

        // powerups -- NEW CODE BELOW
        if (chance(0.05)) { // extra life
            add([
                sprite("heart"),
                pos(block.pos),
                area(),
                origin("center"),
                cleanup(),
                "powerup",
                {
                    speed: 80,
                    effect() { lives++; }
                }
            ]);
        }
    });
This code uses Kaboom's chance() function to set our powerup to spawn after a block is destroyed 5% of the time. The powerup is a game object with similar components to other moving objects we've defined. The cleanup() component will ensure it's automatically destroyed when it leaves the screen. Additionally, we give it a movement speed and an effect() function, which we'll call when it hits the paddle.
Just below the onCollide("ball", "block") callback, add the following two callbacks to define our powerup's movement and collision behavior:
    // powerups
    onUpdate("powerup", (powerup) => {
        powerup.move(0, powerup.speed);
    });

    paddle.onCollide("powerup", (powerup) => {
        powerup.effect();
        powerup.destroy();
        play("powerup");
    });
Run your repl now and you should see the occasional extra life powerup as you play.
Music
As a final touch, we'll add some music to our game. Near the bottom of your file, just above the invocation of start(), add the following code:
// play music
const music = play("ArcadeOddities");
music.loop();
loop() will ensure that the music plays continuously.
Where next?
We've built a simple but polished block-breaking game. From here, you might want to make the following additions:
- Extra levels.
- New powerups, such as a longer paddle, multiple balls, or even a paddle-mounted laser gun.
- Bigger and smaller blocks, blocks that can take multiple hits, or moving blocks.


Latest comments (0)