Snake was an incredibly popular game, mostly remembered from the 1990s era cell phones. For many people, it was the only game on their phone at that time. In the most basic form, it's a super simple game, but still strangely entertaining. It's also a great game to learn the basics of game making from.
In this tutorial, we'll implement the most basic form of Snake in pygame

Overview and Requirements
We'll use the Replit web IDE for creating our version of Snake.
Let's think a bit about what we need to do. Snake in its basic form is a series of blocks representing a snake moving around a grid, with the player controlling the direction. It also has simple rules – when the snake touches the sides of the screen, it dies. If the snake crosses itself, it also dies. If the snake eats some food (a different type of block), it grows by 1 block. The food then re-appears at another random place on the screen.
A few components we will need to build are:
- A way to draw the blocks and move them on the screen.
- A way to get steering directions from the player to the snake.
- A way to determine if the snake has gone out of bounds of the screen.
- A way to determine if the snake has crossed over itself (or bitten itself, as another analogy).
- A way to randomly place the food on the screen.
- A way to determine if the snake has eaten, or touched, the food.
- A way to grow the snake.
That's a lot to think about! Let's get started and create a project in Replit.
Creating a New Project
Head over to Replit and create a new repl. Choose Python as your language. Now, give this repl a name, like "snake-pygame".

After the repl has booted up, you should see a main.py file. This is where we'll start coding.
Getting Started with Pygame
A commonly used game framework in Python is pygame. It has functionality to draw shapes and images to the screen, get user input, play sounds and more. We'll use some of the basic functionality when we build this game, to see how it works.
We can import it into our project by adding the following line to our main.py file:
import pygame
To get the pygame framework started, we need to add some initialization code:
pygame.init()
bounds = (300,300)
window = pygame.display.set_mode(bounds)
pygame.display.set_caption("Snake")
Line 1 of this code starts up the pygame system, by initializing its modules (for example, the font, sound or graphics code).
Line 2 creates a new tuple called bounds. This tuple contains the dimensions of the window that we'll run our snake game in.
Line 3 creates a new window for us to display our game in.
Line 4 gives the window a caption, or title. This can be whatever you'd like to call the game.
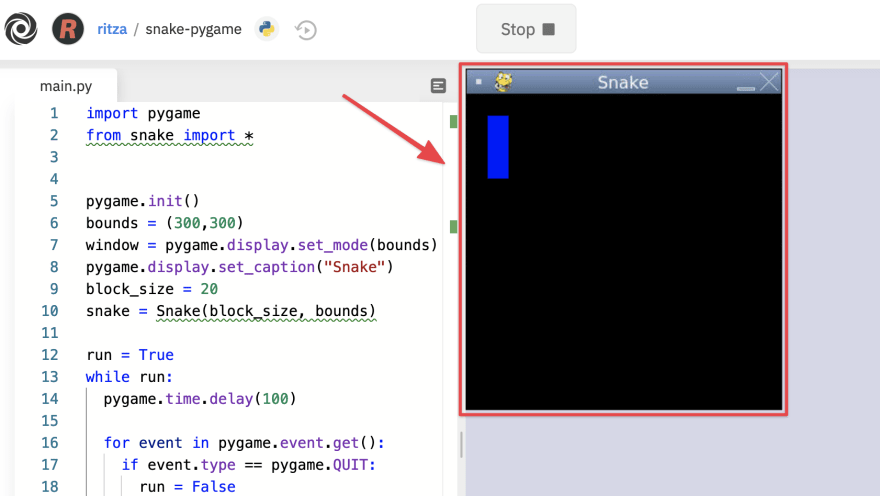
If you run the project, using the "Run >" button at the top center of the repl, you should see a small blank window come up. That means everything is initialized and working so far.
Creating the Snake Class
Now that we have the basic framework, let's create a class to model our snake. This class will have the following responsibilities:
- Keeping track of where the snake is.
- Keeping track of the length of the snake.
- Allowing the snake to grow.
- Checking for collisions with the window boundaries.
- Checking if the snake has crossed over ('bitten') itself
- Keeping track of the direction the snake is moving in.
Let's start by creating a new file called snake.py. Add the following code:
from enum import Enum

class Direction(Enum):
  UP = 0
  DOWN = 1
  LEFT = 2
  RIGHT = 3

class Snake:
  length = None
  direction = None
  body = None
  block_size = None
  color = (0,0,255)
  bounds = None

  def __init__(self, block_size, bounds):
    self.block_size = block_size
    self.bounds = bounds
    self.respawn()

  def respawn(self):
    self.length = 3
    self.body = [(20,20),(20,40),(20,60)]
    self.direction = Direction.DOWN
The first class in this file is an enumeration, which is a nice way to group together a set of related constants. We use this to define the allowable directions the snake can move in, and make code that checks and changes directions easy to read and change, compared to just using numbers or strings to define the directions.
Then we define the Snake class itself. The first few lines are setting up some variables – this is not strictly necessary in Python, but it does make it easier to keep track of the variables, or properties, in our class.
Then, we have the initializer method on the line starting with def __init__. When we create an instance of our Snake class, we pass in the block_size, which must be an integer with size of each block that makes up our grid. This is used for the size of each segment of the snake, as well as for positioning and moving the snake on the board. We also pass in bounds, which is a tuple of integers with the width and height of the playable area (the same size as the screen area). This is so we can check if the snake has moved out of bounds. In the initializer method, we assign these initializer inputs to our internal variables, so that we can use them in other methods later on. Then we call our internal respawn method which contains the default setup for the snake's length, initial body segment definitions, and starting direction. We'll also call respawn whenever the snake crashes or dies in other ways, to reset the game.
Let's look a bit at the body variable. It is a Python list, containing tuples (or pairs) of co-ordinates. Each of these co-ordinates describes the top left x and y screen positions of a body segment, or block. We will add (append) to this list as the snake grows. We also use this list when drawing the snake.
Drawing the Snake
Now that we have the basics of the Snake class and its initialization code up and running, let's add in a method to draw the snake to the screen. Add this to the Snake class:
  def draw(self, game, window):
    for segment in self.body:
      game.draw.rect(window, self.color, (segment[0],segment[1],self.block_size, self.block_size))
This method takes in a pygame instance, game, and a window (or surface in general pygame terminology) to draw on. It then loops through each of the tuples in the body property, and uses the pygame built in method draw.rect to draw a rectangle for each block, or snake segment in the body list. We also use our block_size parameter to set the width and height of the rectangle drawn.
Let's try out what we have so far. We'll just see a static few blocks on the screen, but it's a good test to see if everything is on the right track. To get it working, let's import and create a new Snake object, and set up the first part of our game loop in main.py.
Add the code to import the classes in the snake.py file at the top of the main.py file, just under the import pygame line:
from snake import *
Now we add the following code just under the line pygame.display.set_caption("Snake"):
block_size = 20
snake = Snake(block_size, bounds)
This code sets up our block_size for our grid to a default of 20 pixels. Then we create a new instance of our Snake class, with the block size, and the bounds that we used to set our window size to, and that's what the snake will use to check if it hits the edge of the window.
Now let's set up our game loop. A game loop is the central co-ordination code of most games. It handles reading in user input, updating player status (e.g., position, score etc.), checks for interactions and collisions, and handles drawing.
Add the following to the main.py file to set up our game loop:
run = True
while run:
  pygame.time.delay(100)

  for event in pygame.event.get():
    if event.type == pygame.QUIT:
      run = False

  window.fill((0,0,0))
  snake.draw(pygame, window)
  pygame.display.flip()
This code sets up a loop that keeps repeating every 100ms until a quit signal is received from the window. This is triggered by a player clicking the "Close Window" button at the top of the window. Pygame has the concept of an event queue to which it writes various events that have been triggered. We can read this event queue each time we loop in our game loop and check to see if any of the events was a QUIT signal. Then we can set the condition for the loop to run to False and the next time the loop cycles round, our while condition will no longer be true, and the game will exit.
Our loop also clears the window on each round in preparation for drawing the updated game state. You can see that on the line window.fill((0,0,0)). This fills the whole window with black, specified in the RGB color tuple (0,0,0). Now that we have a clean slate, we can call the draw method on our snake object. We pass in the pygame and Window objects, so that the Snake can draw to them. When we render our food, we will call it after this line.
Lastly, we do the final render to the screen by calling pygame.display.flip(). This takes all our updates and "flips" them from the window buffer to the screen.
To test that the game loop and drawing is working, run the program by clicking the large "Run >" button at the top of the repl. At the top right section of the repl, you should see a black window with a few blocks representing a snake on it.
Moving the Snake
Our next step is to get the snake to move on the screen. A way to do this is to check which direction the snake is heading, and add a block in front of the snake in that direction. Then we'll need to remove a block at the tail end of the snake.
To do this, add this method to the Snake class in the snake.py file:
  def move(self):
    curr_head = self.body[-1]
    if self.direction == Direction.DOWN:
      next_head = (curr_head[0], curr_head[1] + self.block_size)
      self.body.append(next_head)
    elif self.direction == Direction.UP:
      next_head = (curr_head[0], curr_head[1] - self.block_size)
      self.body.append(next_head)
    elif self.direction == Direction.RIGHT:
      next_head = (curr_head[0] + self.block_size, curr_head[1])
      self.body.append(next_head)
    elif self.direction == Direction.LEFT:
      next_head = (curr_head[0] - self.block_size, curr_head[1])
      self.body.append(next_head)

    if self.length < len(self.body):
      self.body.pop(0)
This method gets the "head" of the snake, which is the last element of our body list. Python has a handy feature of negative indices. This means an index of -1 returns the last element in the list, -2 returns the second last, and so on. This allows us to easily get the last element, or the front of the snake in our body list, by using the code curr_head = self.body[-1].
After we get the head of the snake, we check which direction the snake is heading in. If it is going up or down, we append a new block by copying the x co-ordinate of the current head, and adding or subtracting (depending on if the snake is going up or down) one grid block_size to the y co-ordinate. Similarly, if the snake is heading left or right, we append a new block to the body list, using the y co-ordinate of the current head, but modifying the x co-ordinate by one block_size.
Once that is done, we remove a block at the tail end of the snake, using the code self.body.pop(0). We have a condition before that though: if self.length < len(self.body). This is important for when we get to the snake eating, or growing. Everytime the snake eats, we will increment the length property of the snake. Then, we can use that length property to determine if we should actually remove the tail segment from the snake when it moves.
Now let's add a call to this move method in our game loop. In the main.py file, modify the game loop to call this method:
run = True
while run:
  pygame.time.delay(100)

  for event in pygame.event.get():
    if event.type == pygame.QUIT:
      run = False

  snake.move()
  window.fill((0,0,0))
  snake.draw(pygame, window)
  pygame.display.update()
Notice that we've added the line snake.move(). This will call our move method that we added to our snake on every loop. This will create the impression of the snake moving smoothly on the screen. Test it out by clicking the "Run >" button at the top center of the repl. The snake should start at the top left of the window and move down the screen, until it disappears out of the window bounds.
Steering the Snake
We've got the snake moving! Our next task is to get the player's input to steer the snake. We'll start by adding the following method to the Snake class in the snake.py file:
  def steer(self, direction):
    if self.direction == Direction.DOWN and direction != Direction.UP:
      self.direction = direction
    elif self.direction == Direction.UP and direction != Direction.DOWN:
      self.direction = direction
    elif self.direction == Direction.LEFT and direction != Direction.RIGHT:
      self.direction = direction
    elif self.direction == Direction.RIGHT and direction != Direction.LEFT:
      self.direction = direction
This method works by accepting an argument direction, which must be one of our Direction enumeration values we defined earlier. We then do a check for each possible direction to ensure that the new direction input is not the complete opposite direction to which the snake is currently moving – this is because we don't want to allow reversing the snake in our game. If the input direction is a legal move, we update the snake's direction property. Recall from our move method, this property is used to determine how to update the snake's body list property, to create the snake's movement.
Now that we can update the snake's direction through a steering command, we need to get the player's input. Pygame has a useful method key.get_pressed(), which returns a list containing a boolean element for each key on the keyboard. This allows us to find which key the player is pushing by looking up the value at the correct index in this keys list. Luckily, we don't need to memorize the correct index for every key, as pygame has readable names defined as constants we can use. For example, to find out if the 'Up Arrow' is being pressed, we can call keys = pygame.key.get_pressed() to get the status list for all keys. Then we can look for the 'Up Arrow' key's state by looking at the entry for that key, with the code keys[pygame.K_UP]. If the key is being pressed, it will have a True value; if not pressed its value will be False.
Let's add code to our game loop to check if the "Up", "Down", "Left" or "Right" arrow keys are being pressed. Then, depending on the key pressed, we can call our steer method with the updated direction command. Add the following code above the snake.move() line in the game loop, in the main.py file:
  keys = pygame.key.get_pressed()
  if keys[pygame.K_LEFT]:
    snake.steer(Direction.LEFT)
  elif keys[pygame.K_RIGHT]:
    snake.steer(Direction.RIGHT)
  elif keys[pygame.K_UP]:
    snake.steer(Direction.UP)
  elif keys[pygame.K_DOWN]:
    snake.steer(Direction.DOWN)
Let's test this. Click the "Run >" button at the top center of the repl. For Pygame to receive keyboard input, you'll need to click into the game window first quickly, as the game is starting up. You should now be able to use the cursor keys to steer the snake around the screen! We don't have bounds checking yet, so the snake can disappear off the edge of the window.
Adding Food
We have a snake, it moves, and a player can steer it. Let's add some food that the snake can eat, which will cause it to grow longer.
We'll create the food in a similar way we created the snake. Create a new file called food.py. In this file, we'll create a Food class, to manage the position and drawing of food on the grid.
In the game of snake, once a food block is eaten, another one appears at a random location on the grid. This means we'll need a random number generator to determine the location of the food. Python has a module for this called random. This has a function called randint which we can use to find a random position on the screen to place the food. We'll start by adding a reference to the random module in the food.py file. Then we'll add the Food class.
import random

class Food:
    block_size = None
    color = (0,255,0)
    x = 0;
    y = 0;
    bounds = None

    def __init__(self, block_size, bounds):
        self.block_size = block_size
        self.bounds = bounds

    def draw(self, game, window):
        game.draw.rect(window, self.color, (self.x, self.y, self.block_size, self.block_size))

    def respawn(self):
        blocks_in_x = (self.bounds[0])/self.block_size;
        blocks_in_y = (self.bounds[1])/self.block_size;
        self.x = random.randint(0, blocks_in_x - 1) * self.block_size
        self.y = random.randint(0, blocks_in_y - 1) * self.block_size
Notice the commonality with the Snake class. They both have a draw method and a respawn method. Generally in games, most objects will have this functionality.
The Food class has similar properties to the Snake class, too. It has a block_size, referring to the size of each block on our virtual grid. It has a color tuple, which we'll use when drawing the food. It also has a record of the bounds of the window, so that we don't draw the food outside the visible window. However, since the food is only made up of 1 block, we don't need a body array like the snake class. We can keep track of its position with x and y co-ordinate variables.
The draw method is a simplified version of the one in the snake class. This is because we only need to draw 1 block.
The respawn method is interesting. We need to align our food with our virtual grid, defined by the block_size. However, if we simply called random.randint to find an x and y position for the food, it might land up halfway through a block on the grid. This will make it strange to try aim at with the snake, as the snake will not be aligned with the food.
To keep things aligned, we need to take our information of the size of the window, encapsulated in our bounds property, and our knowledge of the block_size of our grid to figure out the dimension of the window in terms of blocks. So for example, if our window size, or bounds is 300x300 pixels, and our block_size is 20px, then there are 300px/20px = 15 blocks in each dimension. We can then choose a random position in terms of block dimensions, i.e choose a number from 1-15, in which to place the food. To get the actual x and y screen co-ordinates to draw the block, we can just multiply our block number by the block_size.
In the first 2 lines of the respawn method, we find the number of blocks in each dimension, as described above. Then the next 2 lines find a random block, and translate that block to x and y co-ordinates. You may notice that instead of finding a random number between 1 and the number of blocks in a dimension, we find one between 0 and the number of blocks minus 1. This is because the window x and y start at 0, not 1, so we need to shift the range over by 1 to compensate.
We have a Food class, so we can create an instance of it and add it to our game loop.
First we need to add a reference to the food.py file, and import the Food class. In the main.py file, just below the import pygame line, add the following:
from food import Food
In the main.py file, after the line snake = Snake(block_size, bounds), and just before the game loop, create a new Food object by adding the line:
food = Food(block_size,bounds)
In the game loop in main.py, just after the line snake.draw(pygame, window), we can add a line to draw the food. Add the following line:
food.draw(pygame, window)
Great! Let's test up to this point by clicking the "Run >" button again. You should now see the snake, as well as a green block representing the food.
Adding Collision Detection for Food
You'll notice that the snake can go right over the food, and nothing happens. A core concept in games is collision detection. As we are using a strict grid system, we can use a simplified version of collision detection. We'll use this to determine if the snake has moved over, or collided with, a food object. Then we can increase the snake's length, and respawn the food again.
We'll give the responsibility for checking collisions to the Snake class. In the snake.py file, add the following two methods to the Snake class:
  def eat(self):
    self.length += 1

  # sees if the head of the snake is over the food
  def check_for_food(self, food):
    head = self.body[-1]
    if head[0] == food.x and head[1] == food.y:
      self.eat()
      food.respawn()
The first method, eat, increases the allowable length of the snake. Remember that the length property is used in the move method to determine if a tail segment needs to be removed.
Then we have the check_for_food method. This accepts a food object as an argument. In this function, we get the front most block of the snake, or head by accessing the last element in the body list. Recall that we can use a negative index to access the last element. Then, because we are using a strict grid system for our game layout, we only need to check if the x and y co-ordinates of the snake head are equal to the x and y co-ordinates of the food object. If they are, we call the eat method to increase the length of the snake. We also call respawn on the food to make it disappear from its current location, and reappear at a different location.
In the game loop in the main.py file, add the following code, just after the snake.move() line:
snake.check_for_food(food)
This adds a call to our food collision detection method on each loop of the game, just after the snake has moved into a new block.
We can test this again, and see if our snake now grows when we eat some food. Click the "Run >" button again to test.

Tail and Bound Collision Detection
We now need to add collision detection if the snake crosses over itself. This is a deadly move, and one of the ways to reach "Game Over" in Snake. Similarly to checking if the snake has eaten food, we can add a method to the Snake class in the snake.py file to check if the snake has crossed over, or bitten itself:
  def check_tail_collision(self):
    head = self.body[-1]
    has_eaten_tail = False

    for i in range(len(self.body) - 1):
      segment = self.body[i]
      if head[0] == segment[0] and head[1] == segment[1]:
        has_eaten_tail = True

    return has_eaten_tail
This method gets the head of the snake, as before in our check_for_food method. Then we set a flag variable to determine if the snake has eaten its tail, and initialize it to False.
The next part of the method runs through all the segments that make up the body of the snake, excluding the last element of the body list, as this element represents the head of the snake. Then we test the x and y co-ordinates of the head and the current segment. If they match, it means the head of the snake is over a body segment, so we can set our flag has_eaten_tail to true.
After all segments are tested, we return the value of the has_eaten_tail flag.
The last detection we need to add is if the snake moves outside the bounds of the window. We can add the following method to the Snake class to do that:
  def check_bounds(self):
    head = self.body[-1]
    if head[0] >= self.bounds[0]:
      return True
    if head[1] >= self.bounds[1]:
      return True

    if head[0] < 0:
        return True
    if head[1] < 0:
        return True

    return False
This code once again retrieves the head block of the snake from the end of the body list. Then it checks each dimension against the bounds of the window. If it's outside any of these bounds, the method returns True. If the snake's head is still within bounds, it returns False.
Adding the "Game Over" Screen
Now that we can detect game-ending collisions, we can add code to the game loop to call these methods, and handle the end of the game. When the game ends, we should show a "Game Over" message to the player for a second or two. Then we can reset the snake and the food to give the player another chance.
To add the "Game Over" message, we can make use of pygame's font module. The basic steps for using a font to draw text to the screen are:
- Create a new font object, specifying the font type, size and bold/italic options, using the constructor method
font.SysFont. - Render the desired text to a surface using the
rendermethod on the font object created above. -
blitthe rendered text onto the main window surface. - Update the window display to show this.
To implement the above steps, create a new font object by adding the following code under the line food = Food(block_size,bounds) in the main.py file:
font = pygame.font.SysFont('comicsans',60, True)
In the game loop, we need to call the collision checking methods we added to the snake class earlier. If a collision is detected, we can render our "Game Over" message, pause, and reset the game. Add the following code under the line snake.check_for_food(food) in the game loop in the main.py file:
  if snake.check_bounds() == True or snake.check_tail_collision() == True:
    text = font.render('Game Over', True, (255,255,255))
    window.blit(text, (20,120))
    pygame.display.update()
    pygame.time.delay(1000)
    snake.respawn()
    food.respawn()
This code calls our bounds check and tail collision methods. If either of them come back True, we render a new "Game Over" message using the font steps above, and blit it to our main window. Then we delay for 1000ms (or 1 second), and then respawn both the snake and food objects for a new game.
Congratulations! The basic Snake game is now complete. Click the "Run >" button at the top of the repl to try it out. When the snake crashes into itself, or goes off the edge of the window, the game will end and reset to a new one.
Things to Try Next
There are endless features that could be added to this game. Some ideas are:
- Create a 2-player version.
- Add obstacles for the snake.
- Incrementally speed up the game as it goes on, to make it harder.
- Add better graphics, utilizing the pygame image modules to load "sprites" and textures for the game.
- Add sound effects and music using pygame's sound functions.


Latest comments (0)