In this article, we'll be using a Jamstack approach to build a Repository Catalogue.
First, we’ll populate a FaunaDB database with a set of repos. For each repo, we’ll store its GitHub URL, the project’s name, logo, and main color.
Then, at build time, we’ll use Nuxt.js to fetch the repo data from FaunaDB, and use it to pre-render the Repo Catalogue app.
Finally, we’ll retrieve some highly dynamic repo info (such as number of stars and forks) from the GitHub API, and with the help of Vue’s awesome client-side hydration features, display it in each repo’s page.
Check out the working demo here.
Why a Repository Catalogue?
As developers, we all have projects we admire/find interesting/look up to, and like to keep track of.
The Repository Catalogue will serve as a collection of GitHub projects, that you can customize to display repo information that is more relevant to you.
Although we'll be building a very concrete implementation, its main purpose is to serve as an example to the core underlying idea of this article.
Harnessing both the benefits from pre-rendering and the flexibility of dynamic sites, by generating as much as possible upfront, and loading the highly dynamic data via JavaScript when the user visits the page. We'll see that hydration is the key that gives us the major benefit of a Single Page Application (no reloads needed to display asynchronously requested data), while also getting the speed of a statically loaded site.
"It’s usually a good idea to load as much data at build time as possible to improve page performance. But if the data isn’t needed by all clients, or too big to be sent to the client all at once, we can split things up and switch to on-demand loading on the client. This is the case for user-specific data, pagination, or any data that changes rather frequently and might be outdated by the time it reaches the user." - Build a dynamic JAMstack app with GatsbyJS and FaunaDB
When analyzing the requirements for a Repo Catalogue, we can straight away identify two categories of data:
Data that does not change often or not at all (e.g., project name, logo, repo URL, and the repo list itself - after all, only some projects have a special place in our heart 😄, so it's not that often we need to add or delete a repo from the catalogue.)
Data that changes frequently (e.g., repository number of stars and forks)
The former, is in our control and therefore well-suited to be stored in a Fauna’s database. Moreover, it can then serve as a data source for any client app we decide to build.
The latter comes from a third-party source and changes often, so it’s not a good candidate for database storage. It’s preferable to fetch it dynamically only when it’s needed, making sure we’re always getting the current data.
One important consideration to make, is that this does not imply that FaunaDB is only appropriate for static data. Quite the contrary, FaunaDB is great for highly dynamic data. So, it might seem an overkill to use FaunaDB for data that doesn't change often. However, we plan to, in a next segment, let people 'like' and comment on our catalogue repositories. For such dynamic data, FaunaDB is a perfect fit and in the meantime, works absolutely fine for storing our repository list.
This data categorization may then lead us to question:
"Do we really need to keep making the same request, to get the same data, take those same results, run them against the same template, and only then, deliver the page to the client?".
“What if we use the server-side build to fetch the repo collection, and serve HTML and static assets to our site's visitors? Does that mean we are bound to fully static pages?”
In fact, we’ll see that by combining a Jamstack approach in the build step with client-side hydration, we’ll be able to enliven our static pages with highly dynamic data.
At the end, you'll be able to take this example, adapt and apply it to your specific use case, by identifying and categorizing your data accordingly.
Jamstack
The concepts of Jamstack and "static-first" are not new and their advantages have been extensively documented before. Jamstack architectures allow us to build faster, more secure, more scalable websites.
With HTML being pre-rendered once and then statically served from a CDN, a website has the potential for great performance. Fetching data at the build stage - instead of each time a client requests a page, with minimum computing overhead.
The term "static" can be a bit misleading - that's why we see "pre-rendered" being used interchangeably. When we build a Jamstack app, it doesn't mean we have to compromise on dynamic content and features.
We can build the site beforehand with the type of data that does not change often, and augment it client-side, only if and when that's needed.
Moreover, the widespread of functionality APIs, makes way for common tasks - such as authentication, e-commerce, and data storage - that used to be implemented over and over, now be delegated to the professional service providers.
FaunaDB
Fauna is a globally distributed, low-latency database, with native GraphQL support, that promises to be always consistent and always secure.
As a serverless database, FaunaDB allows applications to access data through a secure API, in contrast to more "traditional" relational databases that require you to open a connection. In that sense, FaunaDB is “connectionless” and rather behaves like an API, which fits perfectly in a Jamstack architecture. There is also no need to host and manage our own database. It requires zero server configuration and supports seamless scalability out-of-the-box.
"Because serverless technologies abstract away the problems I don't want to deal with (setting up servers, scaling them, hosting my logic etc.) and allow me to just run my code whenever I need it to." - Tomasz Łakomy
From a developer's perspective this is awesome, because it allows us to be more productive and focus solely on the logic of the app we're building.
Nuxt.js
Nuxt.js is an open-source web application framework built on top of Vue.js. It is well known for its SSR capabilities, but it can also do static.
Instead of having a Node server process each client request - eventually fetching data from an API or database in between, we'll be using Nuxt as a static site generator to do the heavy lifting during the build stage.
Goals
What we're setting to achieve in this tutorial:
- building a pre-rendered Repo Catalogue site with Nuxt.js
- building a helper app that we'll use to seed Fauna's database
Although it's not the main focus of the article, the supporting fauna-seeder app will allows us to populate the FaunaDB database with a single command from the terminal. It's just one a way of storing data in FaunaDB - in fact, you could be doing this step in a different way of your choice.
Pre-requisites
Before we move on, I’d like to mention that although not mandatory, a working knowledge of the following technologies is beneficial:
- JavaScript
- Vue.js/Nuxt.js
- GraphQL
Before you begin, you'll need:
- Node, npm, and npx installed
- A FaunaDB account
Without further ado, let's dive in!
Modelling our data
First things first, we begin by specifying the data model. The goal is to store a collection of repos in a Fauna database.
Each repo is represented by the following fields:
- project name
- GitHub repo URL
- project logo
- project color
Writing the GraphQL schema
In this section, we'll be creating the helper app fauna seeder that will populate the database.
Inside this project, we'll also store the GraphQL schema we'll be writing to define our repo data, The schema will be used in the next step to create the database and specify what resources the database will provide.
"GraphQL is a specification for an API query language and a server engine capable of executing such queries." - Production Ready GraphQL
Create a directory for the project and navigate to it:
mkdir fauna-seeder
cd fauna-seeder
From within the root directory, create a new git repo:
git init
Configure git to ignore the node_modules directory and the .env file:
echo "node_modules" > .gitignore
echo ".env" >> .gitignore
Then, let's initialize a Node project:
npm init -y
This creates a package.json file where we can install the required dependencies:
npm install dotenv faunadb simple-icons
We've installed three dependencies:
- faunadb: JavaScript driver for FaunaDB
- simple-icons: Simple Icons npm package
- dotenv: to store and load Fauna's secret key from a
.envfile
The Fauna Query Language (FQL) is the native API for querying FaunaDB. Fauna drivers (available for several programming languages) abstract the FQL, allowing developers to programmatically
interact with FaunaDB databases.
Simple Icons is a cool project that collects SVG icons and colors for popular brands. We'll be using their npm package to get the SVG logo and the hex color code of each project, when the seeder app runs.
Let's now write the GraphQL schema. Create a directory graphql and a schema.gql file inside it:
mkdir graphql && cd graphql && touch schema.gql
type Repo {
  projectName: String! @unique
  repoUrl: String! @unique
  svgLogo: String
  colorHex: String
}

type Query {
  allRepos: [Repo!]!
}
As you may know, GraphQL uses a typed schema to specify entities and their fields. We've declared the object type Repo to represent an individual repository in the collection.
A repo has a project name, a repository URL, a SVG logo, and a color. The first two fields are declared as non-nullable ! and unique @unique. This guarantees that a repo always has values for these required fields, and that there are no repeated repos in the collection.
We've also declared a query allRepos, to list all the repos that are stored in the collection.
Creating a Fauna database
Log in to your Fauna account.
Visit the dashboard and create a new database, named repos:

Importing the schema
Now that the database is created, we can import the GraphQL schema into FaunaDB.
When you import a GraphQL schema, FaunaDB will automatically make the collections and indexes for you to support your queries and provide you with an "instant" GraphQL endpoint to start querying.
We can upload our schema.gql file, via FaunaDB Console by clicking "GraphQL" on the left sidebar:
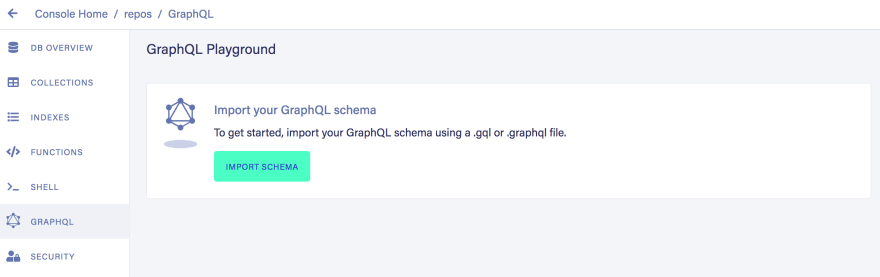
Then click the "Import Schema" button, which opens your browser’s file upload, and select the schema.gql file:
FaunaDB automatically created the necessary collection for the Repo entity.
Additionally, it also created the indexes that support the schema and interact with the collection:

At this point we have an empty database, ready to be populated with some repo data.
Seeding data to Fauna
Inside a Fauna database, we have Collections, Indexes and Documents. FaunaDB is a relational database that stores data in the JSON format.
"A Collection is a categorized group of data. Each piece of data takes the form of a Document. A Document is a “single, changeable record within a FaunaDB database,” according to Fauna’s documentation. You can think of Collections as a traditional database table and a Document as a row." - Bryan Robinson
There are four ways of interacting with Fauna data:
- Fauna drivers
- Interactive Shell using FQL
- GraphQL Playground
- GraphQL API using a GraphQL client (e.g., Apollo)
Normally, after using a GraphQL schema to generate the collections and indexes - as we did, you would use the GraphQL endpoint that’s automatically provided. For learning purposes, I decided to try out a different approach and go with FQL. Although this is not the official way to interact with the data, it also simplifies our schema, avoiding the need for GraphQL mutations to define write operations.
We'll use the JavaScript driver, that we've already installed in a previous step.
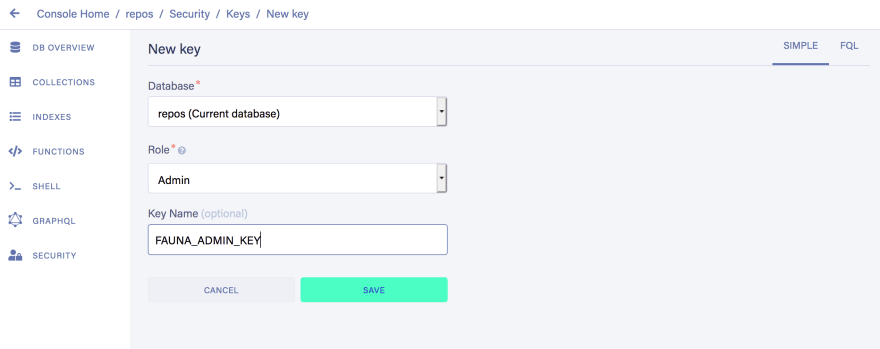
The driver requires a Fauna Admin Key in order to authenticate connections and write data in the repos database.
From the database's dashboard, go to "Security" on the left-hand sidebar, and create a new key with "Admin" Role:
Copy the generated key and save it somewhere safe, as after you navigate away from this page it will not be displayed again.
Create a .env file in the root directory of the fauna seeder app:
cd ..
touch .env
Add the environment variable FAUNA_ADMIN_KEY and paste the generated key right after the variable's name:
FAUNA_ADMIN_KEY=
From here, we just need to reference process.env.FAUNA_ADMIN_KEY to access the key from within our code.
Let's create a function that handles a client connection to Fauna:
cd graphql
touch db-connection.js
Add the following to db-connection.js:
require("dotenv").config();
const faunadb = require("faunadb");
const query = faunadb.query;

function createClient() {
  if (!process.env.FAUNA_ADMIN_KEY) {
    throw new Error("FAUNA_ADMIN_KEY not found");
  }
  const client = new faunadb.Client({
    secret: process.env.FAUNA_ADMIN_KEY,
  });
  return client;
}

exports.client = createClient();
exports.query = query;
The function will try do load the secret key, and in case of success, proceed with creating and returning a connection to the database. Finally, the createClient function is exported, alongside the driver's query variable, which will allow us to seed the data in FQL's functional, composable style.
Repo data
We'll be using JSON to store the minimal set of repo data the seeder app requires.
Each repo is represented by three properties:
{
  "projectName": "Vue.js",
  "repoUrl": "https://github.com/vuejs/vue",
  "simpleIconsName": "Vue.js"
}
- project name
- GitHub repo URL
- Simple Icons brand title
Create a data.json file:
cd ..
touch data.json
Using the format above, add an array of repos that will be written to Fauna's database. You can either use the same
file I've used or tweak it to feature your favorite projects.
Make sure the simpleIconsName value exists in the Simple Icons collection. You can use the search feature on the website to get the correct names of the projects you're adding.
Running the seeder app
Create a file named seed.js:
touch seed.js
This is the code that will run to populate the Repo collection:
const { client, query } = require("./graphql/db-connection");
const q = query;
const simpleIcons = require("simple-icons");
const reposData = require("./data.json");

const repos = reposData.map((r) => {
  const simpleIconsData = simpleIcons.get(r.simpleIconsName);
  r.svgLogo = simpleIconsData.svg;
  r.colorHex = simpleIconsData.hex;
  delete r.simpleIconsName;
  return r;
});

client
  .query(
    q.Map(
      repos,
      q.Lambda(
        "repo",
        q.Create(q.Collection("Repo"), {
          data: q.Var("repo"),
        })
      )
    )
  )
  .then(console.log("Repos seeded successfully to FaunaDB"))
  .catch((err) => console.log("Failed to seed repos to FaunaDB", err));
Let's review what we did:
- Import functions
clientandqueryfrom./graphql/db-connection - Import
simple-iconspackage - Import list of repos from
./data.json - Go through each repo, get the SVG logo and the hex color code from
simple-iconsand add the properties accordingly - Delete property
simpleIconsNamefrom the repo, since we don't want to write it to the database - Use the driver to map over the array of repos and create a new document for each one, in the
Repocollection
Notice that query operates as a transaction, which means that if an error occurs, none of the repos will be written in the database.
If everything goes as expected, we print a success message.
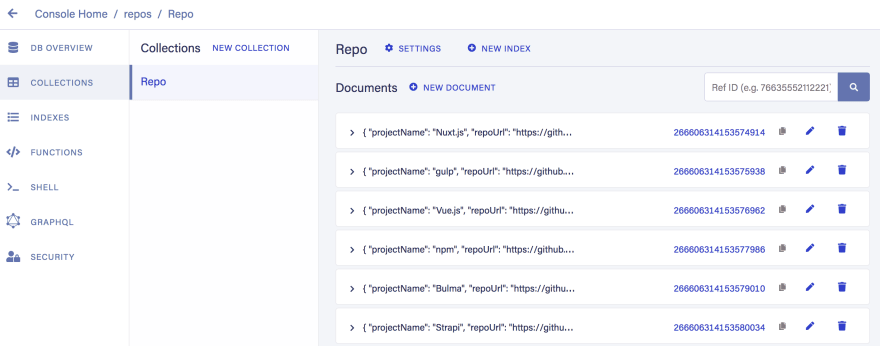
We're now ready to add documents to the Repo collection:
node seed.js
Navigate to "Collections" from the sidebar menu, and confirm that the data was written successfully:
Nuxt Repo Catalogue
Now, let's change gears and look at this tutorial's core app.
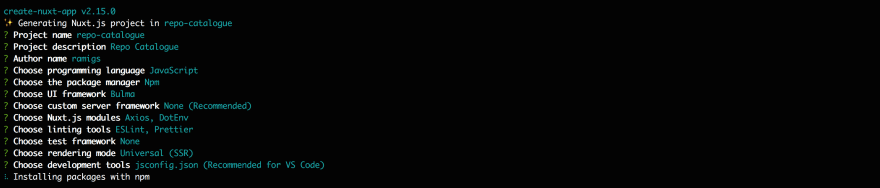
To get started quickly, we'll initialize the project using Nuxt's scaffolding tool:
npx create-nuxt-app repo-catalogue
Go through the guide and select the following options:
- axios and dotenv in the Nuxt.js modules step
- Bulma in the UI framework step, to style our app
Once the tool finishes creating our Nuxt app, install also the other required dependencies:
- faunadb: JavaScript driver for FaunaDB
- slugify: we'll use this package to generate slugs from repo names
npm install faunadb slugify
Fauna key
The same way we did for the fauna-seeder app, let's create a new Fauna key - this time with "Server" Role:

Edit the .env file and paste the key you've just generated.
FAUNA_SERVER_KEY=
In the top of nuxt.config.js require and configure dotenv:
require("dotenv").config();
Routes
The Repo Catalogue website will respond in two types of routes:
- one home page, where all repos are listed
- several repo detail pages, one for each repo in the catalogue
The /pages folder will look like this in Nuxt:
├── index.vue
├── repos
│   └── _slug.vue
Since we want to pre-render the site's pages, we need to tell Nuxt which routes to generate.
The routes for the individual repo pages have to be generated dynamically.
In Nuxt, we do this by setting the generate.routes property to an array of dynamic routes.
When running nuxt generate, Nuxt.js will use the configuration defined in the generate property, to pre-render the site.
We'll write a function routes that reads the repo data from the database and returns the array of routes to be generated.
Let's add the generate property in nuxt.config.js:
generate: {
  async routes() {
    const faunadb = require('faunadb')
    const query = faunadb.query
    const slugify = require('slugify')
    const q = query
    if (!process.env.FAUNA_SERVER_KEY) {
      throw new Error('FAUNA_SERVER_KEY not found.')
    }
    const client = new faunadb.Client({
      secret: process.env.FAUNA_SERVER_KEY
    })
    const result = await client.query(
      q.Map(
        q.Paginate(q.Match(q.Index('allRepos'))),
        q.Lambda('X', q.Get(q.Var('X')))
      )
    )
    const repos = result.data.map((repo) => repo.data)
    const routes = repos.map((repo) => {
      const repoUrlParts = repo.repoUrl.split('/')
      const repoOwner = repoUrlParts[repoUrlParts.length - 2]
      const repoName = repoUrlParts[repoUrlParts.length - 1]
      const slug = slugify(repoName, {
        remove: /[*+~.()'"!:@]/g
      })
      repo.slug = slug
      repo.owner = repoOwner
      repo.name = repoName
      return {
        route: '/repos/' + slug,
        payload: repo
      }
    })
    routes.push({
      route: '/',
      payload: repos
    })
    return routes
  }
}
It's quite some code. So, let’s review the different steps of the snippet:
- Import the
faunadbdriver fromnode_modules - Import the
slugifypackage fromnode_modules - Load the Fauna secret key from
.env - Instantiate a Fauna client using the secret key
- Fetch the entire repo collection using the
allReposIndex - Go through each repo, generate a slug and return an object with the route path and the repo data as payload, that will be passed to the page
- Add the route for the home page, passing the repo collection as payload
- Return the array of routes that should be generated
Creating the pages
Let's being with the homepage /pages/index.vue. This is the page that lists the repo collection.
Delete the default CSS inside <style> so we can start with a blank slate.
Replace the content of <script> with:
<script>
export default {
  asyncData({ payload }) {
    return { repos: payload };
  },
};
</script>
We've used Nuxt's asyncData to instantiate the variable repos with the payload from the generate configuration.
Now that have access to the data, replace the existing <template> with:
<template>
  <section class="section">
    <div class="container">
      <h1
        :style="{ marginBottom: '5rem' }"
        class="title has-text-centered is-size-1"
      >
        Repo Catalogue
      </h1>
      <div class="columns is-multiline">
        <div
          v-for="repo in repos"
          :key="repo.projectName"
          class="card column is-3"
        >
          <div
            :style="{ backgroundColor: '#' + repo.colorHex }"
            class="card-image"
          >
            <a :href="`/repos/${repo.slug}`">
              <figure
                :style="{ maxWidth: '20%', margin: '0 auto', padding: '2em 0' }"
                v-html="repo.svgLogo"
              ></figure>
            </a>
          </div>
          <div class="card-content">
            <div class="media">
              <div class="media-content">
                <h3 class="title">{{ repo.projectName }}</h3>
                <a class="subtitle" :href="repo.repoUrl">GitHub</a>
              </div>
            </div>
          </div>
        </div>
      </div>
    </div>
  </section>
</template>
In the template above, we've gone through each repo and displayed it as a Bulma Card.
Let's move on to the individual repo detail page. Create a new file /pages/repos/_slug.vue and replace the existing <script> with:
<script>
export default {
  asyncData({ payload }) {
    if (payload) return { repo: payload };
  },
};
</script>
Now that have access to the data, replace the existing <template> with:
<template>
  <div>
    <section
      :style="{ backgroundColor: '#' + repo.colorHex }"
      class="hero has-text-centered"
    >
      <div class="hero-body">
        <div class="container">
          <figure
            :style="{ maxWidth: '10%', margin: '0 auto' }"
            v-html="repo.svgLogo"
          ></figure>
          <h1 class="title has-text-light is-size-1">
            {{ repo.projectName }}
          </h1>
        </div>
      </div>
    </section>
  </div>
</template>
In the template above, we've created a Bulma Hero to display the repo data.
Running Nuxt generate
Now that we've created the page templates, we have everything we need to build our website, with dynamically generated routes, using Fauna data.
Build your Nuxt.js Repo Catalogue:
npm run generate
And that's it! 👏 You have now a working static site in the dist folder, that can be served directly from a CDN.

To test it locally run:
npx serve dist
Adding dynamic content to our Repo Catalogue
Perhaps the main objection to static sites is "I don't want to have to rebuild the entire site every time something changes in the database".
It's a totally valid argument - a nuanced one nonetheless. For example, a Netlify hosted website won't have any downtime, while the build/deploy of a new version takes place.
So what is the real downside? Maybe the time it takes to rebuild a website with large amounts of content. And even in that domain, we're starting to see amazing progress being made, e.g. Gatsby's recently announcing incremental builds.
But still, there are certainly some scenarios where constantly rebuilding the site is not viable.
Going back to our Repo Catalogue, suppose we want to add some dynamic data to the detail pages, such as description, number of stars, and number of forks.
Clearly, it's not practical to rebuild an entire website whenever any of this data changes.
In this section, we'll be adding some dynamic data to the Repo detail page. We'll be adding an asynchronous JavaScript API call to the GitHub API to get the repo's information.
The request for this data will be made client-side and we'll rely on Vue's reactivity to display it.
In /pages/repos/_slug.js, declare a repoData object to hold the response data:
data() {
  return { repoData: {} }
},
The GitHub API provides an endpoint GET /repos/:owner/:repo that returns a repo's info. Use Vue's mounted hook to call the GitHub API from the client, with axios:
mounted() {
  this.$nextTick(async () => {
    const repoOwner = this.repo.owner
    const repoName = this.repo.name
    const result = await this.$axios.$get(
      `https://api.github.com/repos/${repoOwner}/${repoName}`
    )
    this.repoData = result
  })
}
Under the Hero <section>, create a container to display the dynamic data:
<div class="container" :style="{ paddingTop: '2rem' }">
  <p><span class="is-size-5">Description:</span> {{ repoData.description }}</p>
  <p><span class="is-size-5">Stars:</span> {{ repoData.stargazers_count }}</p>
  <p><span class="is-size-5">Forks:</span> {{ repoData.forks_count }}</p>
</div>
Now, tell Nuxt to generate the site again, so that the GitHub API call is included in the app's bundle:
npm run generate
And we’re done! 🎉

A dynamic website that loads data in the frontend as the user visits the repo detail page.
Conclusion
In this article, we've built a Repo Catalogue static website that you can now deploy on a host of your choice.
The intent was to point out that it doesn't always has to be a matter of A/B decision. We can aim for a "hybrid" solution whenever possible, where we pre-render the most we can, and asynchronously fetch just the data we need.
We began by writing a GraphQL schema to model our repo data. Then, we used FaunaDB to create a cloud database and, by simply importing the schema, we instantly got a full-featured data backend.
Just like that! No need to deal with any server/database hosting and configurations, we were able to quickly start building our Repo Catalogue.
Another cool benefit we get with a database like Fauna, is that it allows us to have a unique source of truth to represent both the data model and the API that interacts with it.
Then, we used Nuxt to implement the app's pages and configured it to fetch the repo data from the database, using it to build a pre-rendered app.
Finally, we added dynamic data from the GitHub API to our static pages.
The code for this tutorial can be found in the following GitHub repos:
What to do next
Here are a couple of ideas to further explore:
- Hosting the Repo Catalogue on Netlify and configuring it to trigger a new
repo-cataloguebuild/deploy every time there's a push tomaster - Finding a way to trigger a new
repo-cataloguebuild/deploy whenever content changes in Fauna's database - Adding a loader in the repo detail page, while the GitHub API is being requested
- Implementing error handling for database and API requests


Top comments (3)
Great article! I have a question about when to choose for this approach and when it's better to do full SSR. Suppose I have a blog with >100 posts, created in let's say WP. I would like to benefit from the WP editor and keep writing my posts in WP but like to build the frontend with a Nuxt app. Via the WP API I can retrieve the data, like you do with the repo information in this article. If I understand it correctly, after writing a new post I should regenerate. Would this be a problem with an ever growing database of posts?
hi Pim,
thanks for your question.
yes, the way this app is developed, it does expect the regenerate to be done in order to add the new content.
In terms of how this strategy fits a large amount of data, I guess the right answer would be depends on your specific context. Everything is a trade-off, in this case we're shifting work load upfront, during the build/generate, so that users can be served static pages "faster".
For some use cases, it would not be acceptable to wait for a build to see the changes reflected, for others having a build time of a couple of minutes is not an issue.
Recently Nuxt has introduced some features that can open new possibilities regarding these questions.
Haven't tried them myself yet, but I suggest you take a look at:
nuxtjs.org/blog/going-full-static
content.nuxtjs.org/
Thanks for your answer Ramigs, it makes sense: it's all a trade-off. I'll look into these links. Great post, thanks.