Hi and welcome to Django Basic Oversimplified.
Before I start with the tutorial, let me tell you a little story.
15 days ago I started working on django and I kid you not this is the most intimidating process I have ever faced in my life. There are steps after steps I needed to take before displaying just 2 words on a blank page.
It's not just me but other people too found it baffling. So, once I learned and created 2 small projects I decided to create a simple tutorial to explain what you really need to know in your first try.
In this tutorial I will focus on introduction of various steps used in creating a Django app/website. Again, this post might look scary but trust me its not.
Table of Contents
A short note: I am using WSL2 on top of my Windows 10 Visual Studio Code IDE. I highly recommend you to use WSL2 in case you are in Windows 10 or higher.
Getting Started with Django
Installing necessary files and setting up virtual environment.
Now lets start by creating a folder with whatever name you like, for the sake of this tutorial I am choosing "django-oversimplified".
mkdir django-oversimplified
Now we need to open our visual code in this folder. In order to do that first enter into folder using cd.
cd django-oversimplified
code .
Mind the space between code and .(dot) it will open VS Code into our folder. If this ask for permission, allow it.
Now we have to run virtual environment first install it using
sudo apt virtualenv
You don't need to overthink about virtual environment here. It will pack all our python module inside and make it accessible by the other people who are using our code.
The next step is to activate it.
python3 -m venv .venv
source .venv/bin/activate

The first line means we are creating a folder for virtual environment. Let me explain it further python3 -m means we are accessing a python module which is venv in our case and creating an enivronment directory named .venv. The dot before name will make it hidden.
The second line means we are activating a script which is in activate folder within .venv/bin
There is nothing more you need to know about venv right now. Beside it will carry any module we download or install inside it.
You can use clear command to clear your terminal window.
clear
Now, its time for me to create our first project but before that we need to install django.
pip install django
If you already have django isntalled then this will copy django to your .venv folder.
Till this point we -
- Created a directory for our project
- Installed PIP and Virtual Environment
- Activated Virtual Environment
- Downloaded Django
Initializing the Project Folder and App Folder
The first step to your app, setting up urls and running our sample app.
Now we are ready to create our first app but first lets create our project. The project in itself is not your app it does not visualize anything.
In simple words it is a set of settings or configurations which power your django apps or websites you will come to know more about them when we start using them.
django-admin startproject myproject
This will generate a directory and inside another directory with same name and a python file "manage.py".
Its a bit awkward to enter myproject and then working on another myproject directory. So let's remove it and create our project folder right inside django-oversimplified.
rm -r myproject
You can simply delete it but it just a linux command for us. rm is for remove directory and -r flag denotes the directory is not empty.
django-admin startproject myproject .
Mind the space between myproject and .(dot). The dot ensure this directory (django-oversimplified) and ensure the project folder is generated inside our main directory.
Your project folder will look like this.

Time to create an app named 'myapp'.
django-admin startapp myapp
You don't need to worry about subfolder this time as this will be generated inside your main folder.
Now once you expand the myapp folder you will see some bunch of files there.
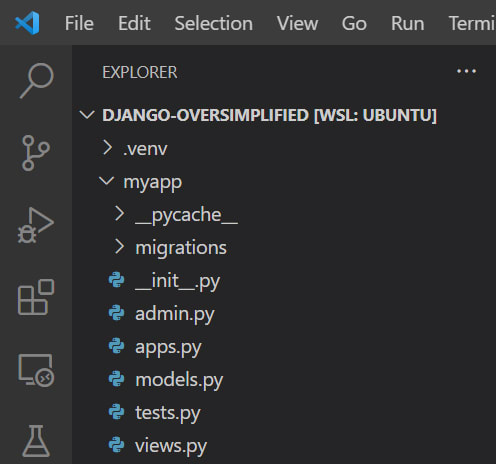
We are going to work with admin.py, apps.py, models.py, and views.py for this project plus one more file which you will find soon.
Now, lets get back to our settings folder "myproject". In here we are going to work with settings.py and urls.py.
The very first thing I am gonna do is register our app in settings.py. Remember our app name is same as its directory
myapp'.
In settings.py find the INSTALLED_APPS (line 33) list and inside this list enter your app name.
'myapp',
This means we have linked/installed myapp with our project. Save it and close it for now.
Now we are very close to our first app.
Open urls.py this file will ensure the navigations in our app. However, we are going to create another file in our app folder in order to make everything easy.
For this we need to include that particular file in our URLS.py. Just to make it clear the first line of code in **urlpatterns **list ensure the path to admin.
See you urls will be like this 127.0.0.1:8000 and the admin here will be 127.0.0.1:8000/admin/ the extra slash after admin ensure the same on your URL part in browser. We will learn more about it later.
Now what we want to do is to avoid using this file in future so we are going to create a point where we can access all of this file feature right from our app folder.
In our myapp folder create a file, URLS.py.
Now, get back to the project folder and URLS.py and add a piece of code first.
from django.urls import include
and inside your urlpatterns
path('', include('myapp.urls')),
We have pointed our urls.py file inside myapp folder which will handle operations on every url except admin.
So, if you want to handle 127.0.0.1:8000/helloworld/, the urls.py file inside myapp will take care of it.
Now move on to your myapp.urls file and enter the following code
from django.urls import path
urlpatterns = [

]
Till this point we -
- Created our project/setting folder
- Created an app named myapp
- Installed our app in settings.py
- Handle the URL behaviors
Defining Views
Creating urls.py file and running our very first hello world app.
Now we are going to design what we call view.
Now, what does it means? is it means we are designing our frontend? Sort of.
Remember Django is not MVC, it is MVT.
M stands for models/database
V stands for views
T stands for template
Just like in MVC the C is controller its exactly what views in our Django.
Controller controls what going to be in your front end it doesn't design the frontend but controls the behavior of it.
The template will display the content to your front-end nevertheless.
This article is getting longer. but don't worry it will become a piece of cake.
Now in our views.py we are going to create a function that display the most anticipated hello world message. But before anything let's ensure everything is working fine. Type,
python manage.py runserver
Click on the url by holding ctrl key or just type 127.0.0.1:8000 in your browser.
If you can see "The install worked successfully" page, well done its working.
If you can't make sure to back-track this tutorial.
It's time to display a hello world message on our home page.
Open your views.py file and enter below code first then I will explain what we just did.
def hello_world(request):
    return HttpResponse("<h1>Hello World</h1>")
Now get to your urls.py (myapp) and enter
from . import views
urlpatterns =[
path('',views.hello_world),
]
This should look something like this.

It will display this.

In the first code block we define a function name hello_world which receive a request.
Now request is whatever you provide to the browser. In our case we are requesting the homepage which means 127.0.0.1:8000 see we are not using requesting any endpoint like /admin/ after the url.
And it returns the httpresponse which in simple word is html.
If you open the page in browser as code (Ctrl+U) you will see the exact same code.
<h1>Hello World</h1>
We have defined a pattern for this file inside the urls.py (myapp).
We used empty '' string to ensure this hello world will display on our homepage and we added our hello_world to make sure it process the function we created for every http://127.0.0.1:8000/ request.
At this point we -
- Learn what is views and created one
- Link our view to URLS.py file in my app
- Accessed our hello world app
This was the part 1 of our Django Basic Oversimplified series. I will get back to you with more forthcoming parts.
What's next?
We will create a site which accept data from user and store it into database and send an email on behalf of it.
Till now, happy coding.


Oldest comments (0)