New day, new WWDC22 session, new overview! Today we’ll walk you through the updates in StoreKit testing.
Before we move on, I’d like to emphasize that previous significant updates for StoreKit testing were introduced during WWDC20, which we’ve also covered here.
Now, it’s time to move on to the brand new updates!
What we will cover today:
- StoreKit updates in Xcode 14
- Advanced subscription cases
- Sandbox updates
StoreKit updates in Xcode 14
During WWDC20, the StoreKit.configuration file was announced. This unlocked the capability to test in-app purchases without needing to set up the Products in App Store Connect.
This allowed you to set up in-app products directly in StoreKit.configuration file, and this local file would be the only place that contains these products and purchases.
The latest WWDC22 updates require you to create the app and products in App Store Connect. You still have an option to test your in-app purchases through StoreKit.configuration directly in Xcode without having an app in App Store Connect. The only limitation of this commonly used approach is that you will not have the chance to use a part of a new features.
You may wonder: what are the features of this and are they worth all this hassle with app creation in App Store? My answer is: absolutely!
By having an app with the products in App Store Connect, you can create a new configuration file in Xcode that will synchronise these products with those that were created in App Store Connect. Any changes that you make within App Store Connect – whether changing the title of the product or doing something else – can be synced with this Xcode Configuration file.
Additionally, you can convert this new file into the local version that won’t be synced with App Store Connect, but will give you an option to edit your products directly in Xcode. Be accurate and careful here, because this is a one-way operation. You will not have a chance to convert the local file back to the synced version. So, in order to proceed with further syncs you’ll need to create a new file. A great option is to have several StoreKit.configuration files; for instance, you could have both synchronized and local ones.
To create the new StoreKit.configuration file you should go to Xcode Menu => File => New (or lock Command + N). Then, type storekit in the search, select StoreKit.configuration file, and push the “Next” button.
Here’s a screenshot to clarify this process:

In Xcode 14 while creating this file you’ll see the checkbox that enables the syncing of in-app products with App Store Connect. To turn this option on, you need to choose the Team and App.
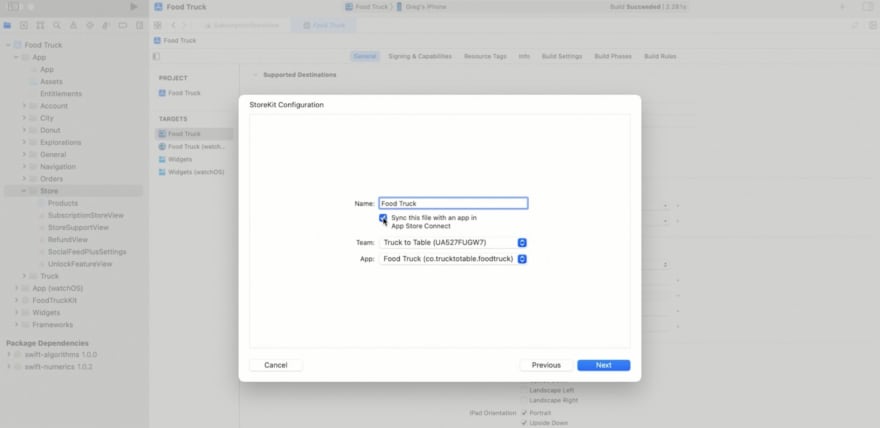
It will be pretty clear to you that to create the local file you should just fill the name of the file and leave the checkbox unchecked.
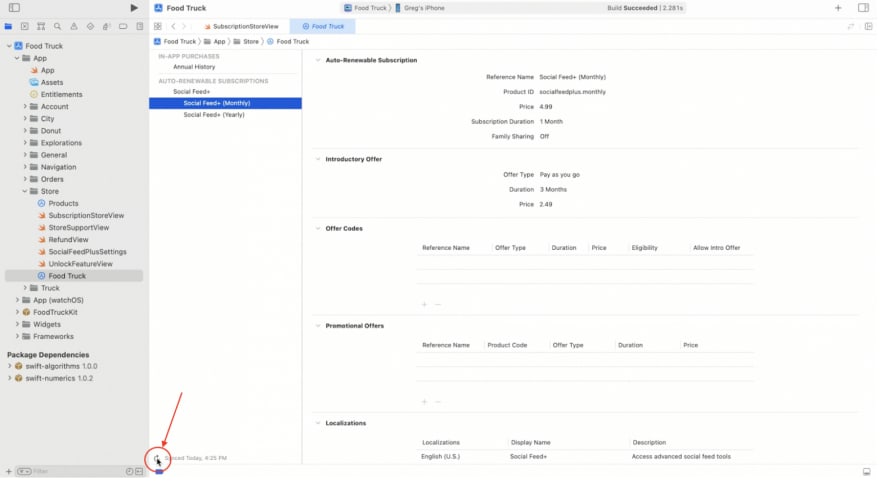
Once you create a configuration file, all the information about your Products begins to sync with App Store Connect. In the lower right corner, you’ll notice the indicator showing you that data downloading is in progress. Even though this job is in progress, you can still continue to work in Xcode.
Those who used to work with the local version of StoreKit.configuration will notice that the newly created file differs from the files that they used to see. The reason for this is that this local version of StoreKit.configuration is read-only. All the changes in products should be made with App Store Connect.
As we highlighted before, all the changes in products that were made in App Store Connect can be synced in StoreKit.configuration file just with one button below. Once the sync is complete, you can see the changes reflected in Xcode.
As I mentioned, this is a read-only file.
You still can easily copy the Product from this file and move it to the local StoreKit.configuration file in Xcode. To do so, right click to the Product that you’d like to copy and click “Copy”. Then choose the local file and open Xcode Menu => File => Paste (or hold command + V).
Alternatively, you can convert this synced file to the local one. You can’t undo this operation, but if necessary you can create a new synced StoreKit.configuration file. Xcode Menu => Editor => Convert to Local StoreKit Configuration.
Let’s move on to the testing.
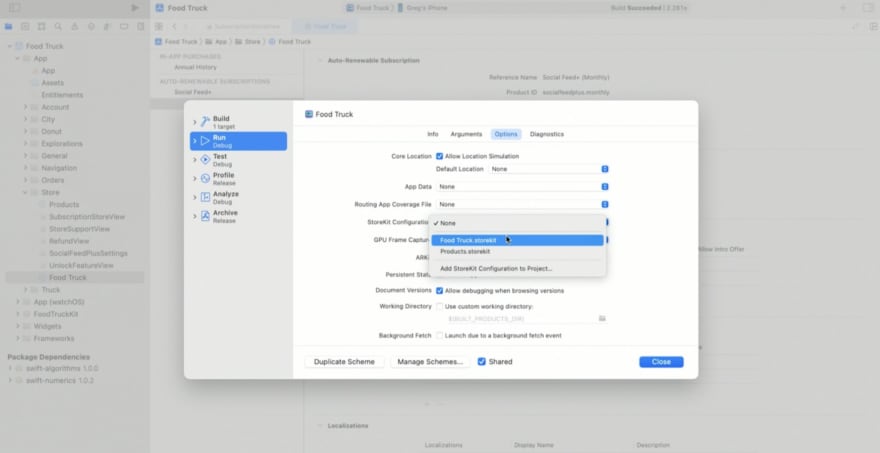
To start this process you should choose the StoreKit.configuration file in Xcode that should be used for building the app. This is a commonly used method.
Then open Scheme Editor:

Choose the “Run” action, then “Options”, and then choose the right file in the StoreKit Configuration:
Congrats on the successful set up of your testing environment! Now you can configure your app.
One more great update for those who use SwiftUI: starting with Xcode 14, all the Products from StoreKit.configuration files will be uploaded to SwiftUI previews.
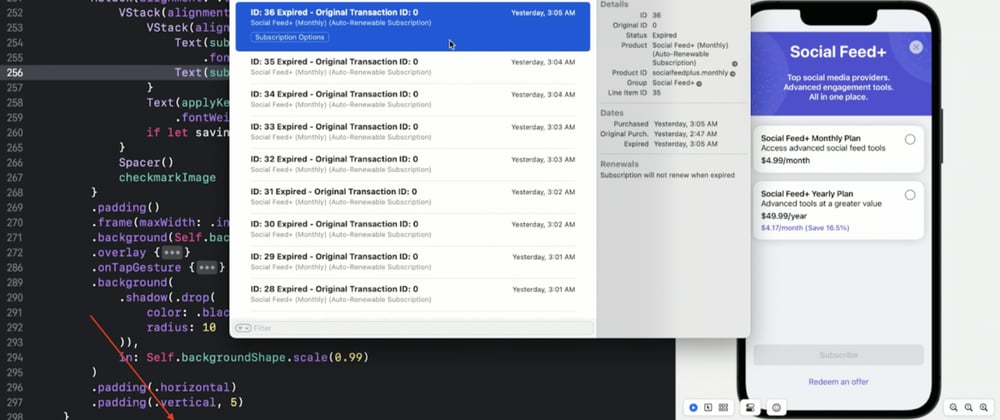
Let’s move on to the testing. As you might remember, WWDC20 introduced the Transaction Manager. You can open it by clicking on the “Purchases” icon in the debug bar.
Xcode 14 Transaction manager includes Transaction Inspector (on the right side) that displays under-the-hood details about a transaction. This is a super convenient way to check subscription statuses. For instance, here you could see the information about expired subscriptions or subscription renewals.

Also, by clicking these buttons you can move to the specific Product in StoreKit.configuration file in Xcode.

Moreover, at the bottom part of the inspector, there is a field to filter transactions. For instance, you can filter by the day of creation of the transaction or by Product ID. This significantly simplifies the way you navigate all your transactions (it is quite a daunting task, as you have all subscription renewals that may confuse your detection of which transaction entitles the feature).
Advanced subscription cases
The new version of Xcode allowed the chance to test things in a more convenient way, and to test something that was previously impossible to test. This is really exciting!
What was added:
- Refund requests
- Offer codes
- Price increases
- Billing retry and a grace period
Refund requests
As you might guess, the option to cancel the subscription directly in the app was released. It means that you can test this functionality for your app.
To show the corresponding screen you need to call just one function: refundRequestSheet(for:isPresented:onDismiss:)
The refund request sheet will appear above the view. It will include the list of refund reasons, and this list corresponds to revocationReason property in the App Store Server API.
It looks like this:

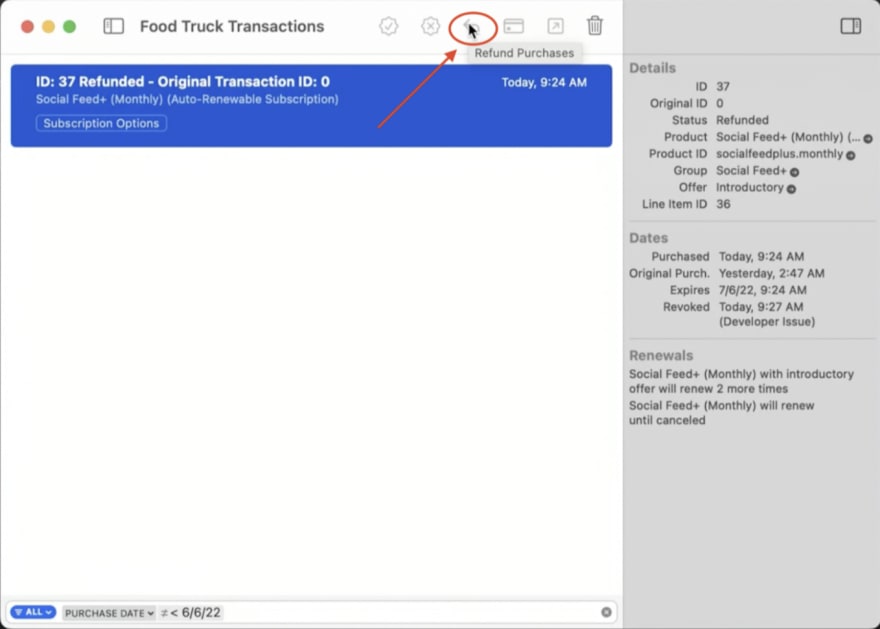
If we are speaking about the Product in App Store, you should remember that refunds can take some time to process; however, when testing with Xcode or Sandbox, a refund request will immediately refund the transaction. You could see this refunded transaction in the Transaction Inspector. You’ll see both the refund reason and the refund date there.
Moreover, you can test the refund directly in the Transaction Manager by clicking the “Refund purchases”.
We’ve described how to test refunds, but how does it look from the code perspective?
The Transaction object that is received from StoreKit consists of revocationDate and revocationReason properties. This will help you detect the refunded transactions.

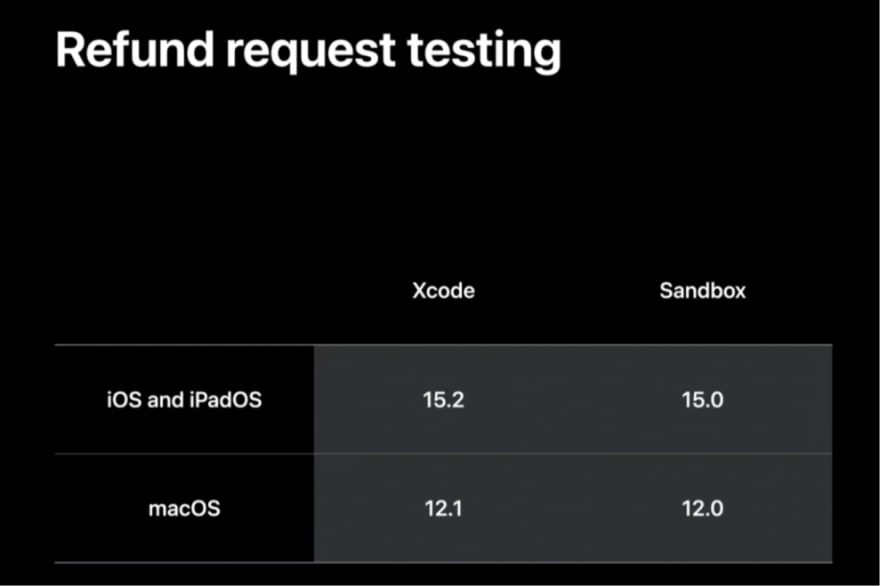
For iOS and iPadOS the testing through Xcode iIs available starting version 15.2, through Sandbox – starting 15.0. MasOS in Xcode – 12.1, Sandbox – 12.0.
Offer codes
In the following example, let’s test offer codes redeem flow with the local configuration file. If you already have offer codes in App Store Connect, and you use synced StoreKit.configuration file, you’ll see these codes automatically in Xcode.
For our case: go to the local file, click the “plus” in “Offer Codes”, configure Offer Code, and click Save.

Once configured, it should be tested. The code implementation is simple in the case of refund requests. You just need to call the function: offerCodeRedemption(isPresented:onCompletion:)
Now you should see the redeem offer code sheet above your app. Only the users of your production app should enter offer code in this field. While testing with Xcode, you won’t need to enter offer code in this info, but rather only to choose the offer code from the list (as all this data is kept in StoreKit.configuration file).

It’s incredibly easy: choose the offer code, confirm the operation – and profit!
Once the offer code is successfully processed, you’ll see this transaction in Transaction Manager; all the details will be available in the new Transaction Inspector.
Let me skip the part where I explain the logic of managing this transaction, as it is quite straightforward. The only difference from managing the ordinary transaction is that you should check a few additional properties.
While managing transactions you can check the offerType property to see if there is an offer applied to the current transaction. While handling renewalInfo, use its property offerType to see what kind of offer will be present in the next renewal.
Offer codes are an incredibly valuable tool for working with users in your app. There are so many things you can achieve, from user acquisition to winning churning customers and support/loyalty programs. So it’s incredibly valuable that we now have a ability to test it.
Just to remind you, this option didn’t previously exist, even in the Sandbox!
Everything described above is available starting Xcode 13.3 and higher and iOS/iPadOS 15.4 and higher.
Price increases
As you might know from our previous overview of WWDC22, StoreKit Messages are aimed to be used to display messages from the App Store API to users. One example of such messages is a change in the app’s price. Let’s take a closer look at how we can test this scenario.
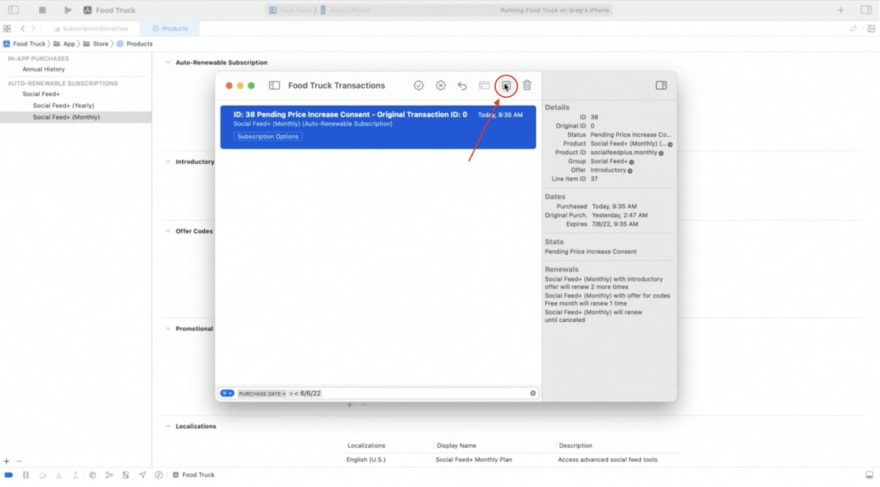
First, change the price of the Product in the StoreKit.configuration file in Xcode. Alternatively, you can choose the needed transaction in the Transaction manager and click the “Request Price Increase Consent”.
You can skip the flow of how to display the StoreKit Messages, but in this case the message will appear automatically over your app. If you’d like to avoid interrupting your user’s flow and do not want to affect user experience, you should implement the StoreKit Messages sequence the same way that you handle the transactions in StoreKit. Find these details here.
What is important is that this price-changing screen might be shown to your users several times until they consent to the new terms. In Xcode, you can manually call this screen only the needed number of times (read above). It is important to remember that the users might consent outside of the app – for instance, via email.
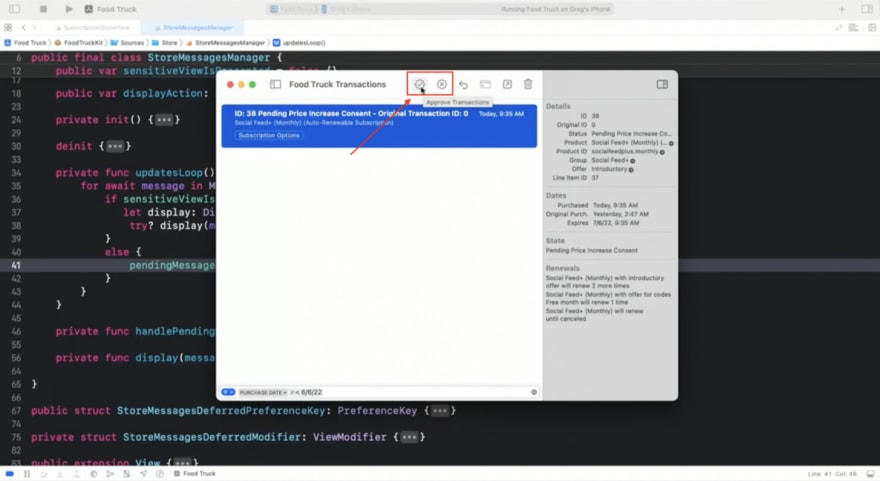
In Xcode, you can test this consent screen display scenario just by clicking the corresponding buttons in Transaction Manager.
Let’s take a look at the code side. As you work with the purchases in your app, you probably are already implemented Statuses.updates sequence. The only thing that you should do now is to check renewalInfo => priceIncreaseStatus property to receive the needed state. Check the expirationReason property to detect if the customer canceled the subscription after the price changed.

All this is unlocked by starting the following versions of OS:

Please consider that StoreKit Message testing on price changing is available just for iOS/iPadOS 15.4 version and higher.
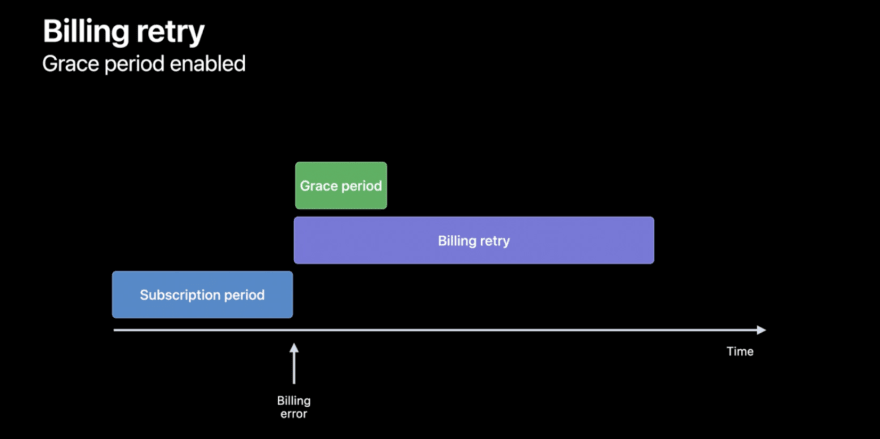
Billing retry and grace period
Billing retry is where an error occurred while trying to renew a subscription, such as if a credit card is expired.

In this case, App Store will attempt to fix the billing issue to renew the subscription.

You can enable a grace period that gives your customer the ability to use your subscription for a limited period of time at the beginning of the billing retry state. In other words, this is a period for the user to solve billing retry issues, pay for the subscription, and continue to experience the app.
Let’s take a look at how to test this case in Xcode.
Choose your StoreKit.configuration file, then Editor Menu => Enable Billing Retry on Renewal. If you’d like to test the grace period, you can refer to the next point in the same menu.

For further convenience, you can speed up the subscription renewal rate from the same menu.
The next steps are straightforward. Let’s subscribe to the app then wait for the renewal period time (that you choose in the Subscription Renewal Rate menu). At the moment of renewal, you’ll see the new transaction with Billing Retry in the Transaction Manager. The Transaction Inspector will show that the transaction is in the grace period. Once the grace period expires, the transaction appears in the standard billing retry state. You can resolve the billing issue by clicking the corresponding button in Transaction Manager.

Handling billing retries and grace periods is key to retaining subscribers by reducing involuntary churn.
Now it’s time to explore how you can handle this in the code.
As the billing retry and grace period states change, the Status.updates sequence will emit a new value.
All that you should do is check, using the renewalInfo.GracePeriodExpirationDate property, whether your user is in the grace period. If so, you should grant him access as if the subscription were active. To detect whether the user is in a billing retry state, check the renewalInfo.IsInBillingRetry property.

Both of these states can be checked with state property in Product.SubscriptionInfo.Status you’d like, you can redirect your user to the App Store to fix the billing issues.

If you are using any currentEntitlement API, you’ll receive the transactions for expired subscriptions while they’re in the grace period.
In which versions is this feature available? Check the following:

So these are the exciting updates with Xcode testing! These will definitely improve the developers’ experience while working with in-app purchases.
Sandbox updates
Last but not least – the updates related to Sandbox.
What we’ll explore:
- Sandbox Apple ID creation
- App Store Connect API
- Billing failure simulation
Sandbox Apple ID creation
To unlock the ability to test in Sandbox, you have to create a testing user.
There are several pieces of good news.
- The number of fields that you should fill while creating the user significantly decreased.
- You can use “+” symbol in email to prevent you from creating a new email for every user. For instance, “your_super_test+sandbox@iclod.com”
- Added in-line suggestions for passwords

App Store Connect API
For the last few years, Apple engineers have added a lot of features to Sandbox per developers’ requests. The changing of the Sandbox account region and clearing purchase history is one of these.
Most of these features are available in App Store Connect or directly on the device on the Sandbox Manage Subscriptions page.
Later this year, the following Sandbox features will be added to App Store Connect API:
- Query for Sandbox Apple IDs
- Clear in-app purchase history
- Set interrupted purchase state
These features will improve the speed of subscription testing with Sandbox accounts and add possibility of automated testing in the basic scenarios.
Billing failure simulation
Since launching in 2019, Billing Grace Period allowed developers to recover 300 million days of paid service to their customers. Soon, there will be the capability to use a new Sandbox Account Settings page to:
- enable billing failure simulation for your account
- test foreground and background subscription failures
- verify subscription status with verifyReceipt, App Store Server API and App Store Server Notifications v2 in Sandbox.
Conclusion
With these testing scenarios, Apple explores the statuses that will affect App Store Notifications V2. This is a big topic to cover, so stay tuned for other articles!
We know a thing or two about in-app purchases as Qonversion provides a complete cross-platform infrastructure that allows you to create and restore purchases, validate receipts, and provide your app with an accurate subscription status without the need to build your server. So, If you’d like to learn more about it or have any questions, feel free to ping me in the comments.
If you'd like to learn more on how to handle StoreKit errors, please follow our guide. Also, recently I've created an article on how to solve SKErrorDomain 0, feel free to check!


Top comments (0)