
Overview
In todays tutorial we will take a look at a cool new feature that is available to us in Azure Bastion whereby we can upload and download files to a VM using a native client. You can read more about this feature on Microsoft Docs.
With the new Azure Bastion native client support, available with Standard SKU, you can now:
- Connect to your target Azure virtual machine via Azure Bastion using Azure CLI and a native client on your local machine.
- Log into Azure Active Directory-joined virtual machines using your Azure Active Directory credentials.
- Access the features available with your chosen native client (ex: file transfer).
Today we will look specifically at how we can upload files from a Windows OS based local machine using WinSCP to a Linux Azure VM using Azure Bastion in Tunnel Mode.
There are a few important notes and limitations I would like to cover off first before we start:
- File transfers are supported using the native client only. You can't upload or download files using PowerShell or via the Azure portal.
- To both upload and download files, you must use the Windows native client and RDP.
- You can upload files to a VM using the native client of your choice and either RDP or SSH.
- This feature requires the Standard SKU. The Basic SKU doesn't support using the native client.
In this demonstration, since our target VM is running a Linux OS we will be using Azure Bastion in tunnel mode, we will only be able to upload files and downloading files is NOT supported yet.
If you want to see how you can Upload and Download files using the native Windows RDP client, please see: Upload and download files - RDP
Pre-requisites
To get started you'll need a few things, firstly:
- An Azure Subscription
- An Azure Bastion (Standard SKU)
- Azure CLI (Version 2.32 or later)
- WinSCP (Version 5.19.6 or later)
- The Resource ID of the VM to which you want to upload files to. (In my case it will be a Linux VM hosted in Azure).
Setting up an Azure Bastion (Standard SKU)
Note: Before we can set up an Azure Bastion host we need an Azure Virtual Network with a /26 subnet called AzureBastionSubnet. I already have a VNET and subnet set up in my environment:

Next I will be using Azure CLI in a PowerShell script below called: Bastion_Setup.ps1 to set up the Bastion Host:
#### Ensure VNET and AzureBastionSubnet with /26 CIDR is available before creation of Bastion Host ####
#Login to Azure
az login
az account set --subscription "Your-Subscription-Id"

#Set Variables
$location = "uksouth"
$bastionName = "Pwd9000-EB-Bastion"
$bastionPip = "Pwd9000-EB-Bastion-Pip"
$bastionRG = "Pwd9000-EB-Network"
$bastionVNET = "UKS-EB-VNET"

#Deploy Public IP for Bastion
az network public-ip create --resource-group $bastionRG `
    --name $bastionPip `
    --location $location `
    --sku "Standard"

#Deploy Bastion
az network bastion create --name $bastionName `
    --public-ip-address $bastionPip `
    --resource-group $bastionRG `
    --vnet-name $bastionVNET `
    --location $location `
    --sku "Standard"
The script created a Public IP and Bastion host as follow:

Next we will enable native client support. Navigate to the Bastion Configuration as shown below and enable Native client support:

Note: If you are running the Basic SKU of Azure Bastion, you can also use this area to upgrade the SKU to Standard. Once you upgrade, you can't revert back to the Basic SKU without deleting and reconfiguring Bastion. Currently, this setting can be configured in the Azure portal only.
Opening a Bastion Tunnel
Now with our Azure Bastion set up and configured we will open a secure tunnel through Azure Bastion to our Azure hosted Linux VM, which we can then connect to using WinSCP to start uploading files to our VM.
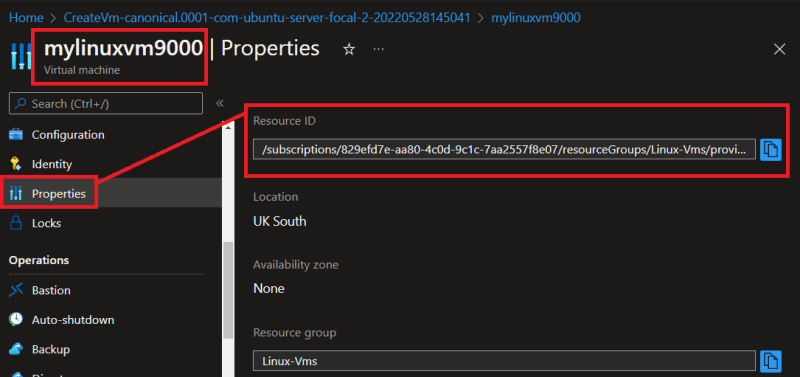
Navigate to the Linux VM in the Azure portal, go to Properties and make a note of the Resource ID as we will need this value when we open the Bastion tunnel.
Next, open PowerShell and run the below Open_Tunnel.ps1 script using your environments variables to open a tunnel on port 50022:
#Login to Azure
az login
az account set --subscription "Your-Subscription-Id"

#Set Variables
$bastionName = "Pwd9000-EB-Bastion"
$bastionRG = "Pwd9000-EB-Network"
$targetVmResourceId = "/subscriptions/829efd7e-aa80-4c0d-9c1c-7aa2557f8e07/resourceGroups/Linux-Vms/providers/Microsoft.Compute/virtualMachines/mylinuxvm9000"

az network bastion tunnel --name $bastionName `
    --resource-group $bastionRG `
    --target-resource-id $targetVmResourceId `
    --resource-port "22" `
    --port "50022"
As you can see we now have a tunnel open on port: 50022 on our local Windows machine (127.0.0.1).

Note: Do not close this shell window as it will close the tunnel, leave the session open.
Connect WinSCP to the running Bastion Tunnel
Next we will open WinSCP and connect to our localhost (127.0.0.1) to the open port: 50022 on the tunnel that is running:

Note: The file protocol is SCP and the UserName and Password is that of our target VM.
However in my case I will connect with a private key instead of a Password. To do so, in WinSCP on the screen above click on Advanced and select the private key you want to use under the SSH -> Authentication section.

Note: If you are using a PEM private key, WinSCP will automatically create a converted copy of the PEM in PPK format. If you select OK in the following screen it will ask you where to save the converted PPK formatted key:

Now with the private key configured in WinSCP, blank out the password and select Login. You will then see a warning about connecting to an unknown server, click Yes to continue:


And that is it, you can now simply drag and drop files from the left pane (local Windows machine) into the Azure Hosted Linux VM on the right pane:

We can also still use the Azure portal to connect to our VM via the Bastion Host and inspect the files we have uploaded:


I hope you have enjoyed this post and have learned something new. You can also find the code samples used in this blog post on my published GitHub page. ❤️
Author
Like, share, follow me on: 🐙 GitHub | 🐧 Twitter | 👾 LinkedIn


Top comments (0)