
Overview
Have you ever had to build and look after 100s of development virtual machines and environments for your organisations developers to work in? Or maybe you are a developer or IT specialist working with code and starting in a new project and you have to configure your own development environment before you can start working on your code.

If you are, you are probably well aware of the PAIN points when it comes to maintaining developer workstations such as:
- Setup and maintenance of a dev workstation or set of workstations for a project.
- The time that is wasted before a 'first commit' can take place.
- Inconsistency between dev workstations for configurations/tooling/settings.
- Versioning Tools/Extensions, Debuggers and Dependencies.
- Personal or Team based settings and customisations.
- Security and vulnerabilities.
- Hardware spec requirements.
The list goes on, and these are all factors that can cause a lot of pain, frustration and time wasted before actual development can start.
So today we are going to take a look at a great service available on GitHub called Codespaces.
In a nutshell a GitHub codespace is a development environment running inside of a container that's remotely hosted on a cloud based Virtual Machine linked to your code repository.
You can almost classify a CodeSpace as a development environment as a service.
You can customise or even have a bespoke docker image as a GitHub codespace tailored to meet the needs of your project and developers, by using configuration files along with your projects source code, which creates a repeatable, consistent and versioned codespace configuration for all users of the project.

Codespaces run on a variety of VM-based compute options hosted by GitHub, from 2 core machines up to 32 core machines. You can connect to your codespaces from a web browser or locally using Visual Studio Code.
At the time of this writing the VM size options for codespaces are as follow:

Who can use Codespaces?
In the past Codespaces could only be enabled in settings by organisation owners for Team and Enterprise Cloud plans. However GitHub since Nov 2022 GitHub announced that Codespaces are available for all GitHub users, and everyone will have up to 60 hours of Codespaces for free every month.
Tip: Press (dot) '.' on any repo to make quick edits powered by Visual Studio Code from a web browser.
Creating your first CodeSpace
All the examples are available on my GitHub Codespaces Demo Repository.
In this tutorial we will look at how easy it is to create a basic CodeSpace to get started and also take a deeper look into how to customise the codespace.
- On your GitHub account navigate to
'Your codespaces'and select'New Codespace'.
- Select the repository and branch that you want to have cloned onto your codespace, as well as the region and machine type to run your codespace and then select
'Create codespace'.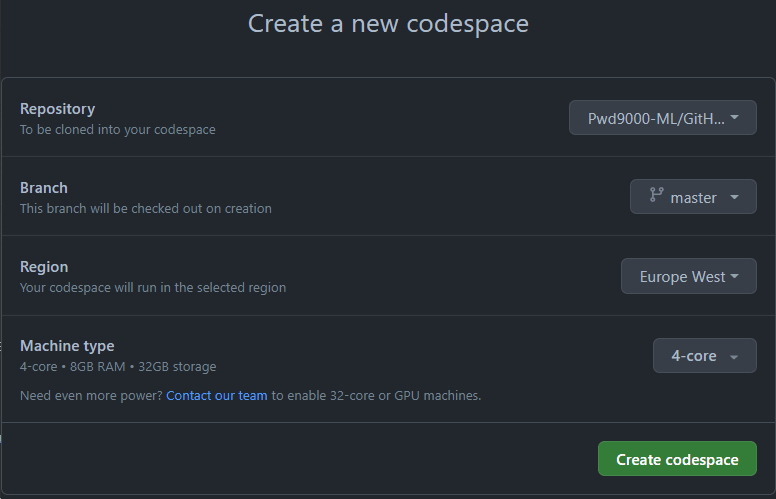
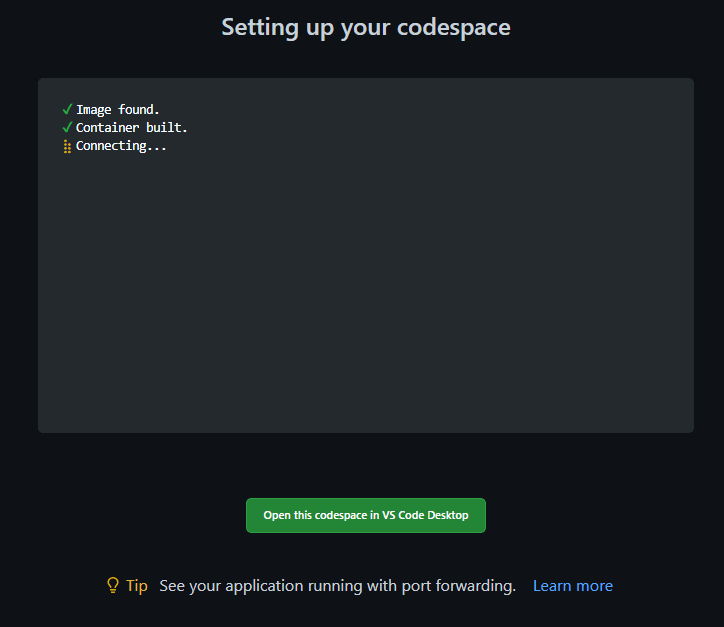
- You will then see the codespace container being provisioned. (Note: GitHubs default image will be used, but we will look at how you can use custom images later on in this tutorial).
- Shortly after the codespace container is provisioned, VS Code will open inside of your web browser, already linked up with your code and a terminal to the remote codespace. If you have VS Code locally installed, it will even detect what extensions you have locally and provision them on the remote dev container codespace for you.
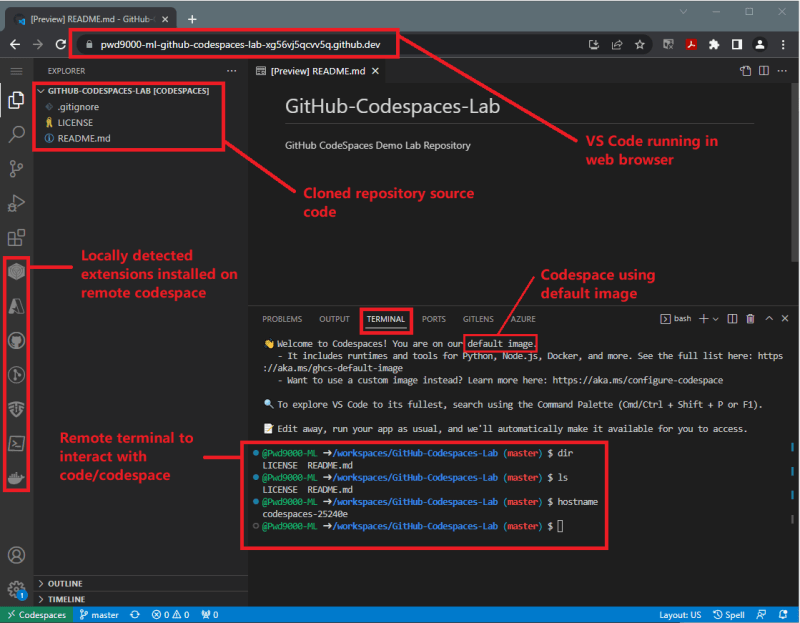
On the bottom left side you will see a green square that says Codespaces, you can click on this for additional options. If you prefer working on a locally installed copy of VS Code you can select the option 'Open in VS Code'.

Note: When using a locally installed copy of VS Code instead of the web browser, you will still be working on the remote codespace instance, thus utilising the remote instance compute power which may be a much higher spec than your local machine and fitting your applications requirements. Pretty neat!!!
With the codespace now up and running, you can simply start to work on your code. If you leave your repository and come back later you can always resume your codespace experience by navigating to your repository 'Code' and selecting the 'Codespaces' tab.

Let's take a look at how you can customise your codepsace next.
Customising your CodeSpace
As mentioned, the codespace we created is using GitHubs default docker image. So what we will do next is create a few configuration files so that we can customise the default image.
- Remember that green square at the bottom left corner I talked about earlier that says Codespaces, click on this for additional options and select the option
'Add Development Container Configuration Files':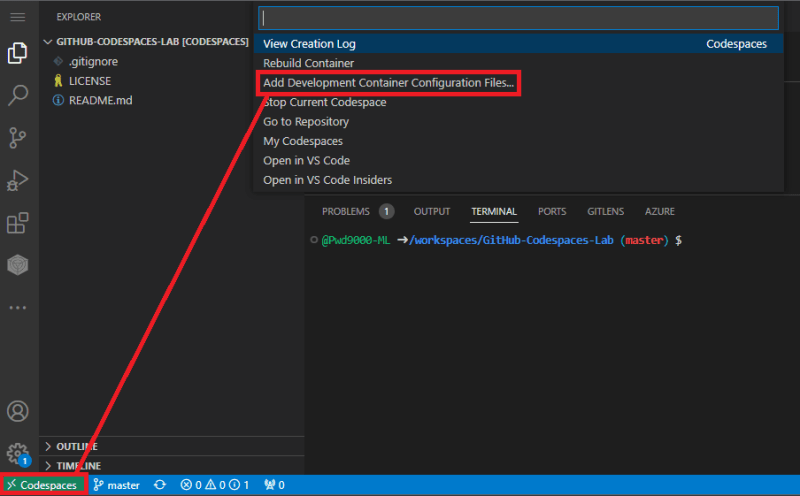
- Select a predefined container definition. In my case I will select
'Ubuntu'. NOTE: There is a growing variety of predefined images that can be selected from, maintained on GitHubs vscode-dev-containers repository: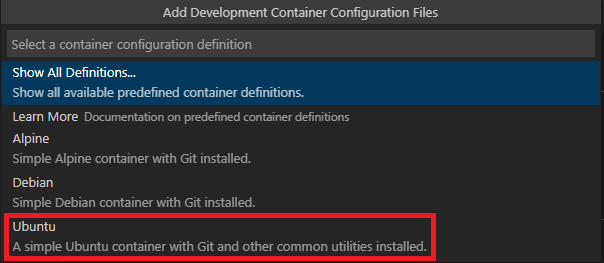
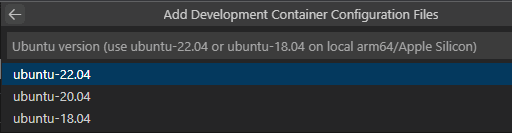
- Select the Ubuntu version to use:
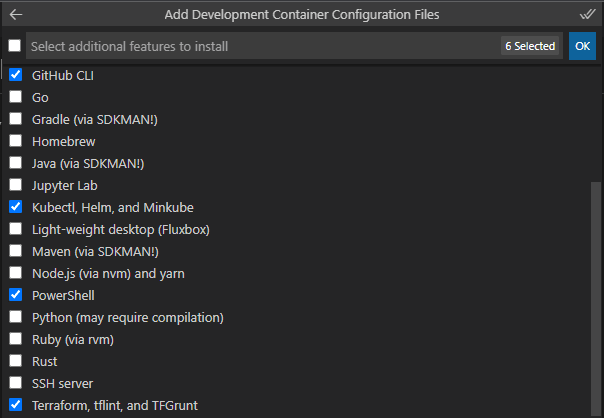
- Select the additional features to install inside of the dev container:
- You may also be asked to select what version of the tooling you selected to use:


After the above process you will notice a new folder has been created inside of the root of your repository called '.devcontainer' that contains a 'devcontainer.json' file and a 'dockerfile':
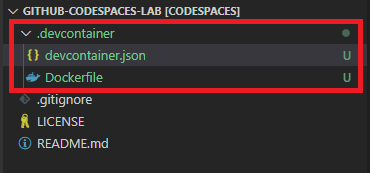
Let's take a closer look at these files.
This dockerfile contains the base image and (optionally added) OS packages that will be used as the dev container/codespace. You can amend this file as needed to suit your requirements.
You can even use images you maintain yourself hosted on your own remote registry such as an Azure Container Regsitry (ACR). Have a look at codespace access to private registry.
# See here for image contents: https://github.com/microsoft/vscode-dev-containers/tree/v0.238.1/containers/ubuntu/.devcontainer/base.Dockerfile

# [Choice] Ubuntu version (use ubuntu-22.04 or ubuntu-18.04 on local arm64/Apple Silicon): ubuntu-22.04, ubuntu-20.04, ubuntu-18.04
ARG VARIANT="jammy"
FROM mcr.microsoft.com/vscode/devcontainers/base:0-${VARIANT}

# [Optional] Uncomment this section to install additional OS packages.
# RUN apt-get update && export DEBIAN_FRONTEND=noninteractive \
#     && apt-get -y install --no-install-recommends <your-package-list-here>
NOTE: Codespaces also supports docker compose instead of using a dockerfile. See this template 'Using docker compose in Codespaces'.
The devcontainer.json file tells Visual Studio Code (and other services and tools that support the format) how to access (or create) a development container with a well-defined tool and runtime stack.
See the official reference documentation for more details on how this file can be modified.
Note that the contents of this file can be amended to suit your needs and also determines if you are using a dockerfile or docker compose, what tooling is available and the version of that tooling. It can almost be seen as a configuration input file for the dockerfile that will configure additional features:
// For format details, see https://aka.ms/devcontainer.json. For config options, see the README at:
// https://github.com/microsoft/vscode-dev-containers/tree/v0.238.1/containers/ubuntu
{
    "name": "Ubuntu",
    "build": {
        "dockerfile": "Dockerfile",
        // Update 'VARIANT' to pick an Ubuntu version: jammy / ubuntu-22.04, focal / ubuntu-20.04, bionic /ubuntu-18.04
        // Use ubuntu-22.04 or ubuntu-18.04 on local arm64/Apple Silicon.
        "args": { "VARIANT": "ubuntu-22.04" }
    },

  // Use 'forwardPorts' to make a list of ports inside the container available locally.
    // "forwardPorts": [],

    // Use 'postCreateCommand' to run commands after the container is created.
    // "postCreateCommand": "uname -a",

    // Comment out to connect as root instead. More info: https://aka.ms/vscode-remote/containers/non-root.
    "remoteUser": "vscode",
    "features": {
        "kubectl-helm-minikube": "latest",
        "terraform": "latest",
        "git-lfs": "latest",
        "github-cli": "latest",
        "azure-cli": "latest",
        "powershell": "7.1"
    }
}
You can even specify which VS Code extensions to install and load on the remote codespace. Let's add some specific custom VS Code Extensions to be installed on our remote codespace by adding the following code into the devconainer.json file:
// Configure tool-specific properties.
"customizations": {
    // Configure properties specific to VS Code.
    "vscode": {
        //"settings": {},
        //"devPort": {},
        // Specify which VS Code extensions to install (List of IDs)
        "extensions": [
            "ms-vscode.powershell",
            "ms-dotnettools.csharp",
            "hashicorp.terraform",
            "esbenp.prettier-vscode",
            "tfsec.tfsec"
            ]
        }
    },
The configuration file now contains custom VS Code extensions that we want to load for anyone who spins up a new codespace from our project, so that everyone has the same extensions:
// For format details, see https://aka.ms/devcontainer.json. For config options, see the README at:
// https://github.com/microsoft/vscode-dev-containers/tree/v0.238.1/containers/ubuntu
{
    "name": "Ubuntu",
    "build": {
        "dockerfile": "Dockerfile",
        // Update 'VARIANT' to pick an Ubuntu version: jammy / ubuntu-22.04, focal / ubuntu-20.04, bionic /ubuntu-18.04
        // Use ubuntu-22.04 or ubuntu-18.04 on local arm64/Apple Silicon.
        "args": { "VARIANT": "ubuntu-22.04" }
    },

    // Configure tool-specific properties.
    "customizations": {
        // Configure properties specific to VS Code.
        "vscode": {
            //"settings": {},
            //"devPort": {},
            // Specify which VS Code extensions to install (List of IDs)
            "extensions": [
                "ms-vscode.powershell",
                "ms-dotnettools.csharp",
                "hashicorp.terraform",
                "esbenp.prettier-vscode",
                "tfsec.tfsec"
                ]
            }
        },

    // Use 'forwardPorts' to make a list of ports inside the container available locally.
    // "forwardPorts": [],

    // Use 'postCreateCommand' to run commands after the container is created.
    // "postCreateCommand": "uname -a",

    // Comment out to connect as root instead. More info: https://aka.ms/vscode-remote/containers/non-root.
    "remoteUser": "vscode",
    "features": {
        "kubectl-helm-minikube": "latest",
        "terraform": "latest",
        "git-lfs": "latest",
        "github-cli": "latest",
        "azure-cli": "latest",
        "powershell": "7.1"
    }
}
NOTE: To get the ID of a VS Code extension you can search the following VS Code extensions page or you can right click on existing extensions inside of VS Code and select 'Copy Extension ID'.

After creating and amending the dev container configuration files, we need to commit and push the files and changes to our project repository.

Next we need to reload our codespace to realise the configuration changes we made.

After the new container is built based on our config files, notice that we now have the additional tooling available on the remote codespace/dev container as well as the custom VS Code extensions we specified.

NOTE: The custom dev container configurations for Codespaces will now be available to anyone else who works on the code in this repository, and will have a consistent and versioned codespace configuration for all users of the project.
Examples
Say a new user starts on the same project, they can now simply go to the repository and create a new codespace that will use the exact same configuration across the team.
- Go to the code repository and select
'Code', navigate to the'Codespaces'tab and select the option for'Advanced Configuration'.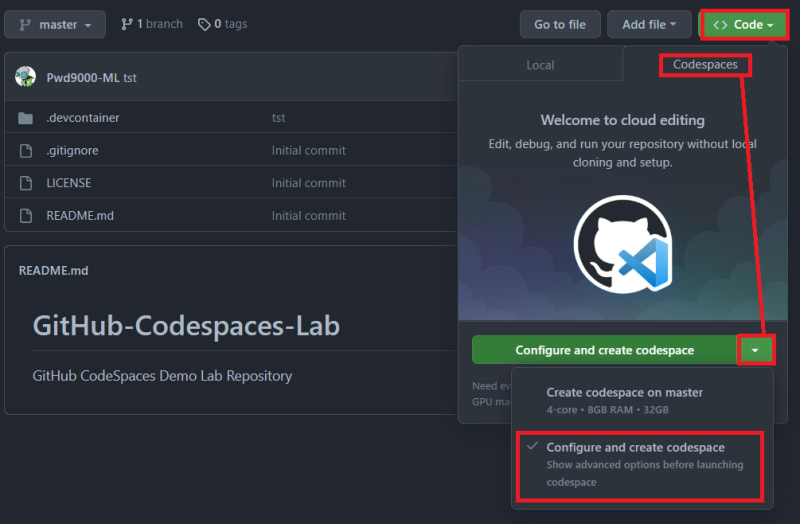
- Notice that there is now an option to select
'Dev container configuration', select the relevant settings and then'Create codespace'.
Each codespace is uniquely identified.

NOTE: By default any Active codespaces that becomes idle will go into a hibernation mode after 30 minutes to save on compute costs. This default behavior is also configurable. See Codespaces timeouts for more info.
One last topic I want to cover is the ability to have more than one dev container configuration on a single/mono repository.
Codespaces supports multiple 'devcontainer.json' files inside of your '.devcontainer' directory.
If you want to have a choice of dev container configurations in your repository, any alternatives to the '.devcontainer/devcontainer.json' (or '.devcontainer.json') file must be located in their own subdirectory at the path '.devcontainer/SUBDIRECTORY/devcontainer.json'. For example, you could have a choice of two configurations:
'.devcontainer/database-dev/devcontainer.json''.devcontainer/gui-dev/devcontainer.json'
When you have multiple 'devcontainer.json' files in your repository, each codespace is created from only one of the configurations. Settings cannot be imported or inherited between 'devcontainer.json' files. If a 'devcontainer.json' file in a custom subdirectory has dependent files, such as the Dockerfile or scripts that are run by commands in the 'devcontainer.json' file, it's recommended that you co-locate these files in the same subdirectory.

In the following example when a new user starts they can pick which configuration would suit their needs best.
- Go to the code repository and select
'Code', navigate to the'Codespaces'tab and select the option for'Advanced Configuration'.
- You will now be able to select multiple
'Dev container configurations', select the relevant settings and then'Create codespace'.
Conclusion
As you can see, GitHub Codespaces is really a mind blowing service that can solve so many problems when it comes to provisioning development workstations. We have only scratched the surface of what Codespaces can offer in this post and I will be creating an entire blog series dedicated to this amazing service, so stay tuned for the next post on GitHub Codespaces.
I hope you have enjoyed this post and have learned something new. You can also find the code samples used in this blog post on my published GitHub page. ❤️
Author
Like, share, follow me on: 🐙 GitHub | 🐧 Twitter | 👾 LinkedIn


Top comments (0)