Mobile chat of all shapes and sizes, whether it be a standalone group messaging app, an embedded customer service widget, or private 1:1 chat in a dating app, is everywhere.
In this tutorial, we’ll show you how to create an iOS mobile chat app with Swift 5, allowing any number of users to chat in realtime. We’ll also show you how to store message history, so when a user leaves and returns, their messages are still in the app.
To create this, we will use a few key features of PubNub: Publish/Subscribe and Storage & Playback (message storage).
After this tutorial, you will have an app that provides a chatroom service and is a great base and addition for any app.
The full iOS chat app with Swift 5 is available here.
Creating a App with PubNub in Xcode
PubNub
If you haven't yet, sign up for a PubNub account. Once you’re logged in, create a new app. Click on it and either create a new keyset or click on the demo one available already. You should now see a publish and subscribe keys, these are what allow us to use the PubNub API.
Under the keys, we have different options that we can enable! Let's enable Storage & Playback near the bottom left. We’re at the point where you can decide how long you want your messages to be retained for. I chose a one-day retention length and saved the changes. Under the retention setting, there are settings to enable delete from PubNub history.
Xcode App Setup
Open up Xcode and create a new project, make it a Single View App, name it, and then close the project. Navigate to your project folder using Terminal and either run the command gem install cocoapods or gem update cocoapods if you already have cocoapods installed.
Enter touch Podfile into your terminal to create the Podfile for your app then go ahead and open the file using open Podfile.
Enter this into the file, making sure to replace the “application-target-name” with that of your project.
source ‘https://github.com/CocoaPods/Specs.git'
# optionally complete and uncomment if compilation issues arise
# project ‘<path to project relative to this Podfile>/<name of project without extension>’
# workspace ‘MyPubNubProject’
use_frameworks!
# replace next lines name in quote with your project name
target ‘application-target-name’ do
# Should only use this with projects
# that must have a minimum deployment
# target of iOS 8
platform :ios, ‘8.0’ # (or ‘9.0’ or ‘10.0’)
pod “PubNub”, “~> 4”
end
Run the command pod install in your terminal after. This should install the PubNub framework for you in your project. After it is installed, open up your project by double-clicking the .xcworkspace file instead of your normal project file.
Design a Chat Storyboard in Swift
Before we start putting in all the logic, let's design and build up the views of our app. Let’s start with our login view.
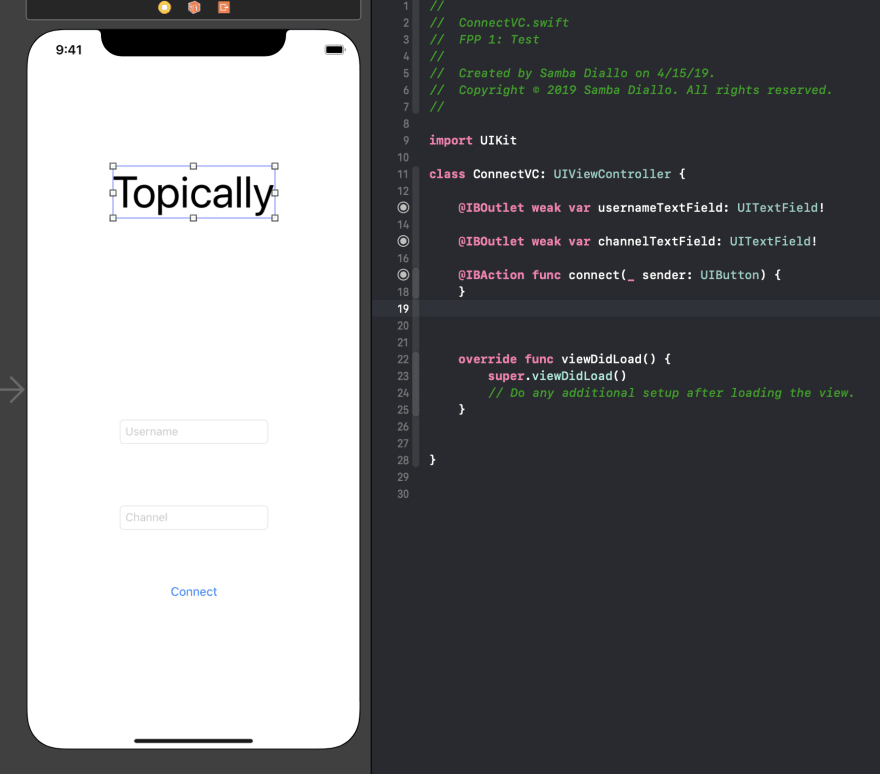
Rename ViewController.swift to ConnectVC.swift by highlighting the name in the class declaration and going up to Editor -> Refactor -> Rename.
When a user opens the app, we want them to have a field to enter a username and a channel they want to connect to, in addition to a connect button. Add those to your first view. Also, put in a cool title you want to call this app, I chose Topically!
I then made outlets for my username and channel TextFields by control-dragging from the item on my storyboard to my ConnectVC file. Do the same to your button, but instead of an outlet, create an action, of type UIButton, for it to run when pressed.
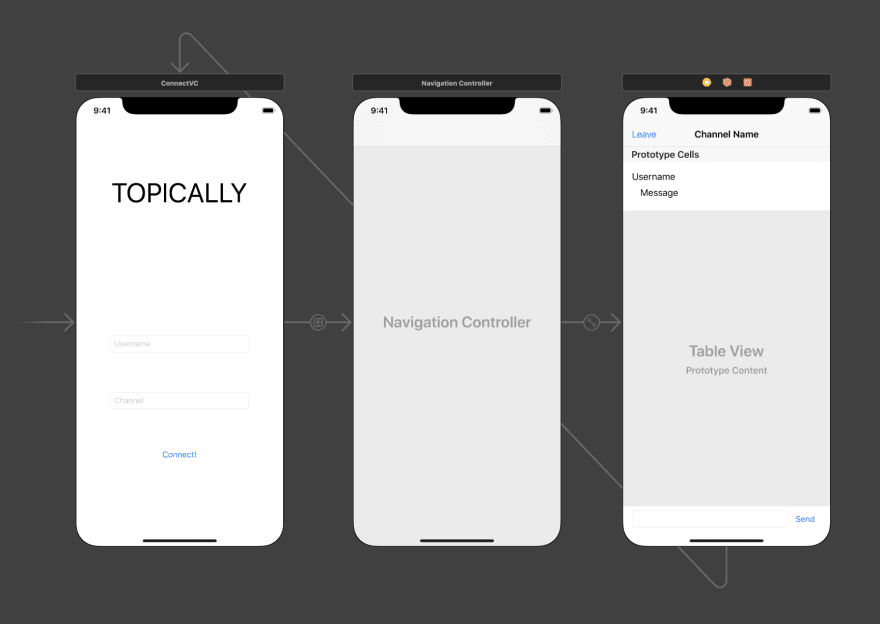
Next, let's create our channel chat view.
Create a new Cocoa Touch Class and name it ChannelVC. Create a new view controller in your storyboard and set the class to ChannelVC as well. While selecting that view, go to the top of your screen and click Editor -> Embed In -> Navigation Controller. Another view should now be in your storyboard. This is the navigation controller, it allows for more mobility for users when going in between views.
Add a UIBarButtonItem to the left spot on the navigation bar on your ChannelVC, this will be the leave button. Control-drag that to your ChannelVC.swift and create an action of type UIBarButtonItem named leaveChannel. Drag a UITableView into your ChannelVC view. Make it take up most of the screen leaving enough room for another TextField and a button with the text Send in it. Create those as well.
Make outlets for the table and for the TextField in your ChannelVC.swift, and make another action for the send button.
Our next step involves not our ChannelVC, but creating the custom cell inside of our table. Once we have the general layout of our ChannelVC setup, we have to customize the cells in our tableView. Create a new cocoa touch class named MessageCell, and drag a UITableViewCell into your table view. Set that cells class to your new class and change the identifier to MessageCell as well.
Drag whatever design you want, including whatever details you deem necessary for your use case. I put in the username and message labels into the cell, and once you're done, control-drag to create outlets to your MessageCell class. Make sure to set constraints so that the table doesn't squish your content.
For more information on making your app work on all screen sizes, reference Apple’s documentation on Auto Layout or the numerous guides available online.
Having all of these views is great, but not if they cannot move from one to another. Click on the bar above ConnectVC that has its name, and then click the yellow circle. Control-drag this to the navigation controller and select the show option. While the line to nav controller is selected click on the attributes tab on your right panel where it says “Storyboard Segue” at the top. Name the identifier “connectSegue”. This will allow you to perform this segue when you click the connect button on ConnectVC.
The next and final segue we need is one that brings us from ChannelVC to ConnectVC. Select ChannelVC the same way we did to ConnectVC and drag it to ConnectVC. This time select “Present Modally” and name it “leaveChannelSegue” in the attributes inspector.
Connecting a User to a Channel
Now that we've finished with the storyboard, let's start coding. We'll start with ConnectVC, which provides the username and channel to our ChannelVC where we'll utilize all of our PubNub knowledge. To start, perform a segue in our connect action.
@IBAction func connectToChannel(_ sender: UIButton) {
    self.performSegue(withIdentifier: "connectSegue", sender: self)
}
This utilizes our connectSegue we made in the previous section that brings us to the ChannelVC’s nav controller. The only other thing we need to do in this view controller is to prepare for the segue above. By overriding this function, we send information between the views.
NOTE: In this tutorial, if the user does not provide a username, I automatically assign the name “A Naughty Moose” to them. If they do not provide a channel, I send them to the channel “General.”
To access the view we are going to, we get an instance of our navigation controller, then get our ChannelVC view from there. We check if the text fields are empty, replace the values if we need to, and then set two variables in ChannelVC, which we have not created yet, with our username and channel values.
override func prepare(for segue: UIStoryboardSegue, sender: Any?) {

    //Accessing Nav Controller and ChannelVC view
    if let navigationController = segue.destination as? UINavigationController,
        let channelVC = navigationController.viewControllers.first as? ChannelVC{
        var username = ""
        var channel = ""

        //Replacing empty values with default ones
        if(usernameTextField.text == "" ){
            username = "A Naughty Moose"
        }
        else{
            username = usernameTextField.text ?? "A Naughty Moose"
        }
        if(channelTextField.text == "" ){
            print("nothing in channel")
            channel = "General"
        }
        else{
            channel = channelTextField.text ?? "General"
        }

        //Setting values in ChannelVC
        channelVC.username = username
        channelVC.channelName = channel
    }
}
Creating a Chat View Controller with PubNub
In our ChannelVC, we should have two outlets, an action and our viewDidLoad function inside already. Above all of those, under the class definition, we will start defining some variables and resources that we need for the rest of the class.
First, let's make our class listen for PubNub events and make it work with our table. Import PubNub at the top of your file and after UIViewController in our class definition put in PNObjectEventListener, UITableViewDataSource, and UITableViewDelegate. Our class should now show an error, click on the error and add those stubs suggested, we'll fill those out in just a second.
- Right under our class definition, let’s define a struct that makes working with our messages a little easier. My struct has three strings: a message, a username, and a UUID. Later when we are publishing messages, you can send different information and update the struct with those updates.
- After that, create an array of Message and initialize it to be empty as all class variables need to have some sort of initial value.
- Create a marker of the earliest message we have received, of type NSNumber and start the marker as -1.
- Another variable to keep track of whether we already started loading more messages.
- Now for the most important variable of this view controller, the one that publishes and subscribes, our PubNub object! This is the object we will be calling our PubNub functions on in this view controller.
- We then have the username and the channel that the user entered in the last step, initialized with temporary values.
- After that should be our message text field, our tableView, and our and our send action.
class ChannelVC: UIViewController,PNObjectEventListener, UITableViewDataSource, UITableViewDelegate {

    //Our Message struct, makes working with messages a little easier
    struct Message {
        var message: String
        var username: String
        var uuid: String
    }
    var messages: [Message] = []

    //Keep track of the earliest message we loaded
    var earliestMessageTime: NSNumber = -1

    //To keep track if we are already loading more messages
    var loadingMore = false

    //Our PubNub object that we will use to publish, subscribe, and get the history of our channel
    var client: PubNub!

    //Temporary values
    var channelName = "Channel Name"
    var username = "Username"

    //-- ALREADY SHOULD BE IN YOUR FILE
    //Where our messages come in
    @IBOutlet weak var messageTextField: UITextField!

    //We populated this with the information from our messages array
    @IBOutlet weak var tableView: UITableView!

    //...

}
Next, that we have established some global variables that we can use all throughout our code, let’s set up our viewDidLoad function. After calling the inherited viewDidLoad, change the title at the top of the navigation controller to the channel name and set your table view's delegate and data source to self.
self.navigationController?.navigationBar.topItem?.title = channelName

tableView.delegate = self
tableView.dataSource = self
Next, we configure and initialize our PubNub object. Here is where you insert your publish and subscribe keys found in your PubNub account. We set stripMobilePayload to false as it is deprecated and give this connection a unique UUID, which will make it easier to develop more features in the future. We initialize it, set ourselves as a listener, and subscribe to the channel the user picked. We then call the method loadLastMessages which we will create next.
//Setting up our PubNub object!
let configuration = PNConfiguration(publishKey: "INSERT PUBLISH KEY", subscribeKey: "INSERT SUBSCRIBE KEY")
//Gets rid of deprecated warning
configuration.stripMobilePayload = false
//Making each connection identifiable for future development
configuration.uuid = UUID().uuidString
client = PubNub.clientWithConfiguration(configuration)
client.addListener(self)
client.subscribeToChannels([channelName],withPresence: true)

//We load the last messages to populate the tableview
loadLastMessages()
There should be an error right now, saying that the function we are calling at the end of our viewDidLoad is undefined, so let's define it! This function is used to load the initial messages when we connect to a channel. It utilizes another function we will create named addHistory.
Let’s call this next function, using nil for the start and end, and then set a number of messages you would like to receive, to a max of 100. Our final act inside of this function is to bring our table views scroll down to the bottom of the table to the new messages.
//This function is called when this view initialy loads to populate the tableview
func loadLastMessages()
{
    addHistory(start: nil, end: nil, limit: 10)
    //Bring the tableview down to the bottom to the most recent messages
    if(!self.messages.isEmpty){
        let indexPath = IndexPath(row: self.messages.count-1, section: 0)
        self.tableView.scrollToRow(at: indexPath, at: .bottom, animated: true)
    }
}
Storage and Playback for Message History
Now for the function that allows us to look back into our history of the channel. Create it with a few key parameters, only of which the limit is needed, then call the essential function that allows us to view our channel’s history.
We use the function historyForChannel which has many overloaded versions. We could use the simpler one that returns the last 100 messages or one that takes in start and end times, both of these methods are handled by a PNHistoryResultBlock, which allows us to access the result of the query and the errors.
First, let's check if the result is not nil and if the status is and start accessing the messages! Once we know that our messages contain at least something, we can start accessing them. We need to update our earlistMessage start time with the earliest message we have received within our result. Next converting the object we get back to something that we can manage, an array of String keys and values.
From this new object, instead of working hard to access them every time we want to, let's create a Message object from our struct, add them to a temporary array, then insert that at the beginning of our global messages array. Make sure to reload the table then check for errors!
//Get and put the histroy of a channel into the messages array
func addHistory(start:NSNumber?,end:NSNumber?,limit:UInt){
    //The PubNub Function that returns an object of X messages, and when the first and last messages were sent.
    //The limit is how many messages are received with a maximum and default of 100.
    client.historyForChannel(channelName, start: start, end: end, limit:limit){ (result, status) in
        if(result != nil && status == nil){

            //We save when the earliest message was sent in order to get ones previous to it when we want to load more.
            self.earliestMessageTime = result!.data.start

            //Convert the [Any] package we get into a dictionary of String and Any
            let messageDict = result!.data.messages as! [[String:String]]

            //Creating new messages from it and putting them at the end of messages array
            var newMessages :[Message] = []
            for m in messageDict{
                let message = Message(message: m["message"]! , username: m["username"]!, uuid: m["uuid"]! )
                newMessages.append(message)
            }
            self.messages.insert(contentsOf: newMessages, at: 0)
            //Reload the table with the new messages and bring the tableview down to the bottom to the most recent messages
            self.tableView.reloadData()

            //Making sure that we wont be able to try to reload more data until this is completed.
            self.loadingMore = false
        }
        else if(status !=  nil){
            print(status!.category)

        }
        else{
            print("everything is nil whaaat")
        }
    }
}
Next, let's fill in our tableView required functions. The first, numberOfRowsInSection is an easy one-liner, return the number of messages in your array. For the second, we first need to get an instance of your message cell and set the cell labels’ text to the message and username of the index of our message array. After that, just return the cell!
//Tableview functions required.
func tableView(_ tableView: UITableView, numberOfRowsInSection section: Int) -> Int {
    //change later
    return messages.count
}

func tableView(_ tableView: UITableView, cellForRowAt indexPath: IndexPath) -> UITableViewCell {
    let cell = tableView.dequeueReusableCell(withIdentifier: "MessageCell") as! MessageCell

    cell.messageLabel.text = messages[indexPath.row].message
    cell.usernameLabel.text = messages[indexPath.row].username


    return cell
}
One of the most import parts of using and debugging PubNub in Swift is creating listeners for events and messages. In this application, we use the function didRecieveMessage which allows us to access messages coming into our channel. The logic inside of this function will act as a smaller version of our loadLastMessages.
Check if the message that came in matches the channel that we are subscribed to in case we’re subscribed to anything else. Take the message we are given, and turn it into an array of String keys and values. Create a Message with that dictionary and append it to the end of your messages array.
Again, reload the data, and scroll down to the new message. This action can be changed based on your use case. I print the message in my console for debugging.
func client(_ client: PubNub, didReceiveMessage message: PNMessageResult) {
    //Whenever we receive a new message, we add it to the end of our messages array and
    //reload the table so that it shows at thebottom.

    if(channelName == message.data.channel)
    {
        let m = message.data.message as! [String:String]
        self.messages.append(Message(message: m["message"]!, username: m["username"]!, uuid: m["uuid"]!))
        tableView.reloadData()


        let indexPath = IndexPath(row: messages.count-1, section: 0)
        tableView.scrollToRow(at: indexPath, at: .bottom, animated: false)

    }

    print("Received message in Channel:",message.data.message!)
}
Now we can load some of the last messages when first opening the channel, and when new ones are sent they appear at the bottom.
What if there are more messages than what we initially load? In this new function, scrollViewDidScroll, we pull another amount of messages from historyForChannel when we pull down from the top. This can also be modified so that it will try to retrieve more when the user has not reached the top of the page for a more infinite scroll look.
We have a global variable called loadingMore that we check at the beginning to see if we are already loading more messages, and we then check if the user is scrolling past a certain threshold to start loading more. Thankfully using PubNub is ludicrously fast so it loads almost instantly. Once that is true, we set loadingMore to true and start to call our addHistory function, putting earliestMessageTime as the start, nil for the end, and the limit as however many you like, although the maximum that will be returned in 100.
//This method allows users to query for more messages by dragging down from the top.
func scrollViewDidScroll(_ scrollView: UIScrollView){
    //If we are not loading more messages already
    if(!loadingMore){

        //-40 is when you have dragged down from the top of all the messages
        if(scrollView.contentOffset.y < -40 ) {
            loadingMore = true
            addHistory(start: earliestMessageTime, end: nil, limit: 10)
        }
    }

}
We now need to publish messages when we click the send button. For that to happen let's create a function that sends the message that is in the messageTextField. Check if it is empty first, and handle if it is, then creates a dictionary with the message information you would like to send, and then use the simple publish function on your PubNub object.
This function takes in numerous types of variables and objects to send as the message and the channel name. You can also include a handler afterward to do something based on the status codes. After that, call the function that we just created in our sendMessage action.
func publishMessage() {
    if(messageTextField.text != "" || messageTextField.text != nil){
        let messageString: String = messageTextField.text!
        let messageObject : [String:Any] =
            [
                "message" : messageString,
                "username" : username,
                "uuid": client.uuid()
        ]

        client.publish(messageObject, toChannel: channelName) { (status) in
            print(status.data.information)
        }
        messageTextField.text = ""
    }

}

//When the send button is clicked, the message will send
@IBAction func sendMessage(_ sender: UIButton) {
    publishMessage()
}
In order to make our app fully work, we need to be able to leave the channel and go back to the ConnectVC. We already have a function for that, we just need to fill it in. Unsubscribe from all channels the client is subscribed to and then perform the “leaveChannelSegue” that we created originally.
client.unsubscribeFromAll()
self.performSegue(withIdentifier: "leaveChannelSegue", sender: self)
Finished Chat App in Swift
Let's run the app!
We've now got basic chat functionality. Users can send and receive messages in realtime, and messages are stored for a predefined amount of time.
The full GitHub repo for this project is available here.
Use PubNub for free up to 1 million messages per month. Check out the PubNub Swift SDK documentation, or any of the other 75+ PubNub client SDKs.


Top comments (0)