Transparent videos are far underused in web projects with complicated designs. They particularly shine:
- When a complicated animation needs to be shown (such as a product mockup, elements of UI, etc.) without limiting background colors and gradients.
- When multiple videos need to be layered.
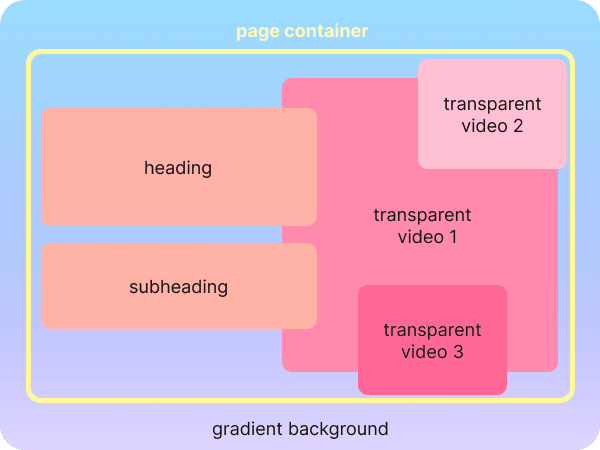
Here's an example of a creative concept that would be impossible to implement without video transparency: Webflow page
In this article, you'll learn how to recreate this page so that it works in any modern web browser like Chrome, Safari, Firefox, and Edge.
Transparent videos 101 and why they are rarely used
Long story short: you need to use certain video formats to enable transparency. Of course, Apple and Google couldn't agree on supporting the same video format, so you have to render two video files:
- HEVC with Alpha for Safari;
- VP9 with Alpha for Chrome.
Some video editing programmes can render HEVC with Alpha, yet they completely ignore the VP9 format (and Google Chrome users). And that's exactly where the problem lies: you have to convert HEVC to VP9, which often doesn't work as smoothly as we'd like. This article shows a way to reliably render both HEVC and VP9 videos by using a sequence of PNG images as a proxy.
Step 1: Create a video with a transparent background.
If you already have such a video, you can continue with step 2. If you have a regular video with background, you need to remove it. A few tips on how to do that:
- An easy way with mostly good (but not guaranteed) results: a tool like unscreen.com.
- A bit more complicated but with guaranteed results: the Rotobrush tool in After Effects. Here’s a good tutorial on how to use it.

Step 2: Render the video as a PNG sequence in AE.
Add your composition to a render queue and set the export format as 'PNG sequence'. Set the channels setting as RGB + alpha.

Set up a naming convention in the ‘Output to’ setting as
video_[###].png

You'll end up with a sequence of PNGs named image-001.png, image-002.png and so on.

Step 3: Render transparent video for Chrome, Safari, Firefox and Edge using FFMPEG.
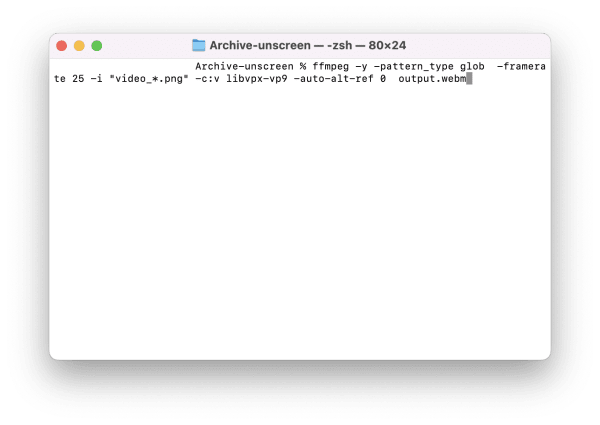
Chrome supports transparency for WEBM videos with VP9 encoding. To render such a video, use this command. If you've used a different naming pattern for your png files, don't forget to change the 'video_*.png' piece to match it.
ffmpeg -y -pattern_type glob -framerate 25 -i "video_*.png" -c:v libvpx-vp9 -auto-alt-ref 0 output.webm
Transparent videos in Safari only work with HEVC videos. To render a HEVC video, use this command:
ffmpeg -y -pattern_type glob -framerate 25 -i "video_*.png" -c:v hevc_videotoolbox -allow_sw 1 -alpha_quality 1 -vtag hvc1 output.mov
If you've used a different naming pattern for your png files, don't forget to change the 'video_*.png' piece to match it.
Step 4 (optional): How to fix the bug in After Effects that the background is 'half' transparent.
In some rare cases, Google Chrome may play your transparent videos as if they still had a background. This can happen because the background pixels are not literally deleted but rather set as 'hidden'. You can check if transparency works in Chrome in your case by uploading the video to Google Drive and then playing it with the built-in player.
If you've encountered this problem, you can remove the background completely with the app Imagemagick. The easiest way to install it is via Homebrew:
brew install imagemagick
Imagemagick comes with a number of tools to process images. The tool we need in our case is called Mogrify. Open Terminal in the folder with the png sequence and try
mogrify -alpha on -background none -flatten *.png

Re-render the videos (as in Step 3) and check if Mogrify did the trick.
Step 5: Using the videos on the web.
Now that you have both MOV and WEBM files, it's time to put them online. Upload the videos to your cloud storage/web server and use this code snippet wherever you need the video.
<video width="600" height="100%" autoplay loop muted playsinline>
  <source
    src="https://path-to-video.com/movie-hevc.mov"
    type='video/mp4; codecs="hvc1"'>
  <source
    src="https://path-to-video.com/alpha-demo/movie-webm.webm"
    type="video/webm">
</video>
Demo page HTML.
Here's the exact code used on the Webflow demo page.
<video width="600" height="100%" autoplay loop muted playsinline>
  <source
    src="https://path-to-video.com/movie-hevc.mov"
    type='video/mp4; codecs="hvc1"'>
  <source
    src="https://path-to-video.com/alpha-demo/movie-webm.webm"
    type="video/webm">
</video>
Quick recap.
- Remove the background in your video or create a new one from scratch.
- Export the video as a PNG sequence.
- Render two videos: HEVC with Alpha for Safari and WebAssembly-based browsers, and WEBM with Alpha for Chrome and Chromium-based browsers.
- Upload the videos to cloud storage.
- Embed the videos with the


Latest comments (0)