
In this article, we will learn to automate mobile applications using Testsigma in 3 simple steps.
Mobile applications can be automated using various platforms and testing frameworks.
- Android apps using AndroidSDK/UIAutomator2
- iOS apps using Xcode-swift / XCUITest
Let us look at the steps one by one.
Step 1
Keep the app required to automate ready for Upload into Testsigma Lab. Installed on Test mobile Device(Local Hybrid Execution). The application can also be located on local machine or server accessible via direct link on internet. You may read more about the execution models in Testsigma here.
Testsigma Lab is Testsigma’s dedicated device cloud that has over 100+ real web, mobile devices and different versions of Android OS, iOS platforms to choose from to execute the tests.
Other Cloud Lab solutions that Testsigma offers include Sauce Labs and BrowserStack.
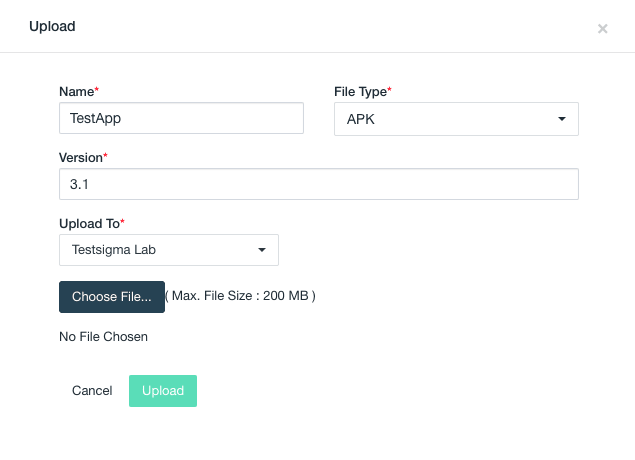
To upload the mobile application, navigate to Test Development > Uploads
In the Uploads page, click on the Upload button in the top right corner.
Step 2
Start writing the Test Steps.
If you are new to creating Test Steps in Testsigma, refer the below links to short videos that explains this. Writing automated tests in Testsigma is quite easy as they can easily be written and understood by everyone since the tests are written in plain simple English. Testsigma uses NLP grammar to automate complex tests easily and involves no coding!
Let us write the steps to launch a mobile application, tap on a few elements on the application.
Entering Test Steps-Quick video
Assigning values to the Test Step elements
The below screenshots the steps for these in Testsigma. In case of doubt, you may refer the Examples tab under the Help(?) icon in the tool.

Step 3
Run your test. Testsigma provides multiple device environments to choose from. Choose your preferred combination and click Create and Run.

Run the execution and get customized run results including screenshots, videos, and logs of the run.


Top comments (0)