🌼 Introduction
Hello, reader! 🐱
As you may know, configuring Webpack can be a frustrating task. Despite having good documentation, this bundler isn't a comfortable horse to ride for a few reasons.
Webpack team is working really hard and relatively quickly developing it, which is a good thing. However, it is overwhelming for a new developer to learn all stuff at once. Tutorials are getting old, some plugins break, found examples can be confusing. Sometimes you can be stuck at something trivial and google a lot to find some short message in GitHub issues that finally helps.
There is a lack of introductory articles about Webpack and how it works, people rush straight to tools like create-react-app or vue-cli, but one sometimes needs to write some simple plain JavaScript and SASS with no frameworks or any fancy stuff.
This guide will look at step-by-step Webpack configuration for ES6, SASS, and images/fonts without any framework. It should be enough to start using Webpack for most simple websites or use it as a platform for further learning. Although this guide requires some prior knowledge about web-development and JavaScript, it may be useful for someone. At least I would be happy to meet something like this when I started with Webpack!
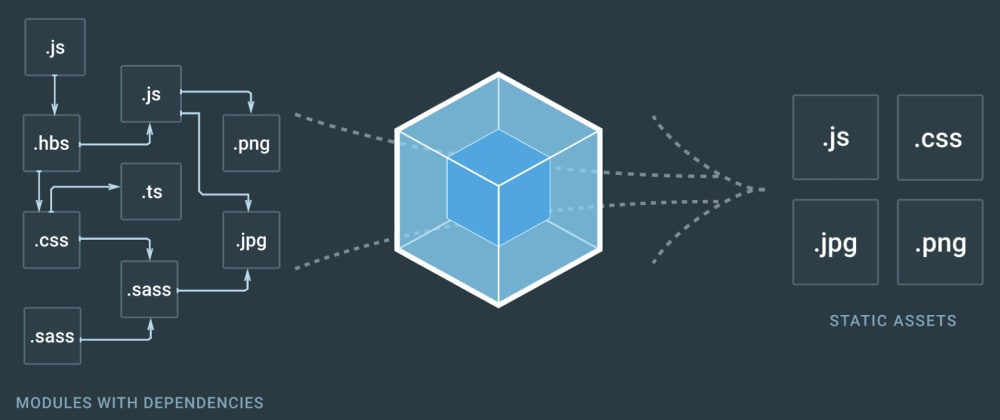
🎈 Our goal
We will be using Webpack to bundle our JavaScript, styles, images, and fonts files together into one dist folder.

Webpack will produce 1 bundled JavaScript file and 1 bundled CSS file. You can simply add them in your HTML file like that (of course you should change path to dist folder if needed):
<link rel="stylesheet" href="dist/bundle.css">
<script src="dist/bundle.js"></script>
And you are good to go 🍹
You can look at the finished example from this guide: 🔗link.
Note: I updated dependencies recently. This guide applies to the latest Webpack 5, but config keeps working for Webpack 4 in case you need it!
🔧 Get started
1. Install Webpack
We use npm: $ npm init command to create a package.json file in a project folder where we will put our JavaScript dependencies. Then we can install Webpack itself with $ npm i --save-dev webpack webpack-cli.
2. Create entry point file
Webpack starts its job from a single JavaScript file, which is called the entry point. Create index.js in the javascript folder. You can write some simple code here like console.log('Hi') to ensure it works.

3. Create webpack.config.js
... in the project folder. Here is where all ✨ magic happens.
// Webpack uses this to work with directories
const path = require('path');

// This is the main configuration object.
// Here, you write different options and tell Webpack what to do
module.exports = {

  // Path to your entry point. From this file Webpack will begin its work
  entry: './src/javascript/index.js',

  // Path and filename of your result bundle.
  // Webpack will bundle all JavaScript into this file
  output: {
    path: path.resolve(__dirname, 'dist'),
    publicPath: '',
    filename: 'bundle.js'
  },

  // Default mode for Webpack is production.
  // Depending on mode Webpack will apply different things
  // on the final bundle. For now, we don't need production's JavaScript
  // minifying and other things, so let's set mode to development
  mode: 'development'
};
4. Add npm script in package.json to run Webpack
To run Webpack, we have to use npm script with simple command webpack and our configuration file as config option. Our package.json should look like this for now:
{
  "scripts": {
    "build": "webpack --config webpack.config.js"
  },
  "devDependencies": {
    "webpack": "^4.29.6",
    "webpack-cli": "^3.2.3"
  }
}
5. Run Webpack
With that basic setup, you can run $ npm run build command. Webpack will look up our entry file, resolve all import module dependencies inside it and bundle it into single .js file in dist folder. In the console, you should see something like this:
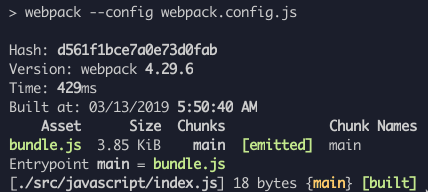
If you add <script src="dist/bundle.js"></script> into yout HTML file you should see Hi in a browser console!
🔬 Loaders
Great! We have standard JavaScript bundled. But what if we want to use all cool features from ES6 (and beyond) and preserve browser compatibility? How should we tell Webpack to transform (transpile) our ES6 code to browser-compatible code?
That is where Webpack loaders come into play. Loaders are one of the main features of Webpack. They apply certain transformations to our code.
Let's add to webpack.config.js file new option module.rules. In this option, we will say Webpack how exactly it should transform different types of files.
entry: /* ... */,
output: /* ... */,

module: {
  rules: [
  ]
}
For JavaScript files, we will use:
1. babel-loader
Babel is currently the best JavaScript transpiler out there. We will tell Webpack to use it to transform our modern JavaScript code to browser-compatible JavaScript code before bundling it.
Babel-loader does exactly that. Let's install it:
$ npm i --save-dev babel-loader @babel/core @babel/preset-env
Now we are going to add rule about JavaScript files:
rules: [
    {
      test: /\.js$/,
      exclude: /(node_modules)/,
      use: {
        loader: 'babel-loader',
        options: {
          presets: ['@babel/preset-env']
        }
      }
    }
]
-
testis a regular expression for file extension which we are going to transform. In our case, it's JavaScript files. -
excludeis a regular expression that tells Webpack which path should be ignored when transforming modules. That means we won't convert imported vendor libraries from npm if we import them in the future. -
useis the main rule's option. Here we set loader, which is going to be applied to files that correspond totestregexp (JavaScript files in this case) -
optionscan vary depending on the loader. In this case, we set default presets for Babel to consider which ES6 features it should transform and which not. It is a separate topic on its own, and you can dive into it if you are interested, but it's safe to keep it like this for now.
Now you can place ES6 code inside your JavaScript modules safely!
2. sass-loader
Time to work with styles. Usually, we don't want to write plain CSS. Very often, we use SASS preprocessor. We transform SASS to CSS and then apply auto prefixing and minifying. It's a kind of "default" approach to CSS. Let's tell Webpack to do exactly that.
Let's say we import our main SASS file sass/styles.scss in our javascripts/index.js entry point.
import '../sass/styles.scss';
But for now, Webpack has no idea how to handle .scss files or any files except .js. We need to add proper loaders so Webpack could resolve those files:
$ npm i --save-dev sass sass-loader postcss-loader css-loader
We can add a new rule for SASS files and tell Webpack what to do with them:
rules: [
    {
      test: /\.js$/,
      /* ... */
    },
    {
      // Apply rule for .sass, .scss or .css files
      test: /\.(sa|sc|c)ss$/,

      // Set loaders to transform files.
      // Loaders are applying from right to left(!)
      // The first loader will be applied after others
      use: [
             {
               // This loader resolves url() and @imports inside CSS
               loader: "css-loader",
             },
             {
               // Then we apply postCSS fixes like autoprefixer and minifying
               loader: "postcss-loader"
             },
             {
               // First we transform SASS to standard CSS
               loader: "sass-loader"
               options: {
                 implementation: require("sass")
               }
             }
           ]
    }
]
Note important thing about Webpack here. It can chain multiple loaders; they will be applied one by one from last to the first in the use array.
Now when Webpack meets import 'file.scss'; in code, it knows what to do!
PostCSS
How should we tell to postcss-loader which transformations it must apply? We create a separate config file postcss.config.js and use postcss plugins that we need for our styles. You may found minifying and autoprefixing the most basic and useful plugins to make sure CSS is ready for your real web site.
First, install those postcss plugins: $ npm i --save-dev autoprefixer cssnano.
Second, add them to postcss.config.js file like that:
module.exports = {
    plugins: [
        require('autoprefixer'),
        require('cssnano'),
        // More postCSS modules here if needed
    ]
}
You can dive into PostCSS deeper and find more plugins that suit your workflow or project requirement.
After all that CSS setup only one thing left. Webpack will resolve your .scss imports, transform them, and... What's next? It won't magically create a single .css file with your styles bundled; we have to tell Webpack to do that. But this task is out of loaders' capabilities. We have to use Webpack's plugin for that.
🔌 Plugins
Their purpose is to do anything else that loaders can't. If we need to extract all that transformed CSS into a separate "bundle" file, we have to use a plugin. And there is a special one for our case: MiniCssExtractPlugin:
$ npm i --save-dev mini-css-extract-plugin
We can import plugins separately right at the start of the webpack.config.js file:
const MiniCssExtractPlugin = require("mini-css-extract-plugin");
After our module.rules array where we set loaders add new plugins code where we activate our plugins with options:
module: {
  rules: [
    /* ... */
  ]
},
plugins: [

  new MiniCssExtractPlugin({
    filename: "bundle.css"
  })

]
Now we can chain this plugin into our CSS loaders:
{
      test: /\.(sa|sc|c)ss$/,
      use: [
             {
               // After all CSS loaders, we use a plugin to do its work.
               // It gets all transformed CSS and extracts it into separate
               // single bundled file
               loader: MiniCssExtractPlugin.loader
             },
             {
               loader: "css-loader",
             },
             /* ... Other loaders ... */
           ]
}
Done! If you followed along, you could run $ npm run build command and find bundle.css file in your dist folder. General setup now should look like this:

Webpack has tons of plugins for different purposes. You can explore them at your need in official documentation.
🔬 More loaders: images and fonts
At this point, you should catch up on the basics of how Webpack works. But we are not done yet. Most websites need some assets: images and fonts that we set through our CSS. Webpack can resolve background-image: url(...) line thanks to css-loader, but it has no idea what to do if you set URL to .png or jpg file.
We need a new loader to handle files inside CSS or to be able to import them right in JavaScript. And here it is:
file-loader
Install it with $ npm i --save-dev file-loader and add a new rule to our webpack.config.js:
rules: [
    {
      test: /\.js$/,
      /* ... */
    },
    {
      test: /\.(sa|sc|c)ss$/,
      /* ... */
    },
    {
      // Now we apply rule for images
      test: /\.(png|jpe?g|gif|svg)$/,
      use: [
             {
               // Using file-loader for these files
               loader: "file-loader",

               // In options we can set different things like format
               // and directory to save
               options: {
                 outputPath: 'images'
               }
             }
           ]
    }
]
Now if you use inside your CSS some image like this:
body {
  background-image: url('../images/cat.jpg');
}
Webpack will resolve it successfully. You will find your image with a hashed name inside dist/images folder. And inside bundle.css you will find something like this:
body {
  background-image: url(images/e1d5874c81ec7d690e1de0cadb0d3b8b.jpg);
}
As you can see, Webpack is very intelligent — it correctly resolves the path of your url relatively to the dist folder!
You can as well add a rule for fonts and resolve them similarly to images; change outputPath to fonts folder for consistency:
rules: [
    {
      test: /\.js$/,
      /* ... */
    },
    {
      test: /\.(sa|sc|c)ss$/,
      /* ... */
    },
    {
      test: /\.(png|jpe?g|gif|svg)$/,
      /* ... */
    },
    {
      // Apply rule for fonts files
      test: /\.(woff|woff2|ttf|otf|eot)$/,
      use: [
             {
               // Using file-loader too
               loader: "file-loader",
               options: {
                 outputPath: 'fonts'
               }
             }
           ]
    }
]
🏆 Wrapping up
That's it! A simple Webpack configuration for a classic website. We covered the concepts of entry point, loaders, and plugins and how Webpack transforms and bundles your files.
Of course, this is quite a straightforward config aimed to understand a general idea about Webpack. There are many things to add if you need them: source mapping, hot reloading, setting up JavaScript framework, and all other stuff that Webpack can do, but I feel those things are out of the scope of this guide.
If you struggle or want to learn more, I encourage you to check Webpack official documentation. Happy bundling!


Top comments (45)
You're a hero! Saved my sanity after hours of trying to get Webpack to work with Ghost CMS :-)
Hey Anton,
I am having one issue when I run build I am getting this error :
Any ideas why this is happening?
Hey Robin!
Well, it basically what it says, sass dependency probably was outdated for sass loader, since the article is 2 years old!
But no worries, I updated all dependencies in the repository (including Webpack, it works now for the latest Webpack 5!), and fixed some typos and wording in the article. You can try to check out the repo and run the code again if you still need it :)
Hi,
fix this one please:
Thanks, I just noticed what was wrong! Fixed.
Loved this article, it's concise and up to date.
The most confusing part for me is Webpack using a .js file for an entry point, instead of an .html.
Speaking of which... there should be an HTML loader setup of some sort, so my .html content is packed into the bundle too, right?
Gonna go search the documentation for it. Cheers!
Correct, there is a html plugin that will automatically create html from template and insert your JS bundle there.
Hi Anton, thanks for this article, very helpful! however when I try it in the production mode I get "You did not set any plugins, parser, or stringifier. Right now, PostCSS does nothing. Pick plugins for your case on postcss.parts/ and use them in postcss.config.js.". I installed postcss-loader, created postcss.config.js file the same as you did but it's not working. Any idea what could be the issue?
Hi!
It's because in postcss.config.js there is a check for process.env.NODE_ENV variable. Even if you set Webpack mode to production it won't automatically change Node environment variable.
The simplest way to configure this is to install cross-env package:
Then just add another npm script in package.json for production mode:
Now when you run
npm run build-productionthe process.env.NODE_ENV variable will be production and postcss.config.js check is going to work:From Webpack documentation:
Many thanks! Now it works :)
@Anton, Big big thank you!!! You've saved my nerves 😊 I had a problem with paths where webpack puts assets after building project. Now you made it absolutely clear!!! THANK YOU BRO! Big plus to your karma 😉
Thank you! Glad it helped! 😊👍
Hey Anton ,
I am very new to JS and everything written here is clearly understandable to me , thank you for this.
though i am getting exception in build for module not found for third party java script libraries .
dev-to-uploads.s3.amazonaws.com/i/...
Thanks, man.
It's hard to say what exactly is wrong with your build, as I can't see your gulp or Webpack config file and what you are actually doing there.
But the error message is pretty clear, you miss
jqueryandslick-carouselmodules. Maybe you declare them globally likewindow.jQueryas it usual for WordPress websites, but Webpack doesn't know about them. You might need to install them via npm or expose them via expose-loader.stackoverflow.com/questions/290801...
Check this, it might be your case
Hi Anton,
i am using babel-loader..
this is my gulpfile
var gulp = require('gulp'),
settings = require('./settings'),
webpack = require('webpack'),
browserSync = require('browser-sync').create(),
postcss = require('gulp-postcss'),
rgba = require('postcss-hexrgba'),
autoprefixer = require('autoprefixer'),
cssvars = require('postcss-simple-vars'),
nested = require('postcss-nested'),
cssImport = require('postcss-import'),
mixins = require('postcss-mixins'),
colorFunctions = require('postcss-color-function');
gulp.task('styles', function() {
return gulp.src(settings.themeLocation + 'css/style.css')
.pipe(postcss([cssImport, mixins, cssvars, nested, rgba, colorFunctions, autoprefixer]))
.on('error', (error) => console.log(error.toString()))
.pipe(gulp.dest(settings.themeLocation));
});
gulp.task('scripts', function(callback) {
webpack(require('./webpack.config.js'), function(err, stats) {
if (err) {
console.log(err.toString());
}
console.log(stats.toString());
callback();
});
});
gulp.task('watch', function() {
browserSync.init({
notify: false,
proxy: settings.urlToPreview,
ghostMode: false
});
gulp.watch('..//*.php', function() {
browserSync.reload();
});
gulp.watch(settings.themeLocation + 'css//.css', gulp.parallel('waitForStyles'));
gulp.watch([settings.themeLocation + 'js/modules/.js', settings.themeLocation + 'js/scripts.js'], gulp.parallel('waitForScripts'));
});
gulp.task('waitForStyles', gulp.series('styles', function() {
return gulp.src(settings.themeLocation + 'style.css')
.pipe(browserSync.stream());
}))
gulp.task('waitForScripts', gulp.series('scripts', function(cb) {
browserSync.reload();
cb()
}))
*and following is my webpack configuration *
const path = require('path'),
settings = require('./settings');
module.exports = {
entry: {
App: settings.themeLocation + "js/scripts.js"
},
output: {
path: path.resolve(__dirname, settings.themeLocation + "js"),
filename: "scripts-bundled.js"
},
module: {
rules: [
{
test: /.js$/,
exclude: /node_modules/,
use: {
loader: 'babel-loader',
options: {
presets: ['@babel/preset-env']
}
}
}
]
},
mode: 'development'
}
following is how i am importing the 3rd party libraries ..
import $ from 'jquery';
import slick from 'slick-carousel';
i tried to use the plugin configuration in webpack setting also but no luck.
Hi Anton,
i added following line in my webpack configuration with absolute path of my node_modules and now its able to build..
resolve: {
modules: [
'__dirname','/Users/rajat.c.singhaccenture.com/Local\ Sites/cp-unique-convent-school/app/public/build-setup/node_modules'
]
Thank you, this is the only tutorial I have found that really helped me understand and get the basics of webpack working! However, in case any other beginners are reading, I want to mention that I would not have been able to get past the first section if I hadn't just come from another tutorial that told me to initialize with "npm init -y". When I tried without the -y, a bunch of confusing questions that I didn't know how to answer came up. With -y, everything worked perfectly.
Yes, a good point! That's one way to do it.
You can just press Enter on each of those questions to accept defaults!
Glad you liked the guide :)
Hi Anton,
I wrote the exact same code and I have an error that I can't fixe..
"Module build failed (from ./node_modules/mini-css-extract-plugin/dist/loader.js):
ModuleParseError: Module parse failed: Unexpected token (1:0)
You may need an appropriate loader to handle this file type, currently no loaders are configured to process this file. See webpack.js.org/concepts#loaders"
Do you have an idea of what's happened ?
Thank for your article !!
Simply amazing guide Anton!! Really, very simple and understandable. I already followed you before I even finished reading.
Just one pro-tip. In English, if you are talking about objects (non-living things) use "it" instead of "he/she". Simply, use "it" when talking about everything except humans or animals. So, webpack == "it"
Cheers!
Glad you enjoyed the guide!
Oh, sorry! Good to know! I'm not a native speaker, but I try to improve my English constantly, so thanks 😊
Great tutorial, thanks Anton! It would really help if you could let us see your full
webpack.config.jsthough. I'm getting a weird errorTypeError: this.getOptions is not a functionfromsass-loader.I'm pretty sure it's because something's in the wrong place in my config.My problem was due to package versions. On
npm installI was getting these warnings:Installing webpack 5.0.0 made them go away and got the build running correctly.
Good post. Thanks
great stuff!
remember to install webpack globally and use webpack-dev-server too for more convenience using npm install webpack webpack-cli webpack-dev-server -g
Great post , if you guys are interested in a more video based course do checkout my course on Udemy, it covers the basics and goes to the advanced section such as micro frontends
udemy.com/course/webpack-5-ninja-b...
Very nice and well documented!