
Having multiple computers on which I am working, I often have to switch between one environment and another.
This requires to update my dependencies and local branches every now and then in order not to introduce any conflict or lose any work.
Lately, when building a small project of mine, I discovered a way to abstract those issues away by taking advantage of Docker, VS Code and GitHub.
Let me show you how!
Creating our Angular app
The first step is pretty common now, we will just create a new blank project for our demo:
~$ ng new code-space-demo
You can leave everything else to the defaults, the actual code won't be the main focus here
Let's now open our project in VS Code and have a look at the project structure:

I'm using the Noctis theme, if you want to give it a shot
Creating our Dev Container 🐳
Our Dev-what?
Dev Containers are a nice feature of Visual Studio Code that lets you run your IDE in a dockerized environment.
Just by specifying a Docker image for your project along with some parameters, you can run a VS Code instance fully configured with all the dependencies and setup for your project.
Configuring VS Code
As for pretty much anything in VS Code, this feature is available through an extension.
Head to the extensions panel and search for Dev Containers:

Once installed we are ready to go!
Adding a Dev Container to our app
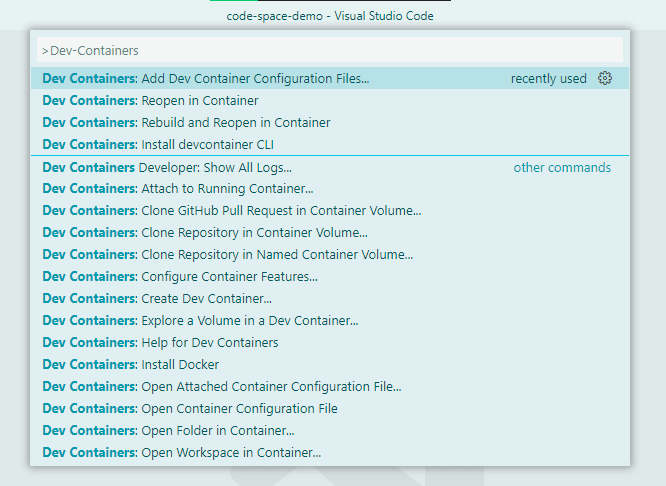
From the command palette (ctrl + shift + p), search for Dev-Containers and select Dev Containers: Add Dev Container Configuration Files
In the next dialog, choose the configuration to be for NodeJS and TypeScript development:

Finally, select the latest Node version and skip any additional import.
On a side note, it is now possible since the latest versions of Dev Containers to import units of configuration as features, a new self contained way to specify units of installation of your containers.
For Angular, there is anAngular CLIfeature that it is available for selection. For the purposes of this tutorial we will not use it but feel free to do so later on!

At this point some files have been created under a new .devcontainer/ folder:

VS Code is also telling you that it has detected your Dev Container and offers to restart using it:

If the option does not appear, look for
Dev Containers: Rebuild and Reopen in Containerfrom the command palette
At this point, with Docker running on your machine, you should be able to reopen your project in your container, resulting in your VS Code looking pretty much like this:

Can I start coding now?
Let's run our app from the container:

Indeed, our container does not have any idea of what Angular is for now. Fortunately, the Dev Container has our back.
In the Dockerfile, we can add our dependencies where it tells us how:
# [Optional] Uncomment if you want to install more global node packages
- # RUN su node -c "npm install -g <your-package-list -here>"
+ RUN su node -c "npm install -g @angular/cli@14.1.3"
As for your usual Docker containers, specifying an exact version number for your dependencies will help you having a consistent environment across your devices.
Once our dependency is specified, select Rebuild container from the command palette and try to run ng version once again:

Yay, our Angular environment is set up!
To be honest it almost is. If you are using Cypress you will need to also specify its dependencies in the the
Dockerfile. Having a look at the required dependencies you could do so by adding this:# Cypress dependencies RUN apt-get update && \ apt-get -y install --no-install-recommends \ libgtk2.0-0 \ libgtk-3-0 \ libgbm-dev \ libnotify-dev \ libgconf-2-4 \ libnss3 \ libxss1 \ libasound2 \ libxtst6 \ xauth \ xvfb # Cypress RUN su node -c "npm install -g cypress"
Customizing our IDE
Remember when I mentioned that we could configure VS Code right from the Dev Container definition?
Now that we have our technical dependencies, it might be a good time to do so before getting started.
You might have noticed that there is another file inside the .devcontainer/ folder: the devcontainer.json.
Inside this file, we can specify how VS Code should behave and be configured inside of our container.
For example, having our Angular app running inside our container is great, but being able to access it locally would be better. This can be achieved by specifying the forwardPorts:
"forwardPorts": [ 4200 ]
Being an array, you can expose whatever ports you want
Great!
However, whenever I am creating my container, I need to install all my dependencies. It would be great if VS Code could do that for me when creating it and that's exactly what the postCreateCommand option is for:
"postCreateCommand": "npm install"
Unfortunately this one is not an array and you might want to rely on calling a script in another file if you want to do some more complex things here
Finally, let's add some more extensions to our instance in order to have a full-featured coding environment.
Our final JSON will be looking like this:
{
  "name": "Node.js & TypeScript",
  "build": {
    "dockerfile": "Dockerfile",
    "args": {
      "VARIANT": "16-bullseye"
    }
  },
  "settings": {},
  "extensions": [
    "angular.ng-template",
    "dbaeumer.vscode-eslint",
    "esbenp.prettier-vscode",
    "shardulm94.trailing-spaces",
    "firefox-devtools.vscode-firefox-debug"
  ],
  "forwardPorts": [ 4200 ],
  "postCreateCommand": "npm install",
  "remoteUser": "node"
}
Let's rebuild our container and see if we notice any change.
On startup, the terminal is showing up and printing the npm install result:

And from the PORTS section, we can see the one we specified:

Looks like we are ready to go!
From the 🐳 to 🌌
For this part you will need a GitHub account
From VS Code, or using a tool of your choice, push your code to a new GitHub repository.
On the main page of your repository, under the "Code" section, click on the "Code Space" tab:

Introducing Code Space
Code Spaces are a feature introduced by GitHub that allows you to work on your project inside a full-featured VS Code instance in the cloud.
It even seems to be efficient enough for GitHub to use it for their own project
Using our configuration from .devcontainer/, GitHub is able to detect how our project is built and can bootstrap it from Code Space.
Please note that this example is a very minimal one and a lot much more configuration can be done. You may want to specify the machine requirements, another specific Docker image, and so on.
Clicking on "Creating a Code Space from main" will result in a new tab being opened with the progression of the build:

And, after a couple of seconds, your IDE is up and running in the cloud. You can notice that it lives on a generated URL and that VS Code is aware it is inside a Code Space environment:

A neat "hidden" feature that is also embedded is the support of redirections: once you entered ng serve, the Angular CLI will invite you to browse http://localhost:4200 by default. When clicking (ctrl + click) on it from your local VS Code, it opens your browser to this URL and displays your Angular app.
However, browsing localhost while your app is running on the cloud won't show you its output. Fortunately, the embedded VS Code intercepts this call and will be redirecting you to a dedicated URL that will reflect ng serve results:

We're good to go, the next part is building your product from it but at this point I will let you handle it.
Advantages
Using Code Spaces or even Dev Containers can really ease your development process.
The benefits of Dev Containers regarding the dependencies and local infrastructure are pretty much the same as the one for which you might use Docker. However, this also includes the setup of the IDE, making it consistent and set up out of the box pretty quick.
Using Code Spaces can help you to take that to the next level and abstract your local machine away. You can virtually code from anywhere with the same capability (given a reliable internet connection).
Combined, your development process will be fully standardized and things like onboarding or changes to the project configuration will work like a charm without the pain of synchronizing everyone on various environments.
A pretty good usage I can also see for this is technical interviews: putting your technical test inside a predictable environment without any setup expected from the candidate is a huge relief in terms of time and unexpected issues.
I hope that you learned something useful there, and wish you a happy coding!


Oldest comments (0)