
Welcome to the first post of my blog. In this article, we shall be building a Django Web Application that allows a user to take a photo of an examination paper, and the application automatically Google's everything for the user and gives back the answers with their descriptions and links of the sources. This article was originally posted on my blog, The Pixel District. Before I start, I would like to say that I did not write this piece of code for the sake of cheating in examination or giving students a platform for cheating, this tool is simply for making examination revision easier and for educational purposes only. Cheating in examinations is illegal and would probably get you expelled!
The full project can be found on my GitHub repository and the demo MAY be found here
Prerequisites
We will be using Python3.6+, Django web framework, Nanonets for character extraction from an image, Cloudinary for image storage and Google Search API for performing the searches.
Following Python best practices, we will create a virtual environment for our project, and install the required packages.
First, create the project directory.
$ mkdir djangoapp
$ cd djangoapp
Now, create a virtual environment and install the required packages.
For macOS and Unix systems:
$ python3 -m venv myenv
$ source myenv/bin/activate
(myenv) $ pip install django requests cloudinary
For Windows:
$ python3 -m venv myenv
$ myenv\Scripts\activate
(myenv) $ pip install django requests cloudinary
Configuring Cloudinary
You will need a Cloudinary account which we shall be using in this project for storing images uploaded by users to be scanned. Cloudinary is an end-to-end image- and video management solution for websites and mobile apps, covering everything from image and video uploads, storage, manipulations, optimizations to delivery.
Once you sign up or login successfully, head over to your Cloudinary console and click on start configuring to get your API key. Note this carefully as we shall be using this shortly
Nanonets for text extraction
Nanonets is a platform that allows for the capture of data from documents instantly at the same time reducing turnaround times and the manual effort required. You can upload your own data and train a model, acquire the JSON responses of each prediction to integrate it with your own systems, and build machine learning-powered apps built on state-of-the-art algorithms and a strong infrastructure. Nanonets also comes with a free tier which allows you to play around with the data on small scale.
Follow the steps below to get started building the model:
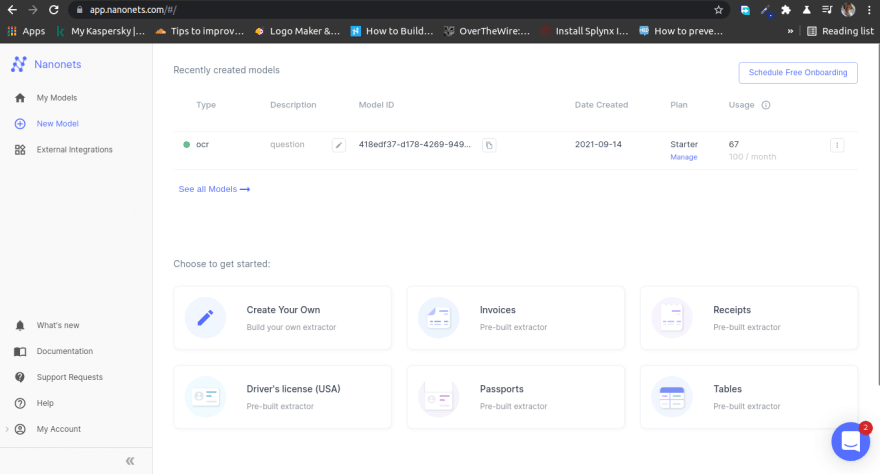
- Get your free API Key
Get your free API Key from http://app.nanonets.com/#/keys

- Upload Images For Training
On the nanonets console, click on new model then create your own, to build your own extractor. Then click upload to add the images to be used for training. You can find them here. Remember, the more the train data the better the results. The minimum required is 10 files, the recommended is 50 - 100.

- Once the images have been successfully uploaded, click on next to start managing the model labels. Incase of any errors, the system will not proceed to the manage label section so be sure to ensure you follow the criteria of upload stated. Add one label and then click on start training. This label will be what we are extracting from the question paper.

- The model learns from the examples before it can be trained, Mark the data for the label question we created above by simply drawing over the question on the question papers uploaded. Do this on the images till there are at least 10 examples per label. The more the examples, the better the results.
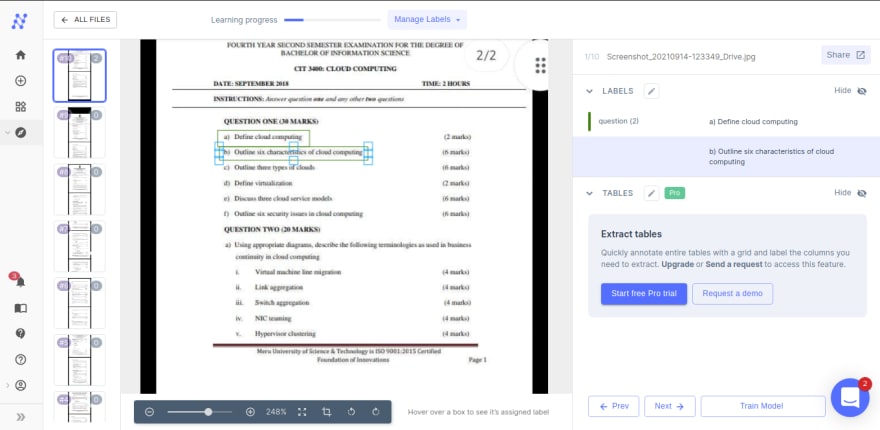
- Once you are done, start training the model by clicking that button. Once the model training finishes, you will be notified by email and the model state will change on the console to green meaning the model is ready. Depending on the number of images you used, this process will typically take a couple of minutes.
Setting Up Your Django Application
Before we start integrating Django with the model we just trained on nanonets, it is worth stating that we do not need Django to integrate our model, you can use any language/Framework you wish to do the integration. The nanonets console even has some code samples on various language integrations.
First, navigate to the directory djangoapp we created and establish a Django project.
(myenv) $ django-admin startproject mainapp
This will auto-generate some files for your project skeleton:
mainapp/
    manage.py
    mainapp/
        __init__.py
        settings.py
        urls.py
        asgi.py
        wsgi.py
Now, navigate to the directory you just created (make sure you are in the same directory as manage.py) and create your app directory.
(myenv) $ python manage.py startapp exam
This will create the following:
exam/
    __init__.py
    admin.py
    apps.py
    migrations/
        __init__.py
    models.py
    tests.py
    views.py
On the mainapp/settings.py file, look for the following line and add the app we just created above.
INSTALLED_APPS = [
    'django.contrib.admin',
    'django.contrib.auth',
    'django.contrib.contenttypes',
    'django.contrib.sessions',
    'django.contrib.messages',
    'django.contrib.staticfiles',
    'exam', #new line
]
Ensure you are in the exam directory then create a new directory called templates and a new file called urls.py. Your directory structure of exam application should look like this
exam/
    __init__.py
    admin.py
    apps.py
    migrations/
    templates/
        __init__.py
    models.py
    tests.py
    urls.py
    views.py
Ensure your mainapp/urls.py file, add our exam app URL to include the URLs we shall create next on the exam app:
"""mainapp URL Configuration

The `urlpatterns` list routes URLs to views. For more information please see:
    https://docs.djangoproject.com/en/3.2/topics/http/urls/
Examples:
Function views
    1. Add an import:  from my_app import views
    2. Add a URL to urlpatterns:  path('', views.home, name='home')
Class-based views
    1. Add an import:  from other_app.views import Home
    2. Add a URL to urlpatterns:  path('', Home.as_view(), name='home')
Including another URLconf
    1. Import the include() function: from django.urls import include, path
    2. Add a URL to urlpatterns:  path('blog/', include('blog.urls'))
"""
from django.contrib import admin
from django.urls import path, include

urlpatterns = [
    path('admin/', admin.site.urls),
    path(' ', include('exam.urls')),#exam app url
]
Now, on the exam/urls.py file, add our website there:
from django.urls import path, include
from . import views

urlpatterns = [
    path(' ', views.exams, name="exams"),#exam researcher view to be created next
]
On the mainapp/settings.py file add the configuration key available on the Cloudinary Dashboard:
cloudinary.config(
  cloud_name = "REPLACE WITH YOUR KEY",
  api_key = "AND REMEMEBER",
  api_secret = "NEVER EXPOSE KEYS DURING PRODUCTION"
)
On the exam/views.py, add the following lines of code: Explanation available through comments
from django.shortcuts import render, redirect
import requests
import cloudinary.uploader
from concurrent.futures import ThreadPoolExecutor, as_completed
from time import time

#exams researcher
def exams(request):
    if request.method == 'POST':
        files = request.FILES['files']
        upload_data = cloudinary.uploader.upload(files)
        imageData = upload_data['secure_url']
        nanoNetsApi = 'https://app.nanonets.com/api/v2/OCR/Model/418edf37-dsdadfgs/LabelUrls/' #replace THE MODEL ID 418edf37-dsdadfgs WITH YOURS found on the nanonets model console https://app.nanonets.com/#/models
        headers = {'accept': 'application/x-www-form-urlencoded'}
        data = {'urls' : [imageData]}
        response = requests.request('POST', nanoNetsApi, headers=headers, auth=requests.auth.HTTPBasicAuth('REPLACE', ''), data=data)
        test = response.json()
        for quiz in test['result']:
            predicted = quiz['prediction']
            q1 = predicted[0]['ocr_text']
            q2 = predicted[1]['ocr_text']
            q3 = predicted[2]['ocr_text']
            q4 = predicted[3]['ocr_text']
            q5 = predicted[4]['ocr_text']
            q6 = predicted[5]['ocr_text']
            q7 = predicted[6]['ocr_text']
            q8 = predicted[7]['ocr_text']
            q9 = predicted[8]['ocr_text']
            q10 = predicted[9]['ocr_text']
            q11 = predicted[10]['ocr_text']
            q12 = predicted[11]['ocr_text']
            q13 = predicted[12]['ocr_text']
            q14 = predicted[13]['ocr_text']

        q1Format = q1.replace(" ", "+")
        q2Format = q2.replace(" ", "+")
        q3Format = q3.replace(" ", "+")
        q4Format = q4.replace(" ", "+")
        q5Format = q5.replace(" ", "+")
        q6Format = q6.replace(" ", "+")
        q7Format = q7.replace(" ", "+")
        q8Format = q8.replace(" ", "+")
        q9Format = q9.replace(" ", "+")
        q10Format = q10.replace(" ", "+")
        q11Format = q11.replace(" ", "+")
        q12Format = q12.replace(" ", "+")
        q13Format = q13.replace(" ", "+")
        q14Format = q14.replace(" ", "+")

        q1SearchUrl = "https://google-search3.p.rapidapi.com/api/v1/search/q="+q1Format
        q2SearchUrl = "https://google-search3.p.rapidapi.com/api/v1/search/q="+q2Format
        q3SearchUrl = "https://google-search3.p.rapidapi.com/api/v1/search/q="+q3Format
        q4SearchUrl = "https://google-search3.p.rapidapi.com/api/v1/search/q="+q4Format
        q5SearchUrl = "https://google-search3.p.rapidapi.com/api/v1/search/q="+q5Format
        q6SearchUrl = "https://google-search3.p.rapidapi.com/api/v1/search/q="+q6Format
        q7SearchUrl = "https://google-search3.p.rapidapi.com/api/v1/search/q="+q7Format
        q8SearchUrl = "https://google-search3.p.rapidapi.com/api/v1/search/q="+q8Format
        q9SearchUrl = "https://google-search3.p.rapidapi.com/api/v1/search/q="+q9Format
        q10SearchUrl = "https://google-search3.p.rapidapi.com/api/v1/search/q="+q10Format
        q11SearchUrl = "https://google-search3.p.rapidapi.com/api/v1/search/q="+q11Format
        q12SearchUrl = "https://google-search3.p.rapidapi.com/api/v1/search/q="+q12Format
        q13SearchUrl = "https://google-search3.p.rapidapi.com/api/v1/search/q="+q13Format
        q14SearchUrl = "https://google-search3.p.rapidapi.com/api/v1/search/q="+q14Format

        searchHeader = { 'x-user-agent': "desktop", 'x-rapidapi-host': "google-search3.p.rapidapi.com", 'x-rapidapi-key': "43628cd680msh1812b1660500eb7p182976jsn5dda2f77f08f" }

        searchResponseQ1 = requests.request("GET", q1SearchUrl, headers=searchHeader)
        searchResponseQ2 = requests.request("GET", q2SearchUrl, headers=searchHeader)
        searchResponseQ3 = requests.request("GET", q3SearchUrl, headers=searchHeader)
        searchResponseQ4 = requests.request("GET", q4SearchUrl, headers=searchHeader)
        searchResponseQ5 = requests.request("GET", q5SearchUrl, headers=searchHeader)
        searchResponseQ6 = requests.request("GET", q6SearchUrl, headers=searchHeader)
        searchResponseQ7 = requests.request("GET", q7SearchUrl, headers=searchHeader)
        searchResponseQ8 = requests.request("GET", q8SearchUrl, headers=searchHeader)
        searchResponseQ9 = requests.request("GET", q9SearchUrl, headers=searchHeader)
        searchResponseQ10 = requests.request("GET", q10SearchUrl, headers=searchHeader)
        searchResponseQ11 = requests.request("GET", q11SearchUrl, headers=searchHeader)
        searchResponseQ12 = requests.request("GET", q12SearchUrl, headers=searchHeader)
        searchResponseQ13 = requests.request("GET", q13SearchUrl, headers=searchHeader)
        searchResponseQ14 = requests.request("GET", q14SearchUrl, headers=searchHeader)

        q1resp = searchResponseQ1.json()
        q1res = q1resp.get('results')

        q2resp = searchResponseQ1.json()
        q2res = q2resp.get('results')

        q4resp = searchResponseQ4.json()
        q4res = q4resp.get('results')

        q5resp = searchResponseQ5.json()
        q5res = q5resp.get('results')

        q6resp = searchResponseQ6.json()
        q6res = q6resp.get('results')

        q7resp = searchResponseQ7.json()
        q7res = q7resp.get('results')

        q8resp = searchResponseQ8.json()
        q8res = q8resp.get('results')

        q9resp = searchResponseQ9.json()
        q9res = q9resp.get('results')

        q10resp = searchResponseQ10.json()
        q10res = q10resp.get('results')

        q11resp = searchResponseQ11.json()
        q11res = q11resp.get('results')

        q12resp = searchResponseQ12.json()
        q12res = q12resp.get('results')

        q13resp = searchResponseQ13.json()
        q13res = q13resp.get('results')

        q14resp = searchResponseQ14.json()
        q14res = q14resp.get('results')

        tester = searchResponseQ3.json()
        testa = tester.get('results')

        context = {
            "tester":testa,
            "q1res":q1res,
            "q2res":q2res,
            "q4res":q4res,
            "q5res":q5res,
            "q6res":q6res,
            "q7res":q7res,
            "q8res":q8res,
            "q9res":q9res,
            "q10res":q10res,
            "q11res":q11res,
            "q12res":q12res,
            "q13res":q13res,
            "q14res":q14res,
        }
        return render(request, 'exam_results.html', context)
    return render(request, 'exams.html')
This view function starts by accepting POST data from the exam.html file that we shall create below. The file uploaded by the user is then uploaded to Cloudinary. If successful, the URL of the image generated by cloudinary is then taken and run against nanonets model we created.
Next, on the mainapp/exam/templates directory, create a exams.html and exam_results.html files and paste the code below to render our output
mainapp/exam/templates/exams.html
<!doctype html>
<html lang="en">
  <head>
    <meta charset="utf-8">
    <meta name="viewport" content="width=device-width, initial-scale=1, shrink-to-fit=no">
    <meta name="description" content="">
    <meta name="author" content="">
    <!-- Favicons -->
<title>AlienX - Exam Researcher</title>
    <!-- Bootstrap core CSS -->
    <link href="https://getbootstrap.com/docs/4.0/dist/css/bootstrap.min.css" rel="stylesheet">
    <link rel="stylesheet" href="https://stackpath.bootstrapcdn.com/font-awesome/4.7.0/css/font-awesome.min.css">
    <style>
      #upload{opacity:0}#upload-label{position:absolute;top:50%;left:1rem;transform:translateY(-50%)}.image-area{border:2px dashed rgba(255,255,255,.7);padding:1rem;position:relative}.image-area::before{content:'Uploaded image result';color:#fff;font-weight:700;text-transform:uppercase;position:absolute;top:50%;left:50%;transform:translate(-50%,-50%);font-size:.8rem;z-index:1}.image-area img{z-index:2;position:relative}body{min-height:100vh;background-color:#757f9a;background-image:linear-gradient(147deg,#757f9a 0,#d7dde8 100%)}
  </style>
  <script src="https://code.jquery.com/jquery-3.3.1.slim.min.js"></script>
  <script src="https://cdnjs.cloudflare.com/ajax/libs/twitter-bootstrap/4.3.1/js/bootstrap.bundle.min.js"></script>
  <script>
      /*  ==========================================
    SHOW UPLOADED IMAGE
* ========================================== */
function readURL(input) {
    if (input.files && input.files[0]) {
        var reader = new FileReader();

        reader.onload = function (e) {
            $('#imageResult')
                .attr('src', e.target.result);
        };
        reader.readAsDataURL(input.files[0]);
    }
}

$(function () {
    $('#upload').on('change', function () {
        readURL(input);
    });
});

/*  ==========================================
    SHOW UPLOADED IMAGE NAME
* ========================================== */
var input = document.getElementById( 'upload' );
var infoArea = document.getElementById( 'upload-label' );

input.addEventListener( 'change', showFileName );
function showFileName( event ) {
  var input = event.srcElement;
  var fileName = input.files[0].name;
  infoArea.textContent = 'File name: ' + fileName;
}
  </script>
</head>

  <body class="text-center">
    <div class="container py-5">

        <!-- For demo purpose -->
        <header class="text-white text-center">
            <h1 class="display-4">Question Researcher</h1>
            <p class="lead mb-0">Take Image or Upload existing image</p>
            <p class="mb-5 font-weight-light">Powered by
                <a href="https://alienx.tech" class="text-white">
                    <u>alienXconnections</u>
                </a>
            </p>
            <img src="https://res.cloudinary.com/mhmd/image/upload/v1564991372/image_pxlho1.svg" alt="" width="150" class="mb-4">
        </header>


        <div class="row py-4">
            <div class="col-lg-6 mx-auto">
                <form method = "post" enctype="multipart/form-data">
                    {% csrf_token %}
                <!-- Upload image input-->
                <div class="input-group mb-3 px-2 py-2 rounded-pill bg-white shadow-sm">
                    <input id="upload" type="file" name="files" onchange="readURL(this);" class="form-control border-0">
                    <label id="upload-label" for="upload" class="font-weight-light text-muted">Choose file</label>
                    <div class="input-group-append">
                        <label for="upload" class="btn btn-light m-0 rounded-pill px-4"> <i class="fa fa-cloud-upload mr-2 text-muted"></i><small class="text-uppercase font-weight-bold text-muted">Choose file</small></label>
                    </div>
                </div>

                <!-- Uploaded image area-->
                <p class="font-italic text-white text-center">The image uploaded will be rendered inside the box below.</p>
                <div class="image-area mt-4"><img id="imageResult" src="#" alt="" class="img-fluid rounded shadow-sm mx-auto d-block"></div>
                <button class="btn btn-lg btn-primary btn-block" type="submit">Next</button>
                </form>
            </div>
        </div>
    </div>
  </body>
</html>
mainapp/exam/templates/exam_results.html
<!doctype html>
<html lang="en">
<head>
<meta charset="utf-8">
<meta name="viewport" content="width=device-width, initial-scale=1, shrink-to-fit=no">
<meta name="description" content="">
<meta name="author" content="">
<link rel="icon" href="https://getbootstrap.com/docs/4.0/assets/img/favicons/favicon.ico">
<title>Top navbar example for Bootstrap</title>
<!-- Bootstrap core CSS -->
<link href="https://getbootstrap.com/docs/4.0/dist/css/bootstrap.min.css" rel="stylesheet">
<!-- Custom styles for this template -->
<link href="https://getbootstrap.com/docs/4.0/examples/navbar-static/navbar-top.css" rel="stylesheet">
</head>
<body>
<main role="main" class="container">
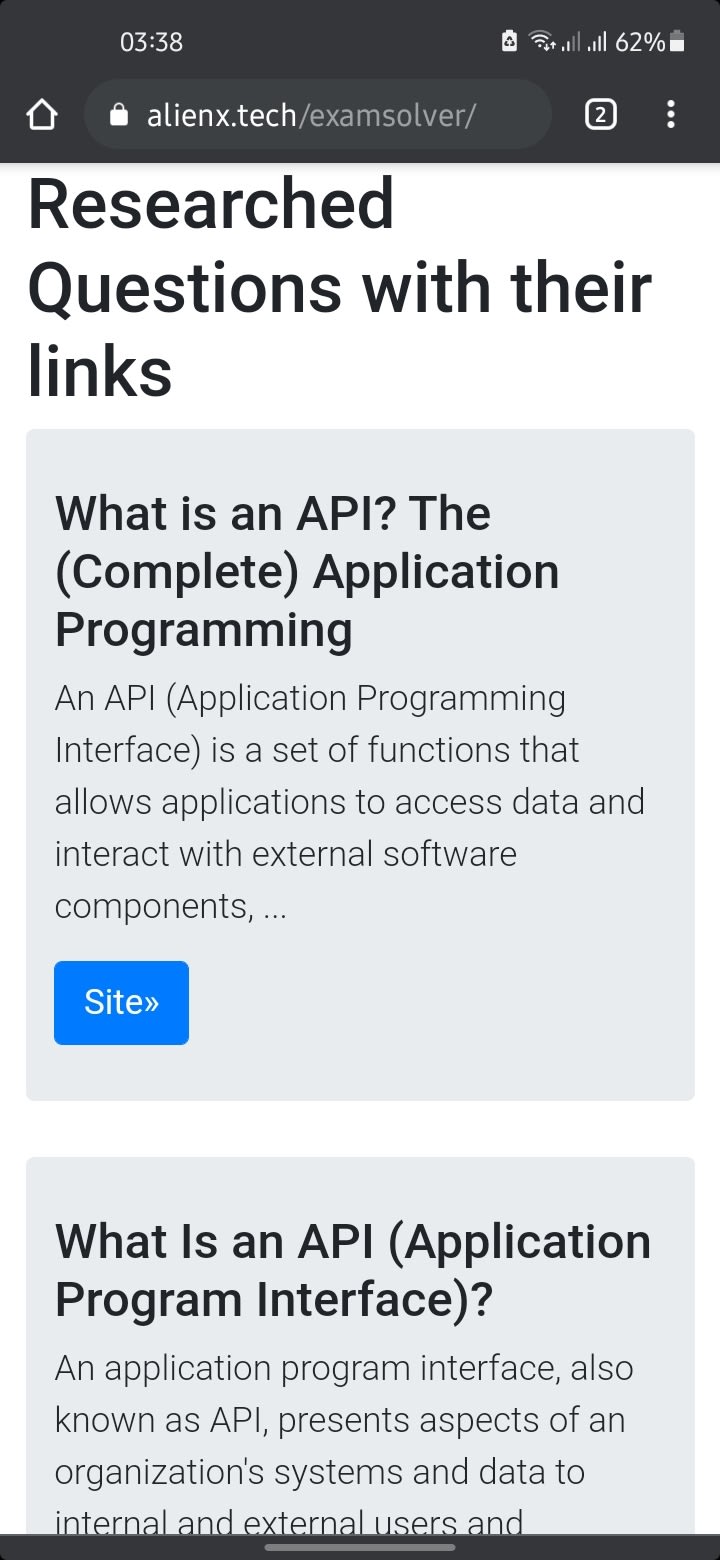
<h1>Researched Questions with their links</h1>
{% for aa in q1res %}
<div class="jumbotron">
<h3>{{aa.title}}</h3>
<p class="lead">{{aa.description}}</p>
<a class="btn btn-lg btn-primary" href="{{aa.link}}" role="button">Site»</a>
</div>
{% endfor %}
{% for bb in q2res %}
<div class="jumbotron">
<h3>{{bb.title}}</h3>
<p class="lead">{{bb.description}}</p>
<a class="btn btn-lg btn-primary" href="{{bb.link}}" role="button">Site»</a>
</div>
{% endfor %}
{% for tt in tester %}
<div class="jumbotron">
<h3>{{tt.title}}</h3>
<p class="lead">{{tt.description}}</p>
<a class="btn btn-lg btn-primary" href="{{tt.link}}" role="button">Site»</a>
</div>
{% endfor %}
{% for ee in q4res %}
<div class="jumbotron">
<h3>{{ee.title}}</h3>
<p class="lead">{{ee.description}}</p>
<a class="btn btn-lg btn-primary" href="{{ee.link}}" role="button">Site»</a>
</div>
{% endfor %}
{% for ff in q5res %}
<div class="jumbotron">
<h3>{{ff.title}}</h3>
<p class="lead">{{ff.description}}</p>
<a class="btn btn-lg btn-primary" href="{{ff.link}}" role="button">Site»</a>
</div>
{% endfor %}
{% for gg in q6res %}
<div class="jumbotron">
<h3>{{gg.title}}</h3>
<p class="lead">{{gg.description}}</p>
<a class="btn btn-lg btn-primary" href="{{gg.link}}" role="button">Site»</a>
</div>
{% endfor %}
{% for hh in q7res %}
<div class="jumbotron">
<h3>{{hh.title}}</h3>
<p class="lead">{{hh.description}}</p>
<a class="btn btn-lg btn-primary" href="{{hh.link}}" role="button">Site»</a>
</div>
{% endfor %}
{% for ii in q8res %}
<div class="jumbotron">
<h3>{{ii.title}}</h3>
<p class="lead">{{ii.description}}</p>
<a class="btn btn-lg btn-primary" href="{{ii.link}}" role="button">Site»</a>
</div>
{% endfor %}
{% for jj in q9res %}
<div class="jumbotron">
<h3>{{jj.title}}</h3>
<p class="lead">{{jj.description}}</p>
<a class="btn btn-lg btn-primary" href="{{jj.link}}" role="button">Site»</a>
</div>
{% endfor %}
{% for kk in q10res %}
<div class="jumbotron">
<h3>{{kk.title}}</h3>
<p class="lead">{{kk.description}}</p>
<a class="btn btn-lg btn-primary" href="{{kk.link}}" role="button">Site»</a>
</div>
{% endfor %}
</main>
<!-- Bootstrap core JavaScript
================================================== -->
<!-- Placed at the end of the document so the pages load faster -->
<script src="https://code.jquery.com/jquery-3.2.1.slim.min.js" integrity="sha384-KJ3o2DKtIkvYIK3UENzmM7KCkRr/rE9/Qpg6aAZGJwFDMVNA/GpGFF93hXpG5KkN" crossorigin="anonymous"></script>
<script>window.jQuery || document.write('<script src="https://getbootstrap.com/docs/4.0/assets/js/vendor/jquery-slim.min.js"><\/script>')</script>
<script src="https://getbootstrap.com/docs/4.0/assets/js/vendor/popper.min.js"></script>
<script src="https://getbootstrap.com/docs/4.0/dist/js/bootstrap.min.js"></script>
</body>
</html>
One major problem with the system, it takes around 40 seconds to run all those requests, this is where concurrency comes in. Try running the files below which simulate the request above and tell the difference! The code was able to run from 40 seconds to 4 seconds just by adding a few lines of code
without_concurrency.py
import requests
from concurrent.futures import ThreadPoolExecutor, as_completed
from time import time

q1Format = "elon+musk"
q2Format = "elon+musk+age"
q3Format = "elon+musk+networth"
q4Format = "elon+musk+wife"
q5Format = "elon+musk+h"
q6Format = "elon+musk+faces"
q7Format = "elon+musk+kenya"
q8Format = "elon+musk+uhuru+kenyatta"
q9Format = "elon+musk+m"
q10Format = "elon+musk+de"
q11Format = "elon+musk+y"
q12Format = "elon+musk+mate"
q13Format = "elon+musk+uk"
q14Format = "elon+musk+london"

url_list = [
    "https://google-search3.p.rapidapi.com/api/v1/search/q="+q1Format,
    "https://google-search3.p.rapidapi.com/api/v1/search/q="+q2Format,
    "https://google-search3.p.rapidapi.com/api/v1/search/q="+q3Format,
    "https://google-search3.p.rapidapi.com/api/v1/search/q="+q4Format,
    "https://google-search3.p.rapidapi.com/api/v1/search/q="+q5Format,
    "https://google-search3.p.rapidapi.com/api/v1/search/q="+q6Format,
    "https://google-search3.p.rapidapi.com/api/v1/search/q="+q7Format,
    "https://google-search3.p.rapidapi.com/api/v1/search/q="+q8Format,
    "https://google-search3.p.rapidapi.com/api/v1/search/q="+q9Format,
    "https://google-search3.p.rapidapi.com/api/v1/search/q="+q10Format,
    "https://google-search3.p.rapidapi.com/api/v1/search/q="+q11Format,
    "https://google-search3.p.rapidapi.com/api/v1/search/q="+q12Format,
    "https://google-search3.p.rapidapi.com/api/v1/search/q="+q13Format,
    "https://google-search3.p.rapidapi.com/api/v1/search/q="+q14Format,
]

searchHeader = { 'x-user-agent': "desktop", 'x-rapidapi-host': "google-search3.p.rapidapi.com", 'x-rapidapi-key': "43628cd680msh1812b1660500eb7p182976jsn5dda2f77f08f" }


def download_file(url):
    html = requests.get(url, headers=searchHeader, stream=True)
    return html.status_code

start = time()

for url in url_list:
    print(download_file(url))

print(f'Time taken: {time() - start}')
with_concurrency.py
import requests
from concurrent.futures import ThreadPoolExecutor, as_completed
from time import time

q1Format = "elon+musk"
q2Format = "elon+musk+age"
q3Format = "elon+musk+networth"
q4Format = "elon+musk+wife"
q5Format = "elon+musk+salary"
q6Format = "elon+musk+faces"
q7Format = "elon+musk+kenya"
q8Format = "elon+musk+uhuru+kenyatta"
q9Format = "elon+musk+trump"
q10Format = "elon+musk+spacex"
q11Format = "elon+musk+cats"
q12Format = "elon+musk+mate"
q13Format = "elon+musk+uk"
q14Format = "elon+musk+london"

url_list = [
    "https://google-search3.p.rapidapi.com/api/v1/search/q="+q1Format,
    "https://google-search3.p.rapidapi.com/api/v1/search/q="+q2Format,
    "https://google-search3.p.rapidapi.com/api/v1/search/q="+q3Format,
    "https://google-search3.p.rapidapi.com/api/v1/search/q="+q4Format,
    "https://google-search3.p.rapidapi.com/api/v1/search/q="+q5Format,
    "https://google-search3.p.rapidapi.com/api/v1/search/q="+q6Format,
    "https://google-search3.p.rapidapi.com/api/v1/search/q="+q7Format,
    "https://google-search3.p.rapidapi.com/api/v1/search/q="+q8Format,
    "https://google-search3.p.rapidapi.com/api/v1/search/q="+q9Format,
    "https://google-search3.p.rapidapi.com/api/v1/search/q="+q10Format,
    "https://google-search3.p.rapidapi.com/api/v1/search/q="+q11Format,
    "https://google-search3.p.rapidapi.com/api/v1/search/q="+q12Format,
    "https://google-search3.p.rapidapi.com/api/v1/search/q="+q13Format,
    "https://google-search3.p.rapidapi.com/api/v1/search/q="+q14Format,
]


searchHeader = { 'x-user-agent': "desktop", 'x-rapidapi-host': "google-search3.p.rapidapi.com", 'x-rapidapi-key': "43628cd680msh1812b1660500eb7p182976jsn5dda2f77f08f" }


def download_file(url):
    global html
    html = requests.get(url, headers=searchHeader, stream=True)
    return html.status_code

start = time()

processes = []
with ThreadPoolExecutor(max_workers=20) as executor:
    for url in url_list:
        processes.append(executor.submit(download_file, url))

for task in as_completed(processes):
    print(task.result())


print(f'Time taken: {time() - start}')
Testing It Works
Make sure you are in the directory with manage.py, and run
(myenv) $ python manage.py runserver
You should see the port that your Django application is running on. But this is still running from your computer. Check out the snapshots below on the final product

Thanks for Reading!
This is my first blog so I know might have left out a lot of details especially on the views part, incase of any question, let me know in the comment section.


Top comments (0)