
Context
Ethereum is not private. Every time you transfer an ERC20 token or any other digital asset, information is leaked to third parties. They could find out your full financial history simply by heading to Etherscan, Blockscout or any other blockchain explorer out there.
Fear not, there are ways to prevent this. For one, you could use multiple accounts, but you'd have to constantly remember not to cross-link these accounts. This would be a life admin nightmare. What if there was a more elegant and programmable way?
Let me introduce AZTEC: a privacy protocol built on top of Ethereum. In this article, I will not emphasise on the cryptography underpinning the protocol, but rather on its practical applications such as developing confidential tokens.
Disclaimer: I'm working at AZTEC as a full-time software engineer.
Prerequisites
I will further assume that you have a basic understanding of:
- Ethereum development using the Truffle Framework
- Zero-knowledge proofs
- Cryptography and elliptic curves
Make sure you have node.js and npm on your machine and install Truffle:
$ npm install truffle --global
Mental Models
Let's pause for a moment and grasp the core technical concepts.
The Protocol
Ethereum is a country and AZTEC is a forest.
In this country, people interact, do finance on dApps, move to different cities (wallets) and so forth. I like to think about AZTEC as a quiet woodland confined within the geography of the country. People can go there, declare their balance before stepping in, but after that transactions are confidential.
The stock picture below represents my (silly) attempt to portray the idea of fading into AZTEC. It's crystal clear what's going on in the normal environment (Ethereum), but the state of the world after one crosses the arch is fuzzy and concealed by the forest (AZTEC).

Notes
An AZTEC note is a first-class citizen and core primitive of the protocol. When you transact in zero-knowledge, smart contracts do NOT store any balances, but instead work with elliptic curve points, which are just computational noise to anyone who doesn't have the private keys.
It is very important to make a distinction between ERC20 and ERC1724, AZTEC's confidential token standard. The former stores a mapping between Ethereum addresses and unencrypted balances. The latter does encrypt the balances. I like to compare AZTEC notes with Bitcoin UTXOs, as the process of spending notes on AZTEC is very much similar.
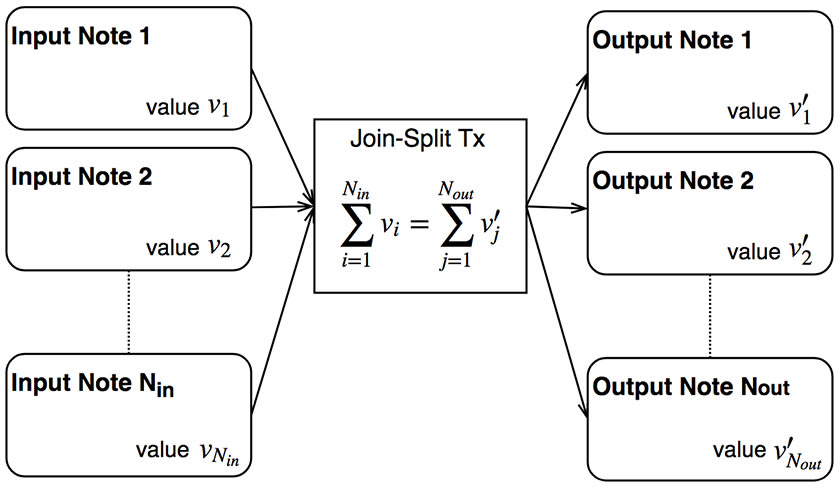
The contents of a note, classified by their visibility:
- Public
- Owner
- Encrypted Value
- Private
- Spending Key
- Value
We're optimising for speed, so we stop with the fancy cryptography here. If you're hungry for more, check out our white paper.
Before continuing though, do note that AZTEC needs a trusted setup. This tutorial uses a trusted setup that was generated by our team internally. We will be releasing more information about the production trusted setup generation in the near future. Use at own risk.
Let's Do It
Clone this repo and install the node modules:
$ git clone git@github.com:PaulRBerg/confidential-tokens.git
$ cd confidential-tokens
$ npm install
If you get a lot of verbose logs related to "scrypt" and "keccak", that's perfectly fine because we require aztec.js which requires web3.js which subsequently has many cryptographic dependencies.
Before actually running the demo, there's a few important steps to do:
- Create an
accounts.jsfile inside thesrcfolder. Only set two accounts. There is an example file calledaccounts.js.example. - Create a
.envfile at the root of the project and fill it with the properties below. Again, there is an example file called.env.example. - Deploy the confidential token contract to Rinkeby. You can use Truffle to do this:
$ truffle migrate --network rinkeby
Environment variables:
- CONFIDENTIAL_TOKEN_ADDRESS: note that the actual contract name is ZKERC20, get this after truffle deploys the contract
- MNEMONIC
- INFURA_API_KEY
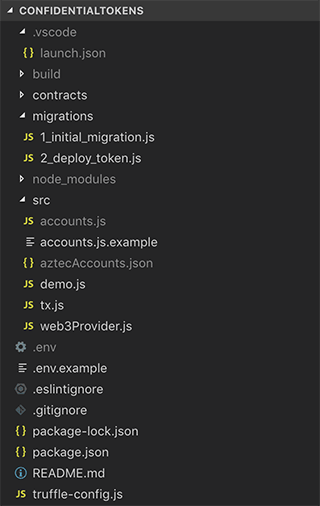
Now, check that your project looks like this:
Run the demo:
$ npm run demo
This is going to take a while, because transactions are sent to Rinkeby. After a few minutes, you should have a list of receipts printed in the console. Hooray, you just performed your first confidential token transfer on Ethereum!
Now, let's go through the source code in src/demo.js.
Create Notes
  aztecAccounts = [...new Array(2)].map(() => aztec.secp256k1.generateAccount());
  notes = [
    aztec.note.create(aztecAccounts[0].publicKey, 5),
    aztec.note.create(aztecAccounts[0].publicKey, 5),
    aztec.note.create(aztecAccounts[1].publicKey, 8),
    aztec.note.create(aztecAccounts[0].publicKey, 2)
  ];
Steps:
- Generate a bunch of random accounts. We have to use "secp256k1" because AZTEC needs the accounts' public keys, not just their addresses.
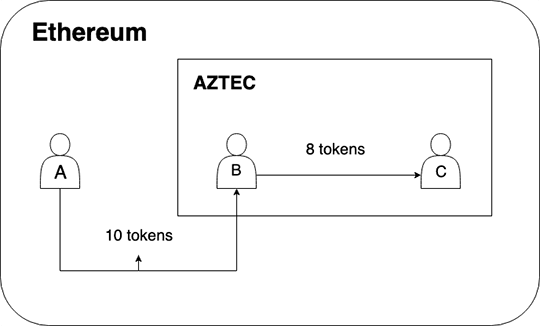
- Create 4 notes, with the first two belonging to the first account and the last two giving 8 tokens from the initial total amount (10) to the second account.
To better understand step 2, recall that AZTEC notes are similar in nature with Bitcoin UTXOs. When one transfers money, the leftover sums have to be converted into a new set of notes - this is by contrast to Ethereum canonical transactions, which use a balance model.
Also, I separated the accounts used in Ethereum (the ones in src/accounts.js) from the randomly generated AZTEC accounts (the demo script generates a file called aztecAccounts.json).
Create Dem Proofs
  proofs[0] = aztec.proof.joinSplit.encodeJoinSplitTransaction({
    inputNotes: [],
    outputNotes: notes.slice(0, 2),
    senderAddress: accounts[0].address,
    inputNoteOwners: [],
    publicOwner: accounts[0].address,
    kPublic: -10,
    aztecAddress: joinSplit.options.address,
  });
The proof object above:
- Attests that
publicOwneris happy to transfer 10 public ERC20 tokens into AZTEC form - Makes the first randomly generated AZTEC account the new owner (recall that the first two notes are worth 5 tokens each and are both owned by that AZTEC account)
  proofs[1] = aztec.proof.joinSplit.encodeJoinSplitTransaction({
    inputNotes: notes.slice(0, 2),
    outputNotes: notes.slice(2, 4),
    senderAddress: accounts[0].address,
    inputNoteOwners: [aztecAccounts[0], aztecAccounts[0]],
    publicOwner: accounts[0].address,
    kPublic: 0,
    aztecAddress: joinSplit.options.address,
  });
The second proof:
- Transfers 8 tokens to the second AZTEC account in fully-fledged zero-knowledge form
- Burns the first two input notes so that the first AZTEC account cannot reuse them in the future
  proofOutputs = proofs.map(({ expectedOutput }) => {
    return aztec.abiEncoder.outputCoder.getProofOutput(expectedOutput, 0);
  });
  proofHashes = proofOutputs.map(proofOutput => {
    return aztec.abiEncoder.outputCoder.hashProofOutput(proofOutput);
  });
We need the above to interact with a contract named "NoteRegistry", which is unique to every confidential token contract. You can think of proofHashes as an array of unique identifiers for the previously generated proofs.
Approve
  for (let i = 0; i < accounts.length; ++i) {
    const data = erc20Mintable
      .methods
      .approve(noteRegistry.options.address, scalingFactor.mul(tokensTransferred).toString(10))
      .encodeABI();
    await sendTx({
      from: accounts[i].address,
      to: aztecAddresses.erc20Mintable,
      data: data,
      privateKey: accounts[i].privateKey,
    });
  }
We mint a bunch of tokens and grant the NoteRegistry permission to spend from the ERC20 contract.
  const delta = 10;
  let data = noteRegistry
    .methods
    .publicApprove(proofHashes[0], delta)
    .encodeABI();
  await sendTx({
    from: accounts[0].address,
    to: noteRegistry.options.address,
    data: data,
    privateKey: accounts[0].privateKey,
  });
Just like ERC20, NoteRegistry needs to be granted permission to work with AZTEC proofs. We confess that this is an area of active research and we're investigating ways of making the development UX smoother.
Transfer
  let data = confidentialToken
    .methods
    .confidentialTransfer(proofs[0].proofData)
    .encodeABI();
  await sendTx({
    from: accounts[0].address,
    to: confidentialToken.options.address,
    data: data,
    privateKey: accounts[0].privateKey,
  });

  data = confidentialToken
    .methods
    .confidentialTransfer(proofs[1].proofData)
    .encodeABI();
  await sendTx({
    from: accounts[0].address,
    to: confidentialToken.options.address,
    data: data,
    privateKey: accounts[0].privateKey,
  });
Finally, the fun part: call the confidential token contract to make the transfers. Note that the first transaction only converts the ERC20 tokens, so third parties can find out how many tokens were transferred. However, the second transaction is fully confidential.
Here's a mindmap for what we just did:
Caveats
- This tutorial uses a trusted setup that was generated by our team internally. We will be releasing more information about the production trusted setup generation in the near future. Use at own risk.
- There's a ton of pre-approvals required before the confidential transfers can be triggered. As previously mentioned, this is something we're looking forward to improving.
- The AZTEC codebase may go through multiple breaking changes after this article is published. Fear not though, this tutorial uses exact versions of npm packages to prevent disruption.
- AZTEC uses Solidity 0.4.24, so you must use a compatible version of OpenZeppelin, that is 2.0.0
- When the AZTEC contracts have only one user, confidentiality is leaked. Third parties can infer how much money is deposited due to ERC20's public nature - they can compare that against the total amount held by the contract. The more users join, the more confidentiality there is.
Packages
Here's an exhaustive list of AZTEC goodies we used:
The source code for all of them is available in our monorepo. Feel free to reach out on Twitter or email at hello@aztecprotocol.com if you have any questions!
Wrap-Up
I hope you enjoyed this tutorial and you're as excited about confidential transactions as I am. Check out these transactions which use a couple of AZTEC proofs to convert 10 ERC20 tokens into fully-fledged zero-knowledge form:
- https://rinkeby.etherscan.io/tx/0x85ab17ab8290bad0d91501083c571a63e8715a0d425828df4c0b36accb11d077
- https://rinkeby.etherscan.io/tx/0xf5dbaf357e09abf2d4151974bdfae5e20317043b155ff653b03fbd137c940a84
Many thanks to Zac Williamson, Arnaud Schenk and Tom Waite for their input and feedback.


Top comments (0)