
In this fun and short tutorial, I'll show you how easy it is to build a fast front-end web app entirely in Rust, compile it to WebAssembly, and host it on the decentralized IPFS network. Yes, this is a Tutorial-to-learn-on-the-weekend-and-boast-to-your-DevOps-on-Monday you don't want to miss.
O, Wasm Fun!
You may have heard in passing of WebAssembly. You may have thought it sounded pretty cool, but like other gazillion other techs of recent, it was cutting-edge and not ready for primetime.
Well, now the time has passed, and although it might have not reached v1 yet, because many have been hacking on and building useful things with it, tooling has matured quickly. Now, it is very easy to start writing a web app entirely in Rust!
For the unadulterated minds, Wasm is a new binary instruction format that lets your program run on the browser at native speed. You might not know it, but as you're reading this, your browser is hustling millions of lines of JavaScript code in real-time, occasionally hanging to clean up values that aren't being used. The fact that this website runs smoothly is due to hours of sweat and tear from developers on both the browser and the app you are using.

Wasm is not specific to Rust. There are currently libraries in many languages that help compile native code to Wasm. However, Rust by far has the most matured tooling and ecosystem. Some benefits in writing Wasm apps in Rust are:
- Rust is similar to TypeScript, but with a more robust type system and ownership tracking that enables developers to create fewer runtime errors typical to JavaScript and TypeScript.
- Rust has a good balance between low-level control and high-level developer ergonomics.
- Rust does not have a runtime, making
.wasmfiles small and downloading faster over the network.
💡 Fun experiment
Try an under-developed, under-funded website, like paying for your utility bill on your municipal's web app or updating your benefits on your HR department's internal app. Record your observations.
Ok, but why IPFS?
Because we think Jeff Bezos has enough of our money to launch himself to space, and it is time to help host a better, less monopolistic internet. And what's a better way to start contributing to the cause than hosting our web app on each other's computers!
IPFS, which stands for solar-system-dominating Interplanetary File System, is a vast, global network of computers helping one another store and serve files. Sounds familiar? It's kind of like BitTorrent, except with much cooler and interoperable ways to link data and objects (which we will touch on later).
IPFS and Wasm app are a perfect match because IPFS is decentralized, meaning it is more likely to cache and serve content on the "edge" nearer to the users while the Wasm app makes it even faster for the browser to load.
Convinced? Let's begin
Here are a few things to get you set up for success:
- Install Rust
- Follow the Yew's Project Setup
- Open up your mind
To sanity-check before we wander off climbing El Capitan without a rope, run the follow commands in your terminal:
cargo --version
> cargo 1.56.0 (4ed5d137b 2021-10-04)

rustup target list | grep 'wasm32-unknown-unknown'
> wasm32-unknown-unknown (installed)

trunk --version
> trunk 0.14.0
Your displayed versions will likely differ from here, but as long as none of the command makes the shell says "command not found" you should be good to join this quest.
Now, when you're ready, create a new app by typing cargo new --bin counter-app into your terminal, and check out the directory with cd counter-app.
From now on, when I say "root", it will mean inside this tada-app directory.
At the root (I said it), run cargo run. Without fail, the sample app Rust created for you should print out "hello, world".
Open up the Cargo.toml file, and add Yew crate as a dependency under the dependencies section:
[package]
name = "counter-app"
version = "0.1.0"
edition = "2021"

[dependencies]
# Add this line
yew = "0.19"
Then run cargo update to install the crate.
Create an index.html file with the following HTML content and save the file:
<!DOCTYPE html>
<html>
<head>
  <!-- UIkit CSS -->
  <link rel="stylesheet" href="https://cdn.jsdelivr.net/npm/uikit@3.10.1/dist/css/uikit.min.css" />
  <!-- UIkit JS -->
  <script src="https://cdn.jsdelivr.net/npm/uikit@3.10.1/dist/js/uikit.min.js"></script>
  <script src="https://cdn.jsdelivr.net/npm/uikit@3.10.1/dist/js/uikit-icons.min.js"></script>
  <meta charset="utf-8" />
  <title>Counter App</title>
</head>
</html>
This HTML file is the base document of our app.
Get familiar with Yew
Yew is a library that glosses over all the nitty-gritty of building Rust into Wasm. If you have done some building in React, Vue, Angular, or Elm, and especially if you have with TypeScript, you will be up and running at full speed.
Otherwise, back off on that gas a bit.
Open up src/main.rs, which is an entry point for all Rust app, and let's start with a counter app that consists of a button to increment a number value.
/// Import all goodies from Yew.
use yew::prelude::*;

/// Our app's state. It is now just a unit struct with no property
/// because our state will be encapsulated within the Counter component.
struct App;

/// A Counter functional component ala React.
#[function_component(Counter)]
fn counter() -> Html {

    // Initializing the component's state.
    let counter = use_state(|| 0);

    // The onclick callback function.
    let onclick = {
        let counter = counter.clone();
        Callback::from(move |_| counter.set(*counter + 1))
    };

    // The component written in plain-old HTML, thanks to html! macro.
    html! {
        <div class="uk-position-center uk-text-center">
            <button
                {onclick}
                class="uk-button uk-button-primary uk-button-large"
            >
                { "+1" }
            </button>
            <p>{ *counter }</p>
        </div>
    }
}

/// The main App container.
impl Component for App {

    // The internal types that are required to be implemented to comply Component trait.
    type Message = ();
    type Properties = ();

    // The constructor function, which instantiates the App.
    fn create(_ctx: &Context<Self>) -> Self {
        App
    }

    // The view lifecycle function, which renders the App.
    fn view(&self, _ctx: &Context<Self>) -> Html {
        html! {
            <Counter />
        }
    }
}

/// Start the Yew app
fn main() {
    yew::start_app::<App>();
}
I hope you can guess a lot from just reading the code. If you are new to Rust, some things might have stuck out, like the #[...] just above the Counter component function and html! { ... } surrounding the HTML code. They are macros, the magic dragons that keeps Rust code simple and boiler-plate free.
Note that we could even include a class attribute to the button element to style our button with our CSS styling library. Neat!
Now, for the moment of truth, run trunk serve and watch in awe as the super speedy web app unwinds on port 8080 (or whatever port it listens on).
Fun with buttons
Now that we had our morale boosted, it is a good time to learn about props and states. Let's add two more buttons - one for decrementing the number and another for resetting it to 0.
First of all, let's change our App component into a functional component, instead of a struct. Replace the App struct and its lifecycle methods (everything within impl App block) with the following functional component:
#[function_component(App)]
fn app() -> Html {
    let _state = use_state(|| 0 as u64);
    html! {
        <Counter />
    }
}
One thing that React did well was to promote functional over class-based components. Functional components are stateless and easier to understand, and Yew carries on with that convention.
We are using use_state hook, which behaves similarly to the one in React. Instead of providing 0 as the initial state, we pass an anonymous function (or as Rust calls a closure) with a value of 0. Because Rust infers 0 as a 32-bit integer (i32) type by default, we have to coerce it to a 64-bit unsigned integer type by using the keyword as.
We need to communicate with the DOM inside the Counter component since all the buttons are wrapped in there. This is where we pass props in. Our props will only contain the state because we just want the child components to change it from inside Counter.
On top of counter function, define a TodoProps struct with a state field:
#[derive(Properties, PartialEq)]
struct TodoProps {
    state: UseStateHandle<u64>,
}
Note the macro clause #[derive(...)] before the struct definition. It implements Properties and PartialEq traits, generating necessary implementation at compile time. All props are required to implement these two traits.
Now, add the props as a parameter to counter.
#[function_component(Counter)]
fn counter(props: &TodoProps) -> Html {
    // ...
}
And now, miraculously, Counter now accepts a props name state:
#[function_component(App)]
fn app() -> Html {
    let state = use_state(|| 0 as u64);

    html! {
        <Counter {state} />
    }
}
Let's head back to counter function. We want to increment the state when a button is pressed. Let's define an increment callback to do that.
#[function_component(Counter)]
fn counter(props: &TodoProps) -> Html {
    let increment = {
        let state = props.state.clone();
        Callback::from(move |_| state.set(*state + 1))
    }
    html! {
        <div class="uk-position-center uk-text-center">
        <button
          onclick={increment}
          class="uk-button uk-button-primary uk-button-large"
        >
          { "+1" }
        </button>
        <p>{ *props.state }</p>
        </div>
    }
}
With these changes, if you run trunk serve now, you should see a button incrementing the number like before. In fact, saving the changes should reload the app in the browser automatically!
All we have to do now is to repeat, add decrement and reset callbacks, and two more buttons that take them as callbacks. Here is the complete code with three buttons:
use yew::prelude::*;


#[derive(Properties, PartialEq)]
struct TodoProps {
    state: UseStateHandle<u64>,
}

#[function_component(Counter)]
fn counter(props: &TodoProps) -> Html {
    let increment = {
        let state = props.state.clone();
        Callback::from(move |_| state.set(*state + 1))
    };

    let decrement = {
        let state = props.state.clone();
        Callback::from(move |_| state.set(*state - 1))
    };

    let reset = {
        let state = props.state.clone();
        Callback::from(move |_| state.set(0))
    };

    html! {
        <div class="uk-position-center uk-text-center">
            <button
                onclick={increment}
                class="uk-button uk-button-primary uk-button-large"
            >
                { "+1" }
            </button>
            <button
                onclick={reset}
                class="uk-button uk-button-primary uk-button-large"
            >
                { "0" }
            </button>
            <button
                onclick={decrement}
                class="uk-button uk-button-primary uk-button-large"
            >
                { "-1" }
        </button>
            <p>{ *props.state }</p>
        </div>
    }
}

#[function_component(App)]
fn app() -> Html {
    let state = use_state(|| 0 as u64);
    html! {
        <Counter {state} />
    }
}

fn main() {
    yew::start_app::<App>();
}
The latest counter app should look like this:
Before we wrap up app building, peek into the dist. You will likely find a .js, .wasm, and a .html files. Trunk had built and compiled the app into a bundle of files in this directory, ready to be served with any HTTP server.
💡 Fun experiment
If you have Python installed, try running HTTP server withindistwith the commandpython3 -m http.server 8080orpython -m SimpleHTTPServer 8080for Python2. Alternatively, Nodehttp-serverworks too.
What are your observations? Epiphanies? Record them.
Deploy to IPFS
IPFS network consists of many nodes running IPFS, coordinating with each other to help store and distribute digital content over the internet. At a high level, the only different you need to know is that IPFS is:
Content-addressed
Unlike the world wide web today, which mostly serve content at a location address like https://coolapp.com/public/cat1.jpg, IPFS identify a piece (or pieces) of content based on its hash, or Content Identifier (CID). It does not matter where the file (or bits of it) is located on the internet. IPFS will retrieve that file based on the hash you provide. For example, on IPFS-compatible browsers like Brave or Puma, check out NFTSchool website on IPFS withipfs://bafybeicsyilnu4rxrjlerad5kzstvgio3n62qlxektwqudj4x53vaexxiu.Immutable
Because you retrieve content on IPFS by its digital fingerprint, contents on the network are unchangeable. There is no way to save a puppy JPEG at https://coolapp.com/public/cat1.jpg to troll with cat lovers or even remove the image and leave them with a 404 Cat Not Found.
The trickiest part of hosting content on IPFS is its "garbage-collecting" nature. To avoid congesting the storage, unused contents are pruned from the hard disk(s) of the storage node(s). To keep a piece of content online and available, we must pin it to the persistent storage.
Run IPFS locally
We will deploy and serve our Wasm counter app on a local IPFS node running on our machine. Download the IPFS Desktop node, which gives you a nice UI on top of the IPFS server.
Open IPFS Desktop app, navigate to the File tab, and drag the dist folder from our project into the app window. Once it's loaded, you should see the directory appears in the app:
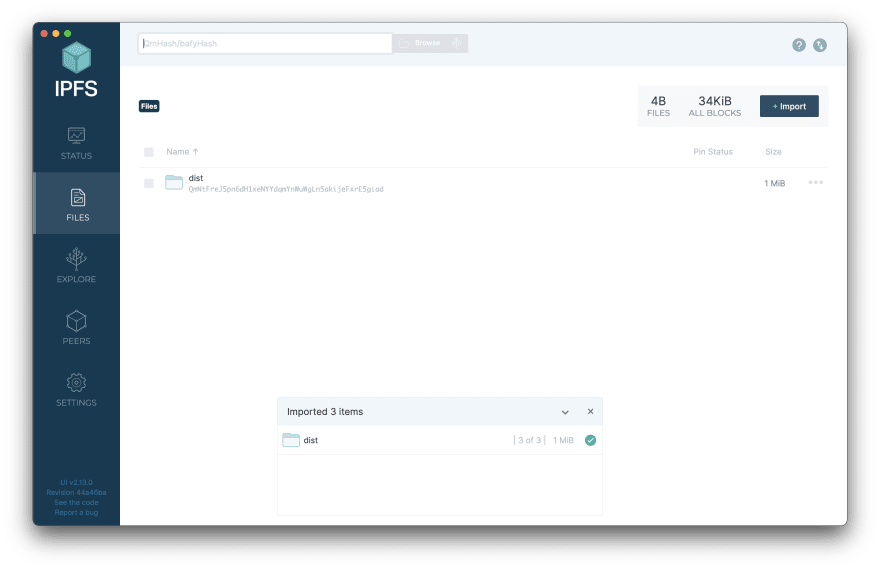
Click on the ellipsis icon to the right of the item (the three-dotted icon), click Share Link, then click Copy. Paste the URL in a browser, then you should be able to see your counter app!
💡 Fun experiment
Try pinning the app by clicking Set Pin from the same menu. Read up quickly on pinning, then come back here a changed person.
IPFS Gateway
You might have noticed that the link you got starts with HTTPS protocol, like https://ipfs.io/ipfs/QmNtFreJ5pn6dH1xeNYYdqmYnWuWgLn5akijeFxrE5giad. Because IPFS is not supported in some browsers, there are several HTTP gateway that acts as a safe passage into the IPFS-hosted content via HTTP. This link connects to a gateway provided by ipfs.io.
In browsers like Brave or Puma, users will be able to browse using IPFS natively with ipfs://QmNtFreJ5pn6dH1xeNYYdqmYnWuWgLn5akijeFxrE5giad. We can think of these browsers as the direct gateways to IPFS without a "web2" middleman sitting in the middle.
Pinning services
Running the IPFS node locally and serving the app on your own is a fun exercise, but if you shut down your computer, your node and your app will likely go down. The fastest way to get up and running is to upload your app to a pinning service such as Estuary, Web3.storage, or deploy directly to Fleek.
Immutability's crux
If you have been thinking it through, you would have realized what a headache it would be to update our app. If you just removed a single line or a print statement from your app and re-deployed, you will end up with a completely different CID. That's why the current internet is based on mutable addresses - So users can always find their way back regardless of the content.
Check out Interplanetary Name System (IPNS) and DNSLink on how to link a static CID and domain name to your IPFS app.


Latest comments (2)
Hey Pan, great tutorial. I'm getting stuck trying to load the app into Brave from my local IPFS instance. When intex.html loads, Brave interoperates the counter-app-___.js file as Content-Type: text/plain; Do you know how this can be fixed?
----What are your observations? Epiphanies? Record them.
Why does this work!?