
Hello there!
I'm studying Vue nowadays. So I thought that the best way to get a full understanding of things is to write an article about them :]
Also, when I was developing the app I realized missing info that I'm gonna talk about.
I'm going to overview my pet-project Vue app that uses public API from Weatherbit and just gets the weather based on a city: temperature and description.
The app has two views:
Home
About

I'm not going to describe every stroke of code in this article. On the contrary, I'll focus on the architecture and processes of the app.
You might need to have a basic knowledge of HTML, CSS & JS, and also the concepts of Vue.js to get a full understanding of things that happen here.
Techs I have used:
- Vuex for storing data.
- Axios for getting data from API.
- Router for navigating throw the app. Actually, it's not necessary to use it in this project, but I just wanted to show it in action.
The project is generated and managed by Vue CLI.
I strongly recommend you to use this instrument. Perfect for beginners.
Let's take a look at the architecture of the project.
So src folder contains:
src
│
├───assets # Stuff like images are stored here
│       logo.png
│
├── components # Independent "bricks" of app
│       weatherWidget.vue
│
├── services # Code that works with API. Axios gets data from API here
│       service.js
│
├── views # Views are like pages. Router navigates through them
│       About.vue
│       Home.vue
├── App.vue # Root Vue component
├── constants.js # Just some constants that I want to store
├── main.js # Core JS file that imports and mounts our app
├── router.js # Router config is here
├── store.js # Store management with Vuex
Now let's research code closer!
main.js 🚩
Starting from main.js.
main.js is the root javascript file of the whole project.
Here we are importing, core libraries configs and components, then creating new Vue instance and telling Vue to use router and store.
import Vue from "vue"; // Vue lib
import App from "./App.vue"; // Our root component
import router from "./router"; // Router config
import store from "./store"; // Store config

import "normalize.css"; // Normalize.css lib to reset default styles

Vue.config.productionTip = false;

new Vue({
  router,
  store,
  render: h => h(App)
}).$mount("#app"); // Create Vue instance and mount it in index.html -> #app element
constants.js 📄
This is the place where my API key and URL are stored.
A lot of data can be fetched from REST API. Check the documentation to dive in.
In this project, I'm going to get the current weather for my home city Kyiv. So the URL with queries and key for API request will be like CURRENT_WEATHER.
const API_KEY = "b60f3577e8eb46f089853e2a9fd7d744";
const CURRENT_WEATHER = `https://api.weatherbit.io/v2.0/current?city=Kiev,UA&key=${API_KEY}`;

export { API_KEY, CURRENT_WEATHER }; // export constant to be able to use them in components
router.js 🔀
Router config. The app has two views (pages) - Home and About. So I wish to have URL's like that: https://app and https://app/about. I can define them in router.js. All I need is to specify every page in routes of Router instance: write the path, give the name to route and link it with an existing component. Note, /about view will be lazy loaded.
mode: "history" means that Routes will have no # in URLs. Without this line, every URL will look like this: https://app/#route. But don't forget to configure your server to make it works properly with history mode.
import Vue from "vue";
import Router from "vue-router";
import Home from "./views/Home.vue"; // import components that you wish to became Routes

Vue.use(Router); // tell Vue to action with Router

export default new Router({
  mode: "history",
  base: process.env.BASE_URL,
  routes: [ // All the routes are described here
    {
      path: "/",
      name: "home",
      component: Home
    },
    {
      path: "/about",
      name: "about",
      // route level code-splitting
      // this generates a separate chunk (about.[hash].js) for this route
      // which is lazy-loaded when the route is visited.
      component: () =>
        import(/* webpackChunkName: "about" */ "./views/About.vue")
    }
  ]
});
store.js 🗃️
Store management.
Store contains global data - the state of the app.
Here the state of the app is set up and mutations & actions are defined.
If you simplify, the algorithm of working with Store is:
we call an action ➡️ action call a mutation ➡️ mutation changes the state
Note: @ in import path means to start from src folder, the root of our workspace.
import Vue from "vue";
import Vuex from "vuex";

import service from "@/services/service.js"; // service.js fetch data from API. We will have a look at it in the next step.

Vue.use(Vuex); // tell Vue to action with Vuex

export default new Vuex.Store({
  state: { // define here data that you wish to store
    weather: {},
    dataIsRecived: false
  },
  mutations: { // change state from here
    UPDATE_WEATHER(state) {
      service
        .getWeather() // call the function from service.js that returns the data from API
        .then(response => { // if the response was get
          state.weather = response.data.data[0]; // set weather obj in state to real weather obj
          state.dataIsRecived = true; // mark that data was recived
          console.log(response); // and log it
        })
        .catch(error => { // if there was an error
          console.log("There was an error:", error.response); // log it
          state.dataIsRecived = false; // and mark that data wasn't recived
        });
    }
  },
  actions: { // call mutations that change the state here
    updateWeather(context) {
      context.commit("UPDATE_WEATHER");
    }
  }
});
services/service.js 🛎️
Communication with API.
Axios is used here. Promise based HTTP request goes to Weatherbit and gets the real data about current weather.
import axios from "axios";
import { CURRENT_WEATHER } from "@/constants"; // URL with queries and API key

const apiClient = axios.create({ // create promise
  baseURL: CURRENT_WEATHER,
  withCredentials: false, // CORS
  headers: { // some HTTP headers
    Accept: "application/json",
    "Content-Type": "application/json"
  }
});

export default {
  getWeather() { // function that is used in store.js 👆
    return apiClient.get();
  }
};
What's next?
Actually now we have everything to write Vue components and use all this stuff inside them.
So let's do it!
App.vue
Root Vue component.
Router is used here to add navbar with links to Home and About views.
<template>
  <div id="app"> // root
    <div class="nav"> // navbar
      <router-link to="/" class="nav__link">Home</router-link>
      <router-link to="/about" class="nav__link">About</router-link>
    </div>
    <router-view /> // router views will be rendered here
  </div>
</template>

<style lang="scss"> // some styles 🖍️
  @import url('https://fonts.googleapis.com/css?family=Montserrat:100,200,300,400&display=swap&subset=cyrillic');

  body {
    font-family: 'Montserrat', sans-serif;
    max-height: 100vh;
  }

  a {
    color: #153B50;
    text-decoration-color: rgba($color: #153B50, $alpha: 0.5);
    transition: all 0.3s ease;

    &:hover {
      text-decoration-color: #153B50;
    }
  }

  .nav {
    display: flex;
    justify-content: center;
    align-items: center;
    padding: 15px 0;
    position: absolute;
    top: 0;
    left: 0;
    width: 100%;
  }

  .nav__link {
    &:not(:last-child) {
      margin-right: 15px;
    }
  }
</style>
views/About.vue
View that has just a placeholder.
<template>
  <div class="about">
    <p>Thanks <a href="https://www.weatherbit.io/">Weatherbit</a> for public API!</p>
  </div>
</template>

<style lang="scss" scoped> // some styles 🖍️
  .about {
    display: flex;
    justify-content: center;
    align-items: center;
    height: 100vh;
  }
</style>
views/Home.vue
View that has the weatherWidget vue component.
Take a look at it in the next part.
<template>
  <div class="home">
    <weatherWidget />
  </div>
</template>

<script>
import weatherWidget from '@/components/weatherWidget.vue'; // import component

export default {
  name: "home",
  components: { // and register it
    weatherWidget
  }
}
</script>

<style lang="scss" scoped> // some styles 🖍️
  .home {
    display: flex;
    justify-content: center;
    align-items: center;
    height: 100vh;
  }
</style>
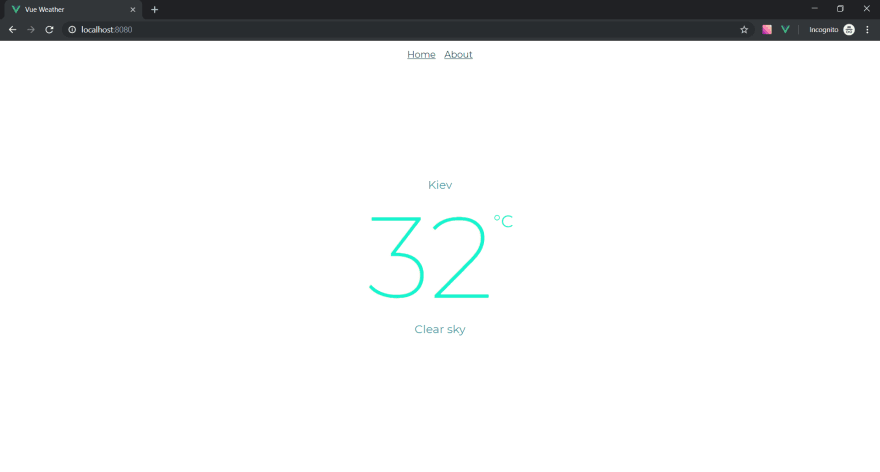
components/weatherWidget.vue
So the magic happens here.
We've got all prepared to get the weather data and render it in the component.
All we have to do now is just dispatch store action (that will call mutation, that will call service and write data caught from API to state).
With the life cycle hook created we call updateWeather action. Then we've got computed property weather that saves reactivity between state and component.
And the last thing: we have to interpolate computed property to component.
Also, there is some kind of preloader. When dataIsRecived state prop is false (look in the store.js) SVG spinner is rotating and waiting for data.
<template>
  <div>
    <div v-if="this.$store.state.dataIsRecived" class="weather-widget"> // widget itself
      <p class="weather-widget__city">{{ weather.city_name }}</p>
      <h2 class="weather-widget__temp">{{ weather.temp }}<span>°C</span></h2>
      <p class="weather-widget__status">{{ weather.weather.description }}</p>
    </div>
    <div v-else class="weather-widget"> // preloader
      <img src="spinner.svg" alt="">
    </div>
  </div>
</template>

<script>
  export default {
    computed: {
      weather() {
        return this.$store.state.weather // gets weather state from Vuex store
      }
    },
    created() {
      this.$store.dispatch("updateWeather"); // dispatch "updateWeather" when component is created
    }
  }
</script>

<style lang="scss" scoped> // some styles 🖍️
  .weather-widget {
    display: flex;
    flex-direction: column;
    align-items: center;
    color: #429EA6;
  }

  .weather-widget__city {
    font-size: 20px;
    margin: 0;
  }

  .weather-widget__temp {
    display: flex;
    align-items: flex-start;
    color: #16F4D0;
    font-size: 200px;
    font-weight: 200;
    margin: 0;

    span {
      font-size: 30px;
      font-weight: 400;
      margin-top: 35px;
    }
  }

  .weather-widget__status {
    font-size: 20px;
    margin: 0;
  }
</style>
That's it!
Our Vue SPA works! It gets data from Weatherbit and renders it on screen. Simple.
Full source code you can find in my GitHub repository.
 oxyyyyy
/
vue-weather
oxyyyyy
/
vue-weather
Weather app made with Vue and public weather API
Vue Weather App
Pet-app with article about it.

Project setup
yarn install
Compiles and hot-reloads for development
yarn run serve
Compiles and minifies for production
yarn run build
Run your tests
yarn run test
Lints and fixes files
yarn run lint
Customize configuration
P.S. I'm looking forward to the feedback from you, guys, it's very important for me. It was my first article and I was glad to make my contribution to the DEV.to community. I hope that this article was helpful for someone 😉


Top comments (8)
Thanks for the walkthrough.
My first suggestion is to get things like API keys and passwords out of code and into environment variables. Even for learning projects, this is a good practice to follow. Your weatherbit key is now public, in both the snippets in this post and in your git repository.
Sure, you are right.
But this project is intended completely for educational purposes, so it's public for everyone.
Thanks for the feedback!
While this is true, I, as a newbie, would like to know proper practices when doing things like this. An update would be great!
Awesome bro. The structure of the app in each of the folders is really explicit and neat.
Thanks a lot! 😊
I am gonna make this my first project in Vue 😀
💎
I like