
🚢 Shall we continue with sea allegories? I made an amazing picture to attract attention.
Large organizations are often quite conservative when it comes to upgrading to the latest software versions.
Of course, it is very important to be sure that everything works clearly and correctly, especially considering Helm's wide use in CI. Fear of migration is not so unfounded. We're not sailors onboard the RMS Titanic who didn't have binoculars, are we? You should turn the helm, understanding which way the ship will turn! But first things first! 🧊
Helm v2 became legacy in late 2020, but there are companies that still use version 2 in their practices these days.
There are not many short and clear summaries on the Internet about migrating to Helm v3. Well, in this note, the author will try to break everything down into points.
⚓ Stage 0. Backup
Backup all the existing releases! It’s important to take a backup of all the releases before starting with the migration. Though the first step of migration won’t delete Helm v2’s release information, it’s always better to take a backup.
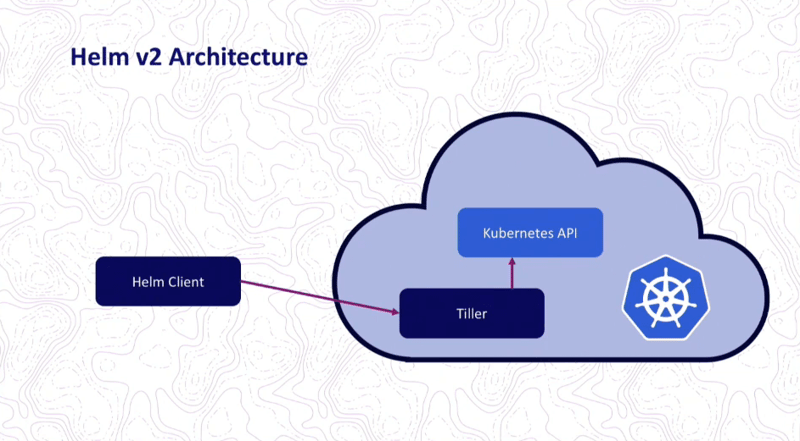
By default, Helm v2 stores its releases' data as ConfigMaps in kube-system namespace of the cluster. This command is to list Helm v2 releases:
$ kubectl get configmap -n kube-system -l "OWNER=TILLER"
Helm v3 changed the default release information storage to Secrets in the namespace of the release. How to list Helm v3 releases:
$ kubectl get secret --namespace my-namespace | grep sh.helm.release
Using helm-backup plugin by Maor maorfr Friedman. The helm-backup is a Helm v2 plugin which can take backup of releases and also has the ability to restore them. Here is how it achieves the backup.
It finds the storage method used by Tiller, then backs up the ConfigMaps along with release names as a .tar file. While doing the restore, it first applies the ConfigMaps. Then, it tries to find the release with STATUS=DEPLOYED label, gets the manifest (YAML) for that release and then applies it.
Another way is to just backup all the ConfigMaps which hold the release information. The easiest way to do it is to run the following command:
$ kubectl get configmaps \
    --namespace "kube-system" \
    --selector "OWNER=TILLER" \
    --output "yaml" > helm2-backup-cm.yaml
⚓ Stage 1: Converting releases
When we install or update a chart, it creates one Helm release in the cluster.
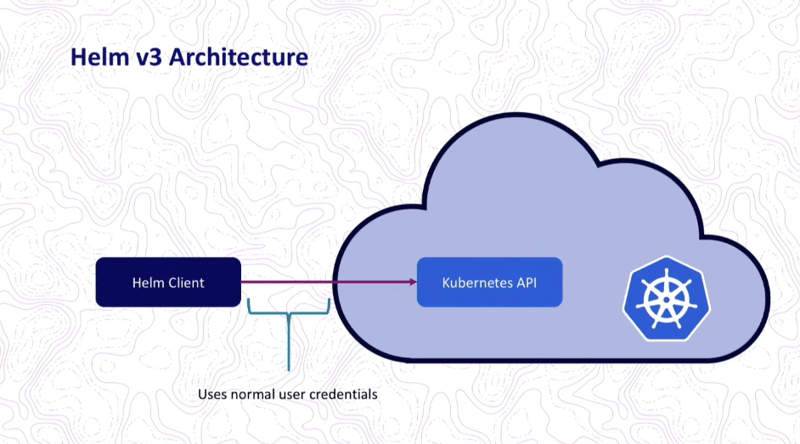
It is stored as a ConfigMap within the cluster in case of Helm v2. This makes it possible to do the rollback and keeps a history. The format in which Helm v3 stores the release information is different from v2; v3 uses Secrets predominately as a storage. The 2to3 plugin written by Martin Hickey will do the work of converting these releases to the new format.
⚠️ An important note about access to the tiller namespace for required RBAC roles. If Tillerless setup, then a service account with the proper cluster wide RBAC roles will need to be used. If not used, forbidden errors will be thrown when trying to access restricted resources.
Install 2to3 plugin:
$ helm3 plugin install https://github.com/helm/helm-2to3
⚓ Stage 2. Dumping Helm v2 (Tiller) releases:
It is good to have this list for your confidence.
$ helm2 tiller run -- helm2 ls --max=0 | sed -n '1!p' | awk 'FNR > 1 { print $1 }' > releases.log
$ kubectl -n kube-system get configmap -l OWNER=TILLER,STATUS=DEPLOYED | awk 'FNR > 1 { print $1 }' | cut -f1 -d"." > releases.log
⚓ Stage 3. Launching an automated migration with a bash script:
#!/bin/bash

helm3_cmd="helm3"
if [[ -x "$(which helm 2>/dev/null)" ]]; then
  helm2_releases="$(helm ls --all --short)"
else
  echo "'helm' is not installed or not present in PATH. Using kubectl to get list of releases."
  # …
fi

echo -e "Found the following releases:\n${helm2_releases}\n"

for release in ${helm2_releases}; do
  ${helm3_cmd} 2to3 convert --dry-run "${release}"
  read -p "Convert '${release}'? [Y/n] " user_choice
  if [[ "${user_choice}" == "Y" ]]; then
    echo "Converting '${release}'."
    ${helm3_cmd} 2to3 convert "${release}"
    echo "Converted '${release}' successfully."
  else
    echo "Skipping conversion of '${release}'."
  fi
done
The original script written by Bhavin Gandhi.
⚓ Stage 4. Resolving Kubernetes API validation problem
Helm v3 validates all of your rendered templates against the Kubernetes OpenAPI schema. This approach supposes your rendered templates are validated before they are sent to the Kubernetes API. That means any invalid fields will trigger a non-zero exit code and fail the release. Lack of fields will lead to the same.
The labels and annotations [which had not been added to migrated Kubernetes objects] should be added manually:
$ kubectl -n ${NAMESPACE} label deployment -l "app.kubernetes.io/instance=${RELEASE}" "app.kubernetes.io/managed-by=Helm"
$ kubectl -n ${NAMESPACE} annotate deployment -l "app.kubernetes.io/instance=${RELEASE}" "meta.helm.sh/release-name=${RELEASE}" "meta.helm.sh/release-namespace=${NAMESPACE}"
⚠️ Example of needed labels & annotations which are valid for stage 4:
metadata:
  labels:
    app.kubernetes.io/instance: {{ .Release.Name }}
    app.kubernetes.io/managed-by: Helm
  annotations:
    meta.helm.sh/release-name: {{ .Release.Name }}
    meta.helm.sh/release-namespace: {{ .Release.Namespace }}
If before we relied entirely on the version 2 of Helm, then we have Tiller installed in our cluster, so we may omit --tiller-out-cluster flag. The safest way of course to start with --dry-run flag (for simulation only).
⚓ Stage 5. Checking out whether it was successful
Helm v3 now behaves similarly to kubectl. With Helm v2, you could query all releases across all namespaces simply by typing helm2 ls. With Helm v3, running helm3 list will only show releases in the default namespace, just like kubectl get pods would.
To list releases in any non-default namespace, you must supply the -n argument and the namespace, just as you would when using kubectl.
$ helm3 list -n <namespace>
⚓ Stage 6. Helm v2 cleanup
As we did not specify --delete-v2-releases flag, Helm v2 releases information was left in-tact, it can be deleted with helm3 2to3 cleanup later on.
⚓ Stage 7. Bye-bye Tiller
After all, we may remove Tiller from our cluster:
$ kubectl delete deployment tiller-deploy --namespace kube-system
🔱 Note A. Check your CIs: CLI commands renamed
Some CLI commands have been renamed in Helm v3
helm2 delete is renamed to helm3 uninstall, but the first one is still retained as an alias to helm3 uninstall. Also, in Helm v2, the --purge flag removes the release configs. In Helm v3, this feature is enabled by default. To retain the previous behavior, you can use the command helm3 uninstall --keep-history.
helm2 inspect command is renamed to helm3 show.
helm2 fetch command is renamed to helm3 pull.
🔱 Note B. Check your YAMLs
When chart's Kubernetes apiVersion is set to v2 it signifies that it is using v2 schema that is introduced in Helm v3. Therefore, apiVersion: v2 is not rendered in Helm v2 because of this. If you need more compatibility, stay on v1 here.
Please see my post on LinkedIn for references. Pic source: Padok 🇫🇷
Painless migration to you!
Happy charting!


Latest comments (0)