Written by: Eze Onukwube
A zero-day attack is a cybersecurity incident that occurs when a hacker exploits a vulnerability before anyone else, including key stakeholders like the product vendor or developers, realize anything is wrong.
To counteract these attacks, you can use open-appsec, a fully automated, open-source web application firewall (WAF). As a cutting-edge cybersecurity tool, open-appsec prevents zero-day attacks through its preemptive web app and API protection that leverages the dynamism of continuous machine learning (ML). However, its ML-based engine isn't a signature-based solution.
This differentiates open-appsec from most security products on the market, especially antivirus, intrusion detection systems (IDS) and existing WAF solutions that rely on discerning threat signatures to detect malware and malicious code. As a result, open-appsec is ideal for remediating pen test results and protecting against zero-day and other Open Web Application Security Project (OWASP) Top 10 attacks such as broken access control, data integrity failures, authentication failures, and code injections.
In this article, you’ll learn about zero-day attacks and how to set up and use open-appsec to secure your web application.
open-appsec and ML
The key to open-appsec's ability to prevent zero-day attacks lies with its contextual ML engine.
It uses two machine ML models:
- A supervised learning model that was trained offline based on millions of requests, both malicious and benign.
- An unsupervised model to train itself in real time on incoming HTTP/S requests. This allows it to establish a baseline of what constitutes normal or benign traffic for a specific web application or API.
In order to enable an ML engine to quickly learn how an application is used, it should be allowed to run in learn/detect mode for two to three days. This typically provides ample time for the ML engine to train itself on a substantial amount of diverse traffic for better prediction accuracy.
As a result, open-appsec is able to detect suspicious patterns and anomalous behavior that is not in line with the web application or API's conventional traffic, unlike most WAFs that are typically rule-based. This equips the ML engine to detect zero-day attacks without having any prior knowledge of the attack vector, threat signature, or payload used. In addition, a security administrator can apply tuning suggestions to the ML engine to improve targeted accuracy.
Agents and Other Key Concepts of open-appsec
In this tutorial, you'll use agents to implement open-appsec. But before you begin this tutorial, let's talk a bit more about what an open-appsec agent is and what it does.
What Is an open-appsec Agent?
Agents are the primary means of deployment in open-appsec. They're ideal for any infrastructure due to their light digital footprint, minimal latency, and the fact that they don't alter the existing infrastructure.
The first step in implementing open-appsec for your application is deciding the type of agent deployment you want to use. In order to make an informed decision, it's imperative to understand how agents and their different deployment types work in open-appsec.
While agents are designed as standalone components, open-appsec also gives you the option to connect them to the software as a service (SaaS) management portal (more on this in the following sections).
Agents are generally deployed on any computing endpoint where client requests are received or routed such as a web server, reverse proxy, or Kubernetes Ingress. Because of this, the agent is best poised to detect and prevent malicious threats since the open-appsec core ML engine is designed to process incoming HTTP/S requests.
Agents are empowered to act as standalone entities since their security processing is done locally. However, they can be managed by a master SaaS component called a Fog. The Fog is responsible for logging in addition to configuration and software updates necessary for ML learning data synchronization between agents.
To further bolster security, agents communicate with the Fog only through encrypted and authenticated channels. When the Fog is unreachable for one reason or another, the agent is still capable of security enforcement. However, some administrative functions will be unavailable when the Fog is unattainable.
open-appsec aims for flexibility and it provides three agent deployment types: container, NGINX addon, and Kubernetes Ingress Controller.
Deploying an Agent Stand-Alone vs. Connected to the SaaS Management Portal
After you've deployed an open-appsec agent, you have the option of managing the deployment with the SaaS Central Management web user interface. If you choose to use SaaS Central Management, its portal allows you to centrally manage your open-appsec deployment with more flexibility and comfort.
However, there is a significant difference between deploying a standalone agent and deploying one connected to the SaaS management portal. While the former is adequate for implementing open-appsec security, the latter offers more to users with its multilayered functionality that provides granular control and oversight of several agent deployments.
With the SaaS management portal, you can edit your web application/API security settings from the convenience of a user-friendly web UI. In addition to policy editing, its web interface provides advanced situational awareness tools. This is a huge benefit, especially when you are managing large deployments:
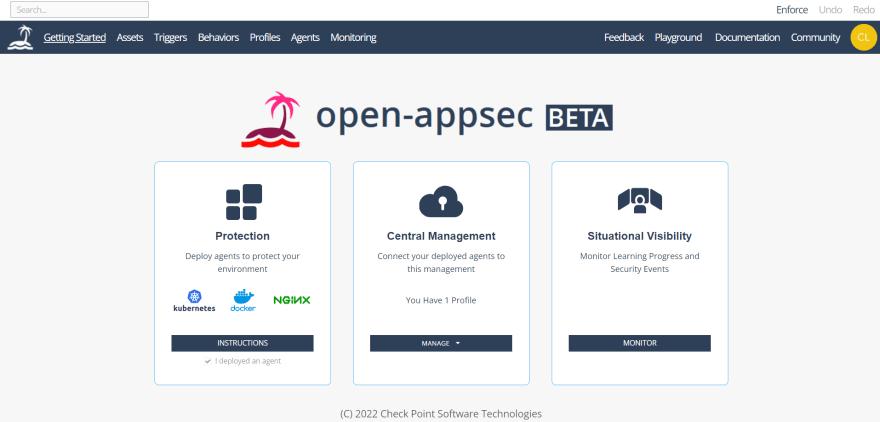
As you can see, it provides three major hubs, namely: Protection, Central Management, and Situational Visibility. While deploying standalone open-appsec for Kubernetes Ingress provides effective protection, you have more opportunities and options when you connect to the management portal.
Implementing open-appsec for Your API or Web Application
The fastest way to set up open-appsec for K8s is through the interactive Kubernetes CLI tool. One of the best things about this tool is that it's easy to use, and guides you through most of the common customizations needed.
However, a certain amount of Kubernetes knowledge and system resources are needed before you can successfully install and run this interactive tool. According to open-appsec's documentation, the following are the prerequisites required to use the Kubernetes CLI tool:
- An understanding of Kubernetes Ingress, in addition to knowing how to configure it or having previously deployed Ingress.
- A Kubernetes 1.16.0+ cluster with role-based access control (RBAC) enabled cluster admin permissions.
- Access to command line tools such as wget and kubectl on either a bastion host or a cloud platform that provides you with a Kubernetes cluster.
- Helm 3, the Kubernetes package manager, installed on your local machine.
You can also peruse the open-appsec source code and information in this GitHub repo to gain more insight into the nuts and bolts of the system.
Deploying an Agent to Your Application
To download and run the open-appsec installer, you can set up open-appsec either in the Killercoda Playground (which is what you'll use her) or on your own Kubernetes cluster.
Please note: The information given and explained in this section (and subsequent ones) can be found in the official open-appsec documentation.
Setting Up open-appsec to Use the Kubernetes CLI Tool
Killercoda's Playground provides interactive environments. As its name implies, these playground environments can be used risk-free for quick and easy deployment and first hands-on experience with modern solutions like open-appsec in immediately available, ready-to-use environments.
You can launch open-appsec's Playground by navigating to Killercoda's website or by clicking on the Playground menu item on the SaaS portal:

If you haven't logged in, or if you don't have an open-appsec Playground account, you'll see an interface with various options to sign in or create an account, using either GitLab, GitHub, Google, or email:

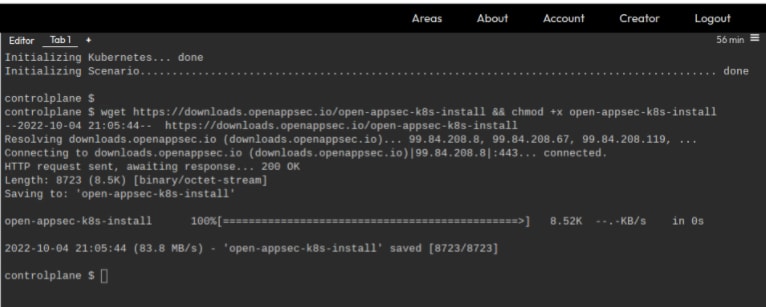
The Playground provides you with a free, computing environment through a terminal in your browser. After you've successfully logged in and the Playground has finished initializing, you’ll see a terminal interface similar to this:

To begin using open-appsec, you need to download the install script and adjust its permissions:
wget https://downloads.openappsec.io/open-appsec-k8s-install && chmod +x open-appsec-k8s-install
If you're using the Playground, all you need to do is click on the link following Download open-appsec install script to activate the download:
Then, run the downloaded install script:
./open-appsec-k8s-install
If you're using the interactive Playground, you'll notice the script is run as ./open-appsec-k8s-install --prevent. However, in a live environment, you don't want to add the --prevent attribute since you'll want to start open-appsec in its learn-detect mode. This allows its ML engine to learn the traffic patterns of your application.
Once the install script has been successfully executed (it may take some time), you should see a message similar to this on the command line:
open-appsec for Kubernetes Ingress Installer v1.2232.1
Most likely, you'll see a variation of the current Kubernetes version that open-appsec is using.
After the Kubernetes installer version is displayed, a subsequent line will give you a heads-up and preview of what the installer will be doing next:

Below is a panoramic view of Playground after running the install script:

Adding the open-appsec Agent to Kubernetes Ingress
After downloading and running the installer, the next step involves adding open-appsec to either a duplicate of an existing Ingress or directly to an existing Ingress.
Immediately after the successful installation of open-appsec, the installer displays a table of the existing ingresses, detailing information pertaining to it:

As shown in a prior image depicting its successful installation, Playground then provides you with two options to apply to the existing Ingress:
- Duplicate an existing Ingress and add open-appsec to it.
- Add open-appsec to an existing Ingress resource.
The first option allows the existing Ingress to operate without disruption to traffic while you add open-appsec and conduct tests on the newly created Ingress. The second option merely adds open-appsec to the existing Ingress. Due to the risk of disruption, the second option is suited for testing purposes or use in a non-critical production environment.
Select the option that corresponds to your situation and you'll be prompted to enter both the name and namespace of the existing or duplicate Ingress.
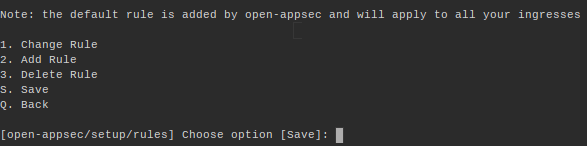
The next step gives you the opportunity to change the Ingress' policy. The CLI displays the default policy rules of the current Ingress:

You have the option of using the default Ingress policy as it is or selecting other options. As you can see from the image below, some of the options presented include changing a rule, adding a rule, deleting a rule, or saving the current policy:
For instance, if you decide to change the rule of the default policy, and select option 1 (Change Rule in the previous screenshot), you’ll be asked to make further choices. You can choose to set a new name, namespace, Ingress rule, protection level, mode, or web response:

The final step of adding the open-appsec agent to Kubernetes Ingress applies the configuration options you selected in the previous two steps to either a manifest (YAML file) or a Helm chart. Finally, save your current policy by selecting one of those options:

When executed, the installer will apply your configuration to one of these three files:
- The
ingress.yamlfile, which is the manifest created based on your instructions in the first step. - The
open-appsec-policy.yamlfile, which is created based on your selections in the second step. - The open-appsec Helm chart, which includes CRDs and other necessary files.
Because you selected to save your current policy, your setup should be saved to the open-appsec-policy.yaml file:

You may see something different depending on the prior options you chose.
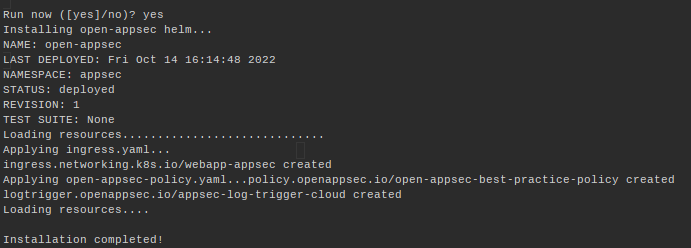
Playground will then notify you it's time for the final configuration step. This is initiated when you execute the Run now option:

After you execute the run command, you will see the installation steps being executed (for open-appsec Helm chart, Ingress resource and the open-appsec policy custom resource):
Connect Your Deployment to the SaaS Web-Based Management
As its name suggests, the SaaS web-based management portal provides the convenience of a graphical UI interface along with sophisticated functionality to oversee, optimize, and control the security configuration of open-appsec deployed agents. You can also analyze all security logs in a flexible way. Before you can connect the deployed open-appsec agent to the SaaS web-based management portal, you'll be required to first create an account on it.
Creating an Account on the open-appsec Portal
To reach the open-appsec portal's main page, navigate to https://my.openappsec.io.
You should see a web form that asks you to create an open-appsec account using your Google, GitHub, or email account. Once you provide your credentials and are authenticated, you will be taken to the Getting Started page.
After you create and deploy an agent to protect a website or app, you have the option of connecting it to SaaS web-based management.
The SaaS-based management provides central policy editing using a web interface and other advanced situational awareness tools. These are huge benefits when managing large deployments.
Once you’ve logged in successfully, you'll be redirected to the home page. Once there, you need to confirm your agent has been deployed. Under the Protection box, check "I deployed an agent" which will enable the Central Management box:

Then, under Central Management, select Manage, and from the dropdown menu, select Kubernetes Profile:

This creates a Kubernetes profile that represents and controls the agents deployed in your cluster:

In order to create secure communication between your agent and the SaaS management, you need to connect to the SaaS application. Onscreen instructions might advise you to enforce the policy if you haven’t already done so:

Under Downloads & Deployment, you'll also see a message reiterating the need to enforce the policy (if you haven’t already done so). After this message, copy the commmand required to connect to your deployment from the Connect your deployment box, which contains the open-appsec token. This token connects your agents deployment to the newly created profile and creates a secure communication channel between the open-appsec deployment and the cloud:

Paste the command into the Kubernetes console, which could be Playground or your own Kubernetes setup. After it executes, your deployment can now be centrally managed in the SaaS portal.
Monitoring Cybersecurity Events after You Simulate an Attack
The best way to understand how open-appsec's event monitoring works is to simulate a cyber attack. This enables you to see how it chronicles threat protection and other relevant sequences of actions.
Fortunately, you don't have to come up with a cybersecurity incident on your own. Through the Playground, you can access open-appsec's Acme Audit application to simulate a SQL injection attack:

Validating open-appsec Protection and Events Monitoring After Attack Simulation
In open-appsec, event monitoring is done through the SaaS management portal. You need to have previously configured it with a deployed open-appsec agent protecting the website or the application. This is why, in the previous section, you used the Playground interactive environment to simulate an attack on the Acme Audit application.
As you can see from the following image, the SQL injection attack attack on the Acme Audit app failed, HTTP error 403 is shown indicating that open-appsec successfully prevented the threat:

This signals that the Kubernetes Ingress and its services were protected. However, it's also beneficial to see how the threat protection worked by viewing the actions and events generated by the attack.
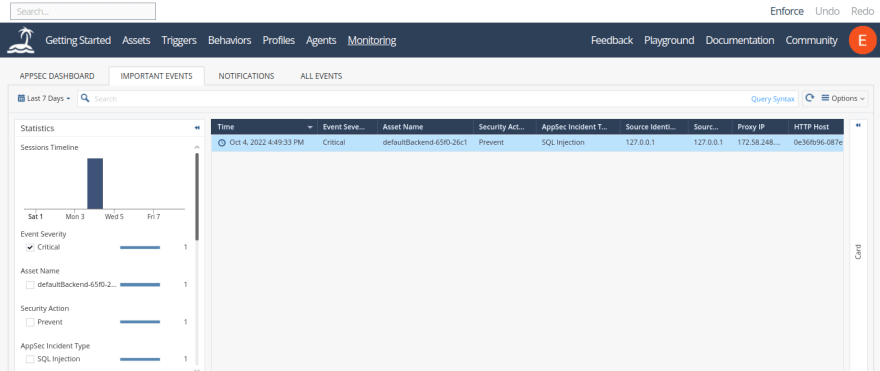
To do this, log in to the SaaS portal and select Monitoring and the All Events tab. This will display the relevant actions triggered by the attack and its threat prevention:

As you can see, a table is displayed with rows containing all the events that occurred within a certain time range. It includes the timestamps of the individual events, along with their level of severity, source IP address, and several other details.
You can see that there was a critical severity event that occurred precisely on Oct 4, 2022, at 4:49:33 PM. It reports that the incident type was a SQL injection attack that was prevented.
When you scroll horizontally to the right across the table, you'll find other granular details that help you better understand the nature of the threat and attack vector used. For instance, the text command used for the SQL injection attack is revealed under the Matched String field, while HTTP URI Path shows the exploit was carried out during a login procedure:

Alternatively, you can select the Important Events tabs to display only those security events with critical and high severity. To target event types more narrowly, filters are activated by checking the box options you want to view:
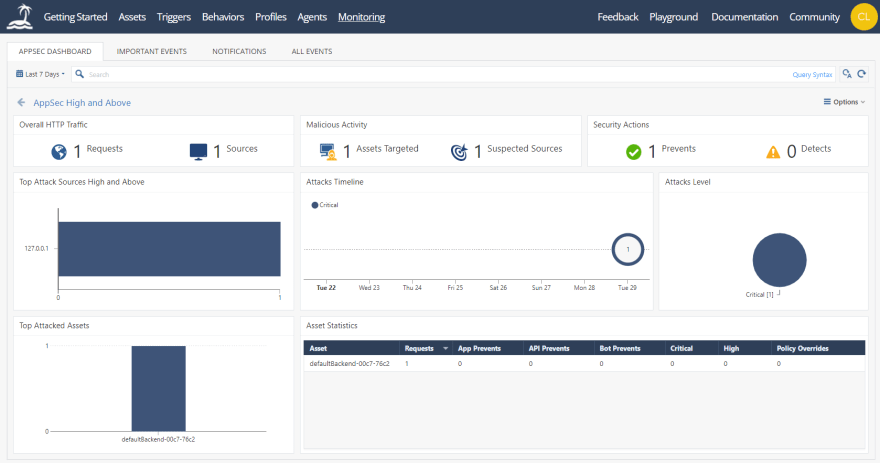
Additionally, the portal provides you with a panoramic and graphical appsec dashboard through which you can access various sections with important security sections. These sections include security actions, overall HTTP traffic, malicious activity, attack levels, and top attacked assets. You can drill down for more information by clicking on individual sections.
Conclusion
ML-based threat prevention is the best and most practical defense against zero-day attacks. In this article you learned how to configure and deploy an open-appsec in Kubernetes. You also learned how to leverage open-appsec’s SaaS management portal as an effective agent monitoring dashboard to provide centralized logging, events analysis, and handling of multiple deployments in a scalable manner.


Latest comments (0)