
Debouncing is a performance optimization technique in JavaScript. It means to delay the execution of a function that you don’t want to run as often.
Show me the code
If you would like to jump straight to the code, here you go -
Here's the interactive codesandbox demo for you to play around with yourself.

Why use debouncing?
Why would you want to create an artificial execution delay anyway? Don’t we all want our computer to go fast, calculate new values really fast, fetch data from an API really fast, update the UI really fast? Yes, we do! But there are performance penalties for executing a function of course. Completing a certain task takes time and when we execute a function repeatedly on user input we have to make sure the rest of our application does not slow down while we focus on executing a function again and again. What does this mean? Let’s see an example.
A common use case is building a dynamic search input, this input allows searching for some resources in the application based on the user input string. We wish to update the search each time the user types new character. But this is not an optimum strategy since updating the search results at every keystroke may lead to results faster than user has typed it in. As a user you type in a whole word to search, we shouldn’t have to spend computation resources search based on half formed queries. Debouncing will allow us to delay the search until after a few milliseconds, giving the user ample time to type in their queries.
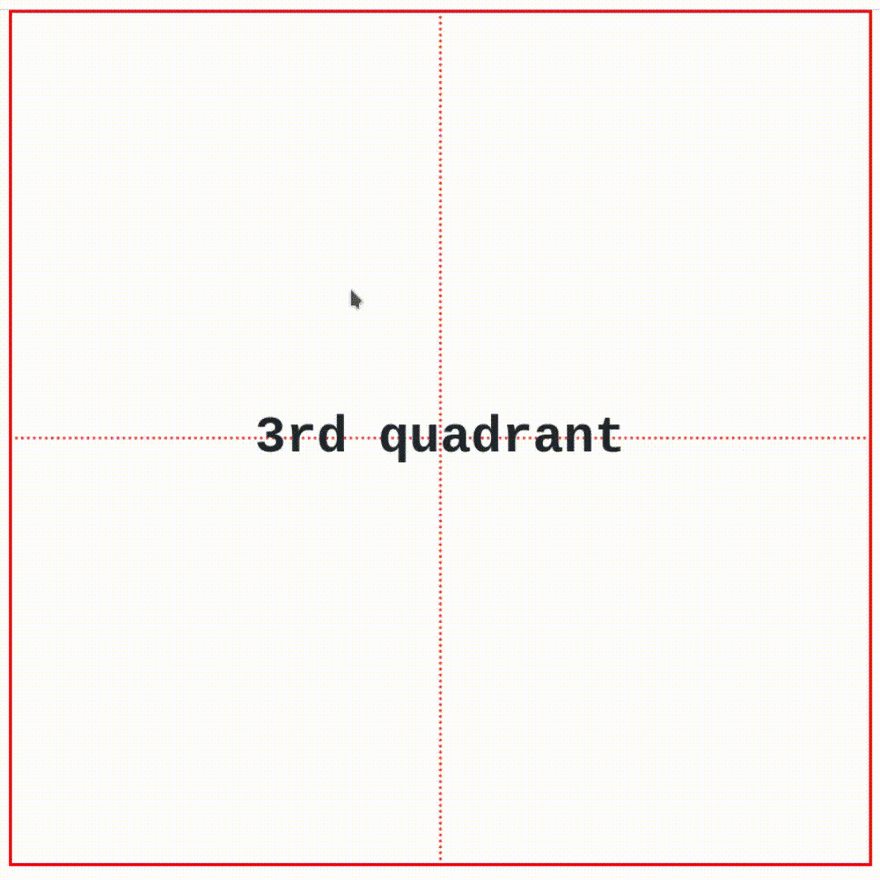
Mouse location coordinates
In the following code examples we'll build a simple application for using the location of your mouse pointer to generate some useful information. Specifically, we'll hover over a div, virtually divide it into 4 quadrants like a cartesian coordinate system, and figure out which quadrant we're currently in. Remember it's a single div, we're not creating four separate divs as quadrants and setting an event listener on each of them.
const App = () => {
    const [quadrant, setQuadrant] = useState(''); // The quadrant name - 1st | 2nd | 3rd | 4th

    const boxRef = useRef(null); // A ref to target our div

    let rect;
    let boxCenter = { x: 0, y: 0 };

    /**
     * This effect if for updating data about our div itself.
     * `getBoundingClientRect()` is a browser provided utility that gives you coordinates of the bounding rectangle.
     * We are interested in the `top`, `bottom`, `left`,`right` position of our div,
     * so we can calculate its center and use it as the origin of our div going forward.
     */
    useEffect(() => {
        rect = boxRef?.current?.getBoundingClientRect();
        boxCenter = {
            x: rect?.left + (rect?.right - rect?.left) / 2,
            y: rect?.top + (rect?.bottom - rect?.top) / 2
        };
    }, [boxRef.current, boxCenter]);

    const handleMouseMove = (e) => {
        /**
         * This code snippet is for calculating the local coordinate of the mouse pointer,
         * ie. coordinate with respect to the origin( center of the div)
         * Understanding the logic is not imperative to understanding the useDebounce() hook.
         * You can just think of it a computationally expensive
         * function that runs every time we move the mouse.
         */
        // G - global, with respect to page
        // L - local, with respect to origin i.e, center of div
        const [mouseX_G, mouseY_G] = [e.clientX, e.clientY];
        const mouseX_L = (mouseX_G - boxCenter.x) / ((rect?.right - rect?.left) / 2);
        const mouseY_L = (-1 * (mouseY_G - boxCenter.y)) / ((rect?.bottom - rect?.top) / 2);

        if (mouseX_L > 0 && mouseY_L > 0) setQuadrant('1st');
        else if (mouseX_L < 0 && mouseY_L > 0) setQuadrant('2nd');
        else if (mouseX_L < 0 && mouseY_L < 0) setQuadrant('3rd');
        else if (mouseX_L > 0 && mouseY_L < 0) setQuadrant('4th');
        else setQuadrant('');
    };

    return (
        <div onMouseMove={(e) => handleMouseMove(e)} ref={boxRef} id="mouse_example">
            {quadrant} quadrant
        </div>
    );
};

export default App;

application with no debouncing
The above code is actually quite performant and you probably won't notice many issues with while using it, since it is a simple application. But we still want more control over the application to make it so the quadrant info is calculated after waiting period. This gives us the option to optimise if we so choose.
The useDebounce() hook
const useDebounce = (value, timeout) => {
    // Save a local copy of `value` in this state which is local to our hook
    const [state, setState] = useState(value);

    useEffect(() => {
        // Set timeout to run after delay
        const handler = setTimeout(() => setState(value), timeout);

        // clear the setTimeout listener on unMount
        return () => clearTimeout(handler);
    }, [value, timeout]);

    return state;
};
Here's how we'll use it in our application. We'll of course have to make some major changes in structure.
const App = () => {
    const [quadrant, setQuadrant] = useState('');

    /**
     * In addition to quadrant we also need to have state for mouse position.
     * We wont' use it directly in UI instead,
     * we need to calculate a debounced version of this position state.
     */
    const [mouse, setMouse] = useState([0, 0]);
    const delay = 15; // milliseconds
    const debouncedMouse = useDebounce(mouse, delay); // Our debounced mouse coordinates for

    const boxRef = useRef(null);

    let rect;
    let boxCenter = { x: 0, y: 0 };

    useEffect(() => {
        rect = boxRef?.current?.getBoundingClientRect();
        boxCenter = {
            x: rect?.left + (rect?.right - rect?.left) / 2,
            y: rect?.top + (rect?.bottom - rect?.top) / 2
        };
    }, [boxRef.current, boxCenter]);

    useEffect(() => {
        /**
         * Instead of calculating the quadrant every time the mouse moves,
         * we instead calculate every time the values in debounced array changes.
         * Since debounced array is calculated at some delay, this useEffect callback function
         * runs with a delay as well.
         */
        const [mouseX_G, mouseY_G] = debouncedMouse;
        const mouseX_L = (mouseX_G - boxCenter.x) / ((rect?.right - rect?.left) / 2);
        const mouseY_L = (-1 * (mouseY_G - boxCenter.y)) / ((rect?.bottom - rect?.top) / 2);

        if (mouseX_L > 0 && mouseY_L > 0) setQuadrant('1st');
        else if (mouseX_L < 0 && mouseY_L > 0) setQuadrant('2nd');
        else if (mouseX_L < 0 && mouseY_L < 0) setQuadrant('3rd');
        else if (mouseX_L > 0 && mouseY_L < 0) setQuadrant('4th');
        else setQuadrant('');
    }, [...debouncedMouse]);

    const handleMouseMove = (e) => {
        /** Instead of calculating the quadrant at every mouse movement,
         * we set our mouse state instead, which in turn will trigger the useDebounce() hook.
         */
        setMouse([e.clientX, e.clientY]);
    };

    return (
        <div>
            <div onMouseMove={(e) => handleMouseMove(e)} ref={boxRef} id="mouse_example">
                {quadrant} quadrant
            </div>
            <div id="delay">Delay - {delay} milliseconds</div>
        </div>
    );
};

export default App;
application with a delay of 150 milliseconds
Conclusion
Debouncing is a general concept for performance improvements in a javascript application. A lot of blog reference and encourage the use of the debounce function in lodash to return the debounced version of a function. Instead, we have built a small reusable useDebounce() hook so it can be used in our functional components in a react application. You can play around with the code here -
Hope you learned something new :)


Top comments (0)