Push notifications have proved to be one of the most effective ways to enhance your user experience, improve app engagement, and boost retention. In this tutorial, we’ll show you how to integrate push notifications in your iOS and Android apps with minor configuration changes using the OneSignal Flutter SDK. In no time, you'll be able to send out transactional and promotional push notifications to users for free!
If you are a Flutter developer and want to leverage push notifications to engage with your users, follow along to add this amazing functionality to your apps.
Guide Overview:
Part 1: Set Up Your OneSignal Account
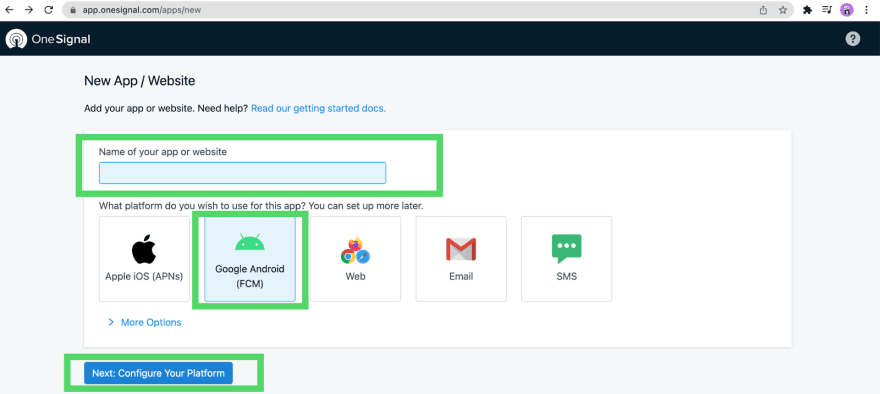
To begin, log in to your OneSignal account or create a free account. Then, click on the blue button entitled _ New App/Website _ to configure your OneSignal account to fit your app or website.

Add your app name, select _ Google Android _ if the target is Android devices or select _ Apple iOS _ if the target is iOS devices. Then click, Next: Configure Your Platform.
For iOS, you will need to add an iOS push certificate. If you're not sure about this step, read OneSignal's instructions on how to generate an iOS push certificate.
Apple iOS (APNs) Configuration in OneSignal

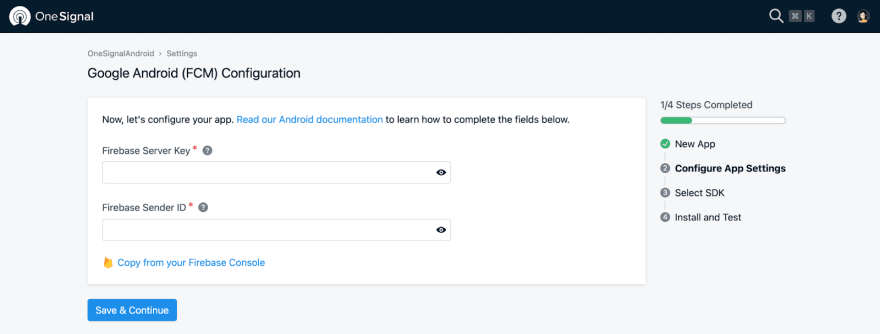
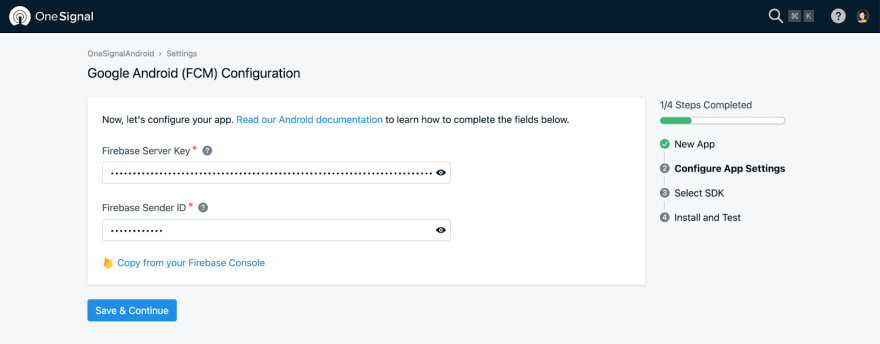
For Android, you will need to enter Firebase Server Key and Server ID that you can get by creating a new project on Firebase Console.
Google Android (FCM) Configuration in OneSignal
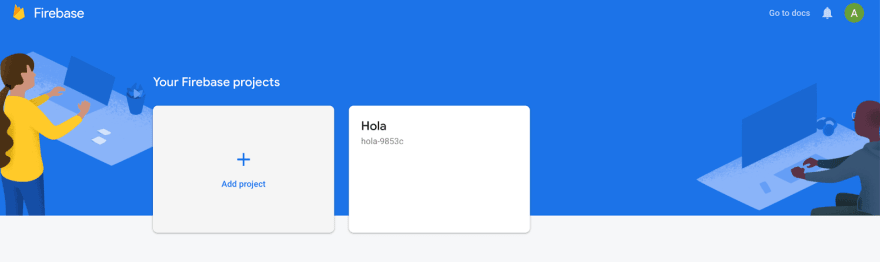
To find the Firebase service key, log in to the Firebase console and click on Add Project.
Add the name of your project and turn off Enable Google Analytics for this project if you want, then click on Create Project.


Click _ Create project _ to save the new entry, then click _ continue _.

You’ll be directed to the project dashboard where you have to click on the Setting icon next to _ Project Overview _ and click on _ Project Settings _ from the menu that appears.
Navigate to the project settings menu in the Firebase console.

In the Cloud Messaging tab, you’ll be able to find the Firebase Server Key and Server ID. Navigate back to your OneSignal dashboard and copy and paste those values into the appropriate fields under OneSignal Google Android(FCM) Configuration like this:
Input your Firebase Server Key and Sender ID in OneSignal.
After clicking on Save & Continue , you’ll be asked to select your target SDK. Choose Flutter.
Choose Flutter as your target SDK.

Click Save & Continue again and then click Done at the bottom of the screen.
View your app ID in OneSignal to finish the Google Android FCM configuration process.

Now, you should see your app dashboard on OneSignal under the _ Settings > Platforms _ tab. On this page under _ Native App _ _ platforms , you should see an **_Active** tag next to _ Google Android, _ which means you’re ready to send notifications to users using the Android version of your Flutter app. If you followed the iOS setup, you should see an _ Active _ tag next to _ Apple iOS _.
An "Active" tag is displayed next to Google Android in the OneSignal dashboard.

Part 2: Creating a Flutter App
So the first thing you need to do after creating a new Flutter project is to add the onesignal_flutter dependency. To do that, visit pub.dev and search for onesignal_flutter.
Shows onesignal_flutter 3.2.7 in pub.dev.

Add the latest version of onesignal_flutter to pubspec.yaml under the dependencies section with the version number from pub.dev.

Now open main.dart and remove MyHomePage() class (or just its contents).
Remove the content of MyHomePage() from main.dart.

Create a new dart file named home.dart (or continue in the main.dart file) and create a stateful widget by the name Home like this:
class Home extends StatefulWidget {
const Home({Key? key}) : super(key: key);
@override
_HomeState createState() => _HomeState();
}
class _HomeState extends State<Home> {
@override
Widget build(BuildContext context) {
return Container();
}
}
Next, build a simple UI by adding a few widgets like Container, Column and Text in the Home class.
@override
Widget build(BuildContext context) {
return Scaffold(
body: Container(
child: Column(
mainAxisAlignment: MainAxisAlignment.center,
crossAxisAlignment: CrossAxisAlignment.center,
children: const [
Text("Hello"),
],
),
),
);
}
Now you can add the OneSignal App ID which you can find in your OneSignal dashboard under the Keys & IDs tab.

Copy the OneSignal App ID and add it into your Flutter app in main.dart as a constant.
static final String oneSignalAppId = "16090413-4b70-4c0b-a9f4-dd43c445ccee";
Then add SDK initialization code to your XXX.
Future<void> initPlatformState() async {
   OneSignal.shared.setAppId(oneSignalAppId);
   OneSignal.shared
       .promptUserForPushNotificationPermission()
       .then((accepted) {});
 }
Also, initialize state.
@override
 void initState() {
   super.initState();
   initPlatformState();
 }
Complete Code(main.dart)
import 'package:flutter/material.dart';
import 'package:onesignal_flutter/onesignal_flutter.dart';

class Home extends StatefulWidget {
 const Home({Key? key}) : super(key: key);

 @override
 _HomeState createState() => _HomeState();
}

class _HomeState extends State<Home> {
 @override
 void initState() {
   super.initState();
   initPlatformState();
 }

 static final String oneSignalAppId = "16090413-4b70-4c0b-a9f4-dd43c445ccee";
 Future<void> initPlatformState() async {
   OneSignal.shared.setAppId(oneSignalAppId);
   OneSignal.shared
       .promptUserForPushNotificationPermission()
       .then((accepted) {});
 }

 @override
 Widget build(BuildContext context) {
   return Scaffold(
     body: Container(
       child: Column(
         mainAxisAlignment: MainAxisAlignment.center,
         crossAxisAlignment: CrossAxisAlignment.center,
         children: const [
           Text("Hello"),
         ],
       ),
     ),
   );
 }
}
Run your Flutter app on your physical device or emulator.
In case you recieve compileSdkVersion error then go to your app-level build.gradle file and update compileSDKVersion to 31.
defaultConfig {
// TODO: Specify your own unique Application ID (https://developer.android.com/studio/build/application-id.html).
applicationId "com.example.flutter_onesignal"
minSdkVersion 16
compileSdkVersion 31
targetSdkVersion 30
versionCode flutterVersionCode.toInteger()
versionName flutterVersionName
}
If you get Kotlin Version error then go to your build.gradle file in the root of your Android directory and upgrade your Kotlin_version to the latest version (ext.kotlin_version = '1.5.10')
For the iOS version, there’s are some additional steps that need to be completed. The first one is to add an iOS service extension.
The OneSignalNotificationServiceExtension allows your application (in iOS) to receive rich notifications with images and buttons, along with badges and Confirmed Deliveries.
The first step is to navigate to your Flutter project's iOS folder and open the .xcworkspace file in Xcode. You can use the open ios/Runner.xcworkspace command in the terminal to do the same.
Then select File > New > Target.
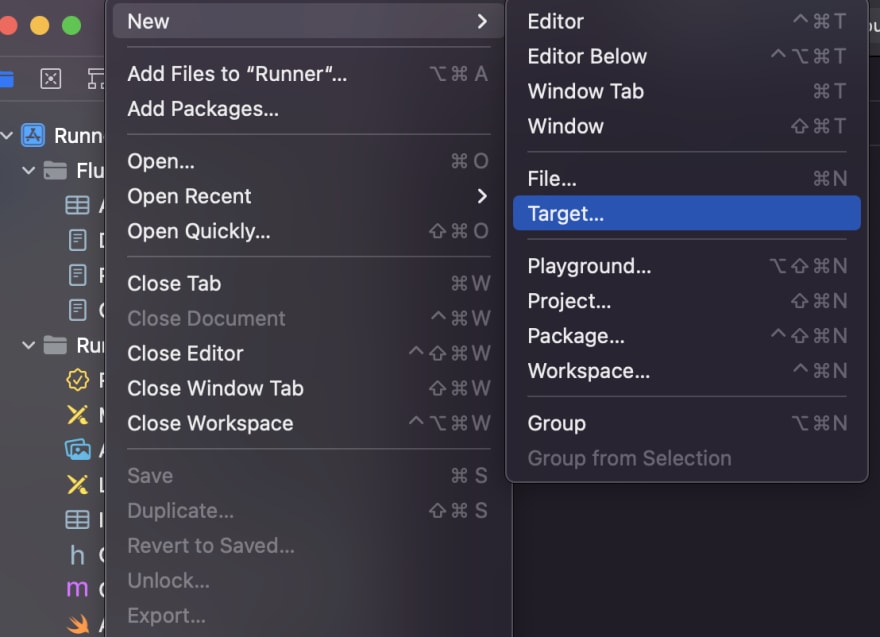
Select Notification Service Extension and press Next.

Add the product name as OneSignalNotificationExtension and change the language to _ Object-C _ or Swift according to your needs. The team account should be your account or your organization’s account.
Add the product name as OneSignalNotificationExtension in Flutter.

Click the _ Finish _ at the bottom right corner of the window, but when prompted to “Activate” scheme click on _ Cancel _.
Click "Cancel" when prompted to activate the scheme.
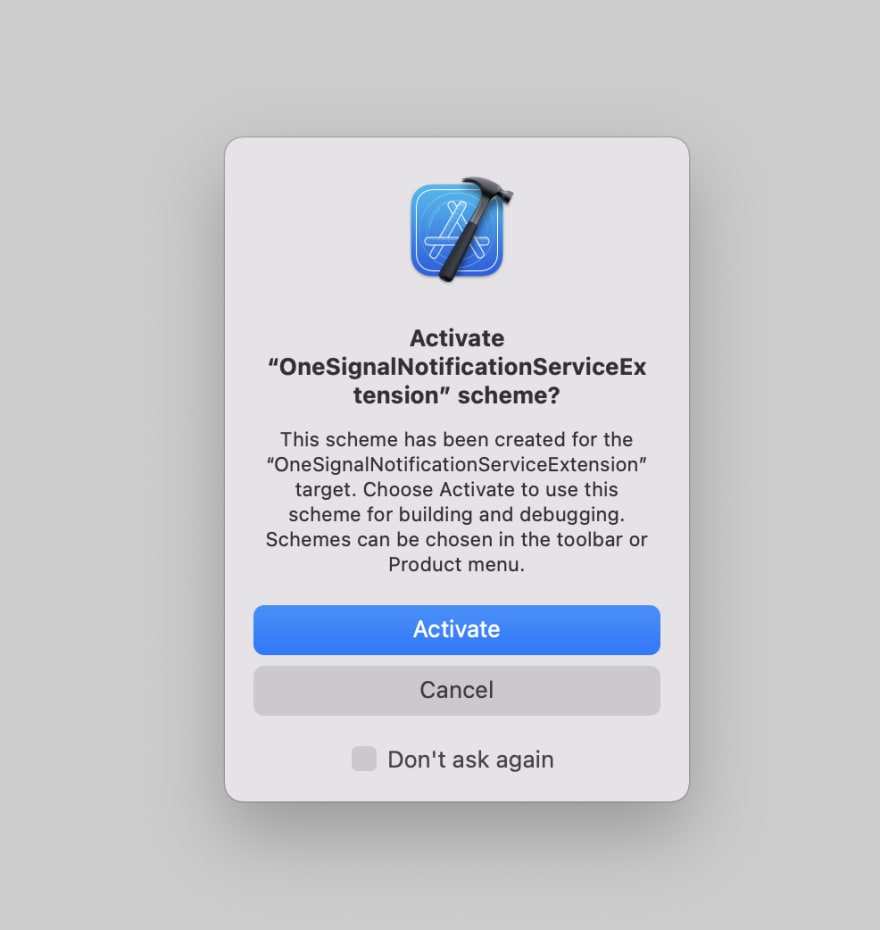
By canceling, you are keeping Xcode set to debug your app rather than using the extension. If you select _ Activate _ by accident, you can simply switch back to debug your app in Xcode (next to the Play button).
Now, open the Xcode project settings and select the _ OneSignalNotificationServiceExtension _ target. Under the _ Deployment info _ section on this page, select iOS 10.0 as the target unless there are any reason for using higher versions.

Now, close the Xcode project and go back to your Flutter development IDE. In the /ios directory of your project, open the Podfile and add the following lines outside of the main target (they should be at the same level as your main target):
target 'OneSignalNotificationServiceExtension' do
use_frameworks!
pod 'OneSignalXCFramework', '>= 3.4.3', '< 4.0'
end

Also, make sure to uncomment the platform line at the top of the Podfile. It can be iOS version 9.0 or higher according to your needs.

Now Open the terminal, cd to the ios directory, and run pod install.

If you see the error below, remove # from the above in front of use_frameworks! and try again.
- Runner (true) and OneSignalNotificationServiceExtension (false) do not both set use_frameworks!.
Open the <project-name>.xcworkspace file. In your project, in the OneSignalNotificationServiceExtension/ folder, open NotificationService.m.

Replace the whole file contents with the following code for Objective-C:
#import <OneSignal/OneSignal.h>
#import "NotificationService.h"
@interface NotificationService ()
@property (nonatomic, strong) void (^contentHandler)(UNNotificationContent *contentToDeliver);
@property (nonatomic, strong) UNNotificationRequest *receivedRequest;
@property (nonatomic, strong) UNMutableNotificationContent *bestAttemptContent;
@end
@implementation NotificationService
- (void)didReceiveNotificationRequest:(UNNotificationRequest *)request withContentHandler:(void (^)(UNNotificationContent * _Nonnull))contentHandler {
   self.receivedRequest = request;
   self.contentHandler = contentHandler;
   self.bestAttemptContent = [request.content mutableCopy];

   //If your SDK version is < 3.5.0 uncomment and use this code:
   /*
   [OneSignal didReceiveNotificationExtensionRequest:self.receivedRequest
                      withMutableNotificationContent:self.bestAttemptContent];
   self.contentHandler(self.bestAttemptContent);
   */

   /* DEBUGGING: Uncomment the 2 lines below and comment out the one above to ensure this extension is excuting
                 Note, this extension only runs when mutable-content is set
                 Setting an attachment or action buttons automatically adds this */
   // NSLog(@"Running NotificationServiceExtension");
   // self.bestAttemptContent.body = [@"[Modified] " stringByAppendingString:self.bestAttemptContent.body];

   // Uncomment this line to set the default log level of NSE to VERBOSE so we get all logs from NSE logic
   //[OneSignal setLogLevel:ONE_S_LL_VERBOSE visualLevel:ONE_S_LL_NONE];
   [OneSignal didReceiveNotificationExtensionRequest:self.receivedRequest
                      withMutableNotificationContent:self.bestAttemptContent
                                  withContentHandler:self.contentHandler];
}
- (void)serviceExtensionTimeWillExpire {
   // Called just before the extension will be terminated by the system.
   // Use this as an opportunity to deliver your "best attempt" at modified content, otherwise the original push payload will be used.

   [OneSignal serviceExtensionTimeWillExpireRequest:self.receivedRequest withMutableNotificationContent:self.bestAttemptContent];

   self.contentHandler(self.bestAttemptContent);
}
@end
For Swift, replace it with:
import UserNotifications

import OneSignal

class NotificationService: UNNotificationServiceExtension {

   var contentHandler: ((UNNotificationContent) -> Void)?
   var receivedRequest: UNNotificationRequest!
   var bestAttemptContent: UNMutableNotificationContent?

   override func didReceive(_ request: UNNotificationRequest, withContentHandler contentHandler: @escaping (UNNotificationContent) -> Void) {
       self.receivedRequest = request
       self.contentHandler = contentHandler
       self.bestAttemptContent = (request.content.mutableCopy() as? UNMutableNotificationContent)

       if let bestAttemptContent = bestAttemptContent {
           //If your SDK version is < 3.5.0 uncomment and use this code:
           /*
           OneSignal.didReceiveNotificationExtensionRequest(self.receivedRequest, with: self.bestAttemptContent)
           contentHandler(bestAttemptContent)
           */

           /* DEBUGGING: Uncomment the 2 lines below to check this extension is excuting
                         Note, this extension only runs when mutable-content is set
                         Setting an attachment or action buttons automatically adds this */
           //OneSignal.setLogLevel(.LL_VERBOSE, visualLevel: .LL_NONE)
           //bestAttemptContent.body = "[Modified] " + bestAttemptContent.body

           OneSignal.didReceiveNotificationExtensionRequest(self.receivedRequest, with: bestAttemptContent, withContentHandler: self.contentHandler)
       }
   }

   override func serviceExtensionTimeWillExpire() {
       // Called just before the extension will be terminated by the system.
       // Use this as an opportunity to deliver your "best attempt" at modified content, otherwise the original push payload will be used.
       if let contentHandler = contentHandler, let bestAttemptContent = bestAttemptContent {
           OneSignal.serviceExtensionTimeWillExpireRequest(self.receivedRequest, with: self.bestAttemptContent)
           contentHandler(bestAttemptContent)
       }
   }

}
You also need to enable an App Group to use Confirmed Deliveries and increment/decrement Badges through push notifications. For that, you can follow the iOS SDK App Groups setup guide to add the OneSignal App Group in your app.
Now you need to enable push capability for iOS apps. Open your .xcworkspace file in Xcode.
In the main app target, select Signing & Capabilities > All > + Capability and then search "push." Double-click on _ Push Notifications _ to enable it.
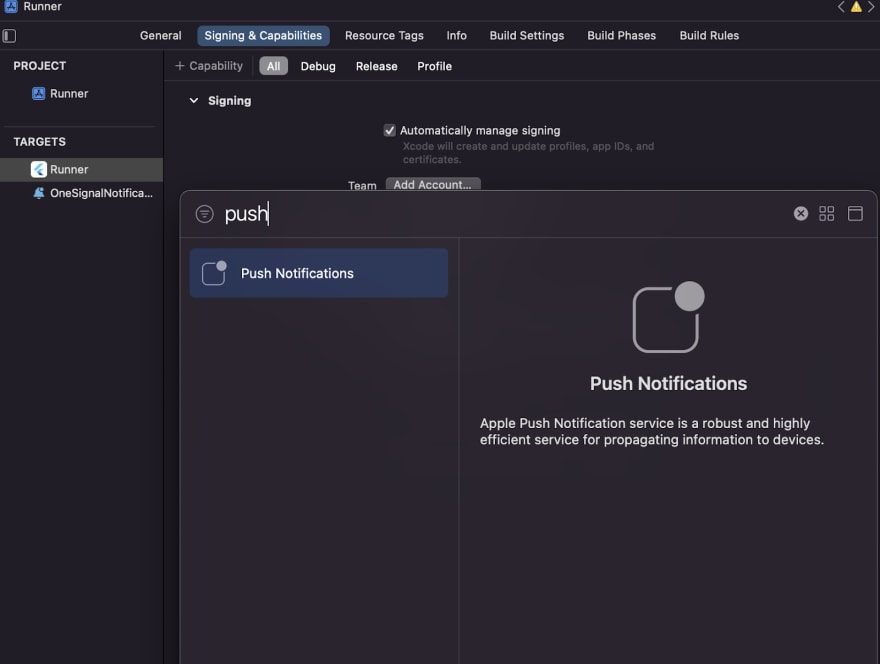
Next, enable Background Modes and check Remote Notifications.

Now you are ready to send notifications from the OneSignal dashboard!
Back in your OneSignal dashboard, click on Messages in the top navigation menu and select _ Push _ from the sub-menu. Click the +New Push button to create your first notification.
Note: Notifications are enabled on Android devices by default if you have disabled your notifications, make sure you enable them again. If you're sending a notification to an iOS device, you will need to opt-in to notifications in your app settings.
Click the "+New Push" button in your OneSignal dashboard.

You will be redirected to a new window that will allow you to customize your push notification. Under _ Audience _, make sure that _ Send to Subscribed Users _ is selected. Then, create your message by adding your message title, content, and image. Because this is the first notification your subscribers will receive, you may choose to craft a simple welcome message to confirm that they've been subscribed and reinforce the value that notifications will provide.
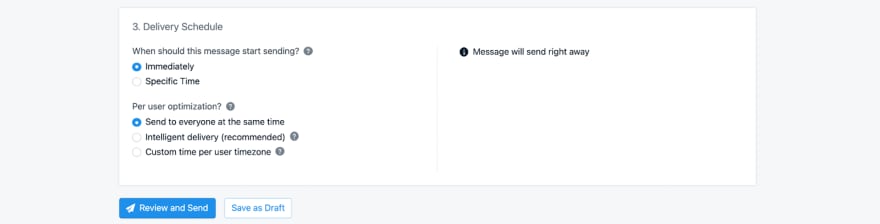
Under the _ Delivery Schedule _ section, select _ Immediately _ and _ Send to everyone at the same time _ to send to all your current push subscribers. If you have just finished setting up your OneSignal account, chances are you're the first and only subscriber. If your app or website is heavily trafficked and other users have already opted in to receive push notifications, you may want to select Send to a particular segment(s) to test your message out on a specific audience.
Specify the audience for your push notification in OneSignal.

Add your message title and copy and preview how your message looks on your target device.

When you're ready to send your message, click on the blue _ Review and Send _ button at the bottom of the screen.
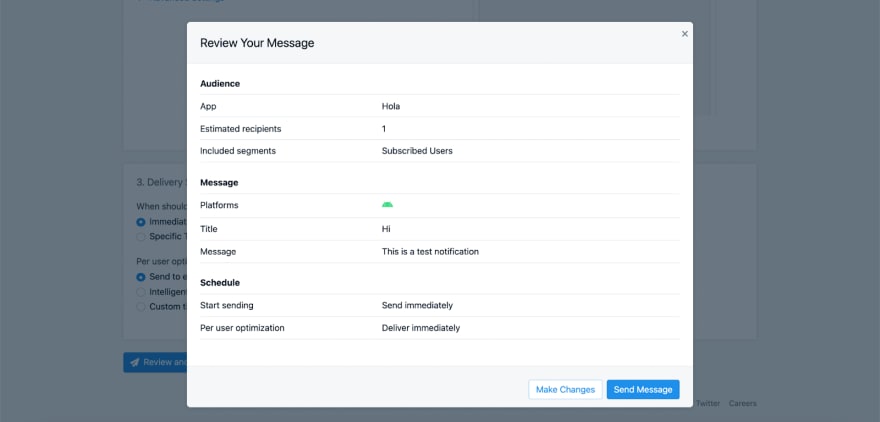
A small popup will appear for you to review your message. Once you are satisfied, click on the blue _ Send Message _ button. You should receive a push notification on your device! 🚀
You’re done 🎊!
You’ll receive the notification on your physical device that you used to run your Flutter app or on the emulator.

After the message sends, you'll be directed to the Delivery page where you can view the send report and track engagement.
Still have questions?
Check out our complete OneSignal Flutter SDK Documentation.
This post was guest authored by Akanksha Singh.


Oldest comments (3)
Is it possible to send notification from another server api(like using php) to flutter android application using this SDK?
You can use the REST API to send the notifications to any device regardless you used Flutter, React, or whatever
onesignal.com/blog/how-to-send-pus...
Okay. That's great. Thank you for your reply