An ASP.Net Core RESTful API can be implemented in different ways. This article will dissect the various steps involved in implementing one using the repository pattern.
What is Repository Pattern?
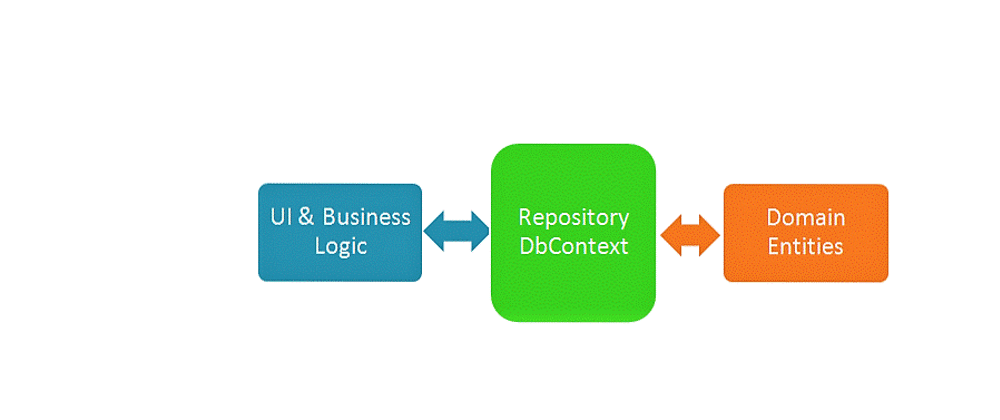
A repository design pattern creates a mediation between the business logic layer and the data source layer of an application. It hides the data manipulation details from the underlying data source.
Repositories comprise classes that encapsulate all data access logic.
Now, let's dive into implementing this pattern from scratch.
Implementing the Repository Design Pattern
First, we create a project. Open Visual Studio and create a new ASP.NET Core Web API Application

Give it a name of your choice, select the .Net version, and Create. If the project creates successfully, the screen below will be seen.

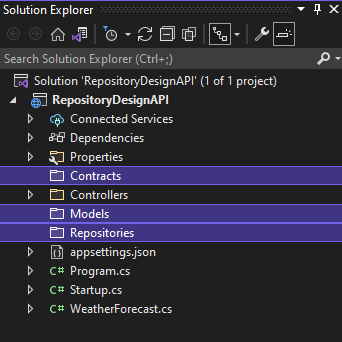
To help structure the project properly, we'll add Models, Contract, and Repository folders.
- Models - Will hold the model classes (entities). These classes will be used by Entity Framework Core to map our database models with the tables from the database.
- Contracts - Holds all the interfaces.
- Repositories - We'll be using this later to store the repository classes.
After adding these folders, our solution will have the structure below.
Next, in the Models folder, we're going to add two simple classes - Department
public class Department
{
    public int Id { get; set; }
    public string Name { get; set; }
    public int NumberOfStudents{ get; set; }
}
and Student.
public class Student
{
    public int Id { get; set; }
    public string Name { get; set; }
}
Setting up Context class and Database connection
Now, we install the Required Packages that EF Core will use for communication with the database and migration execution.
1. Install-Package Microsoft.EntityFrameworkCore
2. Install-Package Microsoft.EntityFrameworkCore.SqlServer
3. Install-Package Microsoft.EntityFrameworkCore.Tools
Next, at the root of the solution, let's add a context class. This is the Data Access Layer. It will be a middleware component for communication with the database. It must inherit from the Framework Core's DbContext class and consists of DbSet properties which EF Core will use for communication with the database.
public class ApplicationContext : DbContext
{
    public ApplicationContext (DbContextOptions options) : base(options) { }
    public DbSet<Department> Departments { get; set; }
    public DbSet<Student> Students { get; set; }
}
After adding the DbContext class, let's open up the appsettings.json file in the solution and add the connection string. We'll name it sqlConnection.
"ConnectionStrings": {
    "sqlConnection": "<type your connection string here>"
},
Below, is mine.

Lastly, we need to register the ApplicationContext class inside the .Net Core's IOC container. So, let's open the Startup.cs file and in the ConfigureServices method, add this line:
services.AddDbContext<ApplicationContext>(opts =>
   opts.UseSqlServer(Configuration.GetConnection("sqlConnection"))
);
Migration
This enables us to create and update the database right from our application. With the models we have created, we can create a real database where our models form the tables.
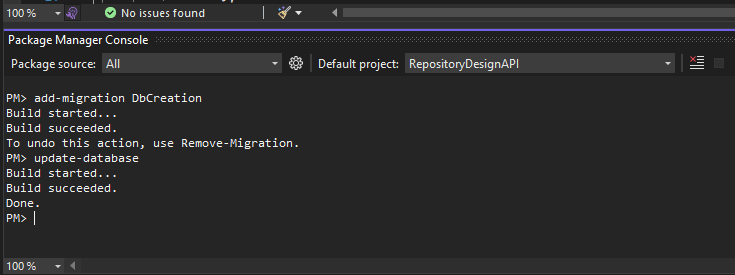
To achieve this, open your Package Manager Console on Visual Studio and run the following commands.
add-migration DbCreation
update-database
A successful database migration should display a similar screen as shown below
Generic Repository Pattern Logic
Now that we've successfully created our database and established a connection to it, let's also create a generic repository. This will provide us with the basic CRUD methods we need.
Firstly, let's create an interface inside the Contracts folder called IRepositoryBase. This will be a generic interface, that can be used for our classes and any other class you choose to add.
public interface IRepositoryBase<T>
{
    IQueryable<T> FindAll(bool trackChanges);
    IQueryable<T> FindByCondition(Expression<Func<T, bool>> expression, bool trackChanges);
    void Create(T entity);
    void Update(T entity);
    void Delete(T entity);
}
Next, we create a new class in the Repositories folder which will implement the IRepositoryBase interface.
public class RepositoryBase<T> : IRepositoryBase<T> where T : class
{
    protected ApplicationContext ApplicationContext;
    public RepositoryBase(ApplicationContext _ApplicationContext)
    {
        ApplicationContext = _ApplicationContext;
    }

    public IQueryable<T> FindAll(bool trackChanges) =>
        !trackChanges ?
          ApplicationContext.Set<T>()
            .AsNoTracking() :
          ApplicationContext.Set<T>();

    public IQueryable<T> FindByCondition(Expression<Func<T, bool>> expression, bool trackChanges) =>
        !trackChanges ?
          ApplicationContext.Set<T>()
            .Where(expression)
            .AsNoTracking() :
          ApplicationContext.Set<T>()
            .Where(expression);

    public void Create(T entity) => ApplicationContext.Set<T>().Add(entity);

    public void Update(T entity) => ApplicationContext.Set<T>().Update(entity);

    public void Delete(T entity) => ApplicationContext.Set<T>().Remove(entity);
}
You don't need to specify any model for the RepositoryBase. The type T represents the specific class that'll work with it. It makes the RepositoryBase class flexible and highly reusable.
The trackChanges parameter is used to improve read-only performance. When it’s set to false, we attach the AsNoTracking method to our query to inform EF Core that it doesn’t need to track changes for the required entities. This greatly improves the speed of a query.
As stated earlier, the RepositoryBase provides the basic CRUD operations that are common for all entities. What then happens if we need to perform database operations that are unique to an entity? To solve this, we will create user classes that will inherit RepositoryBase class. Through this inheritance, they will have access to all methods of RepositoryBase. Also, every class will have its interface for additional model-specific methods.
So, in the Contracts folder, let's create interfaces for Department and Student and add a definition for GetAll... and Create... in both of them.
public interface IDepartmentRepository
{
    IEnumerable<Department> GetAllDepartments(bool trackChanges);
    void CreateDepartment(Department department);
}
public interface IStudentRepository
{
    IEnumerable<Student> GetAllStudents(bool trackChanges);
    void CreateStudent(Student student);
}
Let's create user classes (repositories) that implement these interfaces.
Firstly, we create DepartmentRepository inside the Repositories folder.
public class DepartmentRepository : RepositoryBase<Department>, IDepartmentRepository
{
    public DepartmentRepository(ApplicationContext ApplicationContext) : base(ApplicationContext)
    {
    }
    public IEnumerable<Department> GetAllDepartments(bool trackChanges) =>
        FindAll(trackChanges)
        .OrderBy(c => c.Name)
        .ToList();

    public void CreateDepartment(Department department) => Create(department);
}
Next, we create StudentRepository also inside the Repositories folder.
public class StudentRepository : RepositoryBase<Student>, IStudentRepository
{
    public StudentRepository(ApplicationContext ApplicationContext) : base(ApplicationContext)
    {
    }

    public IEnumerable<Student> GetAllStudents(bool trackChanges) =>
        FindAll(trackChanges)
        .OrderBy(c => c.Name)
        .ToList();

    public void CreateStudent(Student student) => Create(student);
}
Managing All Repositories
We can easily inject our repositories to the constructor of the Services classes and access data. This won't be a problem if we have only two classes, but what happens when there are quite more than 3 repositories. It would not be ideal to keep adding new injections now and then. To help solve this, we're going to create a repository manager class. This class will create instances of all repository user classes for us and then we register it inside the dependency injection container.
In the Contracts folder, let's add a new interface called IRepositoryManager
public interface IRepositoryManager
{
    IDepartmentRepository Department{ get; }
    IStudentRepository Student{ get; }
    void Save();
}
Also, let's add RepositoryManager to the Repositories folder to implement the IRepositoryManager interface
public class RepositoryManager: IRepositoryManager
{
    private ApplicationContext _applicationContext;
    private IDepartmentRepository _departmentRepository;
    private IStudentRepository _studentRepository;

    public RepositoryManager(ApplicationContext applicationContext)
    {
        _applicationContext = applicationContext;
    }

    public IDepartmentRepository Department
    {
        get
        {
            if(_departmentRepository== null)
                _departmentRepository= new DepartmentRepository(_applicationContext );
            return _departmentRepository;
        }
    }

    public IStudentRepository Student
    {
        get
        {
            if(_studentRepository== null)
                _studentRepository= new StudentRepository(_applicationContext );
            return _studentRepository;
        }
    }

    public void Save() => _applicationContext .SaveChanges();
}
Now, we can register our manager class in the ConfigureServices method of the Startup class.
services.AddScoped<IRepositoryManager, RepositoryManager>();
With this in place, we may call any repository user class we need.
Adding a Controller
We now have to add a new Controller to test our repository pattern. We'll be adding just one controller for the purpose of this test.
To create the controller, right click on the Controllers folder of our project and select Add, then Controller. Choose the API Controller class from the menu and name it StudentsController.cs. By default, this should be generated:
[Route("api/[controller]")]
[ApiController]
public class StudentsController: ControllerBase
{
}
To perform the necessary tests using our controller, we'll have to modify it. So let's add some HTTP methods.
[Route("api/[controller]")]
[ApiController]
public class StudentsController: ControllerBase
{
    private readonly IRepositoryManager _repository;

    public StudentsController(IRepositoryManager repository)
    {
        _repository = repository;
    }

    [HttpGet]
    public IActionResult GetStudents()
    {
        var students = _repository.Student.GetAllStudents(trackChanges: false);
        return Ok(students);
    }

    [HttpPost]
    public IActionResult CreateStudents()
    {
        var student = new Student
        {
           Name = "Emmanuel Nzekwe"
        };

        _repository.Student.CreateStudent(student);
        _repository.Save();
        return Ok();
    }


}
Using Postman to Test
We will use Postman to send requests and display responses too. This is a great tool for API testing.
So we send a POST request to save our Student record.

Take note of the port number your API is listening on. We received a 200 Ok status code which indicates a successful operation.
Next, we execute the Get method to return the record we just created.
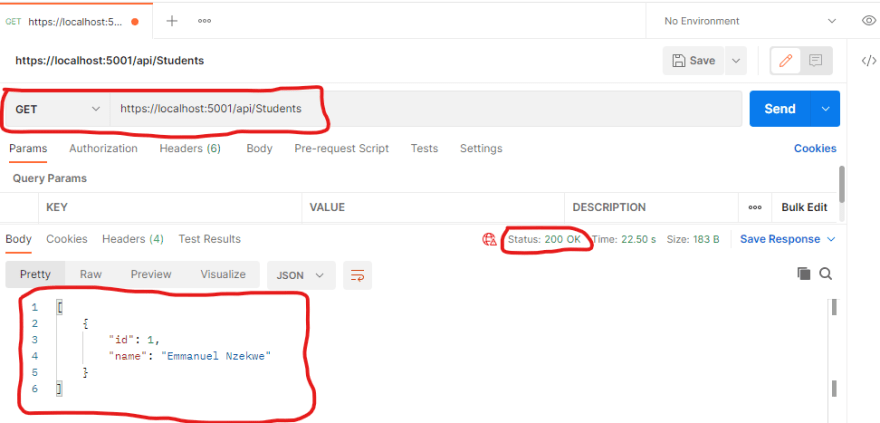
We can see the record we added earlier and a status code of 200 to indicate success.
Conclusion
By using the Repository Pattern, we are promoting a more loosely coupled approach to access our data from the database. Also, the code is cleaner and easier to maintain and reuse. Here is the source code of our project on Github.
Hope this was helpful?


Latest comments (12)
I'll note that if you want the RepositoryBase methods (Create, FindAll, etc.) to be callable when using RepositoryManager, then the IRepositoryManager members Department and Student should be the class references DepartmentRepository/StudentRepository, rather than the interface references IDepartmentRepository/IStudentRepository.
Clean. Logical. Brilliant. Pick any 3. Thanks!
What would be the best way to force others to use the repository classes and restrict them from going directly to the EF objects and DBContext?
Nicely put. But where do my business logic and calculations belong? I don't think the logics and calculation should be done either in repository or controller.
Yea, you're right. Business logic should not be placed directly into Models, Views, or even Controllers because it will reduce the re-use and maintainability of your code. The scope of this article is trivial but for none trivial applications, I'll suggest you create a business logic layer and simply call the business logic layer from your models when needed. The business logic layer will in turn call into the data access layer.
Nice one. A simplified approach.
Yea. Thanks for your review Chief
Thanks alot dear Sir
Very good article. Exposing code patterns which are better served by going generic is a mark of maturity.
Mark of maturity...lolz!
Thanks for the review dear John
Well presented. Really demystified it. Thanks for the article.
Thanks for your feedback dear friend.