
In this article we're going to have a deep dive into setting up a new monorepo using PNPM workspaces that hosts a Remix application as well as a React based library. We will learn how to run commands with PNPM, how to run them in parallel and finally we're going to add Nx for a more sophisticated task scheduling, including command caching and more.
Important: If you are already familiar with the setup and configuration of a new PNPM workspace, feel free to skip to the part where we add Nx later in the article.
Prefer a video walkthrough?
Table of contents
- Initialize a new PNPM workspace
- Setting up the Monorepo structure
- Adding a Remix application
- Create a Shared UI library
- Consuming our shared-ui package from the Remix app
- Running commands with PNPM
- Speeding up with Nx
- Installing Nx
- Running tasks with Nx
- Configure Caching
- Defining task dependencies (aka build pipeline)
- Running just what changed
- Additional features
- Conclusion
Want to follow along? Here's the Git repo:
https://github.com/nrwl/nx-recipes/tree/main/pnpm-workspace
Initialize a new PNPM workspace
To get started, let's make sure you have PNPM installed. The official docs have an installation page with detailed instructions. I also recommend using something like Volta in particular if you have to deal with multiple different versions of NPM/PNPM and node versions.
Let's create a new folder named pnpm-mono, cd into it and then run pnpm init to generate a top-level package.json. This will be the root package.json for our PNPM monorepo.
❯ mkdir pnpm-mono
❯ cd pnpm-mono
❯ pnpm init
It is probably also handy to initialize a new Git repository such that we can commit and backup things as we progress in the setup:
❯ git init
At this point let's also create a .gitignore file to immediately exclude things like node_modules and common build output folders.
# .gitignore
node_modules
dist
build
Setting up the Monorepo structure
The structure of a monorepo might vary depending on what you plan to use it for. There are generally two kinds of monorepo:
-
package centric repositories which are used for developing and publishing a cohesive set of reusable packages. This is a common setup in the open source world and can be seen in repositories such as Angular, React, Vue and many others. Those repos are characterized by most commonly having a
packagesfolder and which are then commonly published to some public registry such as NPM. - app centric repositories which are used mainly for developing applications and products. This is a common setup in companies. Such repos are characterized in having an
appsandpackagesorlibsfolder, where theappsfolder contains the buildable and deployable applications, while thepackagesorlibsfolder contains libraries that are specific to one or multiple applications that are being developed within the monorepo. You can still also publish some of these libs to a public registry.
In this article we're going to use the "app centric" approach, to demonstrate how we can have an application that consumes packages from within the monorepo.
Create an apps and packages folder within pnpm-mono:
❯ mkdir apps packages
Now let's configure PNPM to properly recognize the monorepo workspace. Basically we have to create a pnpm-workspace.yaml file at the root of the repository, defining our monorepo structure:
# pnpm-workspace.yaml
packages:
  # executable/launchable applications
  - 'apps/*'
  # all packages in subdirs of packages/ and components/
  - 'packages/*'
Adding a Remix application
We should now be ready to add our first application. For this example I picked Remix but you can really host any type of application in here, it won't really matter.
Info: We use the normal Remix installation & setup procedure here which you can find on their docs page.
Since we want to have the app within the apps folder, we need to cd into it:
❯ cd apps
❯ npx create-remix@latest
You will be asked for an app name. Let's just go with "my-remix-app" which we'll be using for the rest of this article. Obviously feel free to use a different one. In addition, the Remix setup process is also going to ask you a couple of questions that customize the exact setup. The particular options are not really relevant for our article here, so feel free to choose whatever best suits your needs.
You should have now a Remix app, within the apps/my-remix-app folder or whatever name you chose. Remix has already a package.json with corresponding scripts configured:
{
  "private": true,
  "sideEffects": false,
  "scripts": {
    "build": "remix build",
    "dev": "remix dev",
    "start": "remix-serve build"
  },
  ...
}
Usually, in a monorepo you want to run commands from the root of the repository to not have to constantly switch between folders. PNPM workspaces have a way to do that, by passing a filter argument, like:
❯ pnpm --filter <package-name> <command>
Now it happens (at the writing of this article) that Remix's default package.json doesn't have a name property defined which PNPM wants to run the package. So let's define one in the apps/my-remix-app/package.json:
{
  "name": "my-remix-app",
  "private": true,
  "sideEffects": false,
  ...
}
You should now be able to serve your Remix app in dev-mode by using:
❯ pnpm --filter my-remix-app dev

Create a Shared UI library
Now that we have our app set up, let's create a library package that can be consumed by our application.
❯ cd packages
❯ mkdir shared-ui
Next, let's create a package.json with the following content (you can also use pnpm init and adjust it):
{
  "private": true,
  "name": "shared-ui",
  "description": "Shared UI components",
  "scripts": {},
  "keywords": [],
  "author": "",
  "license": "ISC",
  "dependencies": {
  },
  "devDependencies": {
  }
}
Note, we declare it as private because we don't want to publish it to NPM or somewhere else, but rather just reference and use it locally within our workspace. I also removed the version property since it is not used.
As the technology stack I've chosen to go with React (so we can import it in Remix) and TypeScript (because it can almost be considered a standard nowadays). Let's install these dependencies from the root of the workspace:
❯ pnpm add --filter shared-ui react
❯ pnpm add --filter shared-ui typescript -D
By passing --filter shared-ui to the installation command, we install these NPM packages locally to the shared-ui library.
Info: Be aware that this might potentially cause version conflicts if the React/TypeScript version used by the library package and the consumer (e.g. our app) differs. Adopting a single version policy, where you move the packages to the root of the monoreopo, is a possible solution for that.
Our first component will be a very simple Button component. So let's create one:
// packages/shared-ui/Button.tsx
import * as React from 'react';

export function Button(props: any) {
  return <button onClick={() => props.onClick()}>{props.children}</button>;
}

export default Button;
We also want to have a public API where we export components to be used outside of our shared-ui package:
// packages/shared-ui/index.tsx
export * from './Button';
For sake of simplicity we just use the TypeScript compiler to compile our package. We could have some more sophisticated setup for bundling multiple files together etc with something like Rollup or whatever you prefer using, but that's outside the scope of this article.
To create the desired compilation output create a packages/shared-ui/tsconfig.json file with the following configuration.
{
  "compilerOptions": {
    "jsx": "react-jsx",
    "allowJs": true,
    "esModuleInterop": true,
    "allowSyntheticDefaultImports": true,
    "module": "commonjs",
    "outDir": "./dist"
  },
  "include": ["."],
  "exclude": ["dist", "node_modules", "**/*.spec.ts"]
}
In a monorepo it is good practice to extract the common config part into a higher-level config (e.g. at the root) and then extend it here in the various projects. This to avoid a lot of duplication across the various monorepo packages. For the sake of simplicity I kept it all in one place here.
As you can see the outDir points to a package-local dist folder. So we should add a main entry point in the shared-ui package's package.json:
{
  "private": true,
  "name": "shared-ui",
  "main": "dist/index.js",
}
Finally, the actual build consists of deleting some residual folders from the previous output and then invoking the TypeScript compiler (tsc). Here's the complete packages/shared-ui/package.json file:
{
  "private": true,
  "name": "shared-ui",
  "description": "Shared UI components",
  "main": "dist/index.js",
  "scripts": {
    "build": "rm -rf dist && tsc"
  },
  "keywords": [],
  "author": "",
  "license": "ISC",
  "dependencies": {
    "react": "^17.0.2"
  },
  "devDependencies": {
    "typescript": "^4.6.4"
  }
}
Use the following command to run the build from the root of the PNPM workspace:
❯ pnpm --filter shared-ui build
If the build succeeds, you should see the compiled output in the packages/shared-ui/dist folder.
Consuming our shared-ui package from the Remix app
Our shared-ui library is ready so we can use it in the Remix application hosted within the apps folder of our repository. We can either manually add the dependency to Remix's package.json or use PNPM to add it:
❯ pnpm add shared-ui --filter my-remix-app --workspace
This adds it to the dependency in the apps/my-remix-app/package.json:
{
  "name": "my-remix-app",
  "private": true,
  "sideEffects": false,
  ...
  "dependencies": {
    ...
    "shared-ui": "workspace:*"
  },
  ...
}
workspace:* denotes that the package is resolved locally in the workspace, rather than from some remote registry (such as NPM). The * simply indicates that we want to depend on the latest version of it, rather than a specific one. Using a specific version really just makes sense if you're using external NPM packages.
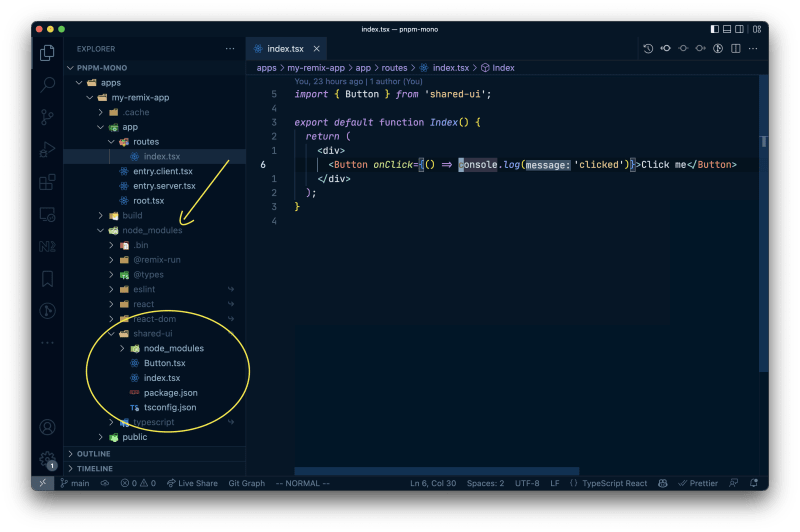
To use our Button component we now import it from some Remix route. Replace the content of apps/my-remix-app/app/routes/index.tsx with the following:
// apps/my-remix-app/app/routes/index.tsx
import { Button } from 'shared-ui';

export default function Index() {
  return (
    <div>
      <Button onClick={() => console.log('clicked')}>Click me</Button>
    </div>
  );
}
If you now run the Remix app again you should see the button being rendered.
❯ pnpm --filter my-remix-app dev
If you happen to get the following error, then it is because you need to build shared-ui first
Error: Cannot find module '/Users/juri/nrwl/content/pnpm-demos/pnpm-mono/apps/my-remix-app/node_modules/shared-ui/dist/index.js'. Please verify that the package.json has a valid "main" entry
    at tryPackage (node:internal/modules/cjs/loader:353:19)
    at Function.Module._findPath (node:internal/modules/cjs/loader:566:18)
    at Function.Module._resolveFilename (node:internal/modules/cjs/loader:919:27)
    at Function.Module._load (node:internal/modules/cjs/loader:778:27)
    at Module.require (node:internal/modules/cjs/loader:1005:19)
    at require (node:internal/modules/cjs/helpers:102:18)
    at Object.<anonymous> (/Users/juri/nrwl/content/pnpm-demos/pnpm-mono/apps/my-remix-app/app/routes/index.tsx:1:24)
    at Module._compile (node:internal/modules/cjs/loader:1105:14)
    at Object.Module._extensions..js (node:internal/modules/cjs/loader:1159:10)
    at Module.load (node:internal/modules/cjs/loader:981:32)
To build that, run
❯ pnpm --filter shared-ui build
Why? This is due to the symlinks PNPM creates in order to be able to reference and resolve local dependencies. By adding shared-ui: "workspace:*" to Remix's package.json you instruct PNPM to add a symlink to Remix's node_modules folder.
Running commands with PNPM
PNPM comes with handy features to run commands across the monorepo workspace. We have already seen how to scope commands on single packages using the --filter :
❯ pnpm --filter my-remix-app dev
You can also run a command recursively on all the packages in the workspace using the -r flag. Imagine for instance running the build for all projects.
❯ pnpm run -r build

Scope: 2 of 3 workspace projects
packages/shared-ui build$ rm -rf dist && tsc
└─ Done in 603ms
apps/my-remix-app build$ remix build
│ Building Remix app in production mode...
│ The path "shared-ui" is imported in app/routes/index.tsx but shared-ui is not listed in your package.json
│ Built in 156ms
└─ Done in 547ms
Similarly you can parallelize the run by using --parallel
❯ pnpm run --parallel -r build

Scope: 2 of 3 workspace projects
apps/my-remix-app build$ remix build
packages/shared-ui build$ rm -rf dist && tsc
apps/my-remix-app build: Building Remix app in production mode...
apps/my-remix-app build: The path "shared-ui" is imported in app/routes/index.tsx but shared-ui is not listed in your package.json dependencies. Did you forget to install it?
apps/my-remix-app build: Built in 176ms
apps/my-remix-app build: Done
packages/shared-ui build: Done
Speeding up with Nx
PNPM workspaces come with some basic facilities for running tasks on the monorepo packages, even in parallel. As the monorepo grows, you might want to have a more sophisticated approach that allows to
- run tasks on only the packages that changed
- advanced caching based on file contents to not run anything that has already been computed previously
- remote distributed caching to speed up your CI
This is exactly where Nx can help. It is optimized for monorepo scenarios and comes with an advanced task scheduling mechanism. We still rely on the package installation and package linking mechanism that PNPM workspaces provide us, but use Nx instead to run our tasks in the most efficient way.
Installing Nx
Since Nx will be used for running operations across the entire monorepo workspace we're going to install it at the root level package.json.
❯ pnpm add nx -D -w
That's it.
Running tasks with Nx
Nx uses the following form to run your commands:
❯ npx nx <target> <project>
target is the NPM script in this specific case you want to execute.
Let's try to run the build for our shared-ui package using the following command:
❯ npx nx build shared-ui
This produces the following output
> nx run shared-ui:build


> shared-ui@ build /Users/juri/nrwl/content/pnpm-demos/pnpm-mono/packages/shared-ui
> rm -rf dist && tsc


 >  NX   Successfully ran target build for project shared-ui (1s)
Nx automatically finds shared-ui and runs the build script defined in packages/shared-ui/package.json.
Similarly, to launch our Remix app, run npx nx dev my-remix-app.
We can also run commands in parallel across the projects with:
❯ npx nx run-many --target=build --all

    ✔  nx run my-remix-app:build (1s)
    ✔  nx run shared-ui:build (1s)

 >  NX   Successfully ran target build for 2 projects (1s)
Or selectively specify projects with
❯ npx nx run-many --target=build --projects=my-remix-app,shared-ui

    ✔  nx run my-remix-app:build (1s)
    ✔  nx run shared-ui:build (1s)

 >  NX   Successfully ran target build for 2 projects (1s)
Note I'm prefixing the commands with
npxwhich runs the Nx executable in thenode_modulesfolder. In this way I don't have to installnxglobally. If you prefer doing that, feel free to do so.
Configure Caching
One of the main benefits of adding Nx to our PNPM workspace is speed via caching. Computation caching is a feature where different inputs (source files, env variables, command flags, etc.) are collected and a hash computed & stored in a local folder. Next time you run the command again, Nx looks for a matching hash, and if it finds one it just restores it. This includes restoring the terminal output as well as build artifacts (e.g. JS files in dist folders).
Not all operations are cacheable, only side-effect free ones are. For example, if you run an operation with the same inputs, it reliably always has to produce the same output. If as part of that operation you call some API for instance, it wouldn't be cacheable because the result of that API might vary given the same input parameters.
In order to enable caching, let's configure our cacheable operations. To do that we create an nx.json at the root of our workspace with the following content
// nx.json
{
  "tasksRunnerOptions": {
    "default": {
      "runner": "nx/tasks-runners/default",
      "options": {
        "cacheableOperations": ["build", "test"]
      }
    }
  }
}
Note the cacheableOperations array where we specify build and test . You can add more such as linting.
Having enabled this, if we now run our Remix app build the first time it is executed just as normal and we'll see it takes roughly 1s.
❯ npx nx build my-remix-app

> nx run my-remix-app:build


> my-remix-app@ build /Users/juri/nrwl/content/pnpm-demos/pnpm-mono/apps/my-remix-app
> remix build

Building Remix app in production mode...
The path "shared-ui" is imported in app/routes/index.tsx but shared-ui is not listed in your package.json dependencies. Did you forget to install it?
Built in 163ms


 >  NX   Successfully ran target build for project my-remix-app (1s)
If you re-run the same command, it will now be pulled out of the cache and take only a few milliseconds.
❯ npx nx build my-remix-app

> nx run my-remix-app:build  [existing outputs match the cache, left as is]


> my-remix-app@ build /Users/juri/nrwl/content/pnpm-demos/pnpm-mono/apps/my-remix-app
> remix build

Building Remix app in production mode...
The path "shared-ui" is imported in app/routes/index.tsx but shared-ui is not listed in your package.json dependencies. Did you forget to install it?
Built in 163ms


 >  NX   Successfully ran target build for project my-remix-app (9ms)

Nx read the output from the cache instead of running the command for 1 out of 1 tasks.
You can also see that from the terminal output mentioning "existing outputs match the cache, left as is" as well as at the end "Nx read the output from the cache instead of running the command for 1 out of 1 tasks."
Having caching in place can drastically improve command execution times. It also gets even more useful if the cache is remotely distributed so that it can be shared with CI as well as other developer machines. In the case of Nx this can be done by enabling Nx Cloud, which comes with 500 hours saved/month for free (no credit card required) and unlimited hours for open source projects.
Fine-tuning the caching
By default the caching mechanism takes all project-level files as an input. We might want to distinguish though which files are being considered based on the target that we execute. Example: you might not want to invalidate the cache for the build task if only spec files for unit testing got changed.
To illustrate this on our example, run npx nx build my-remix-app twice, such that the caching gets activated. Next, change the README.md of the Remix project (apps/my-remix-app/README.md). If you re-run the Remix app build the cache will be invalidated due to the change of the README file. This might definitely not be a desirable operation.
We can fine-tune the caching by adding a targetDefaults node in the nx.json and define that the default input for the build target should exclude *.md files.
{
  "tasksRunnerOptions": {
    "default": {
      "runner": "nx/tasks-runners/default",
      "options": {
        "cacheableOperations": ["build", "test"]
      }
    }
  },
  "targetDefaults": {
    "build": {
      "inputs": ["!{projectRoot}/**/*.md"]
    }
  }
}
With this change, MD files would not be considered as part of the cache input whenever you run the build task.
Note that all path globs are relative to the root of the workspace. This avoids confusion as the inputs could also be defined at the project level in the
package.json(more here). You can use the interpolation variables{projectRoot}and{workspaceRoot}do distinguish whether the path should be targeting the project specific files or workspace level files.
Reusing Cache Input Globs
You can also go a step further as you might re-use this glob for excluding markdown files also for a hypothetical test target. You can do so by extracting the glob into a namedInputs property:
{
  "tasksRunnerOptions": {
      ...
  },
  "namedInputs": {
    "noMarkdown": ["!{projectRoot}/**/*.md"]
  },
  "targetDefaults": {
    "build": {
      "inputs": ["noMarkdown", "^noMarkdown"]
    },
    "test": {
      "inputs": ["noMarkdown", "^noMarkdown"]
    }
  }
}
By adding ^ in front of the namedInput we indicate that this should also apply for changes in any dependencies of the project.
Defining task dependencies (aka build pipeline)
We have seen previously that when running our Remix dev server, but not having compiled the dependent shared-ui package first, we got an error when running our Remix app.
Error: Cannot find module '/Users/juri/nrwl/content/pnpm-demos/pnpm-mono/apps/my-remix-app/node_modules/shared-ui/dist/index.js'. Please verify that the package.json has a valid "main" entry
    at tryPackage (node:internal/modules/cjs/loader:353:19)
    at Function.Module._findPath (node:internal/modules/cjs/loader:566:18)
    at Function.Module._resolveFilename (node:internal/modules/cjs/loader:919:27)
    at Function.Module._load (node:internal/modules/cjs/loader:778:27)
    at Module.require (node:internal/modules/cjs/loader:1005:19)
    at require (node:internal/modules/cjs/helpers:102:18)
    at Object.<anonymous> (/Users/juri/nrwl/content/pnpm-demos/pnpm-mono/apps/my-remix-app/app/routes/index.tsx:1:24)
    at Module._compile (node:internal/modules/cjs/loader:1105:14)
    at Object.Module._extensions..js (node:internal/modules/cjs/loader:1159:10)
    at Module.load (node:internal/modules/cjs/loader:981:32)
To fix it, we had to manually build shared-ui first. Normally you want to avoid this, which is exactly why Nx comes with a targetDefaults definition (often also denoted as the "build pipeline").
We can define such task dependencies in nx.json at the root of the workspace in the targetDefaults property.
As the first dependency we want to define that whenever we run the build target on a project, all the build targets of its dependent projects should be executed first. We can express that by adding an additional dependsOn property to the build task definition:
{
  "tasksRunnerOptions": {
      ...
  },
  ...
  "targetDefaults": {
    "build": {
      ...
      "dependsOn": ["^build"]
    }
  },
}
Similar as we have seen in the definition of the inputs, the ^ here denotes that the target should be run on all dependent projects. If you remove the ^, then the target would be invoked on the same project. That can be useful if you have a prebuild step that always needs to be invoked.
Next, we also want to define a targetDefault for our Remix dev command, such that first the build on all dependent packages (e.g our shared-ui) is run.
{
  "tasksRunnerOptions": {
    ...
  },
  ...
  "targetDefaults": {
    "build": {
      ...
      "dependsOn": ["^build"]
    },
    "dev": {
      "dependsOn": ["^build"]
    }
  }
}
Here's the entire nx.json file again as a reference point:
{
  "tasksRunnerOptions": {
    "default": {
      "runner": "nx/tasks-runners/default",
      "options": {
        "cacheableOperations": ["build", "test"]
      }
    }
  },
  "namedInputs": {
    "noMarkdown": ["!{projectRoot}/**/*.md"]
  },
  "targetDefaults": {
    "build": {
      "inputs": ["noMarkdown", "^noMarkdown"],
      "dependsOn": ["^build"]
    },
    "dev": {
      "dependsOn": ["^build"]
    }
  }
}
If we now run npx nx build my-remix-app we can see that Nx first runs tasks on dependent projects, and only then runs the command we invoked.

Running just what changed
In addition to providing caching, Nx also allows to just run what changed in a given branch with respect to a base branch by using the so-called "affected command".
❯ npx nx affected:<target>
You can use any target you have defined in your workspace. For example
npx nx affected:buildnpx nx affected:testnpx nx affected:lintnpx nx affected:publish
How does this work? Nx builds a project graph based on the structure and dependencies among packages in your monorepo workspace. Let's assume the following hypothetical graph:

Whenever we run the affected commands on a branch, Nx compares all the commits and relative changes with the base branch. By default that is main, but you can fine-tune that in the nx.json file:
{
    "affected": {
        "defaultBase": "main"
    }
}
If lib2 gets changed in our feature branch, running tests against the workspace using affected:test would only run tests for lib2 and appB.

Be aware however, if we run affected:build and we defined a dependency in our nx.json indicating that dependent projects need to be built first as well (see section "Defining task dependencies"), then affected:build would build
lib3lib2appB
It would not build lib1 or appA though.
Additional features
Besides speed and task scheduling improvements, we also get some additional features by adding Nx to our PNPM workspace. Let's explore some:
Want to automate the creation of packages?
Once you have a good setup for a package, you obviously want to replicate that as you create new ones. The usual approach: copy & paste and then remove all stuff that's not needed.
That's tedious and potentially error prone. Nx has a concept of "generators", basically code scaffolding which allows you to generate new packages in the monorepo rather than copy & pasting old ones.
If that sounds interesting, here's a walkthrough:
Dynamic Terminal Output
Running tasks in parallel with PNPM results in quite a messy terminal output. The logs are hard to parse as the messages from the different commands being executed in parallel are interleaved.
❯ pnpm run --parallel -r build

Scope: 2 of 3 workspace projects
apps/my-remix-app build$ remix build
packages/shared-ui build$ rm -rf dist && tsc
apps/my-remix-app build: Building Remix app in production mode...
apps/my-remix-app build: The path "shared-ui" is imported in app/routes/index.tsx but shared-ui is not listed in your package.json dependencies. Did you forget to install it?
apps/my-remix-app build: Built in 176ms
apps/my-remix-app build: Done
packages/shared-ui build: Done
When using Nx to run tasks you get a dynamic terminal that shows just what is necessary and most relevant to the current command that has been executed. Running the same parallel build task results in the following output when using Nx:

Project Graph Visualization
❯ npx nx graph
This launches an interactive visualization of the workspace's project graph with some advanced capabilities of filtering, debugging your workspace structure and more.

As a side-note: you can run the project graph on any PNPM workspace, even if you don't have Nx installed. Running
npx nx graphshould work.
Conclusion
We did it! Here are some of the things we covered:
- how to setup a PNPM based monorepo workspace
- create a Remix and shared React library within a PNPM monorepoe
- how to run different commands with PNPM
- how to add Nx & incrementally adopt it in the monorepo
- benefits and features that come with adding Nx to a PNPM workspace
You can find an example of such setup on the Nx Recipe GitHub repository:
https://github.com/nrwl/nx-recipes/tree/main/pnpm-workspace
Learn more
- 🧠 Nx Docs
- 👩💻 Nx GitHub
- 💬 Nrwl Community Slack
- 📹 Nrwl Youtube Channel
- 🥚 Free Egghead course
- 🧐 Need help with Angular, React or Nx? Talk to us 😃
Also, if you liked this, click the ❤️ and make sure to follow Juri and Nx on Twitter for more!


Latest comments (6)
Great article, glad it still works in 2024
do you see any extra benefits when pnpm used along with Nx ?, I m asking because we just have npm with Nx
This was a nice read, and I definetly try it out in deep in the next days.
One think is irritating: Why do you use
npxwhen you usedpnpm? (I see that more and more in posts related to pnpm)There are two other options how you can run this with pnpm:
They are different, but both should work fine. As nx is installed locally you can run it with
pnpm exec nx .... All of the mentionednpxcommands work fine with this.To run tasks in dependency order. For example, pnpm does not know which workspaces have to be built before other workspaces. Order can matter when one workspace depends on the outputs generated by another, such as
.d.tsfiles, web bundles, or generated schema interfaces.I meant commands like:
npx nx affected:<target>Could be:
pnpm exec nx affected:<target>Running that should give you the same result, and nx is doing all the other parts, right? I don't see why in these cases two package managers should be used. Maybe I missed something?
You are right on the dependency order with pnpm, but isn't that nx job?
Oh, sorry. I read that as "why use nx rather than pnpm?" I too find it easier to type
npxrather thanpnpm exec.