
All React components must have a render method, which returns some element that will be inserted into the DOM. Indeed, ReactDOM.render is called on a pure HTML element, which in most applications use the <div> tag with id root as its entry point.
That's why when we do this:
class sampleComponent extends React.Component {
  render() {
    return (
      <h1>Hello World!</h1>
    );
  }
}

ReactDOM.render(
  <sampleComponent />,
  document.getElementById('root')
);
The <h1> element will be added into the DOM element with id root:
<div id='root'>
  <h1>Hello World</h1>
</div>
Even though you can't see it in the browser, there's a fraction of time before React component render or insert this <h1> element into the browser and after it, and in that small fraction of time, you can run special functions designed to exploit that time.
This is what lifecycle functions in a React component do: it executes at a certain time before or after a component is rendered to the browser.
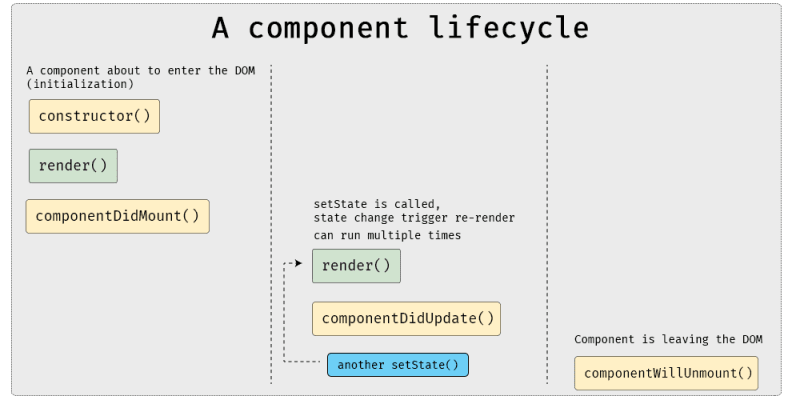
When a component is first inserted into the DOM (or the root element), it will run the constructor method. At this point, nothing is happening in the browser.
Then React will run the component render method, inserting the JSX you write into the DOM. After render is finished, it will immediately run the componentDidMount function.
When you call on setState, the render function will be called again after state is changed, with componentDidUpdate function immediately run after it.
componentWillUnmount function will run before the component rendered element is removed from the DOM.
The theory might seem complex, but as you will see in this post, lifecycle functions are situational code, and they are used only for specific use cases.
The constructor function
The constructor function is run on the initialization of a React component. It is widely used as the place where state is initialized:
class sampleComponent extends React.Component {
  constructor(props) {
    super(props);
    this.state = {
      number : 0
    }
  }
}
The function super will call on the parent constructor (specifically, the React.Component constructor) so that you can call on this:
class sampleComponent extends React.Component {
  constructor(props) {
    // this will cause error
    this.state = {
      number : 0
    }
    super(props);
  }
}
The props are being passed into super so that you can call on this.props on the constructor. If you're not using props in the constructor at all, you can omit it.
You might notice that on the previous chapters, you can also initiate state outside of the constructor:
class sampleComponent extends React.Component {
  state = {
    number: 0
  }
}
Both are valid state declarations, but the constructor style is widely adopted as the conventional style to class components, so you will find most React code use it.
The bottom line for constructor function — initialize your state there.
render function
You have seen this function in previous chapters, so it must be familiar to you. The render function is used to write the actual JSX elements, which are returned to React and hooked into the DOM tree.
Before returning JSX, you can write regular JavaScript syntax for operation such as getting state value, and embed it into the JSX:
render() {
  const { name, role } = this.state;
  return (
    <div>My name is {name} and I'm a {role}</div>
  )
}
The componentDidMount function
The most common use of componentDidMount function is to load data from backend services or API. Because componentDidMount is called after render is finished, it ensures that whatever component manipulation you do next, like setState from fetched data, will actually update state from its initial value.
A data request to backend services might resolve faster than the component is inserted into the DOM, and if it did, you will do a setState faster than the render method finished. That will cause React to give you a warning. The most common use of componentDidMount looks like this:
class sampleComponent extends React.Component {

  componentDidMount() {
    this.fetchData().then(response => {
      this.setState({
        data: response.data
      });
    });
  }

  fetchData = () => {
    // do a fetch here and return something
  }
}
But componentDidMount is limited to running only once in a component lifecycle. To address this limitation, let's learn about the next lifecycle function.
The componentDidUpdate function
Since componentDidMount is run only once in a component lifetime, it can't be used to fetch data in response to state change. Enter componentDidUpdate function. This function is always run in response to changes in the component, remember the diagram again:

An easy example would be to log the new state after a re-render.
class SampleDidUpdate extends React.Component {
  constructor(props) {
    super(props);
    this.state = {
      number: 0
    };
  }

  incrementState = () => {
    const { number } = this.state;
    this.setState({
      number: number + 1
    });
  };

  decrementState = () => {
    const { number } = this.state;
    this.setState({
      number: number - 1
    });
  };

  componentDidMount() {
    const { number } = this.state;
    console.log(`The current number is ${number}`);
  }

  componentDidUpdate() {
    const { number } = this.state;
    console.log(`The current number is ${number}`);
  }

  render() {
    const { number } = this.state;
    return (
      <>
        <div> The current number is {number}</div>
        <button onClick={this.incrementState}>Add number</button>
        <button onClick={this.decrementState}>Subtract number</button>
      </>
    );
  }
}
A demo is available here. Notice how didMount and didUpdate is identical in everything but name. Since user can change the keyword after the component did mount into the DOM, subsequent request won't be run by componentDidMount function. Instead, componentDidUpdate will "react" in response to the changes after render function is finished.
The componentWillUnmount function
The final function componentWillUnmount will run when the component is about to be removed from the DOM. This is used to cleanup things that would be left behind by the component.
To try out this function, let's create two child component and one parent component.
class ChildComponentOne extends React.Component {
  componentWillUnmount() {
    console.log("Component One will be removed");
  }

  render() {
    return <div>Component One</div>;
  }
}

class ChildComponentTwo extends React.Component {
  componentWillUnmount() {
    console.log("Component Two will be removed");
  }

  render() {
    return <div>Component Two</div>;
  }
}
This child components will do a simple div render with componentWillUnmount function that logs a text into the console. Then the parent component will render one of them based on the current state it's in.
class ParentComponent extends React.Component {
  constructor(props) {
    super(props);
    this.state = {
      number: 0
    };
  }

  switchState = () => {
    const { number } = this.state;
    this.setState({
      number: number === 0 ? 1 : 0
    });
  };

  render() {
    const { number } = this.state;
    let component = number ? <ChildComponentOne /> : <ChildComponentTwo />;
    return (
      <>
        {component}
        <button onClick={this.switchState}>Switch</button>
      </>
    );
  }
}
When you click on the Switch button, the component that will be removed from the DOM will log a message, then leave and be replaced with the new component. You can try the Code Sandbox here.
When to use it? It's actually very situational, and the best use of componentWillUnmount is to shut down some external service listener your component is subscribed into.
Conclusion
React's lifecycle methods are used for running codes that needs to be automatically run when the component is created, added, and removed from the DOM.
The lifecycle methods bring more control over what happens at each specific time during your component lifetime, from its creation to its destruction, allowing you to create dynamic applications in the process.
Level up your React skill today!
Get my latest book and build FOUR projects using React. You get 40% off with my Black Friday deal! Grap a copy today!


Top comments (2)
All this is the old react style, why not explaining it with the new hooks? Do you think it's useful to keep writing class components instead of function components nowadays? This is like SUPER old.
Man, we are in 2020, stop joking, and use hooks!