
Hooks are a new addition in React 16.8 which enable us to use state and other React features without writing a class.
“I can build a fully functional app without classes?” I hear you ask. Yes, you can! And in this tutorial, I will show you how.
While some tutorials will focus on hooks in isolation with “made up” examples, in this tutorial, I want to show you how to build a real-world app.
In the end, you’ll have something like this:

As you follow along, you’ll learn how to use the newly-introduced useState and useEffect hooks, which allow us to manage state and lifecycle functions more cleanly.
Of course, if you’d prefer to jump straight into the code, you can see the complete repository on GitHub.
CometChat at a glance
Rather than build our own chat back-end, we will be utilizing CometChat’s sandbox account.
In a nutshell, CometChat is an API which enables us to build communication features like real-time chat with ease. In our case, we will utilize the npm module to connect and begin transmitting messages in real-time.
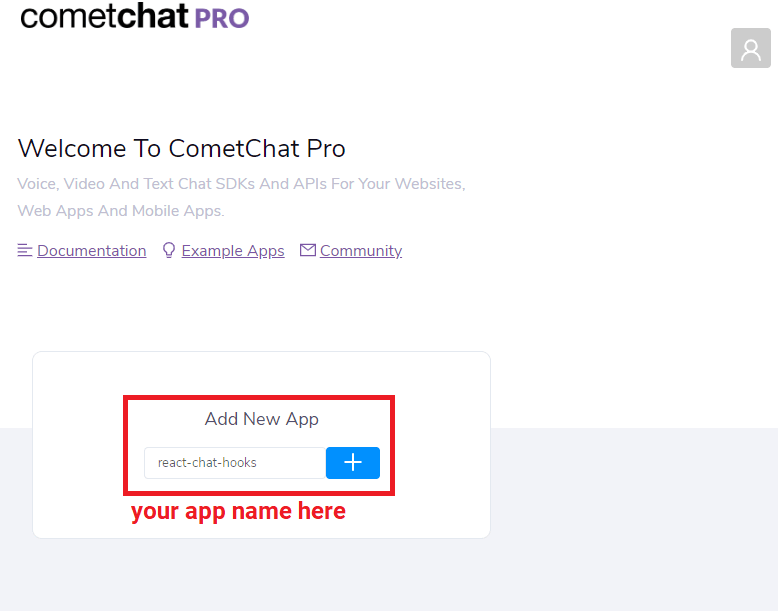
With all of that said, before connecting to CometChat, we must first create a CometChat app (please signup for a forever free CometChat account to begin creating the app).
Now, head to the dashboard and enter an app name – I called mine “react-chat-hooks”. Click + to create your app:
Once created, drill into your newly-created app and click API Keys. From here, copy your automatically-generated authOnly key :

We’ll need this in the next step.
Setting up React
With our CometChat app in place, open your command-line and initialise React with npx and create-react-app:
npx create-react-app cometchat-react-hooks
Once create-react-app has finished spinning, open the newly-created folder and install the following modules:
cd cometchat-react-hooks
npm install @cometchat-pro/chat bootstrap react-md-spinner react-notifications
We’ll need these dependencies to complete our app.
While we’re here, we should also remove all files inside the src directory:
rm src
Sometimes this boilerplate is useful, but today I am keen for us to start from scratch.
And so, in the spirit of starting from scratch, create a new file named src/config.js file and fill in your CometChat credentials:
// src/config.js

const config = {
  appID: '{Your CometChat Pro App ID here}',
  apiKey: '{Your CometChat Pro Api Key here}',
};

export default config;
Through this file, we can conveniently access our credentials globally.
Next, write a new src/index.js file:
import React from 'react';
import ReactDOM from 'react-dom';
import {CometChat} from '@cometchat-pro/chat';
import App from './components/App';
import config from './config';

CometChat.init(config.appID);

ReactDOM.render(, document.getElementById('root'));
This is the entry-point for our React app. When loaded, we first initialize CometChat before rendering our App component, which we will define in a moment.
Setting up our components
Our application will have three noteworthy components namely, App, Login, and Chat.
To house our components, create a nifty folder named components and within it, the components themselves:
mkdir components && cd components
touch App.js Login.js Chat.js
App.js:
import React from 'react';

const App = () => {
  return (
    <div> This is the App component</div>
  );
};
export default App;
Login.js:
import React from 'react';

const Login = () => {
  return (
    <div> This is the Login component</div>
  );
};
export default App;
Chat.js
import React from 'react';

const Chat = () => {
  return (
    <div> This is the Chat component</div>
  );
};
export default App;
If you want, you can run the app with npm start and observe the text “This is the App component” text.
Of course, this is merely a placeholder. Building the App component is the subject of our next section.
Creating the App Component
Alright, time to get serious about hooks.
As we flesh out the App component, we’ll use functional components and hooks where we might have traditionally relied on classes.
To start, replace App.js with:
import React, {useState} from 'react';
import 'bootstrap/dist/css/bootstrap.css';
import 'react-notifications/lib/notifications.css';
import './App.css';
import {NotificationContainer} from 'react-notifications';
import Login from './Login';
import Chat from './Chat';

const App = () => {
  const [user, setUser] = useState(null);
  const renderApp = () => {
    // Render Chat component when user state is not null
    if (user) {
      return <Chat user={user} />;
    } else {
      return <Login setUser={setUser} />;
    }
  };
  return (
    <div className='container'>

      {renderApp()}
    </div>
  );
};
export default App;
I recommend you go through the code for a second to see how much you understand. I expect it might look familiar if you’re comortable with React, but what about the useState hook?
As you can see, we first import the newly-introduced useState hook, which is a function:
import React, {useState} from 'react';
useState can be used to create a state property.
To give you an idea, before the useState hook, you might have written something like:
this.state = { user: null };

setState({ user: { name: "Joe" }})
With hooks, the (more or less) equivalent code looks like:
const [user, setUser] = useState(null);

setUser({ user: { name: "Joe" }})
An important difference here is that when working with this.state and setState, you work with the entire state object. With the useState hook, you work with an individual state property. This often leads to cleaner code.
useState takes one argument which is the initial state and the promptly returns two values namely, the same initial state (in this case, user) and a function which can be used to update the state (in this case, setUser). Here, we pass the initial state null but any data type is fine.
If that all sounds easy enough, it may as well be!
There’s no need to over-think useState because it is just a different interface for updating state – a fundamental concept I am sure you’re familiar with.
With our initial state in place, from renderApp we can conditionally render Chat or Login depending on whether the user has logged in (in other words, if user has been set):
const renderApp = () => {
  // Render Chat component when user state is not null
  if (user) {
    return ;
  } else {
    return ;
  }
};
renderApp is called from the render function where we also render our NotifcationContainer.
If you’re sharp, you might have noticed we imported a CSS file named App.css but haven’t actually created it yet. Let’s do that next.
Create a new file named App.css:
.container {
  margin-top: 5%;
  margin-bottom: 5%;
}

.login-form {
  padding: 5%;
  box-shadow: 0 5px 8px 0 rgba(0, 0, 0, 0.2), 0 9px 26px 0 rgba(0, 0, 0, 0.19);
}

.login-form h3 {
  text-align: center;
  color: #333;
}

.login-container form {
  padding: 10%;
}

.message {
  overflow: hidden;
}

.balon1 {
  float: right;
  background: #35cce6;
  border-radius: 10px;
}

.balon2 {
  float: left;
  background: #f4f7f9;
  border-radius: 10px;
}
Creating the Login Component
As a reminder, our login component will look like this:
To follow along, replace Login.js with:
import React, {useState} from 'react';
import {NotificationManager} from 'react-notifications';
import {CometChat} from '@cometchat-pro/chat';
import config from '../config';

const Login = props => {
  const [uidValue, setUidValue] = useState('');
  const [isSubmitting, setIsSubmitting] = useState(false);

  return (
    <div className='row'>
      <div className='col-md-6 login-form mx-auto'>
        <h3>Login to Awesome Chat</h3>
        <form className='mt-5' onSubmit={handleSubmit}>
          <div className='form-group'>
            <input
              type='text'
              name='username'
              className='form-control'
              placeholder='Your Username'
              value={uidValue}
              onChange={event => setUidValue(event.target.value)}
            />
          </div>
          <div className='form-group'>
            <input
              type='submit'
              className='btn btn-primary btn-block'
              value={`${isSubmitting ? 'Loading...' : 'Login'}`}
              disabled={isSubmitting}
            />
          </div>
        </form>
      </div>
    </div>
  );
};

export default Login;
Here, we utilize useState to create two state properties: uidValue and isSubmitting.
Prior to hooks, we might have written something like:
this.setState({
  uidValue: '',
  isSubmitting: false
})
However, that would have required a class. Here, we use a functional component – neat!
In the same function (before the return statement), create a handleSubmit function to be called when the form is submitted:
const handleSubmit = event => {
  event.preventDefault();
  setIsSubmitting(true);
  CometChat.login(uidValue, config.apiKey).then(
    User => {
      NotificationManager.success('You are now logged in', 'Login Success');
      console.log('Login Successful:', {User});
      props.setUser(User);
    },
    error => {
      NotificationManager.error('Please try again', 'Login Failed');
      console.log('Login failed with exception:', {error});
      setIsSubmitting(false);
    }
  );
};
Here, we utilise the setIsSubmitting function returned by useState. Once set, the form will be disabled.
We then call CometChat.login to authenticate the user utilizing our key. In a production app, CometChat recommends that you perform your own authentication logic.
If the login is successful, we call props.setUser.
Ultimately, props.setUser updates the value of user in our App component and – as is to be expected when you update state in React – the app is re-rendered. This time, user will be truthy and so, the App.renderApp function we inspected earlier will render the Chat component.
Creating the Chat Component
Our Chat component has a lot of responsibility. In fact, it is the most important component in our app!
From the Chat component, the user needs to:
- Choose a friend with which to chat
- See their recent message history
- Send new messages
- Receive responses in real-time
As you might imagine, this will require us to handle a lot of state. I, for one, cannot think of a better place to practice our new-found knowledge of the useState hook! But as mentioned in my introduction, useState is just one hook we will be looking at today. In this section, we will also explore the useEffect hook.
I can tell you now, useEffect replaces the componentDidMount, componentDidUpdateand componentWillUnmount lifecycle functions you have likely come to recognise.
With that in mind, useEffect is appropriate to set up listeners, fetch initial data and likewise, remove said listeners before unmounting the component.
useEffect is a little more nuanced than useState but when completed with an example, I am confident you will understand it.
useEffect takes two arguments namely, a function to execute (for example, a function to fetch initial data) and an optional array of state properties to observe. If any property referenced in this array is updated, the function argument is executed again. If an empty array is passed, you can be sure function argument will be run just once in the entire component lifetime.
Let’s start with mapping out the necessary state. This component will have 6 state properties:
-
friendsto save the list of users available for chat -
selectedFriend— to save the currently selected friend for chatting -
chat— to save the array of chat messages being sent and received between friends -
chatIsLoading— to indicate when the app is fetching previous chats from CometChat server -
friendIsLoading— to indicate when the app is fetching all friends available for chat -
message— for our message input controlled component
Perhaps the best way to master useEffect is to see it in action. Remember to import useEffect and update Chat.js :
import React, {useState, useEffect} from 'react';
import MDSpinner from 'react-md-spinner';
import {CometChat} from '@cometchat-pro/chat';

const MESSAGE_LISTENER_KEY = 'listener-key';
const limit = 30;

const Chat = ({user}) => {
  const [friends, setFriends] = useState([]);
  const [selectedFriend, setSelectedFriend] = useState(null);
  const [chat, setChat] = useState([]);
  const [chatIsLoading, setChatIsLoading] = useState(false);
  const [friendisLoading, setFriendisLoading] = useState(true);
  const [message, setMessage] = useState('');
};

export default Chat;
When our Chat component has mounted, we must first fetch users available to chat. To do this, we can utilise useEffect.
Within the Chat stateless component, call useEffect like this:
useEffect(() => {
  // this useEffect will fetch all users available for chat
  // only run on mount

  let usersRequest = new CometChat.UsersRequestBuilder()
    .setLimit(limit)
    .build();
    usersRequest.fetchNext().then(
      userList => {
        console.log('User list received:', userList);
        setFriends(userList);
        setFriendisLoading(false);
      },
      error => {
        console.log('User list fetching failed with error:', error);
      }
    );

    return () => {
      CometChat.removeMessageListener(MESSAGE_LISTENER_KEY);
      CometChat.logout();
    };

}, []);
As mentioned, when called with an empty array, useEffect will be called only once when the component is initially mounted.
What I didn’t mention yet is that you can return a function from useEffect to be called automatically by React when the component is unmounted. In other words, this is your componentWillUnmount function.
In our componentWillUnmount -equivalent function, we call removeMessageListener and logout.
Next, let’s write the return statement of Chat component:
return (
  <div className='container-fluid'>
    <div className='row'>
      <div className='col-md-2' />
      <div className='col-md-8 h-100pr border rounded'>
        <div className='row'>
          <div className='col-lg-4 col-xs-12 bg-light' style={{height: 658}}>
            <div className='row p-3'>
              <h2>Friend List</h2>
            </div>
            <div
              className='row ml-0 mr-0 h-75 bg-white border rounded'
              style={{height: '100%', overflow: 'auto'}}>
              <FriendList
                friends={friends}
                friendisLoading={friendisLoading}
                selectedFriend={selectedFriend}
                selectFriend={selectFriend}
              />
            </div>
          </div>
          <div className='col-lg-8 col-xs-12 bg-light' style={{height: 658}}>
            <div className='row p-3 bg-white'>
              <h2>Who you gonna chat with?</h2>
            </div>
            <div
              className='row pt-5 bg-white'
              style={{height: 530, overflow: 'auto'}}>
              <ChatBox
                chat={chat}
                chatIsLoading={chatIsLoading}
                user={user}
              />
            </div>
            <div className='row bg-light' style={{bottom: 0, width: '100%'}}>
              <form className='row m-0 p-0 w-100' onSubmit={handleSubmit}>
                <div className='col-9 m-0 p-1'>
                  <input
                    id='text'
                    className='mw-100 border rounded form-control'
                    type='text'
                    onChange={event => {
                      setMessage(event.target.value);
                    }}
                    value={message}
                    placeholder='Type a message...'
                  />
                </div>
                <div className='col-3 m-0 p-1'>
                  <button
                    className='btn btn-outline-secondary rounded border w-100'
                    title='Send'
                    style={{paddingRight: 16}}>
                    Send
                  </button>
                </div>
              </form>
            </div>
          </div>
        </div>
      </div>
    </div>
  </div>
);
If this looks like a lot of code, well, it is! But all we’re doing here is rendering our friends list (FriendsList) and chat box (ChatBox), styled with Bootstrap.
We haven’t actually defined our FriendsList or ChatBox components so let’s do that now.
In the same file, create components called ChatBox and FriendsList:
const ChatBox = props => {
  const {chat, chatIsLoading, user} = props;
  if (chatIsLoading) {
    return (
      <div className='col-xl-12 my-auto text-center'>
        <MDSpinner size='72' />
      </div>
    );
  } else {
    return (
      <div className='col-xl-12'>
        {chat.map(chat => (
          <div key={chat.id} className='message'>
            <div
              className={`${
                chat.receiver !== user.uid ? 'balon1' : 'balon2'
              } p-3 m-1`}>
              {chat.text}
            </div>
          </div>
        ))}
        <div id='ccChatBoxEnd' />
      </div>
    );
  }
};

const FriendList = props => {
  const {friends, friendisLoading, selectedFriend} = props;
  if (friendisLoading) {
    return (
      <div className='col-xl-12 my-auto text-center'>
        <MDSpinner size='72' />
      </div>
    );
  } else {
    return (
      <ul className='list-group list-group-flush w-100'>
        {friends.map(friend => (
          <li
            key={friend.uid}
            c;assName={`list-group-item ${
              friend.uid === selectedFriend ? 'active' : ''
            }`}
            onClick={() => props.selectFriend(friend.uid)}>
            {friend.name}
          </li>
        ))}
      </ul>
    );
  }
};
With our FriendsList and ChatBox components in place, our UI is more or less complete but we still need a way to send and receive messages in real-time.
Creating selectFriend function
In the above FriendsList component, we referenced a function called selectFriend to be called when the user clicks on one of the names in the list, but we haven’t defined it yet.
We can write this function in the Chat component (before the return) and pass it down FriendList as a prop:
const selectFriend = uid => {
  setSelectedFriend(uid);
  setChat([]);
  setChatIsLoading(true);
};
When a friend is selected, we update our state:
-
selectedFriendis updated with the uid of the new friend. -
chatis set to empty again, so messages from previous friend aren’t mixed up with the new one. -
chatIsLoadingis set to true, so that a spinner will replace the empty chat box
Running useEffect on selectedFriend state update
When a new conversion is selected, we need to initialise the conversion. This means fetching old messages and subscribing to new ones in real-time.
To do this, we utilise use useEffect. In the Chat component (and, like usual, before the return):
useEffect(() => {
  // will run when selectedFriend variable value is updated
  // fetch previous messages, remove listener if any
  // create new listener for incoming message

  if (selectedFriend) {
    let messagesRequest = new CometChat.MessagesRequestBuilder()
      .setUID(selectedFriend)
      .setLimit(limit)
      .build();

    messagesRequest.fetchPrevious().then(
      messages => {
        setChat(messages);
        setChatIsLoading(false);
        scrollToBottom();
      },
      error => {
        console.log('Message fetching failed with error:', error);
      }
    );

    CometChat.removeMessageListener(MESSAGE_LISTENER_KEY);

    CometChat.addMessageListener(
      MESSAGE_LISTENER_KEY,
      new CometChat.MessageListener({
        onTextMessageReceived: message => {
          console.log('Incoming Message Log', {message});
          if (selectedFriend === message.sender.uid) {
            setChat(prevState => [...prevState, message]);
          }
        },
      })
    );
  }
}, [selectedFriend]);
By passing the [selectedFriend] array into useEffectsecond argument, we ensure that the function is executed each time selectedFriend is updated. This is very elegant.
Since we have a listener that listens for incoming message and update the chat state when the new message is from the currently selectedFriend, we need to add a new message listener that takes the new value from selectedFriend in its if statement. We will also call removeMessageListener to remove any unused listener and avoid memory leaks.
Sending new message handler
To send new messages, we can hook our form up to the CometChat.sendMessage function. In Chatbox function, create a function called handleSubmit:
const handleSubmit = event => {
  event.preventDefault();
  let textMessage = new CometChat.TextMessage(
    selectedFriend,
    message,
    CometChat.MESSAGE_TYPE.TEXT,
    CometChat.RECEIVER_TYPE.USER
  );
  CometChat.sendMessage(textMessage).then(
    message => {
      console.log('Message sent successfully:', message);
      setChat([...chat, message]);
    },
    error => {
      console.log('Message sending failed with error:', error);
    }
  );
  setMessage('');
};
This is already referenced from the JSX you copied earlier.
When the new message is sent successfully, we call setChat and update the value of chat state with the latest message.
Creating scrollToBottom function
Our Chat component is looking sweet except for one thing: When there are a bunch of messages in the Chatbox, the user has to manually scroll to the bottom to see latest messages.
To automatically scroll the user to the bottom, we can define a nifty function to scroll to the bottom of the messages programatically:
const scrollToBottom = () => {
  let node = document.getElementById('ccChatBoxEnd');
  node.scrollIntoView();
};
Then, run this function when the previous messages are set into state:
messagesRequest.fetchPrevious().then(
  messages => {
    setChat(messages);
    setChatIsLoading(false);
    scrollToBottom();
  },
  error => {
    console.log('Message fetching failed with error:', error);
  }
);
Conclusion
If you made it this far, you have successfully created a chat application powered by CometChat and Hooks. High five 👋🏻!
With this experience under your belt, I am sure you can begin to appreciate the “hype” around Hooks.
Hooks enable us to build the same powerful React components in a more elegant way, using functional components. In summary, Hooks allow us to write React components that are easier to understand and maintain.
And in all truth, we have only touched the surface. With some guidance from the official documentation, you can even create your own hooks!
P.S: If you're struggling to learn React, You might find React Distilled a great aid. Check it out here!
Originally published at https://www.cometchat.com


Top comments (5)
Hi Nathan, great tutorial, thanks a lot for sharing it!
I'm learning react and after reading your tutorial have a few doubts.
Wouldn't be this against what react advice related to the use of hooks? Copy paste from the official docs.
Sorry I hope you can throw some light! Thanks again!
I am a little bit late for the party but if you do not figure it out by now. I will shed some light since the author did not.
When they are saying to call the hooks inside loops, nested functions or conditions does not mean that they are not there for being used in map functions. They are more concerned with the fact of the order of hooks and especially with cases where there is no guarantee that you can preserve the state therefore maintaining the order.
One case is with if statements:
if(!userState) const [user,setUser] = useState('guest');// order here can not be preserved because it rely upon the userState variableI do not have a good example about nested functions or for examples but again the order has to be preserved.
Oh pretty cool! This has been wandering my thoughts some time, finally some light indeed! thanks!
Its one of the great chat application details for enterprise business. I would like to suggest another one leading chat app developers to your readers.
mirrorfly.com/chat-api-solution.php
Hi this tutorial is great .
But i am facing a little problem why i can't login.i face login failed notification when i want to login.??
Please tell me about the problem.Thanks