
In this article, I will guide you through sending notifications in-app and via email using Novu in a Node.js application. We'll first create a Novu project, add an email communication channel via the Novu Manage Platform, install Novu to an Express app, and send in-app and email messages using Novu 🚀.
Who is this article for?
You want to implement product notifications for your users for example, in-app notifications (like the bell icon you have on facebook), send an email / sms or push notification in a flow.
A quick example can be: Facebook is sending you a notification into your bell icon (You have a new friend request) and after 1 hour you haven't read it, they send you an email.
Why Novu?
Novu is the first open-source notification infrastructure that manages all forms of communication from email to SMS, Push notifications, etc.
https://github.com/novuhq/novu
It enables you to add several emails and SMS communication channels, create shared message templates, monitor every activity, and switch between different communication channels of your choice.
Central communication system
One of the reasons why Novu stands out is the ability to have a central means of communication. Novu provides a dashboard where you can monitor and manage all your SMS and email communications. With Novu, you can easily track communication via several channels on a single dashboard.
Several communication channels are available
With Novu, you can use as many communication channels as possible and easily switch from one to another without editing the existing code in your application.
For instance, if you use Sendgrid to send emails in your web application, but the service becomes unavailable for a moment, you can switch to other communication channels until Sendgrid is available without changing your code. Novu makes communication with your users easy to use and maintain.
Content management system
Novu provides every user with a content management system where you can create reusable email and SMS templates that you can share across various software applications. With Novu, you don't need to worry about the stress of creating dynamic content. Novu uses handlebars templating engine to accept dynamic variables, thus, creating a unique experience for your users.
Open source software
Novu is open-source software; this means that the code is readily available for everyone to modify and improve. Novu has a large community of developers and talented contributors constantly maintaining and improving the software. As a user, you can be sure of getting the best performance when you use Novu. You can also request changes to the documentation, ask for help, and chat with the maintainers when you need help or encounter errors.
BTW: You can become a contributor and get recognized! We have created a special page for all our contributors with recognition for their super hard work, and badges they can implement on their Github 🚀
Grab a new issue here: https://novu.co/contributors

Ok, enough with the self promotion 😆🔫, let's start
Here, I will guide you through creating a Novu project and setting up Novu for sending emails and in-app notifications.
Create your project folder and open the folder.
mkdir <folder_name>
cd <folder_name>
Ensure you have Node.js installed on your computer, then run the code snippet below in your terminal to create a Novu project.
npx novu init
You will need to sign in with Github before creating a Novu project. The code snippet below contains the steps you should follow after running npx novu init.
Now let's setup your account and send your first notification
❓ What is your application name? <Your_application_name>
❓ Now lets setup your environment. How would you like to proceed?
   > Create a free cloud account (Recommended)
   Create your account with: Sign-in with GitHub
✔️ Create your account successfully.

Now let's setup your account and send your first notification
❓ Looks like you already have a created an account for Development (Use arrow keys)
> Visit Development Dashboard
  Cancel
The code snippet above opens the Novu Manage Platform in your default browser.

Novu Dashboard page
Congratulations 🎊, you've successfully created an account with Novu. Next, click the Configure Now button to add an Email provider. I will be using Sendgrid in this article.
How to add Sendgrid email provider to Novu
I have choosen Sendgrid but you can easily choose one of: Mailgun, SES, Postmark, NodeMailer, Mailjet, Mandrill, SendinBlue, and EmailJS.
If you are missing a provider, just open a new issue on Github :)
Let's set up a new Sendgrid account and add it to Novu.
Open another tab, visit the Twilio Sendgrid website and create an account using a work or company email.
Sign in, click Settings on your sidebar, and select API Keys to create a SendGrid API key with full access to "Mail Send" permissions.
Copy the API key, and paste it into the Novu Manage Platform
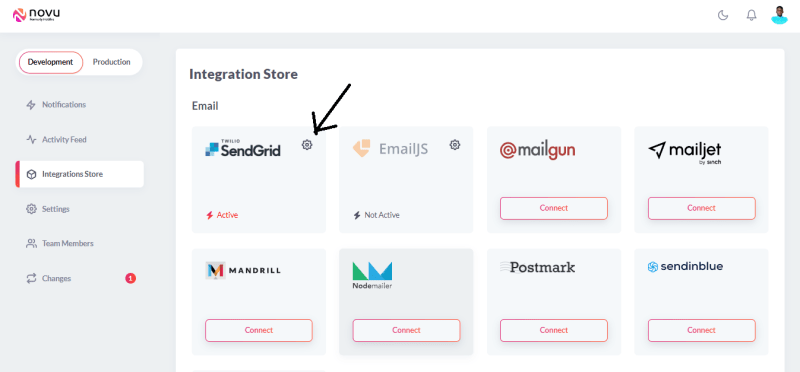
Click the settings icon beside Twilio Sendgrid in the image above and paste the API Key into the API Key field.

Go back to your Sendgrid dashboard to create and verify a Sender Identity.
Paste the email address and the sender name into their fields in the image above, ensure it is active and click the Update button.
Congratulations 🎊, you have successfully connected your Sendgrid account to Novu, and you can start sending emails via Novu.
Next, let's create a workflow showing how we want to send notifications in our Node.js application.
How to create a Novu notification workflow
Click Notifications from the sidebar and select the Notification template already created for you by default.
Select Workflow Editor to create the notification workflow, then drag the different notification channels from your right-hand side into the large box in the center of the page.
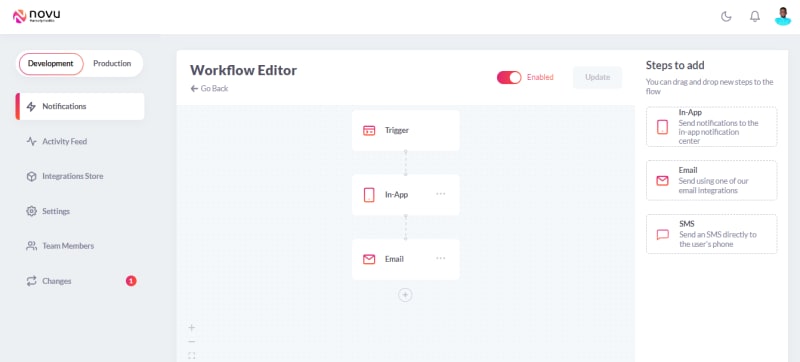
Ensure the workflow is the same as the image above and click the Update button to save the steps.
Next, let's create an Express app and add Novu to the Node.js application.
Adding Novu to an Express application
In this section, you'll learn how to set up an Express Node.js server and add Novu to the application.
In the project's folder created in the previous section, create a package.json file and an index.js file - the entry point to the Node.js application.
cd <project-folder>
npm init -y & touch index.js
Install Express and Novu SDK for Node.js. Express.js is a fast, minimalist framework that provides several features for building web applications in Node.js.
npm install express @novu/node
Copy and paste the code snippet below into the index.js file to create an Express application.
const express = require('express'); //import expressjs
const app = express();
const PORT = 4000; // where the server runs
const path = require('path');

//allows access to data sent from the client - index.html file
app.use(express.urlencoded({ extended: true }));

//creates a route that displays an index.html file.
app.get('/', (req, res) => {
  res.sendFile(path.join(__dirname, '/index.html'));
});

//listens to updates made on the project and shows the status of the project
app.listen(PORT, () => {
  console.log(`⚡️[server]: Server is running at https://localhost:${PORT}`);
});
Create the index.html file referenced above and copy the code below into the file.
<!DOCTYPE html>
<head>
  <title>Generating Employment Letter</title>
  <link rel="preconnect" href="https://fonts.googleapis.com">
<link rel="preconnect" href="https://fonts.gstatic.com" crossorigin>
<link href="https://fonts.googleapis.com/css2?family=Poppins:wght@100;200;300;400;500;600;700;800;900&display=swap" rel="stylesheet">
  <style>
    * {
      box-sizing: border-box;
      margin: 0;
      padding: 0;
      font-family: 'Poppins', sans-serif;
    }
    form {
      min-height: 100vh;
      width: 100%;
      padding: 30px;
      display: flex;
      align-items: center;
      justify-content: center;
      flex-direction: column;
    }
    input {
      padding: 10px;
      width: 100%;
      outline: none;
      border: 1px solid #ddd;
      border-radius: 3px;
      margin-bottom: 20px;
    }
    #button {
      width: 200px;
      padding: 20px;
      outline: none;
      border: none;
      background-color: #333;
      color: #fff;
      cursor: pointer;
      margin-top: 30px;
      border-radius: 3px;
    }
    h2 {
      margin-bottom: 20px;
    }
    .container {
      display: flex;
      width: 100%;
      align-items: center;
      justify-content: space-between;
    }
    .container div {
      width: 45%;
    }
    #personnel {
      margin-top: 30px;
    }
    #others div {
      width: 30%;
    }

  </style>
</head>
<body>
    <form method="POST" action="/sent">
      <h2>Candidate's information</h2>
      <div class="container">
          <div>
            <label for="candidateFirstName">Candidate's First Name</label>
            <input type="text" name="candidateFirstName" id="candidateFirstName"/>
          </div>

          <div>
            <label for="candidateLastName">Candidate's Last Name</label>
            <input type="text" name="candidateLastName" id="candidateLastName"/>
          </div>
      </div>

      <div class="container" id="others">
          <div>
            <label for="candidateEmail" >Candidate's Email</label>
            <input type="email" name="candidateEmail" id="candidateEmail"/>
          </div>

          <div>
            <label for="candidateSalary" >Proposed Salary</label>
            <input type="number" name="candidateSalary" id="candidateSalary"/>
          </div>

          <div>
            <label for="candidatePosition" >Proposed Position</label>
            <input type="text" name="candidatePosition" id="candidatePosition"/>
          </div>
      </div>

      <h2 id="personnel">Official Personnel</h2>

        <div class="container">
            <div>
              <label for="officialFullName" >Full Name</label>
              <input type="text" name="officialFullName" id="officialFullName"/>
            </div>
            <div>
              <label for="officialPosition" >Position Held</label>
              <input type="text" name="officialPosition" id="officialPosition"/>
            </div>
        </div>

        <button id="button">SEND OFFER</button>
    </form>
</body>
</html>
Run the index.js file by copying the code below. Visit http://localhost:4000 to view the index.html file.
node index.js
Next, I will show you how to send emails and in-app notifications via Novu by creating a web application that generates offer letters for successful job applicants in an organization. The index.html file is the web client/layout of the application.
How to send email notifications using Novu
Here, I will guide you through creating email templates and sending them to users via Novu.
Go to the Novu Manage Platform, select the Notification template, and click on Workflow Editor.
Select Email from the large center box to edit the template.

Novu allows us to add plain text and custom code using HTML templates with the Handlebars templating engine as email content.
Copy and paste this as the Subject line of the email
OFFER LETTER FROM NOVU - CONGRATULATIONS {{candidateFirstName}}
Select Custom Code as the content type and copy the code below. The email content and the subject line allow us to pass dynamic data into the variables using the Handlebars templating engine.
<body>
  <p>Dear {{candidateFirstName}} {{candidateLastName}}</p>
  <p>This is to inform you that you've been offered a position at Novu as a
    {{candidatePosition}}
    with a starting salary of
    {{candidateSalary}}
  </p>
  <p>Kindly sign the attached document.</p>
  <p>Congratulations, once again</p>
  <br />
  <p>{{officialFullName}} </p>
  <p><em>{{officialPosition}}</em></p>
</body>
You can now save the template. Next, let me walk you through sending this template via email.
Import Novu into the index.js file. To get your API key, click on Settings on the Novu Manage Platform, select API Keys, and copy it into the code below.
//Import and instantiate Novu in the index.js file

const { Novu } = require('@novu/node');
const novu = new Novu(<YOUR_API_KEY>);
Create a \sent route that accepts only POST requests in the index.js file, and copy the code below. This route receives all the user's data from the client and logs them to the console.
app.post('/sent', (req, res) => {
  //Gets the inputs from the web client
  const {
    officialPosition,
    officialFullName,
    candidateEmail,
    candidateSalary,
    candidatePosition,
    candidateFirstName,
    candidateLastName,
  } = req.body;

  //Logs the data to the client
  console.log({
    officialPosition,
    officialFullName,
    candidateEmail,
    candidateSalary,
    candidatePosition,
    candidateFirstName,
    candidateLastName,
  });
});
Once you've retrieved the data from the client, update the POST route to send the email to the application using the Novu template.
app.post('/sent', async (req, res) => {
  const {
    officialPosition,
    officialFullName,
    candidateEmail,
    candidateSalary,
    candidatePosition,
    candidateFirstName,
    candidateLastName,
  } = req.body;

  await novu
    .trigger('on-boarding-notification', {
      to: {
        subscriberId: '<YOUR SUBSCRIBER_ID>',
        email: candidateEmail,
      },
      payload: {
        officialPosition,
        officialFullName,
        candidateSalary,
        candidatePosition,
        candidateFirstName,
        candidateLastName,
      },
    })
    .then((data) => {
      console.log(data);
    })
    .catch((err) => console.error(err));

  // redirects to the sent.html file
  res.sendFile(path.join(__dirname, '/sent.html'));
});
According to the code snippet above, I changed the callback function to an asynchronous one before adding Novu. Novu then triggers the email templates via its ID and sends the template to the candidate's email. The payload object contains all the dynamic data required by the template.
To get your Subscriber ID, click on Settings on the Novu Manage Platform, and copy and paste the Application Identifier.
Create the sent.html file referenced in the code snippet above.
<!DOCTYPE html>
  <head>
    <title>Email Sent!</title>
  </head>
  <body>
    <p> Message sent!</p>
  </body>
</html>
Start the Node.js server by running the code below.
node index.js
To add attachments to the email messages, you can create an attachments array within the payload object or upload the document via the Novu Manage Platform.
await novu
    .trigger('on-boarding-notification', {
      to: {
        subscriberId: '<YOUR SUBSCRIBER_ID>',
        email: candidateEmail,
      },
      payload: {
        ...,
        attachments: [
          {
            file: fs.readFileSync(__dirname + '/test.jpeg'),
            name: 'test.jpeg',
            mime: 'image/jpg',
          },
      ],
      },
    })
    .then((data) => {
      console.log(data);
    }).catch((err) => console.error(err));
The code snippet above attaches an image to the email before sending the email to the recipient. Next, let's learn how to send in-app notifications to the web client.
How to send in-app notifications using Novu
In this section, you'll learn how to send in-app notifications and display them on the web client of your application.
Visit the Novu Manage Platform, select the template you are using, and click on Workflow Editor.
Select In-app from the large center box, click the Edit Template button to edit the notification and save the content.

Update the sent.html file to contain the JavaScript code and the bell icon before its closing body tag. The JavaScript code displays the in-app notification bar when a user clicks the bell icon.
<!DOCTYPE html>
<head>
    <title>Sent!</title>
    <!-- FontAwesome CDN link-->
    <script src="https://kit.fontawesome.com/0c7ff73f65.js" crossorigin="anonymous"></script>
</head>

<body>
    <p> Message sent!</p>

    <!-- The elements Novu needs to display the Notification bar -->
    <div id="notification-bell" style="min-height: 300px; width: 100%">
        <i class="fa fa-bell"></i>
        <span id="unseen-badge"></span>
    </div>

    <script type="module">
        (function(n,o,t,i,f, m) {
          n[i] = {}, m = ['init']; n[i]._c = [];m.forEach(me => n[i][me] = function() {n[i]._c.push([me, arguments])});
          var elt = o.createElement(f); elt.type = "text/javascript"; elt.async = true; elt.src = t;
          var before = o.getElementsByTagName(f)[0]; before.parentNode.insertBefore(elt, before);
        })(window, document, 'https://embed.novu.co/embed.umd.min.js', 'novu', 'script');

        novu.init('Xr_knh-UYIPD', '#notification-bell', {
          subscriberId: "Xr_knh-UYIPD",
          email: "nevo@novu.co",
          firstName: "Nevo",
          lastName: "David",
        });
      </script>
</body>
</html>
NB: You can get the bell icon from Font Awesome and ensure the CSS id referenced in the JavaScript code exists in your HTML file.

Source Code
You can check the complete source code here:
https://github.com/novuhq/blog/tree/main/sending%20notifications%20with%20Novu
This is just the express server to interact with Novu.
Before you clone the project, please run.
npx novu init
Conclusion
In this tutorial, you've learnt what Novu is, why you should use it, how to create a Novu project, how to add Novu to an Express.js web application, and how to send emails and in-app notifications with Novu.
Novu makes it easy for you to send, monitor, and manage notifications via various SMS and Email communication channels. It enables you to create a rich notification system in your applications, thereby providing a great user experience for your users.
You can also join the community to contribute, chat with the maintainers and improve the software.
Thank you for reading!


Top comments (4)
New Post: Improve your product notifications with Digest, Separate Feeds, and Notification Action Buttons
dev.to/novu/improve-your-product-n...
Do you feel like you have a pain when talking about notifications?
What should be our next feature?
If you have already implemented notifications in your system, share your system here 🚀