Why is building drag & drop UIs so hard? They've been around for a while, so we would be forgiven for thinking they're a solved problem. Certainly there are high quality libraries to help us build drag & drop UIs, and these days we even have an official HTML5 drag & drop API! What's going on here?
I've come to the conclusion a big part of the problem is our choice of tools. Draggables and dropzones are often the wrong abstraction, and choosing different tools can simplify construction of our drag & drop UIs massively.
That's a pretty sweeping statement for a broad term like 'drag & drop', so let's look at three examples of drag & drop UIs built without draggables or dropzones. These examples come from real projects, but I've stripped them down to their drag & drop essentials for this post. I'll include what I believe to be the most relevant code snippets in this post, and provide links to the full source code.
Let's start with a quick refresher on draggables and dropzones before we get to the examples.
A Refresher on Draggables & Dropzones
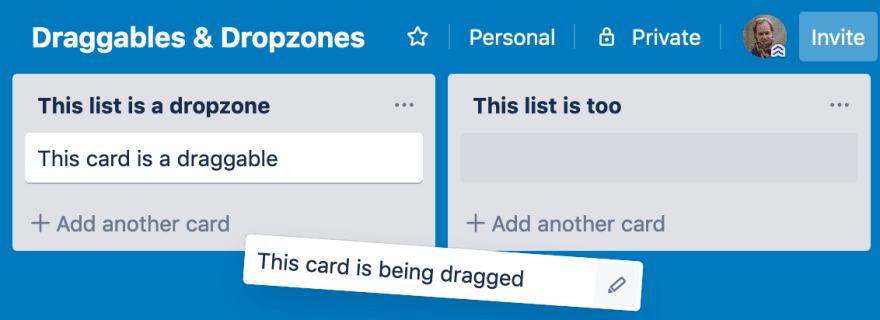
A draggable is a UI element that follows the cursor when the user presses down on it. A dropzone is a UI element that gets an event when we release a draggable over it.
For an example lets look at the application Trello. Trello allows us to organize cards in lists. We could make the cards draggables and the lists dropzones. That way we'd get an event every time a card gets dropped on a list, which we could use to update our app's state with the new location of the card.
On closer inspection though things aren't as clear cut. For example, in the real Trello application it's not necessary to drop a card on top of a list. We can drop a card on some empty space and it will move into the list nearest to where we dropped it. That's much nicer for the user, but it's not clear how to create this behavior using draggables and dropzones.
Our first example, A Timeslot Selector
Our first example is a UI for selecting a time slot in a day. This UI represents a day as a horizontal bar, in which we can select a slot using drag & drop.
I'd like to start these examples by imagining what a draggables and dropzones implementation might look like. In this first example it's unclear what our draggables and dropzones even are. We could make the time slider the draggable, because clicking anywhere in it should start the drag operation even if we don't drag the time slider itself. The screen as a whole might serve as a dropzone, because the user should be able to release the cursor anywhere to finish the drag. Already this approach feels pretty hacky, and we haven't even written any code yet!
Let's start from scratch without assuming draggables or dropzones. As we regularly do, we'll begin building our Elm application by designing a Model. Our application needs to store a time slot which is nothing more than a start and end hour.
-- In this example a time slot always covers whole hours,
-- but we could make this minutes or seconds if we wanted.
type alias Model =
    { selectionStart : Hour, selectionEnd : Hour }

type alias Hour =
    Int
Now we turn to implementing the drag & drop behavior, without draggables and dropzones. When the user presses down we store the hour the cursor is over as the selectionStart field of the timeslot. Then as the cursor moves we will update the selectionEnd field of the timeslot, until the user releases.
At any point we will need to know which hour the cursor is over. We can calculate this if we know the position of the cursor and the position and dimensions of the slider on the screen. Lets be optimistic and assume we just get that information on our drag events. If so we can design our Msg type like this:
type alias Msg =
    { event : DragEvent
    , cursor : Coords
    , sliderPosition : Rect
    }


type DragEvent
    = Start
      -- We don't need to do anything special on a Stop event, so we can treat
      -- it the same as a Move event.
    | MoveOrStop


type alias Coords =
    { x : Float, y : Float }


type alias Rect =
    { x : Float, y : Float, width : Float, height : Float }
The information in this Msg is enough to calculate the hour the cursor is over.
cursorAtHour : Msg -> Hour
cursorAtHour { cursor, sliderPosition } =
    let
        dx =
            cursor.x - sliderPosition.x

        atMost =
            min

        atLeast =
            max
    in
    (24 * (dx / sliderPosition.width))
        |> floor
        -- Ensure we get a number between 0 and 23, even if the cursor moves to
        -- the left or right of the slider.
        |> atMost 23
        |> atLeast 0
All that's left to do is use cursorAtHour in our update function. When we get a Start event we use it to update the selectionStart field in the model, and when we get a MoveOrStop event the selectionEnd field.
update : Msg -> Model -> Model
update msg model =
    let
        hour =
            cursorAtHour msg
    in
    case msg.event of
        Start ->
            if coordsInRect msg.cursor msg.sliderPosition then
                { selectionStart = hour
                , selectionEnd = hour
                }

            else
                model

        MoveOrStop ->
            { model
                | selectionEnd = hour
            }


coordsInRect : Coords -> Rect -> Bool
coordsInRect =
    Debug.todo "Implementation omitted for brevity."
And we have an app! Well almost, we've not discussed where these Msgs will be coming from. There's a bit of JavaScript responsible for that, which I'll talk more about in a bit. Those wanting to peek ahead can check out the time slider source code.
Second example, a polygon editor
Our second example is a tool for editing polygons. We want users to be able to pick up a vertex of a polygon and move it somewhere else.

See those vertices? Those sure look like draggables! But these vertices are small and easy to miss, so we'd want our draggables to be bigger. We could achieve this by making the draggables invisible div elements centered on these vertices, but that gets us in trouble when the div elements are so close they overlap. At that point a click won't select the closest vertex but the top vertex.
We're going to leave those draggables in the toolbox and see how far we can get without them. As usual we start by defining a model to store the polygon we're editing.
type alias Model =
    { polygon : Polygon
    , draggedVertex : Maybe Id
    }


type alias Polygon =
    Dict Id Coords


type alias Id =
    Int
The drag starts when the user presses down on a vertex to select it. For this we'll need to calculate the vertex closest to the cursor, which we can do if we know the positions of the cursor and all vertices. Lets create a Msg type that contains those positions. We can reuse the Coords and Rect types from the previous example.
type alias Msg =
    { event : DragEvent
    , cursor : Coords
    , handlers : List ( Id, Rect )
    }


type DragEvent
    = Start
    | Move
    | Stop
Perfect! Now we can calculate the rectangle closest to the cursor when the user clicks.
closestRect : Coords -> List ( id, Rect ) -> Maybe id
closestRect cursor handlers =
    handlers
        |> List.map (Tuple.mapSecond (distance cursor << center))
        -- Find the vertex closest to the cursor.
        |> List.sortBy Tuple.second
        |> List.head
        |> Maybe.map Tuple.first


center : Rect -> Coords
center =
    Debug.todo "Implementation omitted for brevity"


distance : Coords -> Coords -> Float
distance =
    Debug.todo "Implementation omitted for brevity"
Once we have found the vertex the user picked up we have to move it to the cursor on every Move event. The resulting update function looks like this.
update : Msg -> Model -> Model
update { event, cursor, handlers } model =
    case event of
        Start ->
            { model
                | draggedVertex =
                    handlers
                        |> List.filter
                            (\( _, handler ) ->
                                distance cursor (center handler) < 25
                            )
                        |> closestRect cursor
            }

        Move ->
            case model.draggedVertex of
                Just id ->
                    { model | polygon = Dict.insert id cursor model.polygon }

                Nothing ->
                    -- The user is dragging the cursor, but nothing was picked up on the
                    -- start event. We'll sit this one out.
                    model

        Stop ->
            { model | draggedVertex = Nothing }
And that's that! Again I skipped over the JavaScript that produces our messages and I promise we'll get to that in a moment. The full polygon editor source code is available for those interested!
Last example: an outline editor
Our final example is an outline editor. An outline is a tool for organizing our thoughts on a subject, but creating a list of concepts related to the thought, each of which have their own related thoughts, and so forth. The following image shows an example outline which can be re-arranged using drag & drop. We'll keep our scope small again by not bothering with creating and deleting nodes.

We'll start by creating a model for our outline editor. It will need to keep track of two things: the outline itself and which node we're dragging.
type alias Model =
    { outline : List OutlineNode
    , draggedNode : Maybe DraggedNode
    }


type alias DraggedNode =
    -- For simplicity sake we're going to use the node's contents as an id.
    -- We get away with that here because we can ensure the nodes are unique:
    -- the user will not be able to edit them in this example.
    { node : String
    , cursorOnScreen : Coords
    , cursorOnDraggable : Coords
    }


type alias OutlineNode =
    Tree String


type Tree a
    = Tree
        { node : a
        , children : List (Tree a)
        }
Now we'll need to write behavior for the drag start, move, and end events.
The drag starts when the user pressed down on a node. We can put an onClick handler on each node to detect when this happens. We'll skip the implementation in this post, but it's part of the full outline editor source code!
Then, as the user drags a node around we need to update that node's location in the outline. This part we're going to look at in detail.
Lastly the drag stop event. We already changed the outline while the user was moving the cursor, and so all that's left to do here is change the model to its non-dragging state by setting draggedNode to Nothing.
Moving nodes in an outline
The most challenging part is to decide what the user's intention is. Are they intending to move the dragged node in front of another node, behind it, or nested beneath it?
Using dropzones we could draw invisible boxes in those positions that activate when the user moves over them, but the experience is unlikely to be great. Make the boxes too small and the user will not spend a lot of time over them, making the interface unresponsive for most of the time. Make the boxes too big and they start to overlap, causing the uppermost box to receive the dragged node even if it's not the closest. And even if we get the boxes right a future update changing page styles might move the boxes, breaking the drag & drop interaction.
Let's forget about dropzones and think about the behavior we want. There are candidate positions in the outline where we could drop a dragged node. As the user moves we'd like to display the dragged node in whichever of those positions is closest to the cursor. To figure out which position is closest we need to know where they all are. To do that we are going to put invisible elements in the DOM at each position where we can insert the dragged node. Contrary to the dropzones approach we're not going to bother giving these elements any special dimensions or positioning. We want them to just flow with the content on the page, and keep us apprised of their location. These aren't dropzones but beacons.
Apart from their coordinates in the DOM, our beacons will also need to describe their location in the outline. A beacon can define its location relative to another node in the outline.
type CandidatePosition
    = Before String
    | After String
    | PrependedIn String
    | AppendedIn String
We'll create a JSON encoder for this type so we can tag each beacon element with a data attribute containing its position in the outline. We'll then set up our JavaScript to find all elements with such a data attribute in the DOM and feed their coordinates back to us on each drag event. That will allow us to define a type for drag events containing the positions of our beacons on the screen.
type alias DragMsg =
    { cursor : Coords
    , beacons : List Beacon
    }


type alias Beacon =
    ( CandidatePosition, Rect )
Remember the closestRect function from the polygon example? It's what we need to find the CandidatePosition closest to the cursor! Once we know which candidate position is closest, all we need is a function to that moves a node to its new position in an outline. It's a tricky function to write, but it doesn't have much to do with drag & drop and so I'm skipping the implementation here. I include a solution with the outline editor source code. For those interested in some thoughts on how to approach data transformations like these, I refer to an earlier post on conversion functions, which includes an example of a similar tree manipulation problem.
Necessary JavaScript
I promised I'd get back at the JavaScript required to make these examples work. All three examples use the same JavaScript code, because it turns out they have the same needs. In every example there's one or more Html elements on the page that we need to track the position and dimensions of as a drag interaction takes place. What our JavaScript code needs to do is generate events when the mouse gets pressed, moved, and released, and bundle with those events the positions of all elements we want to track. We identify those elements by giving them a data attribute with their 'beacon ID'.
There's tons of ways to write this code and I don't believe mine is particularly insightful, so I'll not reprint it here. The draggable.js source code for these examples is available though for those interested.
Conclusion
When we need to perform a complicated task it's natural to start by looking for a library to do the heavy lifting for us. For building drag & drop interactions libraries give us draggables and dropzones but they are often a bad fit for drag & drop UIs, of which we've seen three in this post.
Are drag & drop libraries always a bad idea? I don't think so. In particular there are libraries for specific drag & drop widgets such as re-arrangable lists, for example annaghi/dnd-list. Using those when possible could save a lot of time. There are probably UIs where draggables and dropzones are precisely the right abstraction. Please send me a note if you ran into one of those, I'd love to learn about it! Drag & drop covers an incredibly broad range of functionality though, and so often an off-the-shelf solution will not be available. For those I'd put serious thought into whether draggables and dropzones are going to help build the UI or make it harder.
I recommend using 'beacon elements' if you build your own drag & drop behavior. These are regular DOM elements marked so we can access their location on every drag event. Because beacon elements don't need to do anything any element using any positioning strategy can be a beacon. This passive nature distinguishes beacons from draggables or dropzones, both of which include behavior.
I've showed a different approach to building drag & drop UIs. In this approach we subscribe to drag & drop events telling us what's happening in the DOM, update the state of our model based on those events, and finally update the screen to reflect the new state of the model. This is nothing more than the Elm architecture. I hope the examples in this post show writing drag & drop logic does not need to be an arduous task.
Thanks to Ary, Blake, Brian and Stöffel for their reviews of drafts!


Oldest comments (0)