
In this story, I will show you how to create a custom form control that will integrate with Angular forms API and can be used in both template-driven and model-driven form the same way any native form control is used (e.g <input type="text" ../>).
For this purpose we will create a simple color picker component and turn it into a valid reusable form control, after we complete this implementation, you will be able to use your newly created form control in any template-driven or model-driven forms as the following:
Template Driven Approach:
<color-picker [(ngModel)]="color"></color-picker>
Model-driven approach (reactive forms):
<color-picker [formControl]="color"></color-picker>
Or
<color-picker formControlName="color"></color-picker>
You can find the full source code in this Blitz, or embedded at the end of the Article
https://stackblitz.com/edit/custom-form-field-color-picker?embed=1&file=src/app/app.component.html
Creating a new component
Let's start by creating a new simple component as the following:
A very basic component:
- We have a list of predefined colors named colors, we iterate over each one of these colors in the view and render a
divwith a background of that specific color. - We also define a variable
selectedColorwhich holds the value of the selected color. - The user can select a color by clicking on it, this will trigger the method
colorClickedwhich in turn will assign this color the variableselectedColor - On the template, we add the CSS class
selectedto the div of the selected color.
Simple but yet not useful in the contexts of a form, there is no way this component can communicate with the surrounding form to inform it of any change in the selected color, and vice-versa there is no way for the form to pass the component a specific color to be selected.
To fix the above communication problems, let's turn this component into a valid angular form control. To do so we have to do two things:
- We need our component to Act as angular forms API expect it to. To do so we need to implement the
ControlValueAccessorinterface in the new component. - We need to make our component Visible to angular forms API, and we do so by providing our component using the
NG_VALUE_ACCESSORinjection token.
Turning our component into valid Angular custom form control
1- Implementing ControlValueAccessor Interface
To enable angular forms API to interact with our custom form control, we need to implement the ControlValueAccessor interface, If you take a look at Angular source code on github here you can find this description of the ControlValueAccessor interface:
- Defines an interface that acts as a bridge between the Angular forms API and a * native element in the DOM.
* Implement this interface to create a custom form control directive * that integrates with Angular forms.
This interface consists of the following methods which will implement each of them in our component:
-
WriteValue: the forms API calls this method whenever the value of the model linked to this control is changed programmatically. In other words this is how Angular telling our component that somehow the value of the form has been changed and we need to react to this change in our component. The method provides us with the new value in its only parameter
obj, and we need to update the UI accordingly, here we only need to assign the new value to theselectedColorproperty of the color picker component.
writeValue(obj: any): void {
  this.selectedColor = obj;
}
-
registerOnChange: this method provides us with a way to communicate in the opposite direction, as we saw WriteValue will notify our component of the changes from the outer form, now we need a way to notify the outer form of the changes from inside our component UI (in our case user clicking on a new color). This method provides us in its parameter with a callback function
fnthat we should call whenever the value is changed in the UI, to do so we need to save the callback function in a variable, and we use it whenever the user clicks on a new color.
private _onChange: any;
registerOnChange(fn: any): void {
    this._onChange = fn; // Save the callback function
}
colorClicked(color: string) {
    this.selectedColor = color;
    this._onChange(this.selectedColor); // Call the saved callback
}
-
registerOnTouched: this method is similar to
registerOnChange, it provides us with a callback function to notify the form when the current form controlled is touched, usually, when using an input field, we call the callback on blur, in our example, we consider that the control has been touched once we select any new color.
private _onTouch: any;
registerOnTouched(fn: any): void {
    this._onTouch = fn;   // Save the callback function
}
colorClicked(color: string) {
    this.selectedColor = color;
    this._onTouch(true); // Call the saved callback
}
- setDisabledState: the last method to implement, the forms API will call this method whenever the status of the control changes from or to disabled, we are expected to interact on this change and to disable the selection of colors in our component, so we will always save the value returned from this method.
private _isDisabled: boolean;
setDisabledState?(isDisabled: boolean): void {
    this._isDisabled = isDisabled;
}
2- Providing our component using the NG_VALUE_ACCESSOR injection token
So far our new component is ready to integrate with Angular forms API, however, one more step is still necessary to allow forms API to recognize our component as a valid form control and interact with it (this interaction is possible because we implemented ControlValueAccessor interface in the previous step).
Before we start let’s take a look at the source code of Angular official FormControlDirective which is responsible for linking our component with the form, and try to understand how this directive builds this link, by looking at the constructor of that directive we find the following:
constructor( ...
    @Optional() @Self() @Inject(NG_VALUE_ACCESSOR) valueAccessors: ControlValueAccessor[],
...) {...
    selectValueAccessor(this, valueAccessors);
}
Notice the directive is injecting a token NG_VALUE_ACCESSOR and expect it to provide a list of ControlValueAccessor (the interface we have just implemented). then this value is being saved and used internally.
What does this mean to us? this means that if we wanted FormControlDirective to recognise our component and interact with it, we need to provide our component using the injection token NG_VALUE_ACCESSOR and to do so we just need to update the options of the Component decorator to be as the following:
- We configure the component injector using the injection token
NG_VALUE_ACCESSOR. - Then we provide our newly created component
ColorPickerComponent. - After that we use
forwardRef(more about forwardRef), we do so here because at this point our class is not defined, this function allows us to refer to our component even before we define it. - Then we use
multi:trueto specify that this is one of many other configurations of the same token that could exist on the same element, also this is necessary since it makes the injector returns an array of instances, which is the exact typeFormControlDirectiveexpects in its constructor.
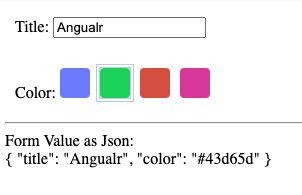
Now our custom form control is ready to be used in any template or model-driven form, we can use it for an example in our AppComponent as the following:
- We define a
formGroupwith two controls title and color, and we add an HTML form element with the directiveformGroup. - The title is just a simple native input, and the color is our newly created color picker component.
- We use
formControlNameto link the controls to our form. - In the end, we are printing the value of the form to confirm that everything is working correctly when we change the form input values.
The final result will be as the following after adding some styling:
Thank you for reading! and remember, never stop learning :)
References
-
forwardReffunction, Angular official documentation https://angular.io/api/core/forwardRef. -
ClassProvider, Angular official documentation https://angular.io/api/core/ClassProvider. - Basics of reactive forms, Angular official documentation https://angular.io/guide/reactive-forms


Top comments (0)