Rapidly deploying Linux servers to meet a whim represents the essence of home lab activities, but we spend a great deal of time spinning/configuring machines to meet our specs.
Worse, we lose a great deal of time keeping them properly configured and up to date, and none have the privilege of unlimited lab time.
Let's explore a way to get a base template implemented in vSphere 7 and enable the machine to boot with customizations like hostname, IP address, startup scripts, etc.
Constructing a VM Template
First, let's pick up a fresh operating system installer ISO from opensuse.org. Since this is a home lab / server-style deployment, I'd recommend using the network image - we'll add everything we want later.
Upload the ISO file to a datastore. This step will allow the installation process to run unattended, even if you shut down the client:

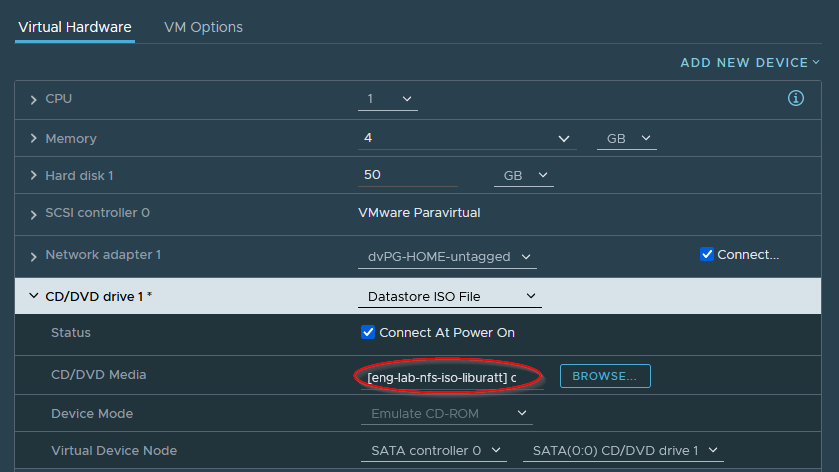
Create a virtual machine, and name it accordingly. Attach the datastore ISO:
Boot the Linux machine. During the installation wizard, ensure that a logical volume manager (LVM2). I've found that when you build a clone template, any disk size you choose will be wrong in the application owner's mind, so plan for the future.
After the installation is complete, disconnect the CD/DVD virtual drive! If you fail to do this on shared infrastructure, the VI admins will have a difficult time with the VM - and in a home lab, that's you. Establish good habits to make responsible tenancy easy.

Start up the machine, and use _ zypper _ to install any packages or keys that may be required to administer the device. In a home lab, CA certificates and SSH keys are OK - but an enterprise environment should have an automated, repeatable way to lifecycle trust in the event of a compromise.
Once that's done, let's install _ cloud-init _. This software package is incredibly useful, but it isn't available by default with OpenSUSE Leap:

After installing the package, ensure it's enabled with:
systemctl enable cloud-initcloud-init clean
Cloud-Init
_ Cloud-init _ is a project managed by Canonical to standardize VM customization on boot, making IaaS more "cloudy", regardless of hosted location. It is structured to receive configuration data from a datasource and abstracts the specific inputs from other "clouds" to the IaaS workload (VM) as consistent instructions. The customization software will use these data sources as "drop points" to transform the cloud-specific instructions (OVF, Azure, EC2) to a common configuration (Metadata, Userdata).
_ metadata _ should represent the workload's system configuration, like hostname, network configuration, and mounts.
_ userdata _ should represent the workload's user space configuration, like Ansible playbooks, SSH keys, and first-run scripts. With the current state, I would tend towards using automation to register a workload with Ansible and perform that configuration centrally. It's neat that this level of customization is offered, though - _ cloud-init _ can automatically register with centralized orchestrators like SaltStack and Puppet on startup.
_ cloud-init _ has a ton of goodness available as boot-time customization, and this will only scratch the surface of how it can be used. _ cloud-init _ accepts a YAML configuration that can include:
- Users/Groups
- CA certificates
- SSH keys
- Hostnames
- Packages/Repositories
- Ansible Playbooks
- External mounts (NFS)
VMware offers two data sources for workloads provisioned on vSphere:
- OVF (the scope of this post)
- Direct Metadata (VMware Documentation)
VMware's new RESTful API has built-in documentation. From the vSphere GUI, select the triple ellipsis and select "Developer Center":

Unfortunately, VMware's new metadata source does not appear to function with this distribution. According to Canonical's changelog, _ cloud-init _ Version 21.3+ is required to recognize the new datasource. I tested with OpenSUSE 15.4 (Ships with _ cloud-init 21.4 _) and received the following error:
# A new feature in cloud-init identified possible datasources for ## this system as: ## [] ## However, the datasource used was: OVF ## ## In the future, cloud-init will only attempt to use datasources that ## are identified or specifically configured. ## For more information see ## https://bugs.launchpad.net/bugs/1669675 ## ## If you are seeing this message, please file a bug against ## cloud-init at ## https://bugs.launchpad.net/cloud-init/+filebug?field.tags=dsid ## Make sure to include the cloud provider your instance is ## running on. ## ## After you have filed a bug, you can disable this warning by launching ## your instance with the cloud-config below, or putting that content ## into /etc/cloud/cloud.cfg.d/99-warnings.cfg ## ## #cloud-config ## warnings: ## dsid_missing_source: off # **************************************************************************
To view the provided and applied _ metadata _ for a system, _ cloud-init _ provides the following file handle:
/run/cloud-init/instance-data.json
To view the _ userdata _ for a system, use the following command:
cloud-init query userdata
This indicates that we probably have an upstream issue with the new data source type. Reviewing the change log we see several fixes applied to this data source.
Applying Workload Templates
Note: This feature is only available on vSphere 7 and up!
Here's how to leverage the OVF data source with vSphere and OpenSUSE.
The flag disable_vmware_customization is a directive that functions as a switch to choose between the metadata source and the OVF data source. following to /etc/cloud/cloud.cfg:
disable_vmware_customization: falsedatasource: OVF: allow_raw_data: truevmware_cust_file_max_wait: 25
Once installed, shut the virtual machine down. Right-click on the VM, and select Clone -> Clone as Template to Library:

This vCenter feature will orchestrate the conversion to a template object and publish it to a Content Library as one step.
Deploying a customized machine
The next process needs to be executed via vCenter's Content Library vSphere API:
- Establish API Session Key (required authentication for the endpoints used to deploy)
-
Deploy Content Library Object (
/api/vcenter/vm-template/library-items/)- Find the correct content library
- Find the correct content library item
- Find the content library item via the
vsphereAPI (ID to use in deployment command) - Find vSphere Cluster
- Find vSphere Folder
- Find vSphere Datastore
- Deploy Content Library Item
-
Wait until deployment is complete, periodically checking to see if it's complete
- Normally, an API will respond immediately that the command was successful, and subsequent calls would be required to validate readiness. Instead, vSphere's RESTful API responds with a
200response only if and when the deployment is complete , which simplifies our code
- Normally, an API will respond immediately that the command was successful, and subsequent calls would be required to validate readiness. Instead, vSphere's RESTful API responds with a
Locate the Virtual Machine. The previous API call responds with a
200 OK, and Postman conveniently times the operation for you as well!Apply Guest Customization
Start VM
To replicate this lab, the Postman Environment and Collection will be provided at the bottom of this post. Postman provides a powerful platform to educate engineers unfamiliar with a particular API by expanding the behaviors an HTTP client may have. Automated processes are typically very terse, and do not effectively explain each step and behavior. To import this collection and environment, download the files, and import them:

Postman Environments will stage variables for consumption by Collections.
I have sorted the Postman Collection based on the order of execution. The final customization step will return a 204 if successful, with an empty body. To verify that the configuration was correctly applied, browse to the individual VM in vCenter, and look under Monitor -> Events for an event of the type "Reconfigure VM". If you see the task on the correct VM, start it, and you will see the following:

Soon after, look at the virtual machine to review its customized attributes!
Debugging/Troubleshooting Tips
This process is slightly opaque, and a little confusing at first. Here are some key points for troubleshooting, and the methods to manage it:
-
The vSphere
/vm/guest/customizationURI will only respond with a204if working correctly.- If it returns a 400, the error will indicate what part of the JSON spec is having issues. Keep in mind that it may only give you the parent key - tools like JSONLint offer a method to quickly validate payloads as well
When locating resources, the Content Library and Templates are returned as a UUID with no description.
GETthe individual objects to match with names, or use the find APIAll other resources (datastore, VM name) are listed with their MOB name, e.g.
domain-c1008Save the response from the deployment action, it has the VM ID when it finally completes
VM Customization can only be applied to a VM that is
OFF, and doesn't customize until the VM starts.
Troubleshooting customization after boot can be done by viewing the metadata (/run/cloud-init/) or by reviewing logs at the following locations:
/var/log//var/log/vmware/imcjournalctl -xesystemctl restart cloud-init
The classic "wipe and restart" method is also quite valuable:
cloud-init clean -l -ssystemctl restart cloud-init
Finally, after a host is successfully configured, I'd recommend disabling cloud-init to prevent further customization. This is just as easily achieved with an Ansible playbook
systemctl disable cloud-init


Oldest comments (0)