
How to Create an API using Ruby on Rails 7 and PostgreSQL database
If you are new to programming like me I am sure that each time you come across this term you think of it as a very complex enigma to decipher. Luckily for you my reader today, I will try to explain to you what an API is in simple terms and walk you through how you can create your API with Ruby on Rails 7.
This will be part A of a two-part series where I will cover creating an API, documenting your API with rswag gem, and deploying the API to Heroku 🚀.
So what is an API?

An application programming interface (API) is like the messenger that takes your requests and tells your system what to do and then returns the response to you. Let's say you walk into a restaurant. You know what you want to eat, but you do not have access to the kitchen. The waiter comes and takes your request and returns your response in this case your food. Easy right?
When creating your website, you might not want it to have static data, that would be very boring. You might want to give it a way of getting dynamic data from somewhere. Ruby on Rails is one of the popular and easy ways to create API and now let's get started.
Our API project
We are going to create an API for a friend's application. You might want to save information about your friends and fetch them dynamically from somewhere and today we are going to do just that.
Prerequisites:
- Rails V7
- PostgreSQL database
- Ruby V 3+
- postman
- Visual studio code
- Some experience with Rails MVC architecture.
Project setup
We shall start by creating a new rails API application with the rails' new command in our terminal.
rails new friends-api --api --database=postgresql
cd friends-api
code .
This creates all our starting files and installs all the dependencies that we are going to need for this project. The --api flag installs the "bare minimum" dependencies excluding the views. This will be our back end remember?
Note: Do not forget to edit your database.yml file to allow Rails to work with your local machine PostgreSQL. Make sure you add your postgres username and passowrd in the development and test blocks. Below is an example:
development:
  <<: *default
  database: friends_api_development
  username: nemwel
  password: root

test:
  <<: *default
  database: friends_api_test
  username: nemwel
  password: root
We now need to create our database but do not migrate it just yet. We will do that when creating our model in a while.
rails db:create
Now let's create our model for our API and lets call it friend and let's assume we want to store the name, phone number, twitter username, his/ her email and maybe the location of the friend.
rails g model friend name:string phone:integer twitter:string email:string location:string
This will create a few files among them our model and a migration. Remember that this is a two-step process and now we need to run the migration so that the changes can persist in the database and we will have a schema.rb file created for us.
rails db:migrate
and now in your db folder, you should have the schema.rb file and our friend table created.
Create the API endpoints
We shall now create the API endpoints. Let's go to app>controllers and create an api folder. Let's create another folder called v1 inside our api folder which will hold the first version of our API.
Inside the app>controllers => api => v1 create our friends_controller and let's create the basic structure of our API friends controller.
class Api::V1::FriendsController < ApplicationController
end
Awesome, now we can start by creating our API endpoint that will list all the friends that are available:
def index
  friends = Friend.all

  if friends
    render json: {status: "SUCCESS", message: "Fetched all the friends successfully", data: friends}, status: :ok
  else
    render json: friends.errors, status: :bad_request
  end
end
but wait, we do not have any developers to test with! We will simplify this by going to our db/seeds.rb file and add some seed data that we shall test our API with.
friends = Friend.create([
  {name: "Nemwel Boniface", phone: 754135545, twitter: "@nemwel_bonie", email: "nemwelboniface@outlook.com", location: "Nairobi, Kenya"}
])
Now that everything is all wired up, we need one last thing. Routes! we need to tell our Rails application where and how to handle that request that we are passing to it.
so let's go to our config/routes.rb file and let's add the routes to our friend's controller.
namespace :api do
  namespace :v1 do
    resources :friends
  end
end
Now run your server with rails s and go to http://127.0.0.1:3000/api/v1/friends and you should be able to see your friend listed there.
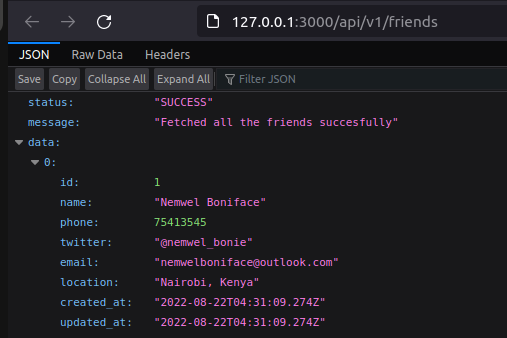
Note: Do not forget to run rails db:seed.
Now, let's move to create a new friend. we will require two methods, one friends_params, and a create method. Let's get to work now. (Remember we will be working mostly in our friends_controller,rb file).
def create
  friend = Friend.new(friend_params)

  if friend.save
    render json: {status: "SUCCESS", message: "Friend was created successfully!", data: friend}, status: :created
  else
    render json: friend.errors, status: :unprocessable_entity
  end
end

private

def friend_params
  params.require(:friend).permit(:name, :location, :email, :twitter, :phone)
end
perfect! let's now test in our Postman. We are going to make a POST request. Make sure your server is still running. You should see something like this:
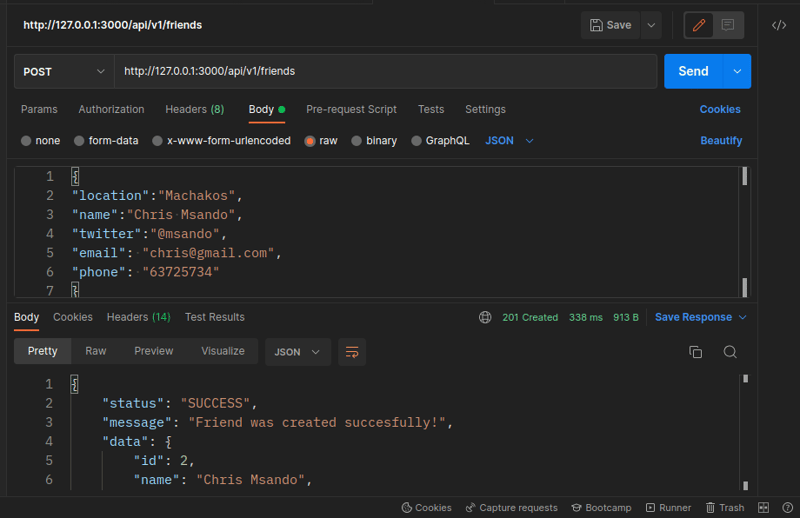
Great! our API is working very well so far. For brevity, I will now include the code for the API endpoints for deleting, editing, and showing the details of a specific friend.
# Show a specific friend GET request
def show
  friend = Friend.find(params[:id])

  if friend
    render json: {data: friend}, state: :ok
  else
    render json: {message: "Friend could not be found"}, status: :bad_request
  end
end

# Delete a specific friend DELETE request
def destroy
  friend = Friend.find(params[:id])

  if friend.destroy!
    render json: {message: "Friend was deleted successfully"}, status: :ok
  else
    render json: {message: "Friend does not exist"}, status: :bad_request
  end
end

# Update details for a specific friend. PATCH request
def update
  friend = Friend.find(params[:id])

  if friend.update!(friend_params)
    render json: {message: "Friend was updated successfully", data: friend}, status: :ok
  else
    render json: {message: "Friend cannot be updated"}, status: :unprocessable_entity
  end
end
With this, we can confidently say that we have successfully created our CRUD API endpoints. But wait, when you try to add some data, even wrong data, the API accepts it.
The rule of "Garbage in, garbage out" is something we want to avoid in our API. Let's add some validations to make sure that no fields are empty and that the correct data types of the data are input. So let's go to our friends model and let's add the following:
class Friend < ApplicationRecord
  validates :name, length: { minimum: 2 }
  validates :location, length: { minimum: 2 }
  validates :email, length: { minimum: 2 }
  validates :twitter, length: { minimum: 2 }
  validates :phone, length: { is: 9 }, numericality: true
end
Now if someone tries adding some wrong data or leaves a field as empty, the API will reject it and the integrity of the data we store will be upheld.
This one marks the end of the first series of creating an API with Ruby on Rails 7 and PostgreSQL database. Part B of this series will cover how to document your API using the Rswag gem and then how to deploy your API to Heroku. Stay tuned!
That is it for today's class. I hope this was useful information for you. See you in my next article.


Top comments (6)
more please
Hello @g33knoob , I will be updating the second part very soon. Stay tuned!
@nemwelboniface great stuff. Can't wait for the part B
Thanks <3
tutorial with jwt auth please
Hi very well written and easy to follow. Kindly upload the API documentation using Rswag gem tutorial.