I fell down a rabbit hole lately into the world of vTubers. The concept actually isn't too weird, instead of showing your face on livestream you choose an avatar, it just happens that most of it is anime. When I tried to look up what sort of software they used I never really got a great answer. The professionally sponsored ones clearly had a specific setup going but I couldn't figure out exactly what. There's a few products, some paid, some free but they all appeared to be PC or mobile apps. This was a bit disappointed to me as a web person, couldn't we make something like this with web?
Boilerplate
This time will be slightly different, I'll build an entire web project and not everything will be from scratch, both models and tensorflow js will be used because building these pieces from scratch is actually really hard.
The basic project setup (you'll see a few more files in the actual example but they are mostly just branding stuff from my template and not strictly necessary for us):
/js
  /components
    /face-example.js
/css
/model
index.html
index.html is pretty simple, just a title and an entry component called face-example.
<!doctype html>
<html lang="en">
    <head>
        <title>Vtube</title>
        <meta charset="utf-8">
        <meta name="theme-color" content="#ff6400">
        <meta name="viewport" content="width=device-width">
        <meta name="description" content="A Web app">
    </head>
    <body>
        <h1>Vtube</h1>
        <face-example>
        </face-example>
        <script src="js/components/face-example.js" type="module"></script>
    </body>
</html>
Next we'll create the face-example component:
export class FaceExample extends HTMLElement {
    static get observedAttributes() {
        return [];
    }
    constructor() {
        super();
        this.bind(this);
    }
    bind(element) {
        element.render = element.render.bind(element);
        element.attachEvents = element.attachEvents.bind(element);
        element.cacheDom = element.cacheDom.bind(element);
    }
    connectedCallback() {
        this.render();
        this.cacheDom();
        this.attachEvents();
    }
    render(){
        this.attachShadow({ mode: "open" });
        this.shadowRoot.innerHTML = `
            <style>
                #panel { display: grid; grid-template-columns: 50% 50%; grid-template-areas: "left right"; }
                #video { grid-area: left; }
                #output { grid-area: right; }
            </style>
            <div id="panel">
                <video id="video" height="640" width="640"></video>
                <div id="output"></div>
            </div>
            <button id="start">Start</button>
        `
    }
    cacheDom() {
        this.dom = {
            video: this.shadowRoot.querySelector("#video"),
            output: this.shadowRoot.querySelector("#output"),
            start: this.shadowRoot.querySelector("#start")
        };
    }
    attachEvents() {

    }
    attributeChangedCallback(name, oldValue, newValue) {
        this[name] = newValue;
    }
}

customElements.define("face-example", FaceExample);
This should be more familiar if you've followed my other posts. We're making a side-by-side view with a video on the left and facial landmarks on the right and a button to start (because media access requires a user gesture).
Setting up a camera preview
in attachEvents let's add click handler for the button:
this.dom.start.addEventListener("click", this.startCamera);
startCamera will look like this:
async startCamera(){
    const stream = await navigator.mediaDevices.getUserMedia({
        video: true,
        height: 640,
        width: 640
    });
    this.dom.video.srcObject = stream;
    this.dom.video.play();
}
you'll also want to bind it to the element in bind. This will grab a 640 x 640 video or whatever your camera closest supports. We set the stream on the srcObject and then play it. If you try it this will produce a basic video preview.
Using the landmark detection model
First we need to import tensorflow js. Most other examples you see tend to be a bit older and just default to using a UMD module to add the tf object to window. Thankfully, version 3.0 of @tensorflow/tfjs adds actual ESM and we can import this like:
import * as tfjs from "https://cdn.jsdelivr.net/npm/@tensorflow/tfjs/dist/tf.fesm.min.js";
I really thought that fesm was a typo but nope, that's the actual file name. Now that we have that we can start using it. But before that we need to do is get a model.
Getting a model
So in most cases you'll have 3 real options: get an off-the-shelf model, use transfer learning on an existing model to do something slightly differently, or build a model from scratch. While I'd really like to the latter, getting an appropriate amount of training data, as well as training and optimizing it would be a massive project in it's own right. If you are looking for tensorflowjs models the best place to start is https://tfhub.dev/. Luckily there is a good face landmark model we can use without modification: https://tfhub.dev/mediapipe/tfjs-model/face_landmarks_detection/face_mesh/1 . They even have an API wrapper version too that takes care of boilerplate but I won't be using that for a few reasons:
- Less 3rd party code in my app
- We get to explore using models in their raw form
- We'll need to read the model docs
- Some models don't have this option so it's helpful to know
Still, if the option is available and suits your needs there's no reason not to in your own projects. Also, one note about models is that you need it to be in a format for tensorflow js. It's possible to port most tensorflow models to this format using a python utility called tensorflow_converter (see https://codelabs.developers.google.com/codelabs/tensorflowjs-convert-python-savedmode) but if it's a different kind of model like PyTorch it's not going to be easy (you'd probably need to save it as ONNX and use onnx.js but I haven't touched that).
Using a model
If you download the above model you'll get two files, a model.json and group1-shard1of1.bin. This is a strange format tensorflow js uses. The model.json contains the metadata and the .bin files have the weight data. It's broken up like this, I assume, because it has better loading characteristics to load a bunch of small files but I still wish I could just straight-up use a normal tensorflow saved model and not deal with directories of files.
One last thing to mention is model types. You can find this as the format key in the model.json. It'll either be "graph-model" or "layer-model". The former is basically the model reduced down into individual operations without the layer data and is an optimization. The latter allows you to modify the model, for example: transfer learning. For this we don't really care what it is because we are using it without modification.
Loading
When we start the camera we can also use that as an indication to download the model (since it's big and we don't want it blocking page load).
const modelPromise = tfjs.loadGraphModel(`./model/model.json`);
This does the work to load a model into memory from a model.json and bin files (the bin files must be stored in the same path as the model.json).
Data Prep
All data to be used with a model needs to be prepared to be in the correct input format. In this case images needs to be turned into tensors. The exact format is usually documented but I found the underlying documentation for this model a bit lacking in details about the exact input/outputs but still useful for interpreting them https://github.com/tensorflow/tfjs-models/tree/master/face-landmarks-detection. Instead we can examine the model.json which is more explict. We can find a few keys that define the input and output:
"inputs": {
      "input_1": {
        "name": "input_1:0",
        "dtype": "DT_FLOAT",
        "tensorShape": {
          "dim": [
            { "size": "-1" },
            { "size": "192" },
            { "size": "192" },
            { "size": "3" }
          ]
        }
      }
    },
    "outputs": {
      "output_mesh": {
        "name": "Identity_2:0",
        "dtype": "DT_FLOAT",
        "tensorShape": { "dim": [{ "size": "-1" }, { "size": "1404" }] }
      },
      "output_faceflag": {
        "name": "Identity_1:0",
        "dtype": "DT_FLOAT",
        "tensorShape": { "dim": [{ "size": "-1" }, { "size": "1" }] }
      },
      "output_contours": {
        "name": "Identity:0",
        "dtype": "DT_FLOAT",
        "tensorShape": { "dim": [{ "size": "-1" }, { "size": "266" }] }
      }
    }
Our input is a tensor with shape [-1,192,192,3]. It might not be obvious at first but we can infer this is an image of 192x192 (and 3 color channels). The -1 of the first dimension is a special value that leaves that size variable. This is because for efficiency we can run the model on multiple samples at once, though in our case we just need one so our input is "1 sample of 192x192 resolution with x3 color channels (rgb)". The output has a few things. I had to read a bit of the source code to understand it but output_faceflag (which corresponds to index 1 of the output) is a size 1 tensor that gives the confidence score that a face was detected. output_mesh is the list of facial landmark points. Since 1404 / 3 = 3 we can infer that these are 3d points.
It was after all that work that I found a direct link to the model card: https://drive.google.com/file/d/1QvwWNfFoweGVjsXF3DXzcrCnz-mx-Lha/preview which confirms our inference. However we only have 3 outputs and the 3rd doesn't really match with the outputs on the model card so hopefully we don't need that. Note that it seems like there are multiple versions of this model, including a larger one that is directly used by the JS library which also includes lips and iris: https://drive.google.com/file/d/1tV7EJb3XgMS7FwOErTgLU1ZocYyNmwlf/preview . This doesn't seem to be available on tfhub though, maybe we'll revisit this.
Anyway, we need to take our camera data and turn it into a tensor. Tensorflow js has some utilities we can use.
const videoFrameTensor = tfjs.browser.fromPixels(this.dom.video);
const resizedFrameTensor = tfjs.image.resizeBilinear(videoFrameTensor, [192, 192], true);
const normalizedFrameTensor = resizedFrameTensor.div(255);
The first line takes a video, grabs a frame and creates a tensor from it (width x height x color depth). The second does bilinear resizing to the dimensions you supply. The cool thing is this is all on the GPU so it's fast. The 3rd parameter basically maintains the corner pixel data during resize, it's not clear if this is important or not. The final line divides all values by 255. This is because at this point we have integers from 0-255 but we want floating point values from 0-1 for the model.
Making a prediction
We can do this with
const prediction = await this.model.predict(normalizedFrameTensor.expandDims());
This runs a prediction. The expandDims() is basically to account for the fact that predict expects multiple samples. Since we have just 1, we can call expand dims to create another dimension basically converting a [192,192,3] tensor to a [1,192,192,3] tensor. We get back an array of tensors from the model which correspond to the outputs we looked at earlier. Perhaps the most useful to start with is whether or not it thought it saw a face which is the second element.
Now let's do something with it.
const faceDetection = await predictions[1].data();
const isFace = faceDetection[0] > 0.8;

this.dom.output.textContent = isFace ? `Face Found (${faceDetection[0].toFixed(4)})` : `Face Not Found (${faceDetection[0].toFixed(4)})`;
data() will extract data from the tensor (eg make it a javascript readable value). Since tensorflow tensors are actually stored on the GPU we cannot access them directly. You can also use .print() as a substitute for console.log for inspecting the value. So we take the first prediction (predict gave us an array of tensors rather than a larger rank tensor for whatever reason) and extract the data. The data itself is a UInt8Array, in this case with just one value, so we need to pick it out. Finally we convert that number, the confidence score, to a boolean. You can choose the threshold you like depending on the situation but I found it very quickly hit mid to upper 0.9s when my face was in the middle of the frame and the right size. We then output some stuff to the #output div so we can see the result in real-time. Before we try it out we need to do one last thing:
videoFrameTensor.dispose();
resizedFrameTensor.dispose();
normalizedFrameTensor.dispose();
predictions.forEach(p => p.dispose());
This is necessary after each inference. The reason is that we create multiple tensors for the intermediate data. Those tensors still exist on the GPU and javascript has no way to clean them when things go out of scope. Tensorflow provides 2 different ways to deal with this. The way we are doing it here is manually. Every tensor you have, if you don't still need it, should be disposed. In some cases you can use a special method from tensorflow called tidy. This takes a function and will be sure to dispose all the created tensors in the function block when it finishes. Unfortunately, this doesn't accept async functions so we use the first instead.
Finally we can try testing, move your head to center in the camera, straight-on if possible and you should see the score shoot up and a face get detected.
Getting the rest of the face data
So the model gives back actual mesh data for face points. What we want to do next is draw those to the screen so we can visually understand what they mean. We can do this by simple creating a rectangle at each point and since they're 3d we can throw away the Z for now.
//First add a canvas and context (this.context) to the custom element
const mesh = await predictions[0].data();
this.context.clearRect(0, 0, 640, 480);
this.context.fillColor = "#ff0000";
for(let i = 0; i < mesh.length; i += 3){
    this.context.fillRect(mesh[i], mesh[i+1], 1, 1);
}

//dispose tensors...
This gives us a diagram:
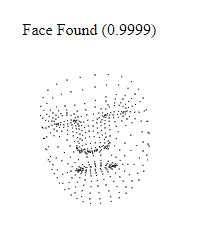
If you play around it does seem to respond to moving the face around however the scale is not correct. The model documentation is not very clear at all how the points should be scaled. The documentation says it's "weak perspective" but we are never directly given the transform matrix and that's about as far as I was able to go with just the model.
Conclusion
I had hoped to make something closer to a series of posts but my first attempt only went so far. Still, it was good for learning. If I were to try again I might just have to use the wrapper library and build on top of it especially now that I know the underlying pieces. The other thing is that the tensorflowjs ecosystem is still really weak. Google has some good models but documentation is scattered and hard to find. It's also hard to find the right model because there are so many variants of the same one.
Still machine learning in the browser is pretty neat, and I'm surprised it works as well as it does.
You can find the source code here:
https://github.com/ndesmic/vTube/tree/v1.0.0


Latest comments (0)