As we all know that Javascript is a very powerful language which helps us to do amazing things on the web and with the combination of Node JS (running on the server-side) it has become even more tremendous.
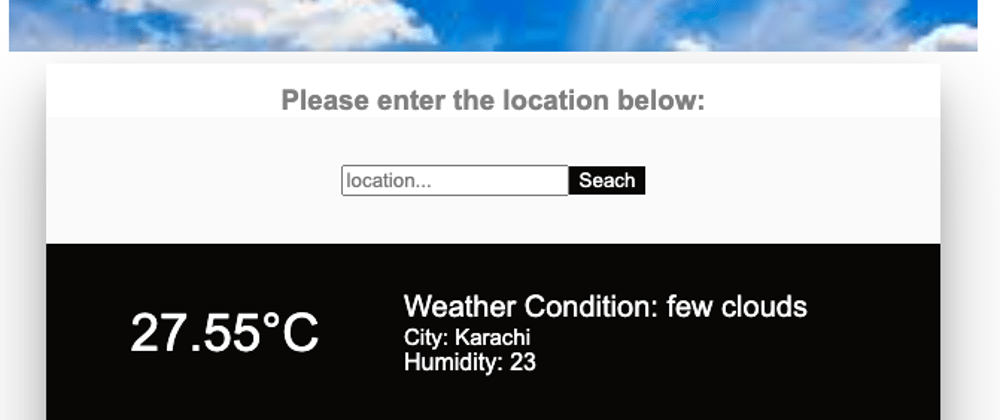
Today, we'll create a simple weather app using the openweathermap api where user will enter a city and we will display the current temperature, weather condition, humidity value and name of the city. My goal here is to experiment with the integration of Node JS on the server side and handlebars as the templating engine just to give you guys a different touch of the syntax of templates, partials and views which we'll create to render the app on the webpage.
So, let's start by creating a new app in the code editor of your choice, I am using VS code and I will navigate in the terminal of my application and initialize node by typing:
npm init
This will create a package.json file in the root of your app indicating the metadata(information) related to your app and all the dependencies required in this app will also be handled in this file.
Next, we will install all the dependencies (npm packages) that we will use through out the project. I have mentioned the dependencies, their use and the commands required to install below:
- express -- it is the standard server-side framework for Node JS that's why we need to have this installed
npm i express
- handlebars template engine -- it is the templating language framework which we will use to generate the HTML for our views/pages
npm i hbs
- request -- finally we would need the request module to make the HTTP calls and get the required data
npm i request
Now, we will create a src folder in the root directory of our app and create an app.js file there and require the dependencies and also place the initial code for the server to setup:
const express = require('express');
const req = require('express/lib/request');

const app = express();

const port = process.env.PORT || 3000;

// create a default route for our server
app.get('/', (req,res)=>{
    res.send('This is the default Route...')
})

app.listen(port, () => {
    console.log('Server is up and running on port: ', port)
});
The above code will make sure that the server is running on port 3000.
Please note that for this app you have to login to openweathermap website and generate an api key which will be used in the base url of this app.
We have defined the base_url and secret key in a separate file called config.js in an object called constants:

Now we will create another file weatherData.js in the root directory and call the api to retrieve current temperature, name of the city, weather description and humidity. For this purpose, we would have to import the request module since we will make an http request to the openweathermap api and then fetch the data from api:
const request = require('request')
const constants = require('./config')

const weatherData = (address, callback) => {
    const url  = constants.openWeatherMap.BASE_URL + encodeURIComponent(address) + `&appid=` + constants.openWeatherMap.SECRET_KEY

request({url,json:true},(error,{body})=>{
    // console.log(body)
    if(error){
        callback(`Can't fetch the data`,undefined)
    } else {
        callback(undefined, {
           temperature: body.main.temp,
           description: body.weather[0].description,
           cityName:body.name,
           humidity:body.main.humidity
        })
    }
})
}

module.exports = weatherData;
The above code is getting the data from the api in a callback function and targeting the response object to extract the required data which is
- temperature: body.main.temp
- description: body.weather[0].description,
- cityName:body.name,
- humidity:body.main.humidity
Now we can call this weatherData method in src/app.js to have access to the response:
const weatherData = require('../weatherData')
Also, we'll define a /weather route here where we can console.log the results obtained:
// This is the Route to get the weather data
// localhost:3000/weather?address=chicago
app.get('/weather', (req,res) => {
    const address = req.query.address

    if(!address){
        return res.send({
            error: "Please enter a location to search weather"
        })
    }
   weatherData(address,(error, {temperature, description,cityName,humidity}) => {
       if(error){
           return res.send({
               error
           })
       }
       console.log(temperature,description,cityName,humidity)
       res.send({
           temperature,
           description,
           cityName,
           humidity
       })
   })
})
Also, we will be creating two folders under templates:
- partials -- to create the partial to be used on different pages in our app like header/footer
- views -- to create the html for homepage and other pages
We would need to specify the views and partials path in src/app.js as follows:
const hbs = require('hbs');
const path = require('path');

const port = process.env.PORT || 3000;

// specifying the path to our public folder having static assets
const publicStaticDirPath = path.join(__dirname,'../public')

const viewsPath = path.join(__dirname,'../templates/views')
const partialsPath = path.join(__dirname,'../templates/partials')

app.set('view engine','hbs');
app.set('views', viewsPath);
hbs.registerPartials(partialsPath)

app.use(express.static(publicStaticDirPath))
Please note that we also have a public directory in the root of our app where we'll define all the static assets like style.css and app.js
Now let's move to the views folder and create an index.hbs file where we will defing the html for the index page using handlebars templating engine:
<!DOCTYPE html>
<html>
    <head>
        <title>{{title}}</title>
        <link rel="stylesheet" href="css/style.css"/>
    </head>
    <body>
        <div class="main-content">
            {{!-- > refers to the partial: header --}}
            {{>header}}
            <article class="widget">
                <h3 class="text">Please enter the location below:</h3>
                <form class="weatherLocation"><input placeholder="location..." type = "text"/><button>Seach</button>
                </form>
                <div class="weatherInfo">
                    <div class="temperature"><span></span></div>
                    <div class="description">
                        <div class="weatherCondition"></div>
                         <div class="place"></div>
                        <div class="humidity"></div>
                    </div>
                </div>
                <div class="date"></div>
            </article>
        </div>
        <script src="js/app.js"></script> <!-- absolute path -->
    </body>
</html>
Now we move on the app.js file which is created in the public/js folder where we will select the elements from the DOM, and render the output on the screen, please note that the style.css file is not included here but you can have a look at the complete code here
var fetchWeather = "/weather";

const weatherForm = document.querySelector('form');
const search = document.querySelector('input');


// const weatherIcon = document.querySelector('.weatherIcon i');
const weatherCondition = document.querySelector('.weatherCondition');

const tempElement = document.querySelector('.temperature span');

const locationElement = document.querySelector('.place');

const humidityElement = document.querySelector('.humidity');

const dateElement = document.querySelector('.date');

const monthNames = ["January", "February", "March", "April", "May", "June", "July", "August", "September", "October", "November", "December"]

dateElement.textContent = new Date().getDate() + ", " + monthNames[new Date().getMonth()].substring(0, 3) + " " + new Date().getFullYear();


weatherForm.addEventListener('submit', (event) => {
    event.preventDefault();

    locationElement.textContent = "Loading...";
    tempElement.textContent = "";
    weatherCondition.textContent = "";
    const locationApi = fetchWeather + "?address=" + search.value;

    fetch(locationApi).then(response => {
        response.json().then(data => {
            if(data.error) {
                locationElement.textContent = data.error;
                tempElement.textContent = "";
                weatherCondition.textContent = "";
            } else {
                locationElement.textContent ='City: ' + data.cityName;
                tempElement.textContent = (data.temperature - 273.5).toFixed(2) + String.fromCharCode(176);
                weatherCondition.textContent = 'Weather Condition: ' + data.description;
                humidityElement.textContent = 'Humidity: ' + data.humidity;
                weatherForm.reset();
            }
        })
    });

})
The code here is self explanatory in which we have just fetched the /weather route and rendered the output object into different divs on the webpage and once the output is displayed, we reset the form so that the user can type in another search value.
Also, please note that the openweathermap api returns the temperature in kelvin therefore we would have to subtract 273 from the output so that the temperature is displayed in Celsius.
We also display current date by calling the javascript standard new Date() method and since the getMonth() call will return a value from 0-11 but we want to display the name of the month so we store the names of the months in an array and retrieve the name of the month from the array depending on the result of new Date().getMonth() method.
locationApi is actually the endpoint which includes the base route i-e /weather and then the location which needs to be passed as the query parameter, this will make a call to the weatherData function and return our desired result.
I have tried to explain as much as possible in the above article, however you can get more insight in the app by going through the code here
If you are looking for a learning experience that makes you a professional developer with hands-on coding skills, join one of the best courses here
I hope you enjoyed reading the article..
Wish you all the very best of luck...
Happy coding...


Top comments (1)
To retrieve the weather information you don't have to import the request module and call the raw API. All can be simplified by using the superface sdk ( it also supports multiple weather providers other than openweathermap )
all you have to do is install the package with - npm install @superfaceai/one-sdk
and follow these steps for integration - superface.ai/weather/current-city