At the time of writing, Amazon Web Services (AWS) is the most popular public cloud provider with a market share of 34%, according to statista.com. If you are new to cloud computing and want to know if AWS is the right fit for you, keep reading to find out the main advantages of Kubernetes on AWS, the different options it offers, how to set up a cloud, and how much it will cost you.
Why AWS
First things first: why would you choose AWS? We think it is perfect if you want to focus on developing your applications and rely on the provider the cloud management. In addition, it has some other very interesting features:
AWS offers a fully integrated ecosystem of services for the cloud. For example, CloudWatch for monitoring, Elastic Load Balancer for load balancing, IAM for users and permissions, VPC for networking, and more.
High availability. The AWS service is split into independent Regions. Availability Zones are distinct locations within an AWS Region, which have low-latency connectivity between them but are isolated from failures in the others.
You have the possibility of launching service replicas across multiple physical nodes – not just different virtual machines –, yielding true scalability.
It offers completely managed Kubernetes support, as well as its own native container orchestrator. More on this in a second.
Container orchestration services in AWS
AWS offers two different container orchestration services: ECS and EKS. In this section, we will cover why you need one, the basics of each of them, and the reasons why you’d probably want to go with EKS.
What is a container orchestrator?
When you run containerized applications on the cloud, you deploy multiple replicas of each one. Each replica has its lifecycle, meaning that it is deployed, runs and, at some time, it crashes. When the demand arises, you want to start more replicas. If it decreases, you want to destroy some of them. If you are running a single service with a handful of replicas, you could probably manage them yourself. The moment you have hundreds of running instances, it becomes unmanageable and you need a tool that automates all those processes. This tool is a container orchestrator. Amazon developed its own container orchestrator, available in its ECS service, and it also offers Kubernetes support.
ECS
ECS stands for Elastic Container Service and it is Amazon’s native container orchestrator. It manages the whole container lifecycle (start, re-schedule, load balance, and so on). When you create an ECS cluster, you get the control plane for the virtual machines that will actually run the containers. After that, you have to attach the working nodes to this ECS cluster. ECS is good for low-complexity applications and you get it for free with your AWS account.
EKS
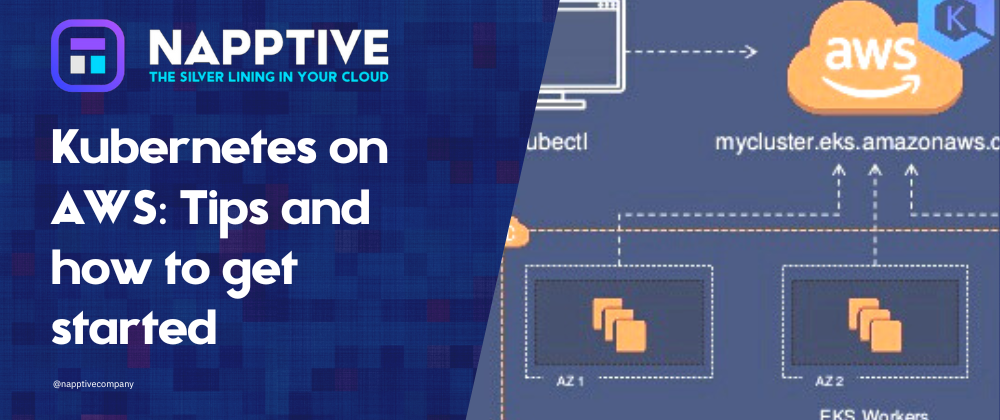
EKS is the Elastic Kubernetes Service. This service is perfect if you want Kubernetes as the container orchestrator but still want to use AWS infrastructure. In this case, the EKS cluster is composed of Kubernetes’ master nodes. EKS deploys, manages, and provisions the master nodes. AWS stores the etcd data, replicates it throughout the Availability Zone, and creates backups. This means that AWS completely manages Kubernetes for you, which is a huge aid as it is quite a complex tool. Using EKS costs $0.10 per hour. You can use a single cluster to run multiple applications, so this price is basically a flat rate no matter how many apps or services you launch.
Why go with EKS?
Though ECS may seem good enough, you may still want to use Kubernetes as your container orchestrator. It is so widely used that you can take advantage of its popularity:
there is a large community that supports the project, so you will have plenty of resources from learning to troubleshooting to exploiting its potential as your business grows;
there is a large variety of tools for K8s, including monitoring, security, and much more;
you can use multi-cloud with lower overhead, as all main vendors support Kubernetes;
and, for the same reason, it is easier to migrate to another platform.
Choosing worker nodes in AWS
ECS and EKS provide the control plane of the cluster, so after creating it you still need to attach the actual nodes that run the applications. In AWS you have three options for this: EC2 instances, creating Nodegroups, and using Fargate.
EC2
An EC2 instance is a virtual machine you have to manage. That is, you have to create it, make it join the cluster, check if you have enough resources in it for your next container, manage the operating system, etc. The upside is that you have full access and control of your machine, which you may desire. When you use an EC2 instance, you pay for the whole server – you can check the pricing here.
Fargate
If you choose this service, you do not need to provision or manage servers. It adds infrastructure on demand, meaning it scales up and down automatically without fixed resources defined beforehand. Consequently, you pay for the time and capacity (CPU and memory) you use.
Nodegroups
Between EC2 (self-managed) and Fargate (totally managed), we have a semi-managed option, which is creating Nodegroups of EC2 instances. This solution automates some of the work (autoscaling), but you still have to configure your virtual machines.
How to create a K8s cluster in AWS EKS
Let’s assume you decided to use AWS EKS. In this section, we will walk you through the steps to achieve it.
The first step will be creating an AWS account. You can sign up for a Free Tier account if you just want to try it out first.
Now, you will need to do some preparation steps, actually create the cluster control plane, and then create worker nodes and attach them to the cluster. This involves a lot of configuration work. Fortunately, there is a Weaveworks tool named eksctl that makes this as easy as running one single command.
To use eksctl, you need to set your AWS credentials on your computer first. Assuming you just created your AWS account, you can access the AWS web console with your root user and click on your Profile > My Security Credentials > select the Access Key tab > Create New Access Key > Show Access Keys. This will show you the Access ID and the Secret Access Key only once, so copy them before closing the pop-up window. Then, you have two options:
Install the AWS CLI and run aws configure to create the configuration file in your HOME directory (~/.aws/credentials).
OR set the variables aws_access_key_id and aws_secret_access_key directly on your PATH.
Finally, install eksctl and simply run eksctl create cluster. This will use the default values for the configuration, but you can override any value using parameters. For example, you will surely want to configure the name of the cluster, the AWS Region closest to your location, and maybe use Fargate for your worker nodes. Then, you will need to run this command:
$ eksctl create cluster –name test-cluster –region eu-central-1 –fargate
If you want to easily destroy the cluster, you will have to run:
$ eksctl detele cluster –name test-cluster
This command will remove all the resources associated with the cluster, so that they do not cost you extra money.
We have seen a general overview of AWS container services, the different options for adding worker nodes to your cluster, and an easy way to set it up and delete it. We hope this will help you choose the best public cloud configuration for your interests.
This article was originally published at Napptive


Top comments (0)