
I was going through an article and found 10 cool web-apps for JS developer to make. Out of them one was the very popular hackernews site. Although the layout is very simple, but you learn all good things like API call to display post, create a post and authentications.
I was thinking to use my new found knowledge of GraphQL using Apollo client, yoga and Prisma to create it. But then found 8base, which allows to get a front-end app up very easily with no backend code. Everything is handled by 8base and we need to write only some GraphQL query and mutations to interact with it.
My article is based on the learning from the 8base official blog on the same.
Let’s create a new react project by npx create-react-app hackernews-react.
The go to the directory and do npm start
This will start our boilerplate react project at http://localhost:3000/
Let’s create our backend first quickly and then we will come back to complete our frontend.
Goto 8base website https://www.8base.com/ and create your free account. When you are in your dashboard, click on the database icon on the left. Then click on New Table.
Here create a table Posts, with three fields url, description and votes. The fields url and description will be text and will contain all default settings.
But votes will be Number and make Default Value as 0.
 The main settings
After that click on the Endpoint at the bottom left an it will open a pop-up with the endpoint. Copy it as we will use it from our frontend later.
 API endpoint
We will give anyone full access to Create a Post and see it. We will add authentication in the later part of the article. So, head over to Settings -> Roles -> Guest
 Giving Access
Here we will give the access as below.
 Full access
Once in the dashboard, we will also create some posts. This will enable us to directly write a Query and display the posts in the frontend.
Again head over to Data -> Posts -> Data and add some rows.
 Entering Data
Lets first install all the requires packages in our project by npm
npm install apollo-boost graphql react-apollo graphql-tag @8base/react-sdk date-fns react-router-dom
 npm install
Open your code editor and open index.js
 The default
Here we will first import ApolloProvider and ApolloClient. Then add the client with the endpoint we got from our dashboard. Finally we will wrap our whole component in .
 Updated index.js
It’s time to get rid of the default React boilerplate home page and add some react router logic to our project. This is just a basic react router code, which is used to implement Routing in react.
Open the App.js and replace the old code with the one below.
 New App.js
Next update App.css to contain the basic style.
 App.css
It’s time to create the Header component now. Create a folder in src called components. Inside it create another folder header.
Create two files inside it as index.js and index.css
Put the following code in index.js
We are just using some basic Navigation divs, which we are going to style later.
 index.js
Now, lets create a router.js file in the src directory
 router.js
We now need to create the Home component, which will be show when the user goes to the root directory. Again, inside component create another folder home.
Create two files inside it as index.js and index.css
Put the following code in index.js
 Home Page
Finally, our localhost will show something. If you had noticed earlier, it was always giving error.
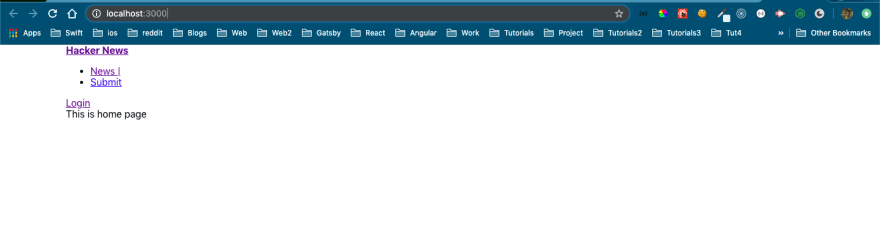 Basic layout
Now, lets give this ugly website, some hackernews awesome style.
Open the index.css inside the header folder and add this first for the root id news-header
#news-header {
background: #ff6600;
display: flex;
justify-content: space-between;
padding: 3px 5px;
margin-top: 7px;
}
This will change our header like below.
 Header first change
Next, we will add another flexbox to section
#news-header section {
display: flex;
align-items: center;
}
It will result in below.
 Another Flexbox
As all NavLinks are anchor tag, they gives this blue hyperlinks. We will remove them next with these two rules.
#news-header a {
text-decoration: none;
color: black;
font-size: 14px;
text-transform: lowercase;
}

.brand a {
text-transform: capitalize !important;
margin-right: 8px;
}
It will result in below.
 Anchor tags removed
Let’s remove the default styles for ul and li and also convert the ul in a flexbox.
#news-header .nav ul {
display: flex;
list-style: none;
padding-left: 0;
margin: 0;
}

.nav li {
margin-right: 5px;
}
It will result in our final Header changes.
 Header changes
Next, let add some css to the Home component’s index.css.
.home{
background: #f6f6ef;
padding: 5px 2px 15px;
}
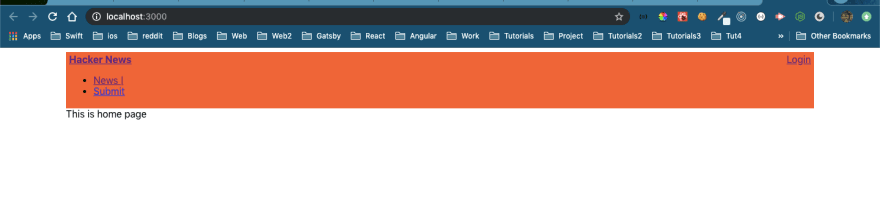
This will give our app, the hackernews look.
 Hackernews look
We will now create our PostList component where we will do all the song and dance with GraphQL and display the data from our backend.
Again, inside component create another folder post-list.
Create two files inside it as index.js and index.css
Put the following code in index.js
 post-list
Here we are first import the gql and graphql required in the file. Then we are writing our GraphQL query to fetch the Posts. Here the fields url, description and votes were created by us and the id and createdAt was auto generated by 8base/GraphQL.
We can also check if the query is working by testing it in the GraphQL playground provided by 8base.
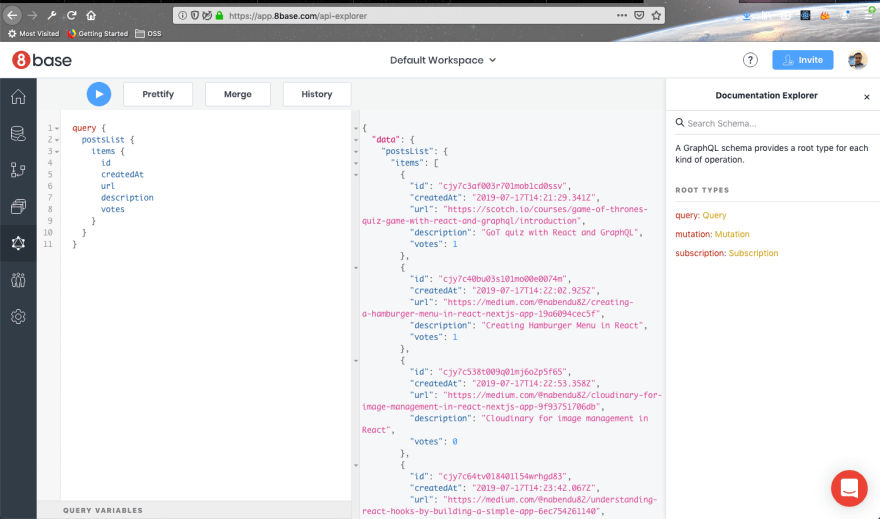 GraphQL playground
We executed the query in GraphQL playground, but how to do the same in code. For that part we use the GraphQL Higher Order Component(HOC). There we pass two parameters — the query string POST_QUERY and an object through which we pass props to our component.
Here the result.data, we are first storing in data variable. If we dig further then the data.postsList.items contains the array for all our posts. We are storing it in a posts variable.
Let’s use the loading, posts, refetch variables, we got from graphql().
We will create a React Functional component PostList for this. Here, we are showing Loading… if the database query is been made. Once it is done we are using map to go through the array posts and console it.
 PostList Functional component
Let’s add the PostList component to Home component, to use it.
 Home Component
Now, go to http://localhost:3000/ and open your console. You will get all the posts from the 8base database.
 Getting the Data
Now, let’s display the data we got from the GraphQL database. We will create a separate component for it.
Again, inside component create another folder post-item.
Create two files inside it as index.js and index.css
Put the following code in index.js
Here, we are using a simple React functional component and use url, description, votes, createdAt to display individual post.
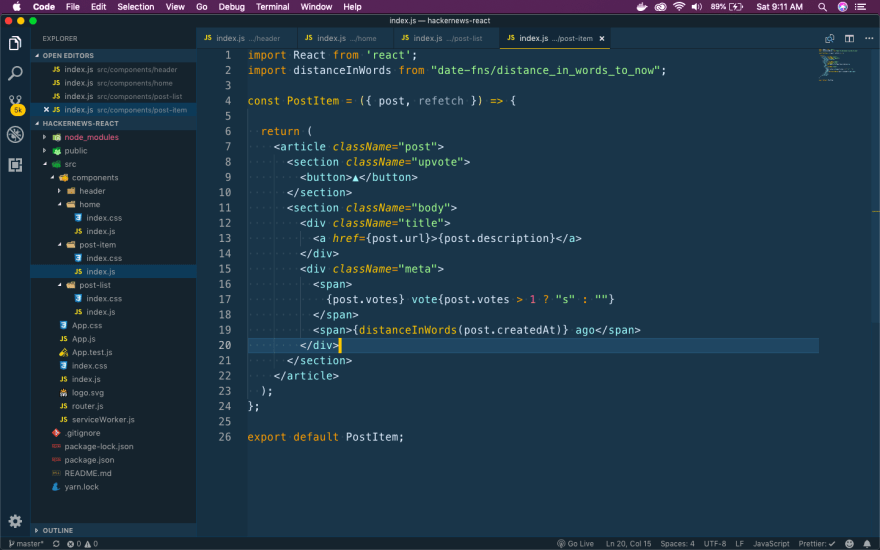 PostItem
Now, use this PostItem instead of the console.log, in PostList component.
 PostItem imported
Now, when we go to http://localhost:3000/ and all the posts will be displayed.
 Posts displayed
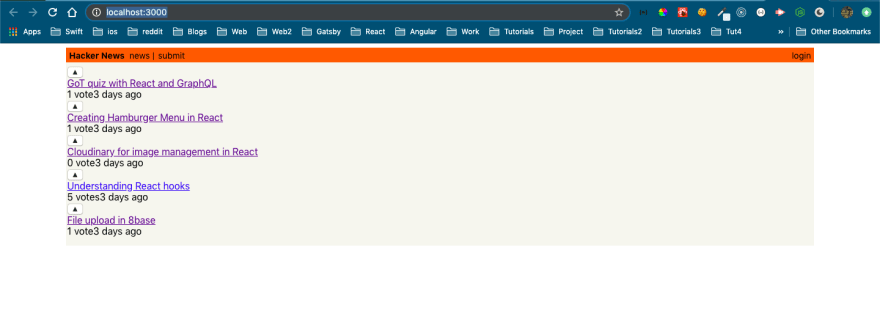
It’s look a bit ugly and not like the posts in hackernews. So, it’s time to give some styles.
Open the index.css of the PostItem component and add this styles. We are using a Flexbox at the top level article and the rest of the styles are just font changes.
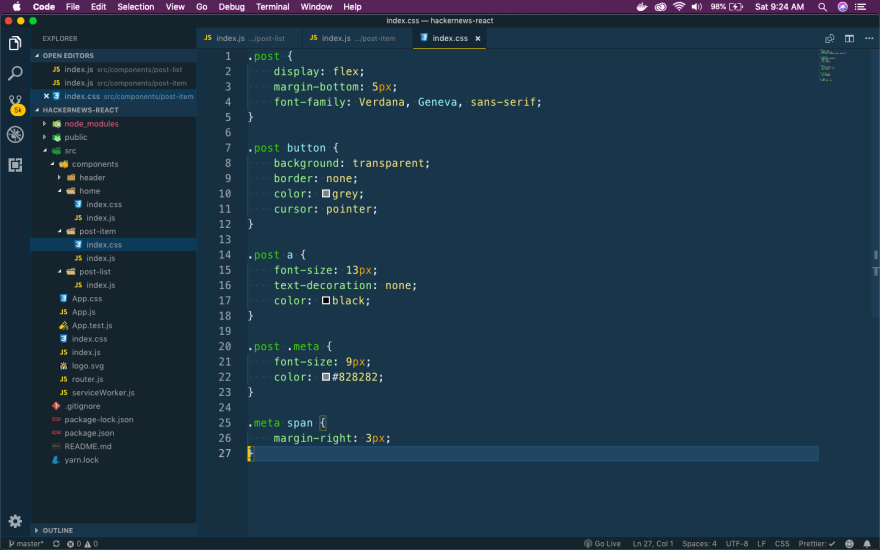 Just some Styles
Now, when go to http://localhost:3000/ and we get this beauty.
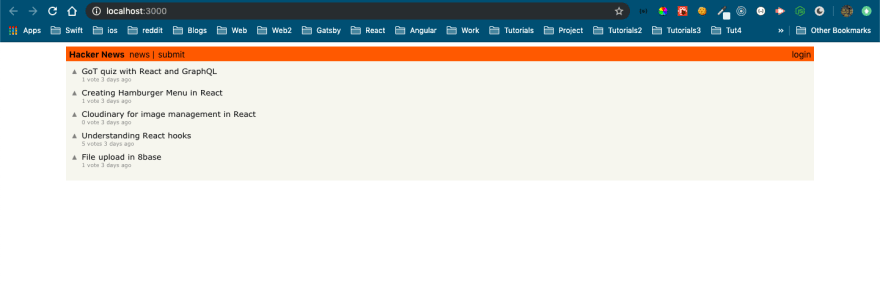 hackernews beauty
Now, that we are able to display all posts let’s create the ability to Submit posts through frontend.
For this we have to write Mutation, but there are many in-build mutations provided by 8base. We can check if we have one for submitting our form.
Goto you 8base GraphQL playground and click on Mutation.
 Mutation
Next, scroll down the list and you will find a postCreate Mutation. We can see that it takes PostCreateInput and returns a Post
 postCreate
Again, inside component create another folder submit.
Create a file inside it as index.js This time we will do some inline styling.
Put the below code in it. We have a simple form here, with two fields for url and description.
One thing to notice that we are using latest hook features in form instead of the old class based method. You can learn more about useState hook here.
 A Simple Form
We also need to create a route for PostForm in router.js file
 router.js
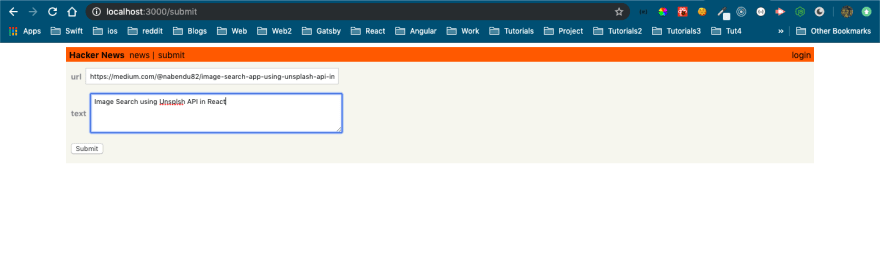
After doing this go to http://localhost:3000/submit and you will see this form. It definitely need some styling.
 An ugly duckling
First we will add a box to the whole form with some padding.
 Adding the box
Which will result in the below.
 The box
Next, we will add style for the div wrapping our elements and also for each label.
 div and label styles
Lastly, we will add some styles for input.
 input styles
Which will complete our styles for the PostForm component.
 PostForm component
Now, we will add Mutation to our component to add the values to the 8base database. First add the postCreate mutation.
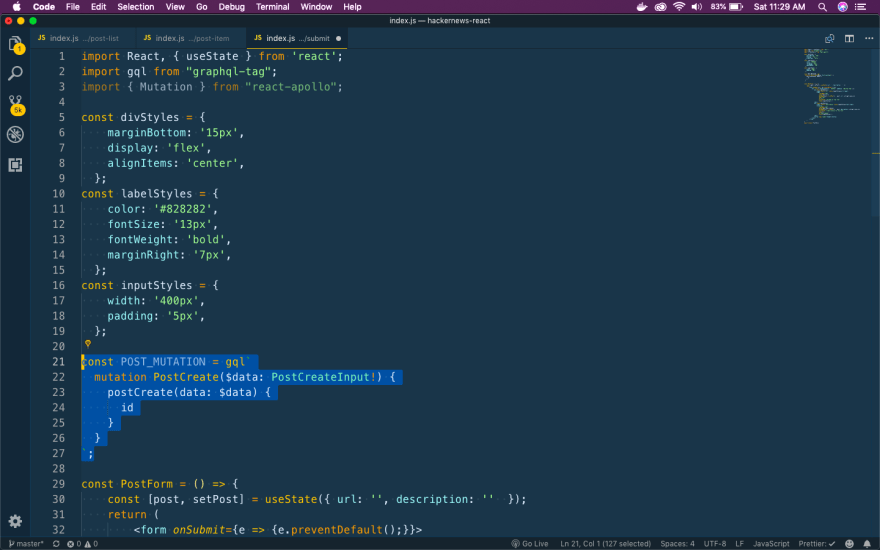 Mutation
Next, as with GraphQL mutation we will wrap the whole component with the Mutaion.
 Mutation wrapping
Next, we will add a function onFormSubmit, which will be called when we submit the form. Here we take the post object, which contains the url and description and called the createPost function with this data.
On getting the successful response, which will have an id, we will get back to the root url using history.push(“/”) from react-router.
 Form Submit
We can test it by going to http://localhost:3000/submit and creating a new post and then submit. On submission, it will take us back to the home page.
 Using submit
Now, we will update the voting functionality in our app. We have a postUpdate Mutation provided by 8base to do exactly the same.
Open the component for PostItem and we will follow the same song and dance, we did in the PostForm component.
First let’s add the import statement and the variable VOTE_MUTATION, which will have the postUpdate Mutation.
 postUpdate Mutation
Next, we will add the upVotePost function, which will update the votes in the 8base database.
 upVotePost
Now, we will add Authentication in our project with a breeze. We will be using the inbuilt 8base authentication. Click on Settings -> Authentication
Then click on the + sign next to Authentication Profiles.
 Adding Authentication
In the next pop-up give a Name. Type should be 8base Authentication. Self Signup should be Off.
In Roles give Guest and Administrator. And click on Add Profile
 Authentication Profile
Scroll to the top of the page and you will get, Client ID and Domain. We will use them later in the code.
 Client ID and Domain
Scroll down and give the below values in Custom Domains
 Custom Domains
Let’s now add these to our app. Open the root index.js
Here we are adding these values and also wrapping our App component with AppProvider.
 AppProvider
Next, we will create a new Component login and a file index.js inside it. We are using the withAuth function provided by 8base for the login.
 login component
Also, add this Login component to router.js
 router.js
Next, we need to create an AuthCallback component. Create a file authCallback.js in the src directory. You can copy it’s content from here.
We also need to add this in the router.js
 Router
Next, let’s create the mechanism for logout. We will create a logout.js file in login component. Here again we are using withLogout provided by 8base.
 Logout
Also, update the login.js to use this LogoutButton
 LogoutButton added
Finally, we will do a small update in Header component.
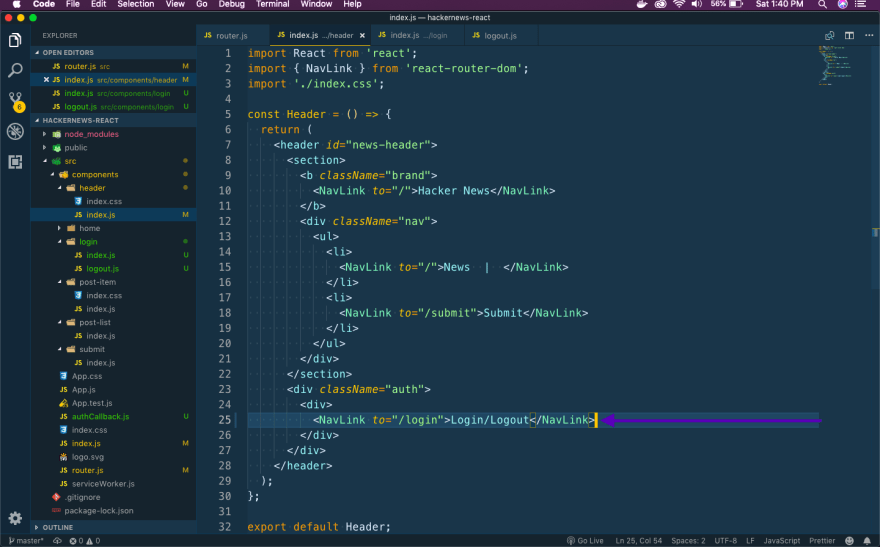 Header
It’s now time to test our web-app for authetication. Once you click on Login/Logout, it will show a small Login button.
 Login button
Once you click on it, you will be taken to the authorization pop-up. Here, you can Login or signup with a new email.
 Login
Login
If you logged in successfully, it will redirect to the home page. Once again click on Login/Logout, it will show a small Logout button.
 Logout
Click on it and you will go back to the homepage.
There are two enhancements to the above logic. I didn’t liked the login/logout text.
Also the submit link should open the form, only if the user is logged in. Otherwise, it should show the login button.
I was not getting the logic/way to solve it. So, i contacted the 8base team and they promptly replied to use the isAuthorized in the App component and pass it as props to Header component.
So, i went ahead and made the changes. The changes in App.js
 App.js changes
And also changes the way to show login or logout, Submit in the Header component.
 Changes in Header component.
Now, go to http://localhost:3000/ and it will show logout link if you are logged in and also Submit will take to form.
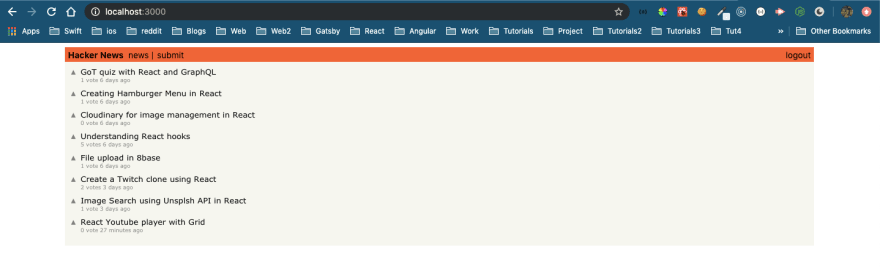 Hackernews clone
This completes our article. Hope you liked it. You can find the full code in my github link https://github.com/nabendu82/hackernews-react


Top comments (0)