
If you want to use an Azure Pipelines Self Hosted agents, you have some different options. But only few of them allow you to be truly flexible and scalable.
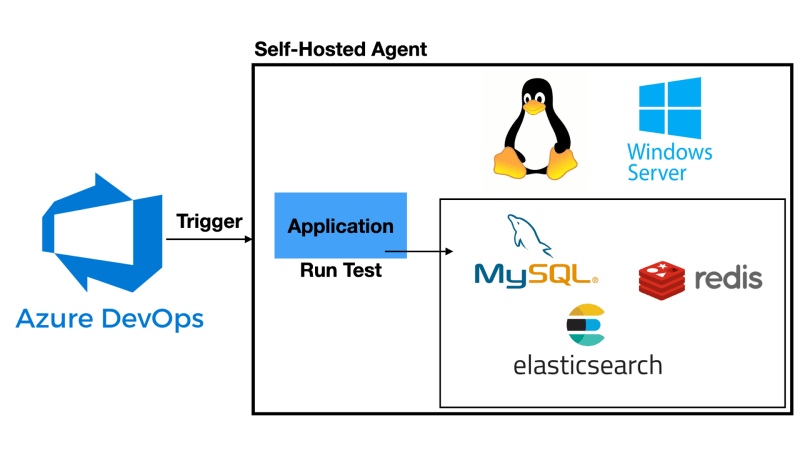
In this post we will see how to run the Azure Pipelines Agents in Docker, so you can take advantage of orchestrators like Kubernetes, Azure Container Instances, and many more.
Let's get into it.
Intro
Today I wanna show you how you can run your Azure Pipelines agents in Docker so you can then take advantage of orchestrators like Kubernetes, Azure Container Instances, and others to make your CI CD agents truly scalable and flexible.
I will walk you through a complete container example.
Video
As usual, if you are a visual learner, or simply prefer to watch and listen instead of reading, here you have the video with the whole explanation and demo, which to be fair is much more complete than this post.
(Link to the video: https://youtu.be/rO-VKProMp8)
If you rather prefer reading, well... let's just continue :)
Supported Platforms
First things first: Let's talk about the supported platforms.
The good news is that both Windows and Linux are supported as container hosts. If your CICD process requires tools that are platform specific there is no problem.
Prerequisites
Second thing, prerequisites. On Windows you would need to remember to enable Hyper-V, which is disabled by default, while on Linux it just works.
Of course you would need to have Docker installed on both platforms, and that could be either Docker Community Edition or Docker Enterprise Edition.
Container Image Creation
Alright, let see now how to create a basic image. The process is slightly different between Windows and Linux, so I will cover both.
I will start with Windows, but you can skip to the Linux section if you want.
Windows
Click here to check the video and see this explained in much greater details.
To create a container image for Windows you need a Docker file, of course.
FROM mcr.microsoft.com/windows/servercore:ltsc2019

WORKDIR /azp

COPY start.ps1 .

CMD powershell .\start.ps1
We derive from the Server Core image, which contains already all the dependencies we need.
Next we need to download the PowerShell script Microsoft provides (here):
if (-not (Test-Path Env:AZP_URL)) {
  Write-Error "error: missing AZP_URL environment variable"
  exit 1
}

if (-not (Test-Path Env:AZP_TOKEN_FILE)) {
  if (-not (Test-Path Env:AZP_TOKEN)) {
    Write-Error "error: missing AZP_TOKEN environment variable"
    exit 1
  }

  $Env:AZP_TOKEN_FILE = "\azp\.token"
  $Env:AZP_TOKEN | Out-File -FilePath $Env:AZP_TOKEN_FILE
}

Remove-Item Env:AZP_TOKEN

if ($Env:AZP_WORK -and -not (Test-Path Env:AZP_WORK)) {
  New-Item $Env:AZP_WORK -ItemType directory | Out-Null
}

New-Item "\azp\agent" -ItemType directory | Out-Null

# Let the agent ignore the token env variables
$Env:VSO_AGENT_IGNORE = "AZP_TOKEN,AZP_TOKEN_FILE"

Set-Location agent

Write-Host "1. Determining matching Azure Pipelines agent..." -ForegroundColor Cyan

$base64AuthInfo = [Convert]::ToBase64String([Text.Encoding]::ASCII.GetBytes(":$(Get-Content ${Env:AZP_TOKEN_FILE})"))
$package = Invoke-RestMethod -Headers @{Authorization=("Basic $base64AuthInfo")} "$(${Env:AZP_URL})/_apis/distributedtask/packages/agent?platform=win-x64&`$top=1"
$packageUrl = $package[0].Value.downloadUrl

Write-Host $packageUrl

Write-Host "2. Downloading and installing Azure Pipelines agent..." -ForegroundColor Cyan

$wc = New-Object System.Net.WebClient
$wc.DownloadFile($packageUrl, "$(Get-Location)\agent.zip")

Expand-Archive -Path "agent.zip" -DestinationPath "\azp\agent"

try
{
  Write-Host "3. Configuring Azure Pipelines agent..." -ForegroundColor Cyan

  .\config.cmd --unattended `
    --agent "$(if (Test-Path Env:AZP_AGENT_NAME) { ${Env:AZP_AGENT_NAME} } else { ${Env:computername} })" `
    --url "$(${Env:AZP_URL})" `
    --auth PAT `
    --token "$(Get-Content ${Env:AZP_TOKEN_FILE})" `
    --pool "$(if (Test-Path Env:AZP_POOL) { ${Env:AZP_POOL} } else { 'Default' })" `
    --work "$(if (Test-Path Env:AZP_WORK) { ${Env:AZP_WORK} } else { '_work' })" `
    --replace

  Write-Host "4. Running Azure Pipelines agent..." -ForegroundColor Cyan

  .\run.cmd
}
finally
{
  Write-Host "Cleanup. Removing Azure Pipelines agent..." -ForegroundColor Cyan

  .\config.cmd remove --unattended `
    --auth PAT `
    --token "$(Get-Content ${Env:AZP_TOKEN_FILE})"
}
This script checks the environment, create some folders and install and configure the agent.
If you want a fresh agent container for every pipeline job, pass the --once flag to the run command. You must also use a container orchestration system, like Kubernetes or Azure Container Instances, to make sure you start new copies of the container when the work completes.
Finally, let's just create the image:
docker build -t dockeragentwin:latest -f Dockerfile.windows .
Once again, you may want to check the video and see this explained in much greater details.
Linux
Click here to check the video and see this explained in much greater details.
For Linux, the Dockerfile looks a little different:
FROM ubuntu:18.04

# To make it easier for build and release pipelines to run apt-get,
# configure apt to not require confirmation (assume the -y argument by default)
ENV DEBIAN_FRONTEND=noninteractive
RUN echo "APT::Get::Assume-Yes \"true\";" > /etc/apt/apt.conf.d/90assumeyes

RUN apt-get update \
&& apt-get install -y --no-install-recommends \
        ca-certificates \
        curl \
        jq \
        git \
        iputils-ping \
        libcurl4 \
        libicu60 \
        libunwind8 \
        netcat \
        libssl1.0

WORKDIR /azp

COPY ./start.sh .
RUN chmod +x start.sh

CMD ["./start.sh"]
The main differences here are that we use a Linux base image, and that we need to install the dependencies manually using apt-get.
Then we need the startup script as well, but this time is a bash script (also provided by Microsoft here)
#!/bin/bash
set -e

if [ -z "$AZP_URL" ]; then
  echo 1>&2 "error: missing AZP_URL environment variable"
  exit 1
fi

if [ -z "$AZP_TOKEN_FILE" ]; then
  if [ -z "$AZP_TOKEN" ]; then
    echo 1>&2 "error: missing AZP_TOKEN environment variable"
    exit 1
  fi

  AZP_TOKEN_FILE=/azp/.token
  echo -n $AZP_TOKEN > "$AZP_TOKEN_FILE"
fi

unset AZP_TOKEN

if [ -n "$AZP_WORK" ]; then
  mkdir -p "$AZP_WORK"
fi

rm -rf /azp/agent
mkdir /azp/agent
cd /azp/agent

export AGENT_ALLOW_RUNASROOT="1"

cleanup() {
  if [ -e config.sh ]; then
    print_header "Cleanup. Removing Azure Pipelines agent..."

    ./config.sh remove --unattended \
      --auth PAT \
      --token $(cat "$AZP_TOKEN_FILE")
  fi
}

print_header() {
  lightcyan='\033[1;36m'
  nocolor='\033[0m'
  echo -e "${lightcyan}$1${nocolor}"
}

# Let the agent ignore the token env variables
export VSO_AGENT_IGNORE=AZP_TOKEN,AZP_TOKEN_FILE

print_header "1. Determining matching Azure Pipelines agent..."

AZP_AGENT_RESPONSE=$(curl -LsS \
  -u user:$(cat "$AZP_TOKEN_FILE") \
  -H 'Accept:application/json;api-version=3.0-preview' \
  "$AZP_URL/_apis/distributedtask/packages/agent?platform=linux-x64")

if echo "$AZP_AGENT_RESPONSE" | jq . >/dev/null 2>&1; then
  AZP_AGENTPACKAGE_URL=$(echo "$AZP_AGENT_RESPONSE" \
    | jq -r '.value | map([.version.major,.version.minor,.version.patch,.downloadUrl]) | sort | .[length-1] | .[3]')
fi

if [ -z "$AZP_AGENTPACKAGE_URL" -o "$AZP_AGENTPACKAGE_URL" == "null" ]; then
  echo 1>&2 "error: could not determine a matching Azure Pipelines agent - check that account '$AZP_URL' is correct and the token is valid for that account"
  exit 1
fi

print_header "2. Downloading and installing Azure Pipelines agent..."

curl -LsS $AZP_AGENTPACKAGE_URL | tar -xz & wait $!

source ./env.sh

print_header "3. Configuring Azure Pipelines agent..."

./config.sh --unattended \
  --agent "${AZP_AGENT_NAME:-$(hostname)}" \
  --url "$AZP_URL" \
  --auth PAT \
  --token $(cat "$AZP_TOKEN_FILE") \
  --pool "${AZP_POOL:-Default}" \
  --work "${AZP_WORK:-_work}" \
  --replace \
  --acceptTeeEula & wait $!

print_header "4. Running Azure Pipelines agent..."

trap 'cleanup; exit 130' INT
trap 'cleanup; exit 143' TERM

# To be aware of TERM and INT signals call run.sh
# Running it with the --once flag at the end will shut down the agent after the build is executed
./run.sh & wait $!
Although it looks different, this script does exactly the same things of the Windows one: prepare the system, and install and configure the agent.
Let's build the image:
docker build -t dockeragentlin:latest -f Dockerfile.linux .
Once again, if you want a fresh agent container for every pipeline job, pass the --once flag to the run command.
Remember to check the video and see this explained in much greater details.
Run the container
That was not too bad right? And the fact that, as we have seen, Microsoft provides the full script for both platforms makes it even easier.
If you are interested in how you can Drastically improve you Docker Build Performance, I have a video which talks just about that.
To run the container, of course we can use the docker run command:
docker run -e AZP_URL=<Azure DevOps instance> -e AZP_TOKEN=<PAT token> -e AZP_AGENT_NAME=<Agent name> dockeragentlin:latest
As you've probably noticed, there are some environment variables we can use to control the execution. Needless to say, those works in both a local Docker instance as well as any orchestrator.

We can use the _AZP_URL_ variable to specify the URL of the instance of Azure DevOps we want to connect to. This parameter, as you may imagine, is required.
We also need to pass the _AZP_TOKEN_ variable and its value must be a Personal Access Token with the Read and Manage Agent Pools scope that is valid on the instance of Azure DevOps we are connecting to.
The other 3 variables are instead optional.
- _AZP_AGENT_NAME_ lets you set a name for the agent and it defaults to the container hostname
- _AZP_POOL_ is used to specify the Agent Pool that you want that specific agent to be part of
- And finally _AZP_WORK_ lets you cange the working directory of the agent, which by default is _work.
Extend the basic image
At this point we have a fully working basic build agent.
You can of course extend the Dockerfile to include additional tools and their dependencies, or build your own container by using this one as a base layer.
Just make sure that the start script is called and it is the last command in the Dockerfile, and ensure that any of the derivative containers don't remove any of the dependencies of the original one.
The agent in Azure DevOps
Check out this section of the video to see how a new agent appears in Azure DevOps.
Important Notes
Before we close, just a few notes.
First of all, as we have seen before, the startup script installs the agents every time the image is run from scratch. If you want the startup to be quicker, you can consider installing the agent as part of your docker image creation instead.
Also, remember that each agent automatically updates itself when it runs a task that requires a newer version of the agent.
Second thing to note is that in order to use Docker from within a Docker container, you have to bind-mount the Docker socket.

As this very noticeable warning message on the official documentation site says, remember that doing so it is not recommended because it has serious security implications. The code inside the container can inf cat run as root on your Docker host.
Lastly, if you are trying to run this on Windows and you experience an error like the one below, you need to install Git Bash by downloading and installing git-scm.
![]()
Conclusions
Alright, that's it for today. Now you can take those container images and run them in any orchestration of your choice, to have a truly flexible and scalable CICD platform with Azure Pipelines.
Let me know in the comment section below what you think about this, and if you'd like me to make a follow-up post/video on this showing how to deploy the containerized Azure Pipeline agents to Kubernetes.


Top comments (10)
Hi, I want to make a pipeline in azure devops to automate the deployment of those commands, apart I use an ACR (Azure Container Registry of Azure) image and I am using my own agent within the agent pool to launch those commands, I would have a skin like this:
pool:
name: MYPOOLAGENT
demands:
agent.name -equals $(AGENT_TO_DEPLOY) # My Agent WINDOWS
steps:
task: DockerInstaller@0
displayName: Docker Installer
inputs:
dockerVersion: 17.09.0-ce
releaseType: stable
task: Docker@2
displayName: Login to ACR
inputs:
command: login
containerRegistry: 'DockerRegistrySREDevSecOps'
script: |
docker run -d -e AZP_URL="$(azure-url)" \
-e AZP_TOKEN="$(PERSONAL_ACCESS_TOKEN)" \
-e AZP_AGENT_NAME="$(AGENT_NAME)" \
-e AZP_POOL="MYPOOLAGENT" $(acr-image)
displayName: Deploy Agent in Azure
I get the following error:
error during connect: Get http://%2F%2F.%2Fpipe%2Fdocker_engine/v1.32/version: open //./pipe/docker_engine: The system cannot find the file specified. In the default daemon configuration on Windows, the docker client must be run elevated to connect. This error may also indicate that the docker daemon is not running.
the agent in which I compile is Windows so I have added install docker tasks, but I think the docker does not initialize, how can I add some task in my pieline to correct the error?
When you use your own agens (aka Self-hosted Agents) you need to install docker on your agent manually before executing any pipeline to make sure they run with the proper permissions.
How can I specify a custom path for docker.sock while mentioning the resources or while mentioning container inside the task?
I am running the agent as a service on a linux machine which has docker installed but the socket is not at its default location. I want to run jobs inside a docker but the build fails as I am not able to specify the docker.sock path.
In order to use Docker from within a Docker container, you need to [bind-mount}(docs.docker.com/storage/bind-mounts/) the Docker socket.
you will need to add 2 parameters to your docker run command line which are
-v /var/run/docker.sock:/var/run/docker.sock -v /usr/bin/docker:/usr/bin/docker(Change it with your path)Thank you for the reply Davide! :)
The way I have configured my pipeline is somewhat like this
My agent is a running as a service. The docker installed on the agent is having its docker.sock file at a different place. As I am not running the docker run command manually is there a way I could specify it in the above configurations?
I tried giving it under resources > containers > container > options but that didn't work.
Well, that should be in the
docker runof your agent container (in the script you use to start the container that has the agent in it)Hi, I want to make a pipeline in azure devops to automate the deployment of those commands, apart I use an ACR (Azure Container Registry of Azure) image and I am using my own agent within the agent pool to launch those commands, I would have a skin like this:
pool:
name: MYPOOLAGENT
demands:
steps:
task: DockerInstaller@0
displayName: Docker Installer
inputs:
dockerVersion: 17.09.0-ce
releaseType: stable
task: Docker@2
displayName: Login to ACR
inputs:
command: login
containerRegistry: 'DockerRegistrySREDevSecOps'
script: |
docker run -d -e AZP_URL="$(azure-url)" \
-e AZP_TOKEN="$(PERSONAL_ACCESS_TOKEN)" \
-e AZP_AGENT_NAME="$(AGENT_NAME)" \
-e AZP_POOL="MYPOOLAGENT" $(acr-image)
displayName: Deploy Agent in Azure
I get the following error:
error during connect: Get http://%2F%2F.%2Fpipe%2Fdocker_engine/v1.32/version: open //./pipe/docker_engine: The system cannot find the file specified. In the default daemon configuration on Windows, the docker client must be run elevated to connect. This error may also indicate that the docker daemon is not running.
the agent in which I compile is Windows so I have added install docker tasks, but I think the docker does not initialize, how can I add some task in my pieline to correct the error?
How can i provide tools to build an SQL Database project for example?
Not sure I got your question. But if you are referring to the content of the article, you can add all the tools you need to the base image, together with the agent.
This way every time your pipeline runs, you have all the tools you need already there to use
Do you use already the Azure Pipelines Agents inside Docker Containers?
Some comments have been hidden by the post's author - find out more