
In this tutorial, we will learn how to confidently write unit tests using Testing Library which is a very popular React testing library for writing unit tests.
So let's get started.
If you want to learn React Testing Library from scratch and want to learn how to confidently test an entire application with functional components including hooks, mock API calls, and set up test coverage, then do enroll in my MERN stack course.
Why Do You Need to Write Unit Tests?
You might think that there is no need of writing so many unit test cases and wasting time, instead, we can manually test the application.
You're right, you can certainly do that. But as the application grows, it might be difficult to test all the scenarios in the application and you might miss something and even a smaller change can break the application If all the functionality is not tested properly.
That's the reason, it's recommended to write unit test cases covering all those scenarios which you're manually doing as a user.
So by executing just a single command you will be able to know If something is broken in your application If some test is failing.
What is the React Testing Library?
The React Testing Library has a set of packages that helps you test UI components in a user-centric way which means just like how the user interacts with the various elements displayed on the page.
It means what happens when the user clicks any button or types in any of the input textboxes, that interaction is tested using this testing library.
So instead of the user doing this testing manually which takes a lot of time and he/she might miss testing some scenarios when the application size grows, the testing is done by writing unit test cases and executing them by just a single command.
What Not to Test with the Testing Library
Testing Library encourages you to avoid testing implementation details like the internals of a component you're testing.
The guiding principles of this library emphasize a focus on tests that closely resemble how your web pages are interacted by the users.
You may want to avoid testing the following implementation details:
- Internal state of a component
- Internal methods of a component
- Lifecycle methods of a component
- Child components
So If you have experience with enzyme testing, where you might be checking the value of state once you click any button or you might be checking the prop value If something changes.
These types of checks are not necessary for testing with react testing library. Instead, in react testing library you check the behavior of DOM when the user clicks on a button or submits a form and so on.
How to Setup a React Project with Vite
We will be using Vite which is the most popular and a faster alternative to create-react-app.
The reason for using vite, is that create-react-app becomes slow when the application grows and takes a lot of time to refresh the page when we make any change in the application code, and by default, it also adds a lot of extra unnecessary packages which we rarely need.
Vite just rebuilds the things we changed, instead of rebuilding the entire application which saves a lot of time during development.
Vite requires Node.js version 14.18+, so make sure to install node version greater than or equal to 14.18.
The easiest and simplest way to install and switch Node.js versions is to use nvm.
Even If you're using
create-react-app, all the tests you will learn in this tutorial will run exactly the same without any errors.
To create a new Vite project with React, execute the npm init vite command from the terminal.
It will ask you the project name, framework, and variant.
- For
project name, you can entertesting-library-demoor any name of your choice. - For
framework, selectReactfrom the list of options - For
variant, selectJavaScriptfrom the list of options

Once the project is created, you can open that project in your favorite IDE.
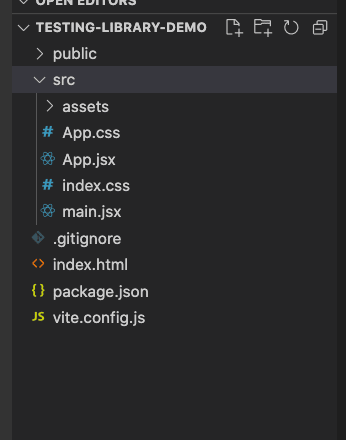
The project folder structure will look like this:
Now, execute the yarn or npm install command to install all the packages from the package.json file.
Once all the packages are installed, you can execute the yarn run dev or npm run dev command to start the created React application.

Now, If you access the displayed URL http://127.0.0.1:5173/ you will be able to see the default React application created using Vite.

So let's see how we can set up Testing Library in our Vite project.
How to Set Up the Testing Library and Jest in a React Project
We cannot only use the testing library alone, but we also need to install Jest which exposes extensively used global expect function and other things which help to make assertions in our test cases.
To set up Testing library and Jest, we need to install jest and testing library packages as dev dependencies.
So execute the following command from the testing-library-demo folder:
yarn add @testing-library/jest-dom@5.16.5 @testing-library/react@13.4.0 @testing-library/user-event@14.4.3 jest@29.3.1 jest-environment-jsdom@29.3.1 vitest@0.25.3 --dev
OR
npm install @testing-library/jest-dom@5.16.5 @testing-library/react@13.4.0 @testing-library/user-event@14.4.3 jest@29.3.1 jest-environment-jsdom@29.3.1 vitest@0.25.3 --save-dev
We're mentioning versions here for each package which are the latest versions at the time of writing this tutorial, so even if there is a newer breaking version release that happens for any of the packages in the future, your code will not break.
Here, we're installing the jest-environment-jsdom library because we will be running tests in the node environment but we're testing browser interaction through DOM so to inform jest about that, we need to add this library.
The @testing-library/jest-dom library is required because it contains assertions like toBeInTheDocument, toHaveBeenCalled etc which makes it easy to test for DOM elements which you will see later in this tutorial.
We have also added vitest package which is only required when you're using vite for the application.
You don't need it If you're using create-react-app or your own webpack configuration.
Now, we have installed the required packages, let's add a script in the package.json file to run the tests.
Open the package.json file and add the test script inside it like this:
"test": "vitest"
Your package.json file will look like this now:

If you're not using vite for creating the React app, then you will be using the following test script:
"test": "jest --watch"
Now, create a new file in the root of your project (testing-library-demo) with the name setupTests.js and add the following code inside it:
import "@testing-library/jest-dom";
Now, open the vite.config.js file and add a new test object as shown in the below screenshot:

How to Create the UI for Testing
Before writing tests, we need to have some components to test.
So let's create a simple registration page with some checkboxes, input fields, select dropdown, and buttons so we can write test cases for it.
We will use react-bootstrap to create the UI elements so we don't have to write all CSS from scratch.
Install bootstrap and react-bootstrap by executing the following command from the terminal.
yarn add bootstrap@5.2.3 react-bootstrap@2.6.0 react-select@5.6.1
OR
npm install bootstrap@5.2.3 react-bootstrap@2.6.0 react-select@5.6.1
bootstrap provides a base CSS which we need for the UI to look nice so we're also installing bootstrap along with react-bootstrap.
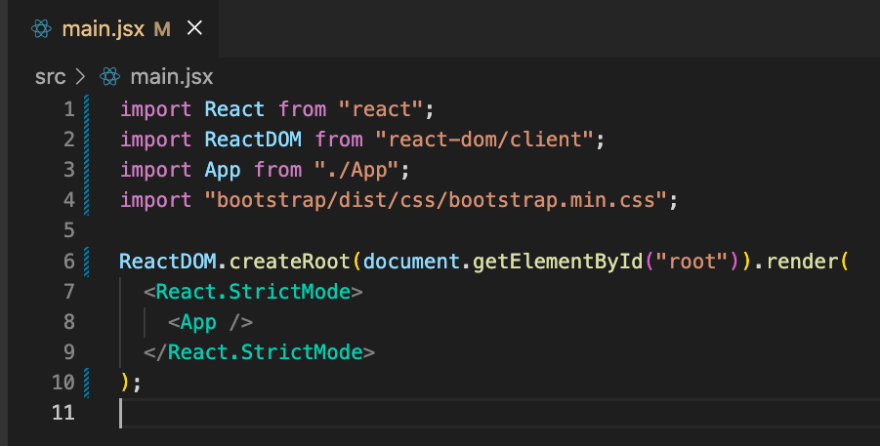
Once installed, open src/main.jsx and add an import for the bootstrap CSS file before any of your other CSS files as shown below:
import "bootstrap/dist/css/bootstrap.min.css";
Your src/main.jsx file will look like this now:
We don't need index.css and App.css files so you can delete those files.
Now, create a components folder inside the src folder and create a register folder inside the components folder, and inside the register folder create Register.jsx and register.css files.
So your Register.js file path will be src/components/register/Register.js.
Add the content from this link in the Register.jsx file and inside register.css file add contents from this link.
Now, open the App.jsx file and add the following contents inside it:
import Register from "./components/Register";

function App() {
  return <Register />;
}

export default App;
Now, If you run the application by executing the yarn run dev or npm run dev command, you will see the following screen:

This tutorial is for teaching testing library so I'm not going to explain the code from the Register.js file as it's basic React code. But If you're not familiar with React hooks, you can check out my this article to understand it better.
Also, instead of managing the state and onChange handler yourself, you can use a very popular react-hook-form library.
It also allows you to add validations to your code without writing much code. Check out my this article, If you want to learn it in detail.
Now, we're all set to write unit test cases, so let's get started.
How to Write Unit Test Cases
Before writing test cases, you should be aware of different queries which you can make to access elements on the page.
The testing library provides a set of queries which you can see in the below screenshot:

To summarise:
- To select a single DOM element, you can use
getBy,findBy, orqueryByquery - To select multiple DOM elements, you can use
getAllBy,findAllByorqueryAllByquery -
getByandfindByreturns an error If there is no match or more than one match -
queryByreturns null If there is no match and returns an error If there is more than one match -
findByworks well with asynchronous code but not withgetByandqueryBy -
getAllByreturns an error, If there is no match and returns an array of matches for one or more than one match -
findAllByreturns an error, If there is no match and returns an array of matches for one or more than one match -
queryAllByreturns an empty array for no match and returns an array of matches for one or more than one match
So If you don't want your test to fail If the element is not displayed on the UI, then always use queryBy or queryAllBy.
In other words, only use the queryBy or queryAllBy queries for asserting that an element cannot be found or is hidden.
Now, we're familiar with query methods, let's start writing test cases for the Register component.
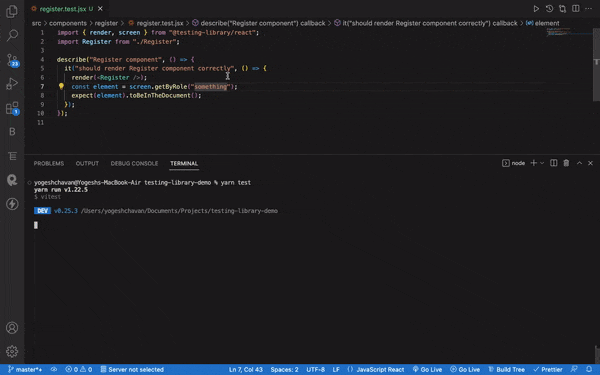
Create a new register.test.jsx file in the src/components/register folder with the following content inside it:
import { render, screen } from "@testing-library/react";
import Register from "./Register";

describe("Register component", () => {
  it("should render Register component correctly", () => {
    render(<Register />);
    const element = screen.getByRole("heading");
    expect(element).toBeInTheDocument();
  });
});
Note that, we're using vite so the filename has to end with
.jsxextension even for test files.
If you're not using vite then you can end the filename with.jsextension.
Now, If you execute the npm run test or yarn run test command you will see that the test passes.

In the above code, we're first rendering the Register component using render method provided by the testing library.
As we have an h1 element with Register text in the Register component, we're using the screen.getByRole method to get the DOM element of the role heading.
If you don't know, what role to use in the getByRole method, then you can use some random name and the testing library will show you all the available roles for each DOM element for that component as shown below:
Once we get that element using the getByRole method, then we're making an assertion to check If that element exists in the DOM using:
expect(element).toBeInTheDocument();
You can see a list of all available getBy,findBy or queryBy methods by adding a dot after screen like this:

Now, we have added one test to check If the Register component is getting rendered correctly or not.
Let's write some more tests.
If you run the application by running the yarn dev command, you will see that, once you click on the Register button without filling out all the details, you're getting an error message as shown below.

So now, we need to test the same by writing a test case.
For that, we can use userEvent from the @testing-library/user-event package which we already installed previously.
Now, add a new test in your register.test.jsx file as shown below:
it("should show error message when all the fields are not entered", () => {
    render(<Register />);
    const buttonElement = screen.getByRole("button");
    userEvent.click(buttonElement);
});
Your register.test.jsx file will look like this:

So we're triggering the click event for the Register button in the above code,
Now, we need to find the element with the error message so we can add assertions for it in the test.
The error message is actually an Alert component from react-bootstrap which is not visible initially and is only displayed when we submit the form without filling in all the data.
In such a case, we can call the screen.debug method to see the structure of the DOM at that moment when we trigger the click event.
So change the test case as shown below:
it("should show error message when all the fields are not entered", async () => {
    render(<Register />);
    const buttonElement = screen.getByRole("button");
    userEvent.click(buttonElement);
    screen.debug();
});
Note that we have added screen.debug at the end of the test.
Now, If you run the yarn run test or npm run test, you will see the following DOM structure:
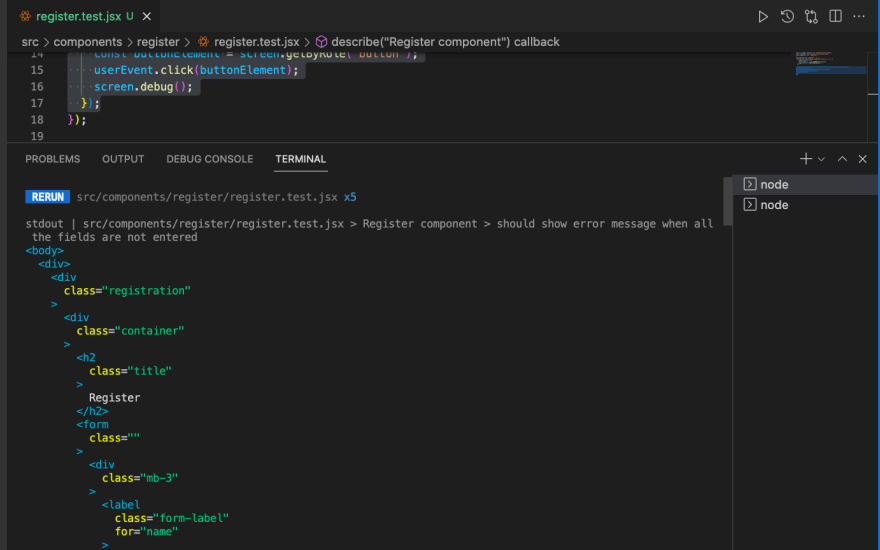
As you can see from the screenshot, you directly see the name input label inside the form tag after the Register heading.
So we're not able to see the error message even If we have triggered the click event for the button.
This is because it takes some time to execute the validation code from the handleFormSubmit method and before that only we're using the screen.debug method so we don't see the error message.
So to fix this, we can wait using async/await.
So declare the test function as async and before the userEvent.click(buttonElement) add an await keyword like this:

Now, If you check the console, you will be able to see the text All the fields are required. inside a div with the role alert.

so we can use it in our assertion like this:
const alertElement = screen.getByRole("alert");
expect(alertElement).toBeInTheDocument();
And now, you can see that the second test is also successful.

Some points to note:
- Always remember to remove the
screen.debugstatement, once you're done with your assertions, and never keep it in your code - Always add an
awaitkeyword before triggering any event usinguserEventas you may not know when the action will be completed
Let's Write Some More Tests
Now, we're done with adding two tests, we can add one more test to check If there is no error when the page is loaded like this:
it("should not show any error message when the component is loaded", () => {
    render(<Register />);
    const alertElement = screen.getByRole("alert");
    expect(alertElement).not.toBeInTheDocument();
});
Here, instead of using
expect(alertElement).toBeInTheDocument();
we're using
expect(alertElement).not.toBeInTheDocument();
Because we want the alert element to be not present on the component load.
But If you check the console, you will see that the test is failing.
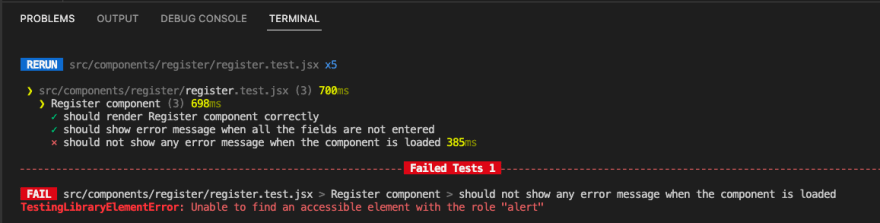
So, the test is not failing because of our assertion but it's failing because it can't find an element with role alert on page load which is expected as there will not be any error on page load.
But how we can make the test pass?
If you remember from the list of queries screenshot shown before:
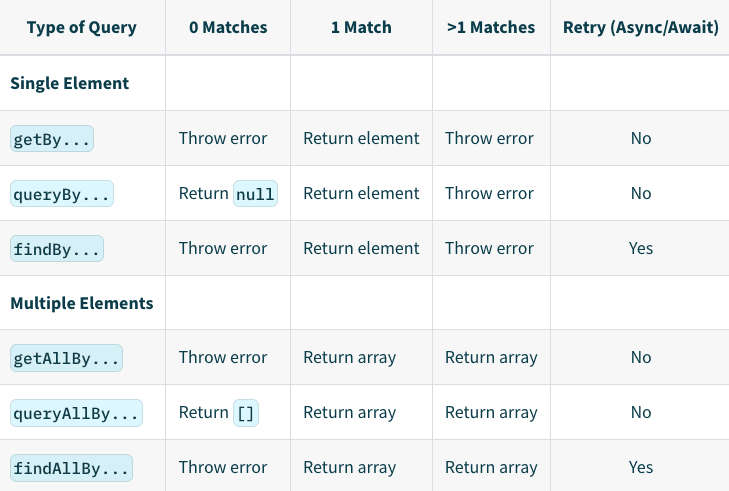
The getBy method throws an error If it does not find the matching element so instead of using getBy we need to use queryBy which does the same thing but it does not throw an error when there is no matching element.
So let's modify our test case to the below code:
it("should not show any error message when the component is loaded", async () => {
    render(<Register />);
    const alertElement = screen.queryByRole("alert");
    expect(alertElement).not.toBeInTheDocument();
});
Now, If check the console, you will see that the test passes successfully.

Now, let's write a test for successful registration when we fill out all the required fields.
it("should show success message when the registration is successful.", async () => {
    render(<Register />);
    const buttonElement = screen.getByRole("button");
    await userEvent.click(buttonElement);
    const alertElement = screen.getByRole("alert");
    expect(alertElement).toBeInTheDocument();
});
Now, If you see the console, you will see that the test passes successfully.
Now, let's add a subheading to the registration page and see what happens when we run the tests again.
Add the following heading inside the Form tag in the Register.jsx file:
<h6 className="subtitle">
   Please enter your details below to register yourself.
</h6>
so your code will look like this:

Now, If you run the tests again, you will see that one test fails:

The test failed because in the first test we're finding the Register heading text as shown below:
screen.getByRole("heading")
And as you know, getBy returns an error when you have more than one match.
Here, we've two headings on the Register component so the test failed.
So how can we fix it?
To fix it we need to identify how to accurately select elements while writing tests.
I have seen many developers changing the HTML structure by adding some testid so they can get the test passed like this:
 it("should render Register component correctly", () => {
    render(<Register />);
    const element = screen.getByTestId("title");
    expect(element).toBeInTheDocument();
});
Assuming you added an extra data-testid attribute to your JSX like this:
<h2 className="title" data-testid="title">
     Register
</h2>
This will work and make your all tests pass. But this is not the correct way.
Just to make your test pass, you should not change your JSX by adding some extra testid or class.
Instead, you should always try to use methods provided by screen to make an accurate selection of DOM elements.
So now the question is how to make an accurate selection.
The getByRole method accepts optional options which you can use like this:
const element = screen.getByRole("heading", { level: 2 });
As our main Register heading is a h2 heading, we specifically said to select level 2 heading.
Now, If you update the first test case, you will see that all the tests are passing.

Now, let's add another test for testing the subheading.
As the subheading is of level 6, you can query it like this:
const element = screen.getByRole("heading", { level: 6 });
This will work but there is another way we can target that element.
For that, you can install the testing playground chrome browser extension.
Once it's installed, follow the below steps:
- open your chrome dev tools using Ctrl + Alt + I or Cmd + Option + I (Mac)
- select the
Testing Playgroundtab - Click the cursor pointer and select the subheading of the
Registercomponent as shown below:

As you can see, you will get the accurate DOM element query which you can use in your test like this:
screen.getByRole('heading', {
  name: /please enter your details below to register yourself\./i
})
so you can write your test like this:
 it("should test for presence of subheading in the component", () => {
    render(<Register />);
    const element = screen.getByRole("heading", {
      name: /please enter your details below to register yourself\./i
    });
    expect(element).toBeInTheDocument();
 });

Writing a test case for subheading is not necessary, because it does not affect the component behavior even if you don't test that. But just to show you how your tests will break for multiple elements, I have added that element on the UI along with its test case.
The Testing Playground chrome extension is really useful to find out the exact matching query for any of the UI elements.
So instead of using the screen.debug method to see the DOM structure, you can use this chrome extension to find out the role and other information for all the displayed elements as can be seen below:

So as you can see, you can get any element by role, by placeholder text, or by label text with the methods provided by screen.
Now, that we're aware of the more specific query selectors, let's update other test cases to use the specific selectors.
Wherever we're using just screen.getByRole("button"), replace it with the following:
screen.getByRole("button", {
   name: /register/i
})
So now, If later someone adds another button in the same component, your test will not fail.
Your final register.test.jsx file will look like this:
import { render, screen } from "@testing-library/react";
import userEvent from "@testing-library/user-event";
import Register from "./Register";

describe("Register component", () => {
  it("should render Register component correctly", () => {
    render(<Register />);
    const element = screen.getByRole("heading", {
      level: 2
    });
    expect(element).toBeInTheDocument();
  });

  it("should test for presence of subheading in the component", () => {
    render(<Register />);
    const element = screen.getByRole("heading", {
      name: /please enter your details below to register yourself\./i
    });
    expect(element).toBeInTheDocument();
  });

  it("should show error message when all the fields are not entered", async () => {
    render(<Register />);
    const buttonElement = screen.getByRole("button", {
      name: /register/i
    });
    await userEvent.click(buttonElement);
    const alertElement = screen.getByRole("alert");
    expect(alertElement).toBeInTheDocument();
  });

  it("should not show any error message when the component is loaded", () => {
    render(<Register />);
    const alertElement = screen.queryByRole("alert");
    expect(alertElement).not.toBeInTheDocument();
  });

  it("should show success message when the registration is successful.", async () => {
    render(<Register />);
    const buttonElement = screen.getByRole("button", {
      name: /register/i
    });
    await userEvent.click(buttonElement);
    const alertElement = screen.getByRole("alert");
    expect(alertElement).toBeInTheDocument();
  });
});
Conclusion
React Testing library is amazing and very popular to test React applications.
Unlike enzyme testing library, you should not test for state changes when using React Testing Library.
So we have not written test cases to check If the state correctly changes after the user types some text in the name, email, or password fields.
In React Testing Library you check the behavior of DOM when the user clicks on a button or submits a form and so on instead of testing the internal state of the component.
Thanks for Reading!
You can find the complete source code for this tutorial in this repository.
If you want to become THE BEST MERN stack developer(full stack developer), then do check out my this course.
This is a pre-recorded video course that will be constantly updated for any future changes.
In this course, you will learn how to create React and Node.js applications from scratch and build an amazing online learning platform.
After learning through this course, you will be able to build any MERN stack application confidently and easily.
There is a separate section in this course, where you will learn how to test your entire React application using React testing library and jest.
You will also get my popular Mastering Modern JavaScript ebook and Mastering Redux course for FREE during this sale.
Today is the last day of the extended sale with a 70% discount. So don't miss this last opportunity and enroll in the course now.
Want to stay up to date with regular content regarding JavaScript, React, Node.js? Follow me on LinkedIn.


Oldest comments (2)
very cool, thanks for writing this
Glad it was useful to you. Thank you @devhaitham481