
Today, I'll go over the steps needed to create a pipeline to deploy a React app to Hostinger so that whenever you push to your Github repository, your changes will automatically be deployed to your website. This tutorial will dive deeper into deploying React apps onto Hostinger, so if you do not know how to do so, please check out my previous tutorial: Deploy React App on Hostinger.
The steps in this tutorial will be broken down into:
- Create Git repository for code
- Set up Git configuration on Hostinger
- Configure Github to push to Hostinger
- Add Github actions to your repository
1. Create Git repository for code
First thing you'll need to do is create a repo for your code on Github. Whether you choose to create a public or private repo, you'll have to do some different steps in the future, so be mindful.
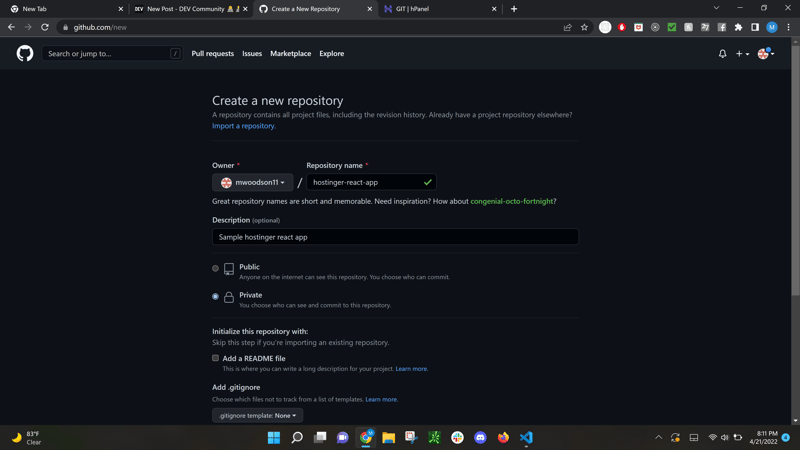
Once you have the repo created, add, commit, and push your changes to the repo. There's many resources online to help you with this. But if this is your first time, the following commands should be all you need to do:
echo "# test-repo" >> README.md
git init
git add README.md
git commit -m "first commit"
git branch -M main
git remote add origin git@github.com:sample/react.git #change to your Github repository
git push -u origin main
Once that's finished and you see your code in your repository, you're good to go to the next step!
2. Set up Git configuration on Hostinger
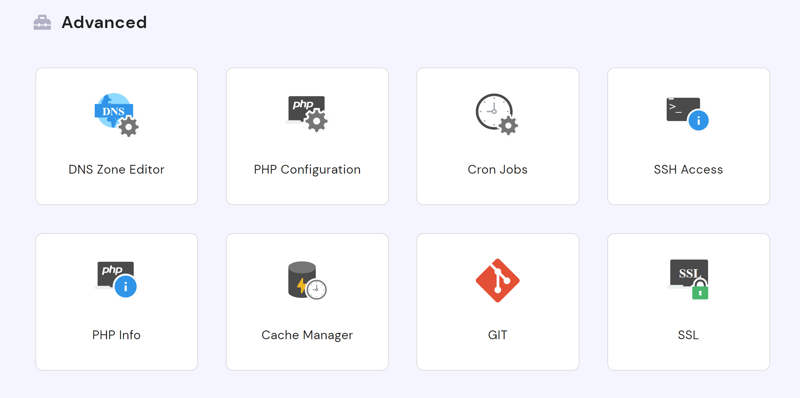
Next we'll set up the Git configurations for Hostinger. Back on Hostinger, you'll need to go to the GIT configuration settings for your website. So go to Hosting -> (your website) -> scroll to the Advanced section and select GIT.
First, we will go to the Create a Repository section and add your git repo (private repo's should look like git@github.com:sample/react.git and public repo's should look like https://github.com/sample/react.git). For branch, put build. The reason for this is when we push our code to Github, we want the build of the code to be sent to Hostinger, not the code itself (the last step will cover this).
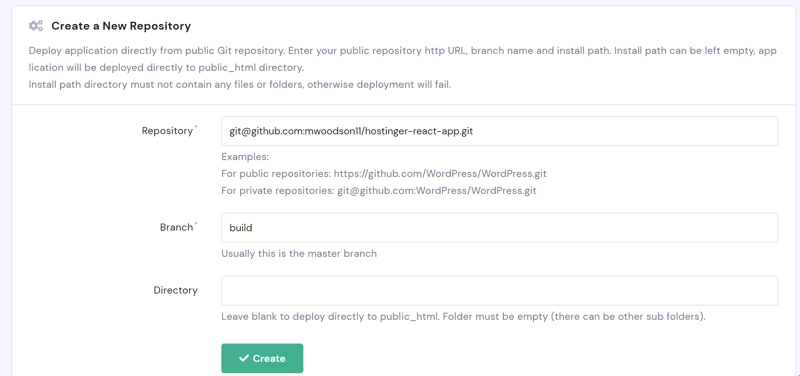
If this branch does not exist, that's okay. If you currently have a branch for build, make sure you are ok with it being used to have the builds pushed to this branch for the future. Note: if you already have contents in your public_html folder, you will have to delete the contents inside, but we will quickly get everything back in there soon enough!
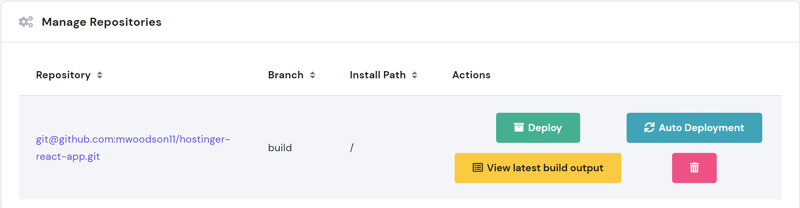
In the Manage Repositories section, click Auto Deployment and note the Webhook URL, since we will use it in the next step.
If your repo is private, continue with this next step, but if not you can skip to step 3.
Scroll up to the Private Git Repository and click the generate SSH Key button. Keep note of key, since we will use it in the next step.
3. Configure Github to push to Hostinger
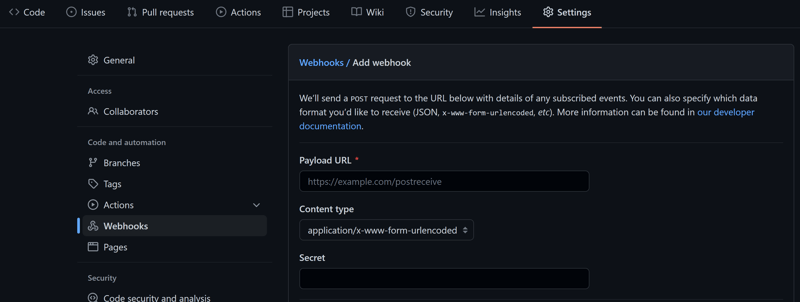
Next, we'll set up your repository to send your builds to Hostinger whenever you push to your repo. First on Github, go to your settings on your repository and then select Webhooks. Paste the Webhook URL from the previous step into the payload URL input and leave the content type as application/x-www-form-urlencoded. You don't need to add a secret, and you can leave everything else as is (just make sure that the Just the push event option is selected. Select Add webhook and then you're almost done.
Now if your repo is private, you'll have to follow this next step, otherwise you can skip to the final part.
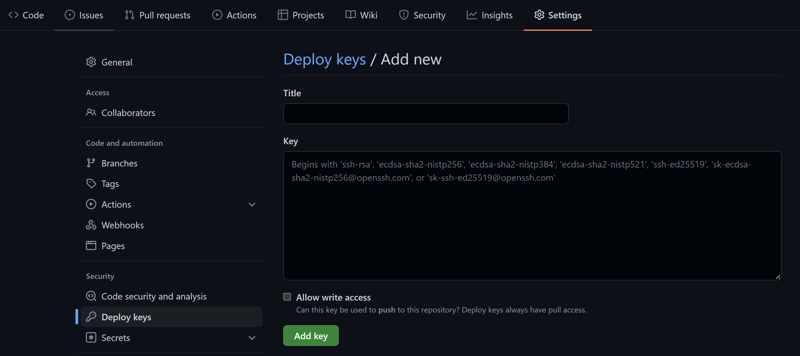
Now to successfully allow Hostinger to pull your build, you need to go to Deploy keys in the repo settings and paste the ssh key that was generated in the previous step. You can title it Hostinger key and it does not need write access, so you can leave the allow write access box unchecked.
Once you click Add key you're good to go to the final step.
4. Add Github action to repository
Lastly, we will set up Github Actions to build your code whenever you push to your repo. Now all you need to do is create a folder called .github/workflows from the root, and add a publish.yml file in there.
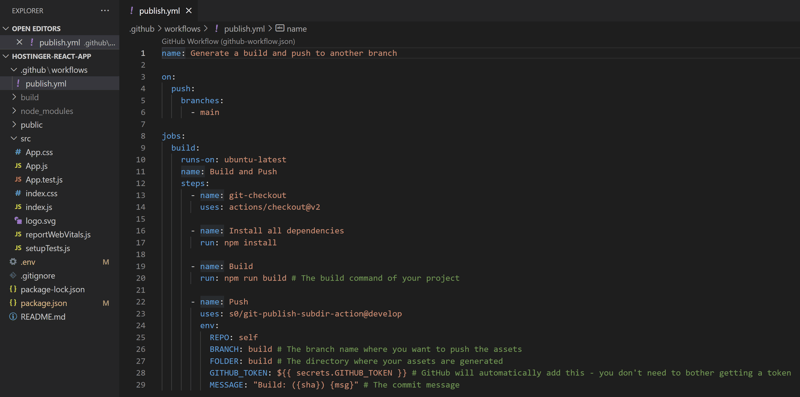
Post the following code into this file, and if you are not using the build branch, then make sure to change lines 26-27 to the name of the branch you plan to use:
name: Generate a build and push to another branch

on:
  push:
    branches:
      - main

jobs:
  build:
    runs-on: ubuntu-latest
    name: Build and Push
    steps:
      - name: git-checkout
        uses: actions/checkout@v3

      - name: Install all dependencies
        run: npm install

      - name: Build
        run: npm run build # The build command of your project

      - name: Push
        uses: s0/git-publish-subdir-action@develop
        env:
          REPO: self
          BRANCH: build # The branch name where you want to push the assets
          FOLDER: build # The directory where your assets are generated
          GITHUB_TOKEN: ${{ secrets.GITHUB_TOKEN }} # GitHub will automatically add this - you don't need to bother getting a token
          MESSAGE: "Build: ({sha}) {msg}" # The commit message
Once you add this, add, commit, and push the change.
Your pipeline should be fully set up so whenever you push a change to your main branch, this should automatically update your website on Hostinger!
If you have any comments or questions, please leave a reply or reach out to me on my portfolio!


Top comments (10)
Thanks!
Thanks for this article! Thou it works perfectly but I am not able to see any other pages like /services, /about, /contact.
What could be the reason? I did updated my htaccess
RewriteEngine On
RewriteBase /
RewriteRule ^index\.html$ - [L]
RewriteCond %{REQUEST_FILENAME} !-f
RewriteCond %{REQUEST_FILENAME} !-d
RewriteCond %{REQUEST_FILENAME} !-l
RewriteRule . /index.html [L]
but it did not fix the issue. The homepage shows up fine. All other pages give a 404 error
Hi @clockworkaiesh!
Just to clarify, is your .htaccess file named ".htaccess" or just "htaccess", just to make sure the period is at the front?
If not, can you send a picture of your file structure?
Run s0/git-publish-subdir-action@develop
Cloning into '/tmp/git-publish-subdir-action-PeMhLU/repo'...
From github.com/ariibansari/sevaX-frontend
[info] Checking if branch build exists already
data build
Switched to branch 'build'
[info] Updating branch build
[info] Removing all files from target branch
[info] Copying all files from /home/runner/work/sevaX-frontend/sevaX-frontend/build
[info] Pushing
remote: Write access to repository not granted.
fatal: unable to access 'github.com/ariibansari/sevaX-front... The requested URL returned error: 403
Error: Process exited with code: 128:
remote: Write access to repository not granted.
fatal: unable to access 'github.com/ariibansari/sevaX-front... The requested URL returned error: 403
Hey @ariibansari are you pushing to your own repo's branch? Looking up similar issues that people have had, it most likely has something to do with the privacy settings! You could try to create a Personal Access Token to use instead of the secrets.GITHUB_TOKEN, but if that's not working please message me and I could try checking out your code/repo to see what the issue may be! Hope we can resolve the issue!
were you able to solve the issue? can you help me? I have exactly the same issue.
I get this error, what could it be?
I followed all the steps correctly.
And granted the accesses that you nentioned
It looks like the permissions error where it's not allowing Github Actions to write to your branch. If you already tried using a Personal Access Token instead of the Github Token, can you also check that in your Settings -> Actions -> General -> Workflow permissions, and make sure 'read and write permissions' is selected

Also you can try adding this to the
publish.yamlfile:I am getting following error in the git actions.
Could you please me out.
Looks like actions/checkout@v2 uses node12, I've updated the script to start using actions/checkout@v3. Thanks for pointing that out!