Connect4 is a great childhood game of mine. So when I saw that the amazing Ania Kubow made it using vanilla JavaScript, I was set on creating my own version using React!
Before getting started, if you'd like to play the game that we'll be building in the first 2 parts of this series, you can do so here.
Understanding Connect4
For those not familiar with the game, here's the basic structure and ruleset:
- A game is played on a grid made up of 6 rows and 7 columns
- Players take turns adding a token to a column, columns fill from bottom to top
- A game is won if a player manages to get 4 of their tokens lined up either vertically, horizontally, or diagonally
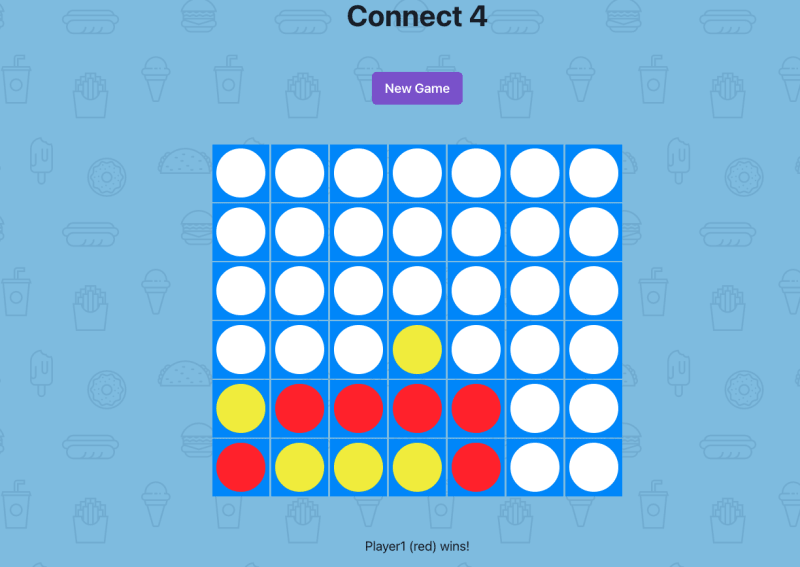
Here's a preview of what our finished game will look like:
Stack Overview
To help in quickly building out our project in order to focus on the actual game logic, I'll be using the following tools:
- NextJS -- Used to scaffold out our React project with a friendly developer experience.
- ChakraUI -- Used to quickly add styling and alignment.
-
useReducer -- As opposed to
useState,useReducerwill be used to help manage our game logic.
Project Setup
To get started, we'll create a new react project with NextJS by running the following command in our terminal:
npx create-next-app connect4
Once our project is set up, we'll want to install the dependencies needed for styling. Change into your project directory and install the following dependencies:
npm i @chakra-ui/react @emotion/react@^11 @emotion/styled@^11 framer-motion@^4
Now that our dependencies are installed, we can begin setting up our game. Let's kick things off in _app.js. In this file, we'll set up ChakraUI.
Replace the contents of _app.js with the following:
import { ChakraProvider, extendTheme } from '@chakra-ui/react'

function MyApp({ Component, pageProps }) {
  return (
    <ChakraProvider>
      <Component {...pageProps} />
    </ChakraProvider>
  )
}

export default MyApp
Note that all this does is allow our entire application to use the default theme provided by ChakraUI.
🗒️ Feel free to delete any of the global styles in styles/globals.css as we won't be using them. We'll cover global styling in ChakraUI towards the end.
Setting Up Our Game
Looking at the screenshot above, we'll need a title, a button, the game board itself, and an area to display a message.
ChakraUI will make it easy for us to center and vertically stack these components with consistent spacing using the VStack component.
Go ahead and replace the contents of index.js with the following:
import { Connect4 } from '../components/Connect4'
import { Heading, VStack } from '@chakra-ui/react'

export default function Home() {
  return (
    <VStack spacing="3rem">
      <Heading>Connect 4</Heading>
      <Connect4 />
    </VStack>
  )
}
👀 Notice that in the above code snippet, there is an import for Connect4 that lives outside of the pages directory, inside a directory called components called Connect4.js.
Go ahead and create that file as we'll be working on it next.
Creating The Gameboard
As we code along, I want to make sure we understand the responsibilities of our game. As such, here is what our game will be in charge of:
- A game knows how to reset itself
- A game knows who's turn it is
- A game knows the current positions that have been played
- A game knows if a winner has been declared
- A game knows what message, if any, needs to be displayed
Using the above as a set of requirements, we can begin modeling what the initial state will look like for our game.
In Connect4.js Add the following:
//1
import { useReducer } from 'react'
import { Row } from './Row'
import { Button, Text } from '@chakra-ui/react'
import * as gameStyles from '../styles/Home.module.css'
//2
const gameReducer = (state,action) => { return state}
//3
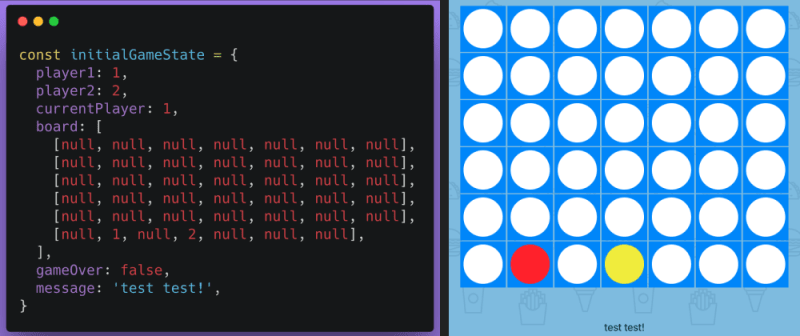
const initialGameState = {
player1: 1,
player2: 2,
currentPlayer: 1,
board: [
[null, null, null, null, null, null, null],
[null, null, null, null, null, null, null],
[null, null, null, null, null, null, null],
[null, null, null, null, null, null, null],
[null, null, null, null, null, null, null],
[null, null, null, null, null, null, null],
],
gameOver: false,
message: '',
}
export const Connect4 = () => {
const [gameState, dispatchGameState] = useReducer(
gameReducer,
initialGameState
)
//4
const play = (c) => {}
return (
<>
<Button
colorScheme="purple"
className={gameStyles.button}
>
New Game
</Button>
//5
<table>
<tbody>
{gameState.board.map((row, i) => (
//6
<Row key={i} row={row} play={play} />
))}
</tbody>
</table>
<Text>{gameState.message}</Text>
</>
)
}
Whoa, that's a lot of code all at once! Let's go through the commented numbers and understand what is happening.
We're bringing in
useReducerto manage our state, a component called Row (feel free to create the file now), and a few self-explanatory components from ChakraUI.Our state will be managed by a reducer. We'll fill this out in a bit, but in the meantime, it's just going to be a function that takes in the current state and an object called
action. Lastly, it will return the state.Speaking of state, remember when we listed out what a game is in charge of? We can use those bullet points to set up our initial state. In this case, an object. The most important piece is the
boardproperty. We use an array of arrays to represent a Connect4 grid of 6 rows and 7 columns. A game with no moves defaults to null. As players place their pieces, we'll substitute null with either a 1 or a 2 (for player 1, or player 2).All of our game logic is going to be encompassed in a
playfunction. This function, coupled with our useReducer, will be the heart of our application.To represent our Connect4 board, we'll use a table.
We'll iterate over each array contained in our
boardarray from our state. For each iteration, we'll create aRowcomponent. Again, if you haven't already created this file, go ahead and do so now.
Wrapping Up Our Styling
The last bit is to create each Row, which in turn, consists of a bunch of Cell components.
Aside from adding a Flex component from ChakraUI to add some basic layout, this code is how most presentational components in React are structured. In Row.js add the following:
import { Flex } from '@chakra-ui/layout'
import * as gameStyles from '../styles/Home.module.css'

export const Row = ({ row, play }) => {
  return (
    <tr>
      {row.map((cell, i) => (
        <Cell key={i} value={cell} columnIndex={i} play={play} />
      ))}
    </tr>
  )
}

const Cell = ({ value, columnIndex, play }) => {
  let color = 'whiteCircle'

  if (value === 1) { color = 'redCircle'}
  else if (value === 2) { color = 'yellowCircle'}

  return (
    <td>
      <Flex
        justify="center"
        align="center"
        className={gameStyles.gameCell}
        onClick={() => {
          play(columnIndex)
        }}
      >
        <div className={gameStyles[color]}></div>
      </Flex>
    </td>
  )
}
To expand on this a bit, we are creating two components. One called Row that will take in an array containing 7 null values. Each index in the array represents the column of the Connect4 board.
In game terms, to place a token on the board, we don't care what row we're in, we only care what column we're in. Using that logic, we create a Cell component that renders out the circles for the board:
- By default, an untaken area on the board will be a white circle
- Player 1 will be represented by a red circle
- Player 2 will be represented by a yellow circle.
Every time a Cell is clicked, we'll call the play function (that we stubbed out in Connect4.js) and passing in the index of the column.
Adding Styling
I'm sure you've noticed by now that we've been passing around this line of code:
import * as gameStyles from '../styles/Home.module.css'
That file was created for us, but it doesn't contain any of the styles that pertain to our app. Let's update that file to only contain the following:
.gameCell {
  height: 70px;
  width: 70px;
  background-color: #1990ff;
  cursor: pointer;
}

.whiteCircle,
.redCircle,
.yellowCircle {
  height: 60px;
  width: 60px;
  border-radius: 100px;
}

.whiteCircle {
  background-color: #fff;
}

.redCircle {
  background-color: rgb(251, 42, 42);
  transition: background-color 0.5s;
}

.yellowCircle {
  background-color: rgb(243, 239, 20);
  transition: background-color 0.5s;
}
The above has some basic styling that makes our board blue, sets the colors for our circles, and because I was feeling fancy, adds a half-second transition for the circles to change from white to either red or yellow.
As promised, the last thing we'll do in this post is to add some global styling using ChakraUI
In _app.js, we'll extend the default theme with the following object:
// _app.js
import { ChakraProvider, extendTheme } from '@chakra-ui/react'

const theme = extendTheme({
  styles: {
    global: {
      body: {
        backgroundColor: '#8fc2e5',
      },
    },
  },
})
In my screenshot of the game, you'll notice that I also have a background image. To add this, I added a backgroundImage property to the theme, and generated a background image from hero patterns.
To view you game, start the server:
npm run dev
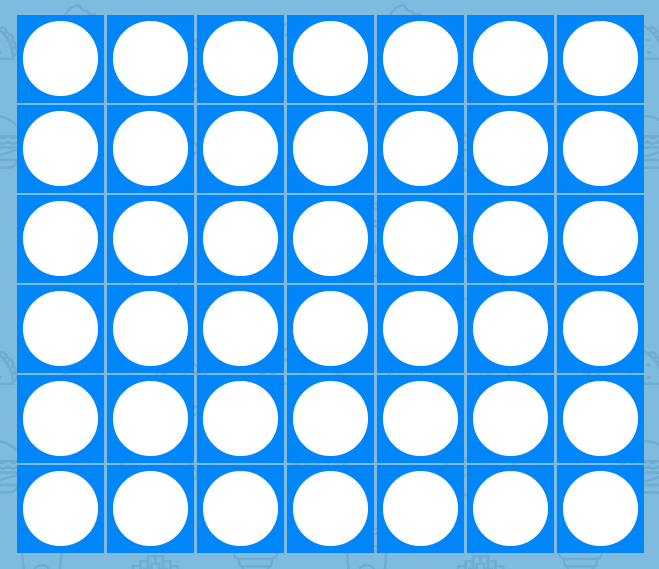
🎊 Congratulations! If all went well, you now have a static gameboard that looks like this:
To view the player circles in your game, feel free to change the parts of your state and they should reflect in your game:
That's it for this section. In the next part, we'll tie things together by adding all of the code needed to have a functioning turn-based game.
Thanks so much for checking out this tutorial and I look forward to catching you next time!


Top comments (0)